Are you getting Permission denied errors when trying to edit your Google Cloud Platform files via FTP?
In this tutorial you will learn how to fix Permission denied errors that occur when trying to save and upload changes to Google Cloud Platform files that you’ve downloaded and edited over FTP.
Before starting this tutorial, you should have already configured an FTP client to work with your website on Google Cloud Platform.
There are 6 steps in this tutorial:
1. Identify Error
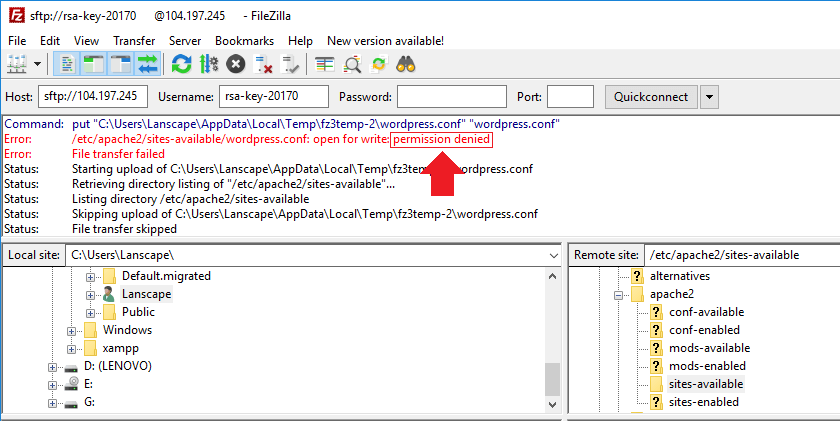
What is a Permission denied error in FTP, and what does it look like?
Permission denied errors occur when you don’t have the required permissions to make changes to a file that you’re trying to edit over FTP.
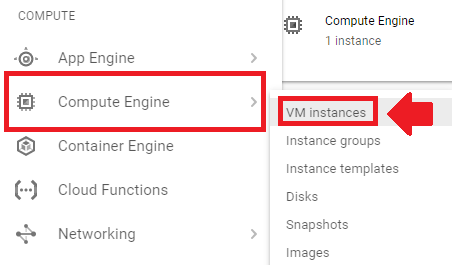
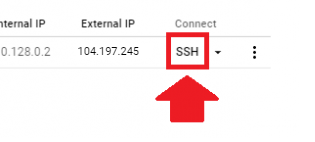
2. Connect to VM Instance
In order to fix the problem, you will need to edit the file’s permissions in Google Cloud Platform. This requires you to connect to your VM instance using the SSH (Linux Shell) terminal.

3. Check File Permissions
Now that you’ve connected to your website via SSH, the first step is to check the permissions of the file you want to edit. In this example, the user would be checking the permissions of the wordpress.conf file.
To do this, execute the following command:
stat -c "%a %n" /path/to/file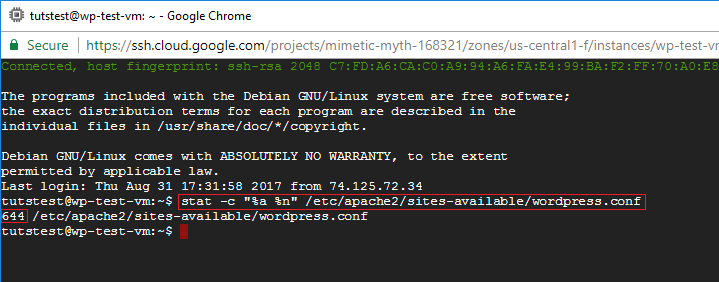
4. Edit File Permissions
Because the file’s permissions are set to 644, you would not have sufficient permissions to edit the file via FTP. To fix this problem, you are going to change the file’s permissions from 644 to 777, thereby granting all permissions.
To do this, run the following command:
sudo chmod 777 /path/to/file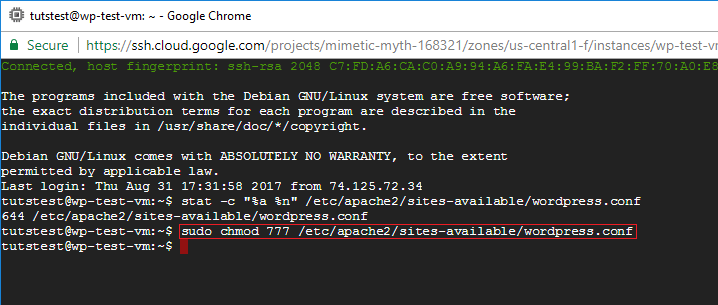
5. Restart Apache
For changes to take affect, you will need to restart your Apache server.
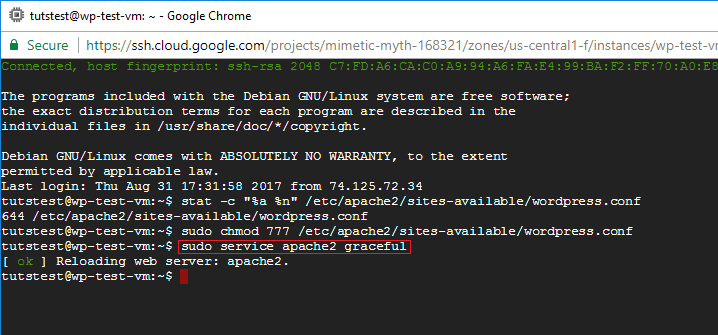
For most Apache configurations, run the following restart command:
sudo service apache2 gracefulFor Bitnami Apache configurations, run the following restart command:
sudo /opt/bitnami/ctlscript.sh restart apache6. Retry File Upload
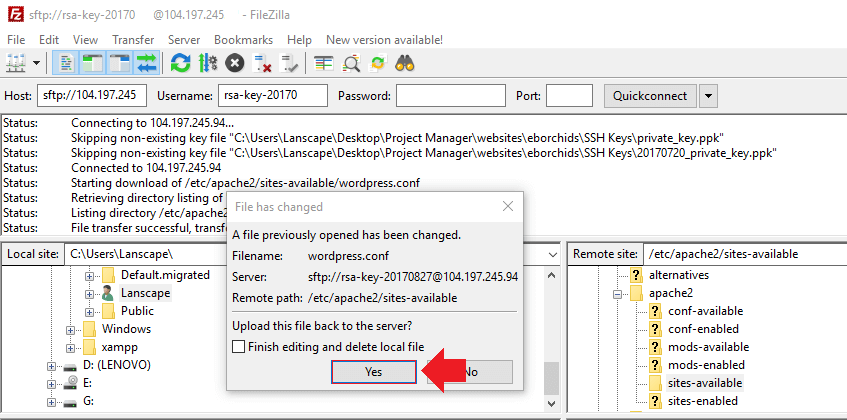
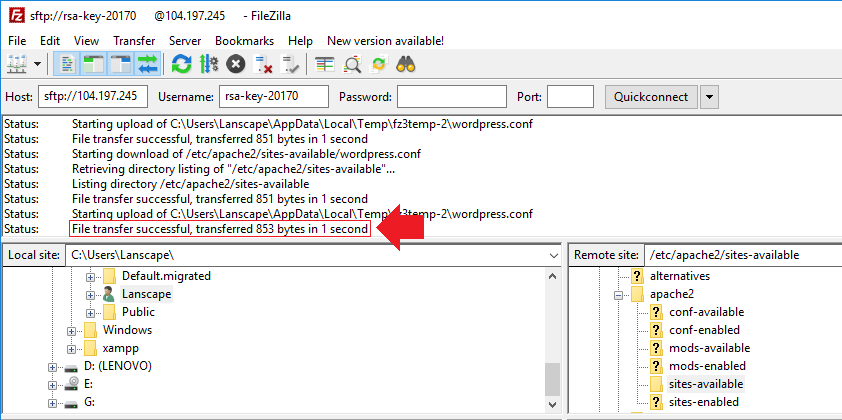
Go back to your FTP Client and try uploading the saved file again. Now that the file has permissions of 777, you will be able to upload it to your server successfully via FTP.
Did it Work?
With the use of chmod 777, you should now be able to avoid Permission denied errors when uploading files via FTP.
If you have any questions or comments, please post them below!
Thanks,
![]()
Up Next…

Tom Mitchell says
Very helpful – Thank you! Should I CHMOD to 777 all my web files (ie. /var/www directory with -R)? I cannot upload any files at this point, but I don’t want security concerns later.
Leron Amin says
Hi Tom,
As you mentioned, don’t do it for all files and folders.
You should only change the permissions of the target file and/or directory, and should change it to the lowest level possible. For instance, use 644 over 777 if it achieves the desired outcome.
Let me know if you have other questions,
Joe
Vignesh Krishnamoorthy says
You save my day. Thanks.
Leron Amin says
Thanks for the feedback Vignesh – happy to help!
Dasep says
Hi, I want to ask and want to apply the guide that you wrote.
Why use 777. Isn’t that unsafe?
Your reply is very much appreciated. Thanks.
Leron Amin says
Hi Dasep,
Great question! Using 777 permissions isn’t necessarily considered best practice because it can potentially expose vulnerabilities. Keep in mind that WordPress has recommended permission levels for files and folders which you can view here.
Hope this helps and let me know if you have other questions,
Joe
Isaac says
Hi Leron,
Apart from /.htaccess, all my files are unable to open, just like the one below
Status: Starting download of /var/www/html/wp-content/uploads/.htaccess
Command: cd “/var/www/html/wp-content/uploads”
Response: New directory is: “/var/www/html/wp-content/uploads”
Command: get “.htaccess” “/var/rwho/.htaccess”
Error: local: unable to open /var/rwho/.htaccess
Error: Critical file transfer error
Leron Amin says
Hi Isaac – were you able to resolve the issue? It seems like it’s likely permissions related.
Isaac says
Hi Leron,
I have tried 777, but it still leads back to this Critical File Transfer Error.
Leron Amin says
Which files and/or folders did you change the permissions to?
jerry says
i only had to go to step 4 for the directory – does this seem right – are there any security concern with leaving the permissions 777
Leron Amin says
Hi Jerry,
There are possible security concerns with 777 permissions, particularly if you have multiple users/admins accessing your system. Additionally, the 777 permissions has the potential to allow other processes/applications to write to the file – which isn’t something you want. Learn more about the recommended file permissions for WordPress here.
Let me know if you have other questions,
Joe
Derek says
hi, i would like to know how i can set permission to delete a folder on Google Cloud recursively (including all its folders and files) over FileZilla
First, i tried setting permission for the bigger folder itself, but the contents won’t just delete because of permission issues. And they are quite plenty, i can’t set permissions for all of them, one by one
Can someone help please
Leron Amin says
Hi Derek,
I don’t think this can be done over FileZilla.
You have to SSH into your instance and run the following command recursively to change the permissions of the parent directory and all of it’s children:
Remember to replace ‘path/to/parent’ with the actual path to the parent directory.
Let me know if you have questions,
Joe
Anuj says
with ssh key i am able to go into the file now but if i create FTP account from plesk of particular directory it gives an error as
Status: Connection established, waiting for welcome message…
Status: Initializing TLS…
Status: Verifying certificate…
Status: TLS connection established.
Status: Logged in
Status: Retrieving directory listing…
Status: Server sent passive reply with unroutable address. Using server address instead.
Command: MLSD
Error: Connection timed out after 20 seconds of inactivity
Error: Failed to retrieve directory listing
Please help me with this i am using google cloud
Leron Amin says
Hi Anuj,
It looks like you need to enable Passive Mode in Filezilla. Check out the full solution here.
Let me know if you have questions,
Joe
Shivam Athiya says
Please help i just want to add this line
`define( ‘FS_METHOD’, ‘direct’ );` in my wp-config` file
Firstly, i tried Cloud Shell editor but it did not worked i do not know why,
then I tried file zilla but do not know where to paste SSH key i generated from PUTTY keygen as i am using app engine.
i am stuck please help …… any workaround will be appreciated.
Leron Amin says
Hi Shivam,
Cloud shell has a built in editor if you’re not comfortable navigating the terminal. Check out the setup instructions here.
Please reach out if you have questions,
Joe
Walter says
Try these commands accordingly instead:
sudo adduser www-data
sudo chown -R www-data:www-data /path/to/directory/or/file/
sudo chmod -R g+rwX /path/to/directory/or/file/
Worked perfectly for me.
Walter says
Seems like some lines have been stripped out automatically.
Here’s the full commands:
sudo adduser yourFTPusername www-data
sudo chown -R www-data:www-data /path/to/directory/or/file/
sudo chmod -R g+rwX /path/to/directory/or/file/
Nickie Oakwood says
Sadly doesn’t work for me. When trying to delete a plugin get permission denied. I tried setting the plugin folder to allow me.
I mean the lunacy of these developers!!!!!!! Imagine I sold you a house, you own 100% of the house. You go in and there are several locked rooms which the keys are not on the keys you received. When you enquire, you are told ‘Permission denied’. Admin should mean Admin so you the Admin are allowed cart blanche
Simplification simply evades so many people.
Leron Amin says
Hi Nickie,
The safeguards are in place to prevent people and/or processes from making changes to critical files.
If you want to open up any folders for complete read/write access, you can run the following command:
Remember to replace /path/to/folder with the actual location of the folder you’re trying to edit. Also, make sure to restart your server so that the changes take effect.
Running the above command will open read/write permissions for that folder, including for all of the files contained within that folder. This will also allow you to upload to that folder via FTP without encountering any permission issues.
Hope this helps and let me know if you have questions,
Joe
George says
Hey I tried this and it works. is there any risks to leaving this option on for the future? I dont want to have problems trying to update files in my wp_content again
Leron Amin says
Hi George,
There are recommended permissions for your WordPress files, which you can view here.
Let me know if you have questions,
Joe
navaneeth says
Thank you sir it really worked for me . No matter what i appreciate your work
Leron Amin says
Thanks for the feedback Navaneeth!
Anas Gamrani says
This website is a life saver ! Thank you so much for the useful tutorials and solutions.
Leron Amin says
Thanks for the feedback Anas – I’m glad you’ve enjoyed the tutorials!
kartik says
I have still got error “permission denied” after provided permission to that folder, but the folder containing images.
Error is:
Error: EACCES: permission denied, open 'uploads/imagebhi-126_b.png'
Leron Amin says
Hi Kartik,
Which steps have you undertaken so far? Did you restart your server after making the changes?
Talk to you soon,
Joe
Glenn Hunter says
Thank you so much for writing this guide and the one about how to connect with Filezilla. You saved me a big headache! I will go through your other Google Cloud tutorials as well.
Leron Amin says
Thanks for the feedback Glenn – I’m glad to know the tutorial was helpful!
Bipin Shah says
Hi Leron Amin,
my website rbl.care is a business listing website,
In Google backend files i am able to see the folder of a plugin but same plugin I cannot see it in the front end, so when i am trying to install the plugin it says folder name already exists, Now I am trying to delete the plugin from backend via ftp it giving an permission error after following your tutorial, Single Folder permission is changed but the sub directories & files permission is not getting changed, is there any command where we can change the permission for entire folder and subdirectories, or any otheway where i can reinstall that plugin or overwrite that same plugin via ftp, so that i can see that plugin in front end inside wordpress, please help me & Thanks alot because one page zen i am able to learn many things regarding google cloud platform, Google should learn from your website that how to create user friendly troubleshooting tutorials waiting for your reply,
Regards
Bipin Shah
Leron Amin says
Hi Bipin,
When you change the directory permissions, you need to run the command recursively so that all of the files in the folder inherit the new permissions level. To do this, run the following command – replacing path/to/directory with the path to the directory that you want to change the permissions of:
Let me know if you have any questions,
Joe
Shelley says
This site has actually saved my noob life while setting up a WordPress site on google cloud for the first time. Sending you massive gratitude and thanks!!!
Leron Amin says
Thanks for the feedback Shelley – I’m glad to hear you were able to get your site up and running on GCP!
David says
Amazing help. Thanks guys!!
Leron Amin says
Glad to help David!
Billy Jo says
You are a master. Works perfectly. But you have to be targeting a specific file.
Tulika says
Hey, I have deleted my wp-confg.php file from console by mistake but before delete it i have download wp-confg.php file in my desktop. now i want to reupload the file. i have establish ftp server filezila but it has permission denied to upload file could you please help me. how can reupload the wp-config.php file to my bitnami wordpress?
please help me
Leron Amin says
Hi Tulika,
You will have to SSH into your VM instance in order to change the permissions level of the directory you’re trying to upload to.
I go over how to fix permission errors in this tutorial – give it a look and let me know if you have any questions!
Talk to you soon,
Joe
Ramon says
I have tried to run that command:
stat -c “%a %n” /var/www/mywebsite.com/wp-config.php
but it does not work…
stat: cannot stat ‘/var/www/mywebsite.com/wp-config.php’: No such file or directory
I have typed exact the same path as it has been showing in Filezilla’s status: permission denied
What went wrong here?
Leron Amin says
Hi Ramon,
Make sure that the wp-config.php file actually exists in that location.
Also, try replacing the quotation marks, as sometimes they don’t copy and paste correctly.
Let me know if you have questions,
Joe
Tushar says
Hey, Thank you for such valuable tutorial. I have created openlitespeed wordpress instance. So, what command i need to restart that instance. I tried to find on google but none working. I followed all step you mention just stuck at last one restart server.
Leron Amin says
Hi Tushar – check out this documentation page for a list of administrative commands.
Luis Urrea says
What a wonderful website. I just switched to GCP and without your help, will not be possible to bypass all the problems trying to understand this new technology.
Thank you Leron for your knowledge!
Leron Amin says
Thanks for the feedback Luis – I’m glad the tutorials have been helpful to you!
CL says
Hi Joe,
I’m using Bitnami version and has successfully changed permission to edit PHP file via Filezilla. Used this “sudo chmod -R 777 /opt/bitnami/apps/wordpress”.
However, read over the internet that giving permission 777 might risk allowing everyone to read everything on your site? username, pwd etc.?
I’ve then tried to revert back to 644 by simply using “sudo chmod -R 644 /opt/bitnami/apps/wordpress”, and immediately got this message when I refresh my website “Forbidden You don’t have permission to access / on this server.”
Now i’m changing permission back to 777 again and website is working as normal. Can you kindly clarify if the risks concerning security are real, and if it is, is there any other way to revert permission back to default?
Thanks a lot!
Leron Amin says
Hi CL,
Keep in mind that giving 777 permissions does not allow random strangers on the internet to edit/access your files. What it means is that system administrators or developers (such as yourself) who have SSH access to your virtual machine instance, will have the ability to read/edit/delete any and all files with 777 permissions.
This doesn’t present an issue in situations where you’re the only administrator. However, in situations where there are multiple administrators with access to your system, as is typical in large-scale projects, it’s true that you’d want to exercise great diligence in selecting the appropriate permission levels for your website’s files and directories.
I hope this answers your question, and please let me know if you have any other concerns.
Joe
CL says
Hi Joe,
Thanks so much for your enlightenment ! My doubts are cleared now.
Cheers!
Alan says
Everything went okay in changing the permission till I did the command to restart apache. The responsed was unrecognized. See the command and responses below.
$ sudo service apache2 graceful
apache2: unrecognized service
Leron Amin says
Hi Alan – which version of WordPress on Google Cloud are you using?
Alan says
Hi Leron, I am using WordPress 5.2, which I just installed recently.
Leron Amin says
Hi Alan,
Are you using a pre-configured solution such as Bitnami WordPress, or Click-to-deploy WordPress?
If you’re using using Bitnami WordPress, execute the following command:
If you’re using Click-to-deploy or a standalone WordPress installation on top of LAMP stack, try the following restart commands:
If none of these work, please get back to me with the requested information and I will see how I can help.
Thanks,
Joe
Joao Rodrigues says
Hey there,
I’m trying to upload the wp-config.php to google cloud via sftp filezilla but when i do this the file uploaded is completely empty in the server. Can someone help me with this?
I’ve tried already with other ftp clients (WinSCP) and disabled my firewall but still have the same problem.
peguy says
hi!
i’m using bitnami
I’m trying to upload a theme to wp-content/theme but appears permission danied I did all of those steps
Leron Amin says
Hi Peguy,
Check that the permissions of the file are set to the correct level. Check out the ‘Stat’ command from this tutorial for more information.
Let me know if you have questions,
Joe
pguy says
Hi Leron Amin ,
thanks you for your time . But when i tried to do that i got this message (stat: cannot stat ‘/home/myfile.txt’: No such file or directory.)
Leron Amin says
Hi Pguy – did you create the file myfile.txt? The file doesn’t exist by default, and was created to be used as an example.
Pguy says
When i trying to create the file , i get the (permission denies).
Calebfrika says
THERE THIS IN YOUR SSH;
rsa-key-20190323 change this your Urs
sudo usermod -a -G www-data rsa-key-20190323
set permissions for user group www-data
sudo chgrp -R www-data /var/www/html
followed by
sudo chmod -R g+w /var/www/html
sudo service apache2 graceful
Then try to upload again the access denied should be gone
pguy says
i think my problem it’s on the step one. i can’t get to /ect/apache2/site-available .
Leron Amin says
Make sure that directory actually exists. The path is:
Keep in mind that this path only exists for the Click-to-deploy version of WordPress on Google Cloud. The Bitnami version has a different file structure, which you can learn more about by checking out the commands in this tutorial.
Let me know if you have questions,
Joe
caleb adekunle says
Leron i finally got the solution you need to add this to your tutorial. This is for (CLICK TO DEPLOY) i dont know if it wil also work for Bitnami users. For does who have changed Permisson to 777. and you still get the permission denied error when using ftp here is the simple solution to your problem.
The trick is to add your user “demo” to the group www-data (since www-data is a group)
GO TO COMPUTE ENGINE CLICK ON SSH
add user “demo” to group “www-data” (below replace demo with your username)
Your user demo is your ftp username. (The one you got from putty) e.g. sftp://35.238.238.244
sudo usermod -a -G www-data demo
set permissions for user group www-data
sudo chgrp -R www-data /var/www/html
followed by
sudo chmod -R g+w /var/www/html
sudo service apache2 graceful
finish
permission will be automatically granted.
Leron my website was locked today so i found the answer to my problem so i felt i should share maybe you should update the tutorial with this command also. thanks and stay blessed
Leron Amin says
Hey Caleb – thanks for sharing this awesome tip! I know many users will find this very helpful.
caleb adekunle says
You welcome you the best
Tony says
how to do this for a bitnami project?
I did two ftp tutorials on the site and I can not give permission to many files in a directory
command:
chmod -R 777 /opt/bitnami/wordpress/wp-content/uploads/2019/07/
shell:
file1.png Operation not permitted
file2.png Operation not permitted
file3.png Operation not permitted
file4.png Operation not permitted
file5.pngOperation not permitted
.
.
.
Leron Amin says
Hi Tony,
You have to run the command with ‘sudo’ in front:
Let me know if you have questions,
Joe
Claire says
I have done this too, a few days earlier, and now I dont have to change the permissions to 777. This is a much better and safer solution!
A Thankfull woman. says
I could kiss you righ now.
Caleb Adekunle says
haha you are highly welcome i think you should kiss Leron Instead his the master teacher. Thanks for the compliment though.
Andrew says
Thanks mate, Saved my day 🙂
caleb adekunle says
Hey onepagezen quick question i was asked to add this to .htaccess file
SetEnvIf Authorization “(.*)” HTTP_AUTHORIZATION=$0
I followed your instructions and i was able to successful configure my website on Google Cloud
please how do i add this code to GOOGLE CLOUD .HTACCESS FILE
Leron Amin says
Hi Caleb – are you using Click-to-deply or Bitnami?
caleb adekunle says
Hello Leron i am using Click to Deploy i followed the tutorials above but the 777 didnt still work for me after i successful did everything in the instruction i went back to my ftp client try to upload a file again and i was still denied permission.
Error message: /opt/bitnami/wordpress/wp-content/uploads/2017/1.JPG: open for write: permission denied
Error: File transfer failed
Leron Amin says
Hi Caleb,
Were you able to get it working? Did you remember to restart Apache server after making the changes?
Talk to you soon,
Joe
Caleb says
Yes I did. But I got a way around it i installed a plugin (file manager) on my wp dashboard so I was able to access and edit my ftp files easily with it without stress I really appreciate your help you are the best
Leron Amin says
Great tip – thanks for sharing. I’m glad to hear you were able to get it working!
Ben says
Hi,
First of all I would like to truly thank you for the amazing tutorials. They are clearly written and nothing left out! Its amazing. If not for you I probably wouldn’t have started with GCP.
Being that many people are new to SSH and not comfortable with it, can you do a nice tutorial on simple commands showing how to easily use SSH solely as an FTP?
I am sure others do not like to change their folder permissions to 777 every time they need to upload something and would really benefit from a tutorial like this. Having a great tutorial, or at least an SSH Cheat sheet for file transfer, would greatly complete all that I am looking for with GCP.
All the best,
Ben
Leron Amin says
Hi Ben,
Thanks for the feedback – I’m thrilled to hear that the tutorials have been beneficial in helping you get started with GCP.
I could do a tutorial on getting started with FTP. I know that many users are uncomfortable with the terminal – and I agree that it can be intimidating. It’s a powerful tool – which also makes it easy to break things if you’re not careful.
Thank you for the great suggestion – I know many users will find this information helpful!
Joe
Pradeep sharma says
Hello sir,
we need to delete a plugin in my google cloud binami WordPress site but when I connect through ftp they could not delete as per your tutorial apply all solutions but no one success tell me how to delete a plugin because this plugin stop my website and I can’t open wp-admin to change anything.
Leron Amin says
Hi Pradeep,
Don’t use FTP to delete plugins – just delete them from the command line. To to this, navigate to your plugins directory. Once inside of the plugins directory, run the following command to delete the plugin, replacing PLUGIN_NAME with the name of the plugin:
Let me know if you’re using Bitnami or Click-to-deploy and I will provide you with the command to run to access your plugins directory.
Talk to you soon,
Joe
Mahesh K says
while i m trying to change permission of ftp of my google cloud
i completed the all step & while i submit (stat -c “%a %n” /path/to/file) in SSH
this error arrise
contrapolice007@malaysia-pagi-vm:~$ stat -c “%a %n” /path/to/file
stat: cannot stat ‘/path/to/file’: No such file or directory
i m using bitnami wordpress
i think this could be happen becoz after just uploading bitnami wordpress
i tried to install SSL by https://letsencrypt.org/
but the instalation was successfull
but after that this error was coming on my wordpress
System detection encountered issues
A definition of a siteurl or homeurl was detected in your wp-config.php, but the file is not writable.
Set your wp-config.php to writable and reload this page.
Please help
Leron Amin says
Hi Mahesh,
In the command
stat -c “%a %n” /path/to/filethe line ‘/path/to/file/’ is the location of the file of directory that you’re targeting. For instancestat -c “%a %n” /var/www/htmlLet me know if you have questions,
Joe
hyjinx says
Here’s another way to accomplish this using www-data group.
With this method you don’t have to manually change the permissions for each file and you don’t compromise security by changing all folders to 777. As you say in the video, that’s not good on systems with multiple users.
https://stackoverflow.com/a/45235071/7958049
Leron Amin says
Thanks for the awesome tip Hyjinx!
raby hasan says
why i din’t go on my root directory and where was my word press .htaccess file . and wp config file does not editable now.
Ernest Akpos says
Hello Leron
Thank you for the awesome tutorial. i am trying to fix permission error. When i enter he command
stat -c “%a %n” /etc/apache2/sites-available/wordpress.conf
i get this error
stat: cannot stat ‘/etc/apache2/sites-available/wordpress.conf’: No such file or directory
same error for all he commands in this tutorial. I need your help. Thanks
Leron Amin says
Hi Ernest,
The file path to wordpress.conf that is used frequently throughout the tutorial is for the ‘Click-to-deploy’ version of WordPress on Google Cloud. If you are using the ‘Bitnami’ version, your equivalent file is bitnami.conf and it is located at
/opt/bitnami/apache2/conf/bitnami/bitnami.confKeep in mind that the ‘Click-to-deploy’ and ‘Bitnami’ versions of WordPress on Google Cloud each have completely different directory structures.
Let me know if you have any questions,
Joe
Ernest Akpos says
Thank you very much. I was using click to deploy instead of bitnami. More grease to your elbow and keep the flag flying
Benoy says
excellent tutorials. I am now following you on youtube. Keep up the good work. I had tried to setup GCP for my site and was totally lost. You have been a guiding star for me. I am slowly moving my site to GCP
Leron Amin says
Thanks for the feedback Benoy – I’m glad the tutorials have been helpful to you!
Pablo says
How can I upload or replace a folder that contains several files in order to replace an existing one? I have given 777 permissions to a folder but when wanting to replace it, it denies because the subdirectories and files do not have permission
Leron Amin says
Hi Pablo,
You can run the command recursively, which will assign 777 permissions to that folder and all of it’s children:
Hope this helps and let me know if you have any questions,
Joe
Pablo says
Thank you !
Pablo says
Hello again! I would like to ask how I can do to give 644 permissions to several files within a folder that has 755 permissions
Leron Amin says
Hi Pablo,
Let’s imagine you want to give 644 permissions to the default-ssl.conf file and the wordpress.conf file. Both of these files exist within the sites-available directory, which has 755 permissions. To accomplish this, you would run the following command:
Hope this helps, and let me know if you have any questions!
Joe
JSL says
Crap! I did this to my entire html folder, so I could upload files.. but when I switched it all back to 644 – I get 403 Forbidden can’t access HTACCESS file error.. I’m guessing I made a decent boo-boo here as now I realize I have switched all of my files permissions and I’m not sure what is supposed to be what. Any help here? I’ve read its not a good idea to leave the folder permissions to 777 correct? /var/www/html
Leron Amin says
Hi JSL,
That’s correct – 777 isn’t ideal, especially on systems where you have multiple users accessing your project.
The recommended WordPress permissions levels are 640 for files and 750 for folders. I’d also recommend checking out this Digital Ocean thread for more information.
Let me know if you have any questions,
Joe
Rayyan says
Hey Amin,
I was able to connect and edit files on the server with the help of your video. But when I edit .htaccess file. I am getting a 500 Internal Server error.
Regards,
Rayyan
Rayyan says
I was trying add set expiry headers to leverage browser cache. Whenever I add the below code I used to get 500 internal server error.
ExpiresActive On
ExpiresByType image/gif A2592000
ExpiresByType image/jpeg A2592000
ExpiresByType image/jpg A2592000
ExpiresByType image/png A2592000
ExpiresByType image/x-icon A2592000
ExpiresByType text/css A86400
ExpiresByType text/javascript A86400
ExpiresByType application/x-shockwave-flash A2592000
#
Header set Cache-Control “public”
and this is what I see in my error log.
[Sun Jul 22 07:00:27.738360 2018] [core:alert] [pid 17016] [client 66.249.82.132:39033] /var/www/html/.htaccess: Invalid command ‘Header’, perhaps misspelled or defined by a module not included in the server configuration
Please let me know how to fix it.
Leron Amin says
Hi Rayyan,
Are you using click-to-deploy or Bitnami?
Do an Apache config test to check for any errors in your syntax:
Talk to you soon,
Joe
GOURAV says
file’s permissions set to 777,, still permissions denied error.
Leron Amin says
Hi Gourav,
Please provide details of the commands that you executed in the terminal, including their outputs.
I will use this information to help you come up with a solution to the problem.
Talk to you soon,
Joe
GOURAV says
I an not able to find etc/apache2/sites-available/wordpress.conf.
In my case no apache2 folder found. So i was change permission for wordpress hdocs folder.
Leron Amin says
Sounds good – I’m glad you were able to get it working!
Shweta Rao says
Hi
As usual, let me begin by thanking you for your great tutorials…
I am stuck. My client had made some change to the site that had gone bad and I was trying to restore the site to an earlier version via All in One WP Migration when there was a connectivity issue and everything stopped and when it came back I was locked out of the site and wp-admin through a 500 error! I logged into filezilla successfully to delete the plugin directory and resolve this for that’s what everyone said, when I try to run “chmod -R 777 /opt/bitnami/wordpress/wp-content/plugins” it says “operation not permitted”. I even tried “sudo sudo rm -r ” from another tutorial but it just said directory is protected!
How do I get back in? I am completely stuck. Any help is hugely appreciated. Thanks a ton in advance.
Warm Regards
Shweta Rao
Leron Amin says
Hi Shweta,
Thanks for the feedback!
First, try running the remove commands as root user:
sudo -iAs root user, run the command to force remove the plugins:
rm -rf /opt/bitnami/wordpress/wp-content/plugins/plugin-nameHope this information is helpful, and let me know if you have any questions,
Joe
Shweta Rao says
Thanks, this worked to delete the plugins but now I am getting the error: ‘a2zit.in refused to connect’ for both the site and wp admin!
And I have no idea what to do!! Tried clearing cache and all that bit!!
Am at a complete loss… any help is hugely appreciated. Thanks
Leron Amin says
Hi Shweta,
Were you able to get the problem resolved?
You will have to check your error logs and see what’s going on. What happens when you try to restart Apache? Do you see any error messages?
Talk to you soon,
Joe
Joshua Radmore says
Thank you so much! This was driving me crazy.
Leron Amin says
Thanks for the feedback Joshua – I’m glad the tutorial helped! 🙂
Eff K says
Only the wp-config file uploaded successfully. I tried uploading a wordpress theme and image but they still say permission denied. Please what is the cause? On the command terminal, it shows that the permission is now 777 but still i cannot upload.
Leron Amin says
Hi Eff,
Did you restart Apache after changing the permission levels? This is a necessary step in order for the changes to take effect.
Talk to you soon,
Joe
Eff K says
It worked, thanks.
Rudhra says
You are marvellous. I am a complete newbie and have been following your tutorials.
Really very interesting. The step by step method is really informative. Thank you very much for sharing your knowledge with us.
May I recommend a new tutorial covering WordPress multisite installation and management.
Thanks again.
Leron Amin says
Great suggestion! That will be one of the next tutorials.
Talk to you soon,
Joe
Dat says
Thank you, It works very well. You are my life saver !
Leron Amin says
Hey Dat,
Thanks for the feedback – I’m glad the tutorial helped you!
Aashish Sharma says
when i try to run stat -c “%a %n” /etc/apache2/sites-available/wordpress.conf
it gives error:
stat: cannot stat ‘%n”’: No such file or directory
stat: cannot stat ‘/etc/apache2/sites-available/wordpress.conf’: No such file or directory
while in FTP i can see file exist on same path
how to solve this…
also my website open like:
http://www.domain.com/index.php
i want
http://www.domain.com
Leron Amin says
Hi Aashish,
Try running stat -c “%a %n” /etc/ then moving up one level at a time.
Regarding your second question: change your permalinks in Settings > Permlinks > Post Name.
Let me know if you have any questions,
Joe
Rudhra says
Remove space in between %a %n and try. It worked for me!
Bharath says
Hi,
I am getting permission denied for all files(whichever I try to edit) in the directory. I’m using click to deploy version. This method is to fix for a single file right?
Waiting for a solution.
Leron Amin says
Hi Bharath,
To change the permission levels of entire directories, you will have to make the command recursive:
Check out step 11 of this tutorial for more information on changing the permissions of files and directories.
Let me know if you have any questions,
Joe
John Antonacci says
thanks for the tutorials.
when I try to execute:
sudo stat -c “%a %n” /opt/bitnami/apache2/conf/bitnami/bitnami.conf
i get:
stat: cannot stat ‘%n”’: No such file or directory
“644
any thoughts?
Leron Amin says
Hi John,
I have heard of that happening before.
What you can do is to try running the command:
sudo stat -c “%a %n” /opt
sudo stat -c “%a %n” /opt/bitnami
And gradually work your way up the file path and see if it works.
It’s an unusual problem and I have’t discovered a quick fix or clear explanation.
Let me know if you have any questions,
Joe
John Antonacci says
ok, I think I have it worked out,
thanks again,
John
T.S. says
I was worried about GCP. As they do not offer already install cpanel as other server provided offered like hostgator and godaddy. I saw your tutorial and i finally managed my transfer new site to gcp. Its working like charms. I would not be possible without your tutorial. Thank you so much for such detail explain video and this blog site.
I have one issue i have installed WordPress bitnami. while making any changes in file or folder i am getting FileZilla permission error. Can i remove this complete by using any commend?
Leron Amin says
Hi T.S.,
I am glad the tutorials have helped you! 🙂
Yes, you could completely remove future errors by assigning 777 permissions to all of your website files.
However, that is not a recommended practice and will put your website’s security at risk.
Claire says
Hi Leron,
Should I only change to 777 when uploading files?
and in the meantime change back to 644?
Leron Amin says
Hi Claire,
Yes you should change back the permissions after editing the files. If you need increase the permission level permanently, use the lowest level of permissions required to accomplish the job.
Let me know if you have any other questions! 🙂
Rudhra says
I recently changed permissions for few files and directories. Instead of changing back permissions one by one is there an universal command to change back the permissions
Mehran says
Leron,
I’m glad that you mentioned ” that is not a recommended practice and will put your website’s security at risk.” however I think it was better this article was not not published for this reason since the goal shouldn’t be just solving a problem anyway!
Thanks for your useful blog.
Leron Amin says
Hi Mehran,
The purpose of the tutorial is to instruct users on how to change file permissions, not necessarily to advise them on recommended file/directory permissions or security practices. That being said, I understand your point, and will include a notice in the tutorial body that advises users on proper file/directory permissions.
Here’s the link for the recommended file permissions for WordPress files and directories (per the WordPress Codex).
Talk to you soon,
Joe
Claire says
Hi Joe,
Thanks for all your amazing tutorials. I have followed many of them already!
Is it possible just to use the select File permissions on the wordpress.conf and ‘Change File Attributes’ window and change the numeric value to 777 ?
Thanks,
Claire
Leron Amin says
Hi Claire,
I’ve never tried it but it would probably work. The only issue preventing it would be if root permissions are required to edit the file permissions.
If you give it a try, let me know how it goes!
Thanks,
Joe
Chris says
Hi Joe,
I’d like to establish access to the wp-config.php file, because I’m using a plug-in (Code Snippets) to change the php file, and I understand that if I make a mistake with that, I’ll loose access to my site. When I try to find the path to the wp-config file, I get as far as the root folder (where I understand the wp-config file lives), and I get “Directory /root: permission denied”. I’m using Bitnami. Seems like I need to fix the permissions of the folder, rather than just a file. Can you tell me how to proceed?
Thanks much,
Chris
Leron Amin says
Hey Chris,
If you’re using SSH to access your wp-config.php file, simply run sudo infront of the command. For example:
If you’re trying to edit the file through FTP, check out this tutorial on changing the folder permissions.
Let me know if you have any questions, 🙂
Joe
Richard says
I deleted wp-config.php file and would like to upload it back to the same folder. It shows permission denied. How can I upload the file back ?
Leron Amin says
Hi Richard,
You can temporarily change the permissions of the folder that you want to upload to to 777 – thereby allowing you to upload the file.
Check out this tutorial for instructions on how to check/change permission on files and folders.
Let me know if you have any questions,
Joe
Richard says
Joe: Thank you very much for the help. It works.
Richard says
Joe: I changed the permission of /opt/bitnami/wordpress/wp-content to 777 and my website crashed. How can I reinstall wordpress on Google cloud without losing all the database that I have saved with all in one migration plug in ?
Leron Amin says
Hi Richard,
I responded to this question in the support group.
If the problem is severe and can’t be fixed, you could simply launch a new WordPress instance on a new virtual machine and then import your All-in-One WP migration file that you saved.
Talk to you soon,
Joe
Tyler says
Really love your site. If only everyone on the web wrote tutorials like you do!!
My bitnami wordpress site suddenly started showing the Apache Default Page which says I should delete the index.html file located in var/www/html/
Followed your tutorial and successfully changed the permissions on that file to 777 but I am still unable to delete it or rename it and my site is still showing the Apache Test Page and my wordpress admin is displaying a 404.
Ever come across something like this before?
Leron Amin says
Hi Tyler,
Thanks for the feedback! I am glad to hear that the tutorial has been helpful for you!
Regarding your issue – do not delete your index.html file. The reason you are getting the Apache start page is because your server isn’t running properly.
First of all, are you running Bitnami or Click-to-Deploy WordPress?
Tyler says
Not just this tutorial – all of them!
I am running Bitnami WordPress. I installed it and it set it up following your tutorials around 4 months ago and everything was running smoothly until 2 days ago when that Apache page appeared. I’ve restarted the instance, restarted the apache service and still the page displays. I can still connect to the wordpress install via ssh so the files are still there. I’m not really too stressed about fixing it to be honest – it was a site built for a marketing campaign which has finished – but I was planning on spending the holidays transferring all my other sites over to Google Cloud Platform and was wondering if this is a common issue and something that I would need to fix again and again.
Leron Amin says
Hi Tyler,
The error doesn’t mean there is anything “wrong” or “deleted” from your website, it just means your server is temporarily down.
What is the output of sudo /opt/bitnami/ctlscript.sh status
Tyler says
The plot thickens!! Apache not running fors ome reason
php-fpm already running
apache not running
mysql already running
Leron Amin says
Run the following command:
sudo /opt/bitnami/ctlscript.sh start apache
What does the error message say?
Tyler says
httpd.bin: Syntax error on line 562 of /opt/bitnami/apache2/conf/httpd.conf: Syntax error on line 29 of /opt/bitn
ami/apache2/conf/bitnami/bitnami.conf: Syntax error on line 2 of /opt/bitnami/apache2/conf/bitnami/bitnami-apps-p
refix.conf: Syntax error on line 7 of /opt/bitnami/apps/wordpress/conf/httpd-prefix.conf: Syntax error on line 39
of /opt/bitnami/apps/wordpress/conf/httpd-app.conf: Syntax error on line 8 of /opt/bitnami/apps/wordpress/conf/h
taccess.conf: without matching section
apache config test fails, aborting
Monitored apache
Leron Amin says
Hi Tyler,
There are numerous errors in your various configuration files.
You will have to fix the syntax errors in your httpd.conf file, bitnami.conf file, bitnami-apps.prefix.conf file, httpd-prefix.conf file, httpd-app.conf file, and htaccess.conf file in order to get your Apache server to start back up properly. If you are unable to resolve all of the errors, you can restore your site from a snapshot from when it was running properly, or launch a new VM instance and re-import your site.
Good luck and let me know if you have any questions,
Joe
Tyler says
Really appreciate your help – thanks so much.
I suppose the only question I have is if you have any idea what would have caused this and if its a common issue?
I literally haven’t even logged in to GCP since I installed the site and it was working perfectly until a couple of days ago.
Leron Amin says
Hi Tyler,
I assumed you had made changes to all of these files.
Oftentimes it happens that, if you make changes to a single file (such as bitnami.conf) that results in an error, it can cause errors in other files that are dependent on that file’s configuration settings. So, did you make changes to any of those files recently? Even to a single one of them? This could have caused the chain event of errors that you’re seeing right now.
Talk to you soon, 🙂
Joe
Tyler says
No – not a single change. The last time I logged into my GCP account was months ago when I had got everything running smoothly (thanks to this site) and I only noticed the error when I saw zero traffic in my analytics.
Leron Amin says
That is really weird – I am not sure how the error could have occurred.
Assuming no one had access to your account, it may have been caused by an application or plugin writing to one of the files; I really don’t know.
Please let me know if you find out what caused the problem.
Talk to you soon,
Joe
Tyler says
Will do. I’m actually glad that you don’t know! I’d be more worried if you had said that it was a common issue with GCP. Thanks for all your help though and I’ll report back when I get to the bottom of it
jonas Luz says
Good Morning !!
Man really nice tutorial congratulations, i already shared to my friends in Brasil !!
I only have problem, my SSH conection showing diferent as you can see in this screen https://prnt.sc/hgql90 !!
What i should do ?😕
By the way i alredy subscribe on your youtube and website !!!
Thanks very much !!!
Leron Amin says
Hey Jonas,
Thanks so much for sharing the tutorials and subscribing to my channels! 🙂
The screenshot from the tutorial shows the .conf file location for a Click-to-Deploy WordPress installation.
Because you are using the Bitnami version of WordPress on Google cloud, your .conf file is located in a different location:
/opt/bitnami/apache2/conf/bitnami/bitnami.conf
Now just replace the file path with the one above and it should fix the issue!
Let me know if you have any other questions, 🙂
Joe
jonas Luz says
Thanks very much Leron !
now i got another mensage ( -bash: /opt/bitnami/apache2/conf/bitnami/bitnami.conf: Permission denied )
https://prnt.sc/hguowh
Leron Amin says
Hey Jonas,
Try running the command with sudo in front, as shown below:
That should take care of the permission error. 🙂
Joe
jonas Luz says
Again i tried https://prnt.sc/hgv2dp but no worked again !! and i even try than put also the other command but nothing https://prnt.sc/hgv46e
Thanks Joe
Leron Amin says
Hey Jonas,
There is a problem with the quotation marks automatically changing in my WordPress theme.
Enter the command as I showed you, but make sure that the quotation marks surrounding “%a %n“ are the quotation marks that appear next to the Enter key on your keyboard. You can can just manually move your cursor over them, and then replace them with the quotation marks next to your Enter key.
Let me know if this makes sense to you!
Talk to you soon,
Joe
Ransford says
Hello,
I am getting this error “cannot stat ‘%n”’: No such file or directory” when adding this code. Could you please let me know how to fix this issue…
Thanks for your time…
Leron Amin says
Hi Ransford,
Copy and paste the command directly from the tutorial page, making sure to change path/to/file to the file or directory that you want to check the permissions of. In your case, the error means that the file or directory path that you entered does not exist. So what you will need to do is to verify the directory path actually exists. You can do this by running the command ls path/to/directory to check if a directory exists, and nano path/to/file to see if the file exists.
Let me know if you have any other questions, 🙂
Joe
johnny says
Thanks you so much for all the good tutorials and info! I follow your tutorial to connect via sftp! .Simple and very well explain!.
Im having an issue with “permission denied” when i try to upload a folder on my Magento directory !! any idea why and how to fix it?
Leron Amin says
Hi Johnny,
Thanks for posting a comment. I am glad to hear the tutorials have helped you!
To fix the problem you are experiencing, you are going to have to change the default permissions of the directory to which you’re trying to upload a directory. For instance, if the directory your’re trying to upload the directory to is /data/users/johnny then you would need to change the permissions by running a command such as sudo chmod -R 777 /data/users/johnny
Look at number 11 from this post for more examples. Let me know if you have additional questions. 🙂
Joe
Julius says
This really helped, thanks mate!
Quick question, once all edits to files/folders have been made, whats the best permission level to set all the files/folders back to? It would take too long to set each individual file/folder back to their original permission levels.
Leron Amin says
Hi Julius,
The default permission level is 644.
Let me know if you have any other questions 🙂
Joe
Bimbimz says
thats good, but How to delete file ?
Via ssh or sftp :
delete file “Permission denied”
Thx
Leron Amin says
Hi Bimbimz,
The same things goes for deleting files.
Change the permissions level to 777 then delete the file with sudo rm path/to/file.
Good luck!
Joe
Bimbimz says
I get it
Your answers are helpful
* if you there is spare time please create tutorial about:
Upload file via url to google cloud storage
(I am looking for this tutorial but have not got it yet)
Thx
Leron Amin says
Hi Bimbimz,
I am going to make a tutorial on using Google Cloud Storage as you described.
Talk to you soon,
Joe
z says
how to upload video on google cloud
Leron Amin says
Hi Z,
I will make a tutorial on uploading videos.
One way is to upload them to ‘cloud storage’ and then embed them into your site.
Talk to you soon,
Joe
Mohammed says
Hey
So just yesterday I added some code to my theme’s functions. Now I’m getting the HTTP ERROR 500.
I tried to disable the theme by changing the themes name in FileZilla but I’m getting ”permission denied”. I followed this tutorial but it still says the same thing.
Any idea on how to fix it?
Thanks in advance.
Leron Amin says
Hey Mohammed,
If you are using Bitnami GCP, try restarting your server with: sudo /opt/bitnami/ctlscript.sh restart apache
If you are using Click-to-Delpoy GCP, try restarting your server with: apachectl restart
Are you getting any errors when you try to restart? If so, what do the errors say?
Since the error occurred after working on your theme functions, it could likely be an error with your PHP syntax.
Talk to you soon, 🙂
Joe
Jonathan Hatch says
You really should not be changing anything in your system to 777 via chmod, that’s just begging to be hacked.
Leron Amin says
Hey Jonathan,
I’m always happy to see comments from fellow Minnesotans 😉
I agree with you that temporarily changing a file or directory to 777 is not necessarily a ‘best practice’, but from the research I’ve done I don’t believe it poses a real threat for temporarily editing individual files and sub-directories via FTP, so long as the permissions are reverted to their default levels after necessary changes have been made. That being said, I also agree that changing the permissions of a major directory to chmod 777 is generally considered a bad practice.
My determination as to whether or not the use of ‘777’ is appropriate in certain circumstances was considered on an ‘average-user’ basis, taking into account that the majority of developers referencing this site are running WordPress on private virtual machines, usually acting as the sole administrator for their servers.
The whole issue of whether or not it is safe to use 777 is contested, with both sides making strong arguments for and against the practice.
My conclusion that using 777 is a safe practiced when used under the conditions described above is based on the arguments for and against the practice, as described below:
Resource 1
Resource 2
Resource 3
I am eager to hear your thoughts on the matter, as you seem to be well versed in the field and I could probably learn a thing or two from you!
Talk to you soon, 🙂
Joe
Luis says
Hi,
Is there any tutorial explaining how to setup phpmyadmin connection?
I just followed bitnami tutorial but never works.
Would you help me on this?
Leron Amin says
Hey Luis,
I have tested out the phpmyadmin connection tutorial from Bitnami and it does work.
However, there are a few parts of it that are confusing. I can help you fix the problem if you tell me at which point you got stuck stuck in the tutorial.
Talk to you soon, 🙂
Joe
Luis says
Following all the steps I get stucked in opening it via browser.
This site can’t be reached
127.0.0.1 refused to connect.
Try:
Checking the connection
Checking the proxy and the firewall
ERR_CONNECTION_REFUSED
Leron Amin says
Hi Luis,
Did you watch the video that is posted on the page?
That might help you if you haven’t seen it yet.
Talk to you soon,
Joe
Isabel says
Hi Prof* Joe and Luis,
Funny that is exactly what I’m experiencing even after re-checking all 4 steps:
PuTTY —
Session [IP Address] > Auth [ppk KEY] > Tunnel [8888 localhost:80] > Data [bitnami] >>> Open
Not sure why either?
Would like to find out your view…
Also what link should be on the Windows browser?
http://127.0.0.1:8888/phpmyadmin or http://localhost/phpmyadmin/
I’ve installed XAMPP … no show.
However, I saw this ‘possible’ solution but not too sure with regards to add phpmyadmin to the apache configuration:
https://stackoverflow.com/questions/10111455/i-cant-access-http-localhost-phpmyadmin
What say you professor? 😉
Leron Amin says
Hi Isabel and Luis,
I looked over the tutorial, and I noticed that it doesn’t mention anything about having an SSH key pair configured for your instance.
For the SSH tunnel tutorial to work, you need to have an SSH key pair that is already configured between your PuTTY terminal and your VM instance.
For instructions on how to generate the key pair, take a look at this tutorial. Also, make sure to put ONLY bitnami in the key comment section; this will be your username.
Next, look at step 6 of this tutorial, where I paste the contents of an SSH key file into my VM instance settings page. Note that I change the username to Bitnami. In this tutorial, I copy the contents of an SSH key file; in your case, however, you will be able to simply copy and paste the public key text to your VM instance directly from the PuTTY keygen console.
Hopefully this makes some sense… at least enough to steer you in the right direction.
Talk you soon,
Joe
Raj says
Hi Leron,
wordpress.conf file where store in wordpress bitnami (google compute engine), I can’t find it
Leron Amin says
Hey Raj,
The Bitnami version of WordPress on Google Cloud uses a bitnami.conf file in place of wordpress.conf.
The file is located at /opt/bitnami/apache2/conf/bitnami/bitnami.conf
Talk to you soon, 🙂
Joe
tarik says
HELLO JOE
i try to change the file : /opt/bitnami/apache2/conf/bitnami/bitnami.conf
I have succeeded inchanging the permissions of the file, but when i try to modify it, the file become automatically emty
i tryed several time to copy from local machine the version i downloaded before but no issue
🙁
Leron Amin says
Hey Tarik,
If the file is showing up empty, it means that the file does not already exist and therefor it created a new empty file with the name bitnami.conf.
Check the file path to make sure the file exists. You can run ls /opt/bitnami/apache2/conf/bitnami/ to see if a file with the name bitnami.conf exists in that directory.
You can also run sudo nano /opt/bitnami/apache2/conf/bitnami/bitnami.conf which will open the file regardless of it’s permission level. This is another way of checking whether or not the file exists in that directory location.
Hope this helps, and let me know if you have more questions!
Best regards,
Joe
tarik says
Hello Joe
thank you for the answer, i actually edit the file past the code ans save , i check now it exist but still have problem with ftp can’t upload file via ftp
Erreur : error while writing: received failure with description ‘Failure’
🙁
best regards
Leron Amin says
Hey Tarik,
I am not sure exactly what the problem is, or the solution.
From what I have found, it seems that issue usually surfaces when there is a lack of available disk space, which I would doubt is the issue in your situation given the small size of the file. It may also be a permission error, but I’m not sure, seeing as permission errors usually show a “Permission denied” message.
I hope you’re able to find a solution to the problem, and if you do – please share the solution.
Talk to you soon, 🙂
Joe
tarik says
Yes of course !
it seem that the problem of disk is full ” temporary files ”
i have to contact GCP for that
and looking for solution, of course i will come back to you
thank you for your quick response and this beautiful website
best regards
tarik
Leron Amin says
Hey Tarik,
Sounds good! Let me know if you found a good solution to the problem, or if you have any other questions! 🙂
Talk to you soon,
Joe
Isabel says
Hi Joe,
I hope you are well… 😉
This is a bit off topic but I have just bought a wp-plugin and need to click on a link to register but only to get this message: “You are not allowed to access this page.”
I have taken a look at my website’s config.php file and picked up the hostname, username and password…
How do I compare it to the actual MSQL database to make sure the two are in sync?
Or do you have any any tips on this…?
FYI: The website was launched with WordPress Bitnami
As always thanks my friend, Isabel
Leron Amin says
Hey Isabel,
I am well and I hope you are as well! 😀
I will try my best to help you with this issue!
I’m assuming you’re seeing a black page with a single container showing the “Sorry you are not allowed to access this page.”
Two common causes are:
1) Multiple browser tabs/windows of WordPress open at the same time.
2) Multiple WordPress installations in a single database using the same table prefix, as shown in resource 3.
These are the only things I can suggest, given that I don’t know much about your WordPress configuration, such as how many WP sites you’re running on your virtual machine. If you’re just running a single site, then resource 3 likely won’t provide the solution.
The good news about this error is that I found a lot of resources on how to fix it. I ran a Google search for:
wordpress plugin “you are not allowed to access this page” and it turned up many results.
I hope this helps somewhat, hopefully enough to guide you in the right direction!
Let me know if you figure out the problem (and what the solution was) or if you have additional questions.
Best regards,
Joe
Resource 1
Resource 2
Resource 3
Matheus Santana says
I’m trying to upload a plugin to wp-content/plugins but appears permission danied I did all of those steps
Leron Amin says
Hi Matheus,
You would need to change the permissions of the wp-content/plugins/ folder to 777.
However, the best thing to do would be to upload it from the plugins page within your WordPress site.
Let me know if this answers your question. 🙂
Joe
Youlong Chey says
Hello,
Here is what I had seen, It still show permission denied when try to upload file.
How can I do it?
Leron Amin says
Hi Youlong,
It appears that you don’t have a wordpress.conf file – at least not in that location.
Before entering the command, you can check if the file actually exists by running:
ls /etc/apache2/sites-available/
That will show whether or not a wordpress.conf files exists in that directory.
I hope this answers your question 🙂
Joe
Luis says
Guys,
For bitnami installs:
I realized that to fix “permission denied” error on SFTP transfer we need to change the SSH username ( the field from w== xXXXXX) to w== bitnami.
And on FileZilla settings use be sure to set the username for that connection to “bitnami” as well.
After doing this I was able to transfer and edit wp-config file.
I’m not expert on this but I just followed your tutorial in parallel with “bitnami tutorial for GCP.
Leron Amin says
Hey Luis,
Thanks for posting this comment.
Although using the Bitnami username is not required, I agree with you that it is a best practice when using the Bitnami version of WP on GCloud.
Regards,
Joe
Bruce says
Thank you for your help with this (for me) very difficult problem! Much appreciated.
Leron Amin says
Hey Bruce!
Happy to see that the tutorial helped with the problem! 🙂
ric says
No, I am using ‘Click-to-Deploy’
Thanks so much for your tutorials, its been really helpful!
I am migrating a couple of sites from bluehost to google cloud. I am using the all-in-one wp migration plugin and it works fine. but when i go to update my permalinks, i get the 500 internal error and I am unable to get back into wp-admin.
I am using your FTP tutorial to try and modify my .htaccess file and hoping that will fix all my errors.
Thanks for you help.
ric says
How can I get the path file for the .htaccess file. I am getting an internal error and I think my .htaccess file is corrupt
Leron Amin says
Hey Ric,
It depends on your Apache configuration.
If you’re using the Bitnami stack, the file is located at /opt/bitnami/apps/wordpress/conf/htaccess.conf.
Leron Amin says
Did this tutorial work for you?
Please share your questions and comments below!
Thanks,
Joe
ric says
Yes, thank you so much. All sites transferred and working great.
Leron Amin says
Great Ric! I am glad to hear it! 🙂