So you want to host WordPress on Azure?
This guide will take you step-by-step through the process of deploying a WordPress website to Microsoft’s Azure cloud platform.
Start by reading through the Introduction section of this guide to learn about hosting WordPress on Azure, then complete each of the three parts in this guide.
Let’s get started!
In the first section of this guide you’ll learn how to Configure WordPress on Azure. Then, in the second section, you’ll learn how to Configure a Domain Name. Lastly, in the third section, you’ll learn how to Configure SSL for your website.
Good luck, and don’t forget to reach out to the WordPress Cloud Hosting Support group if you get stuck on any section of the tutorial!
Introduction
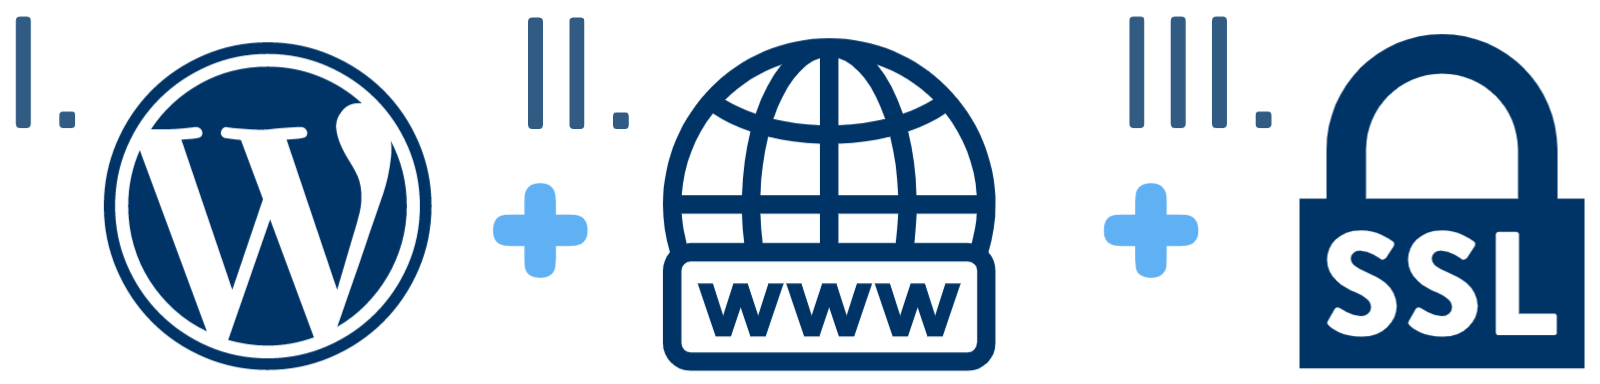
I. Configure WordPress
II. Configure Domain Name
III. Configure SSL
Next Steps…
Introduction
In this introduction section of the guide, you will learn about the pros and cons of moving to Azure. You will also learn about the costs of hosting WordPress on Azure, including the importance of deploying a solution that balances efficiency with performance.
After you’ve read through this introdution, the guide will then walk you through the process of deploying a WordPress website to Azure.
Why host WordPress on Azure?
Azure is an excellent platform for hosting WordPress websites that require scalability, resiliency, and performance.
The #1 reason why you should host WordPress on Azure is because you’re developing a website that you predict will grow in size and complexity over time, and you require a highly-scalable infrasture that can grow with your website.
Below is a list of pros and cons to consider when determining whether to host your WordPress website on Azure:
Pros of Azure hosting
- Significantly Increased performance
- Virtually unlimited scalability
- Highly cost-effective for large projects
- Greater control and flexibility
- Native integration with Microsoft services
Cons of Azure hosting
- Steep learning curve for beginners
- Requires significant time investment
- No customer support options included
- Greater risk exposure for new users
Cost of Hosting WordPress on Azure
The cost of hosting WordPress websites on Azure varies widely, and depends on many factors. Generally, the cost ranges between $7-$30 per month for typical WordPress websites.
Balancing efficiency and performance
When selecting the infrastructure to use for hosting your WordPress website on Azure, it’s important to understand the need for balancing efficiency and performance.
Before getting started, it’s important to understand that Azure, GCP, and Azure, offer different types of free-tiers. If your goal is to deploy a WordPress website for the lowest possible cost, per the efficiency model, then you should deploy on GCP, because it’s the only cloud provider to provide compute resources under it’s always-free tier.
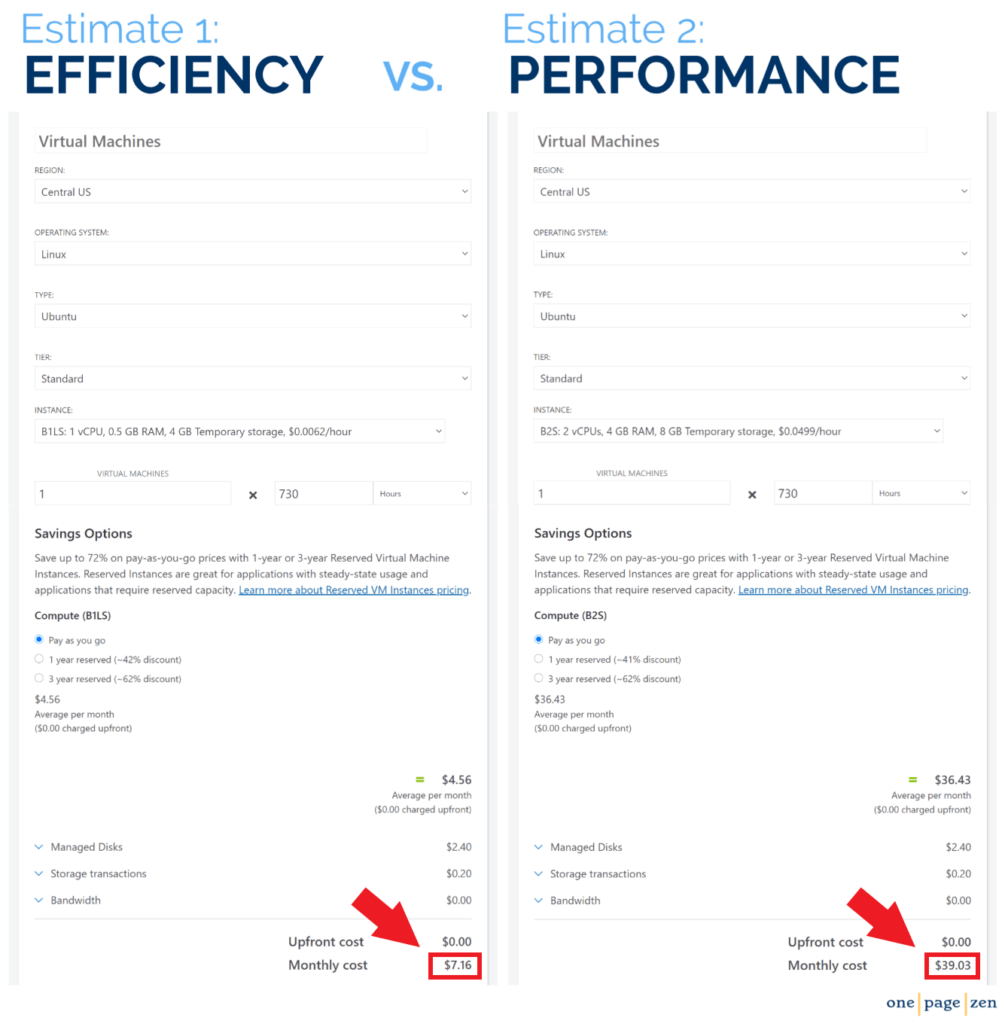
Below is a side-by-side comparison of an efficiency ($7.16/month) vs. performance ($39.03/month) based configuration for hosting WordPress on Azure.
Efficiency Configuration
The efficiency configuration is optimal for low traffic websites (under 1000 daily users). At around $7.00/month, this configuration takes full advantage of Azure’s 12-months free tier, which provides a B1LS instance, as well as 30GiB of SSD persistent disk storage, all at no cost during the 12-months free tier.
This strictly efficiency-based model will allow you to host your WordPress website on Azure at a very low cost, however, larger websites strictly adhering to the efficiency model may incur performance issues.
Performance Configuration
The performance configuration is optimal for websites with higher traffic volumes (over 1000 daily users). At around $39/month, the performance configuration will delivery better performance than the efficiency configuration under heavy server load. However, unlike the efficiency configuration, the B2S instance is not covered under Azure’s 12-months free tier.
This strictly performance-based model will allow for your website to out-perform the efficiency model, especially under heavy load. However, low-traffic websites that utlize this configuration may be allocating resources inefficiently.
Which configuration should you choose?
One of the benefits of migrating to Azure is that you can take advantage of their ‘pay-as-you-go’ model, which means only paying for the resources that your website requires, and nothing more. That being said, a good rule of thumb is to start small, and upgrade only when necessary. To determine whether upgrading is necessary, you will need to monitor your instance’s performance metrics.
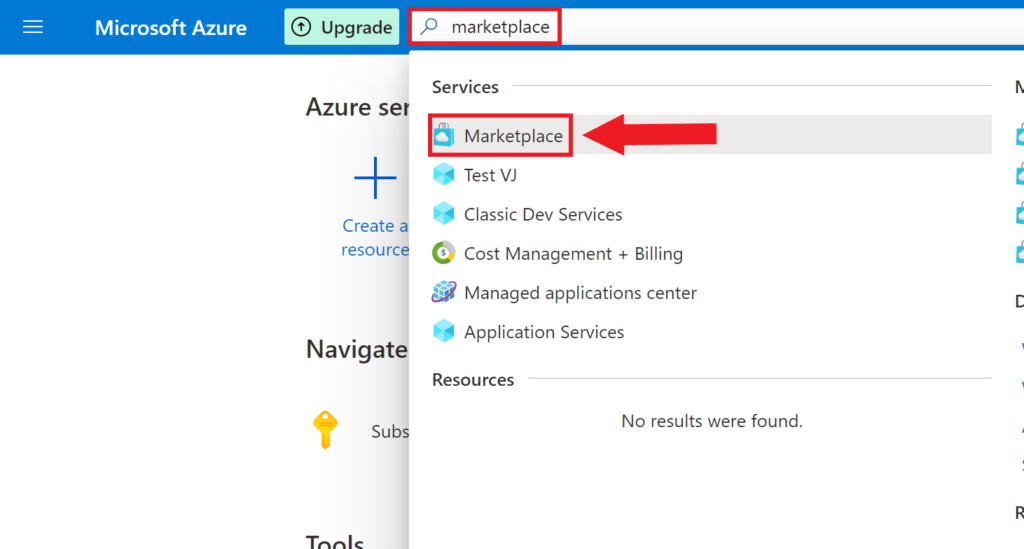
To access your instance’s performance metrics, start from the Azure sidebar menu and navigate to Azure Portal > Virtual Machines, then click on your instance. From here, you’ll see a Monitoring tab towards the middle of the page, which links to a dashboard displaying your instance’s performance merics.

The most important metric to assessing the performance of your instance is CPU usage. CPU usage consistently under 60% is ideal. If CPU usage is consistently over 60%, you may want want to consider upgrading your machine size.
In addition to CPU usage, you’ll also want to monitor the free space available on your persistent disk. To check available disk space, use the df command, as shown in the Linux commands tutorial.
Now that you’ve learned about balancing costs with efficiency and performance considerations, it’s time to get started deploying your website.
PART I
Configure WordPress
Configure WordPress
In this first part of the guide, you will deploy a WordPress website on Azure using the efficiency configuration, which consiststs of an Standard_B1ls instance and a 10GB Persistent Disk, at an estimated cost of around $1 per month (for 12 months only – if you need an Always-Free instance and storage, use Google Cloud instead).
1. Deploy WordPress
2. Customize Deployment
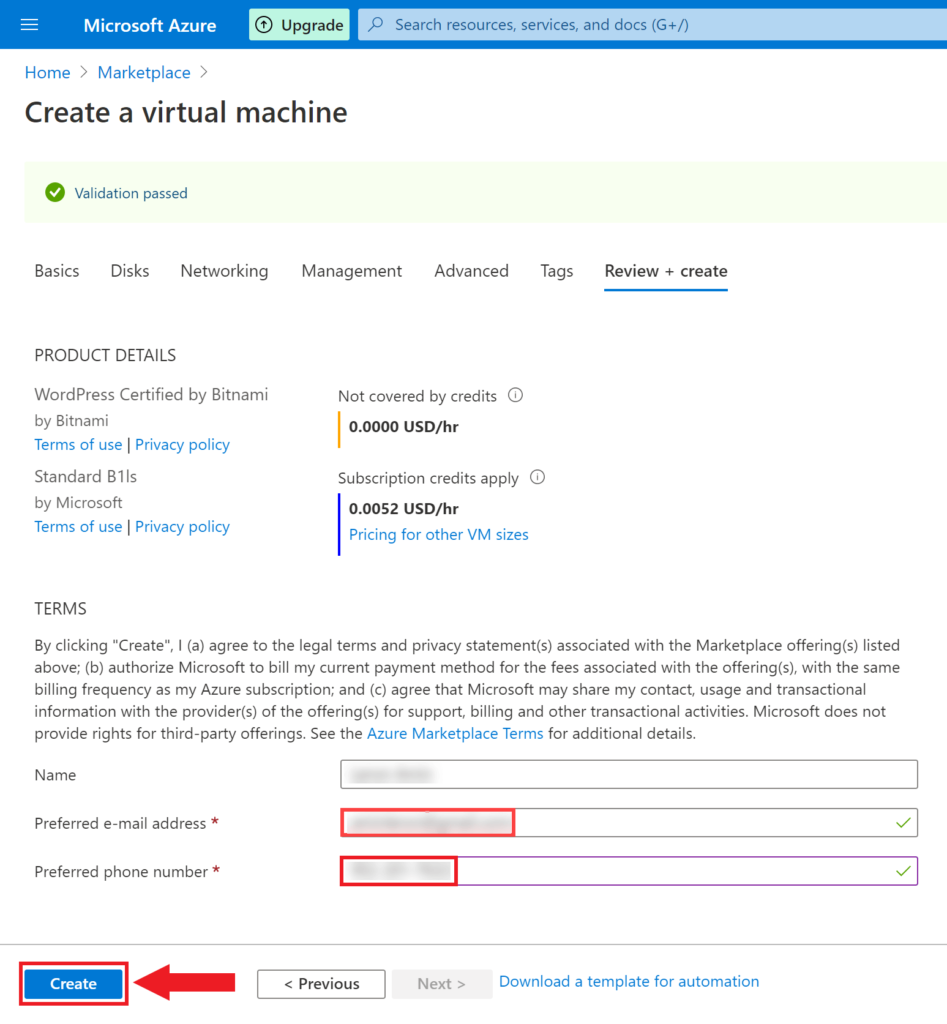
In this section of the Configure WordPress part of the guide, you will deploy your WordPress instance using the default settings. For the sake of simplicity, this tutorial leaves most of the default settings (including a 10GB HDD persistent disk) as is, and jumps quickly to the Review + create end screen. If you’d like to customize your deployment details further, click the series of Next: buttons instead of the Review + Create button.
Step 1: Choose a WordPress Image
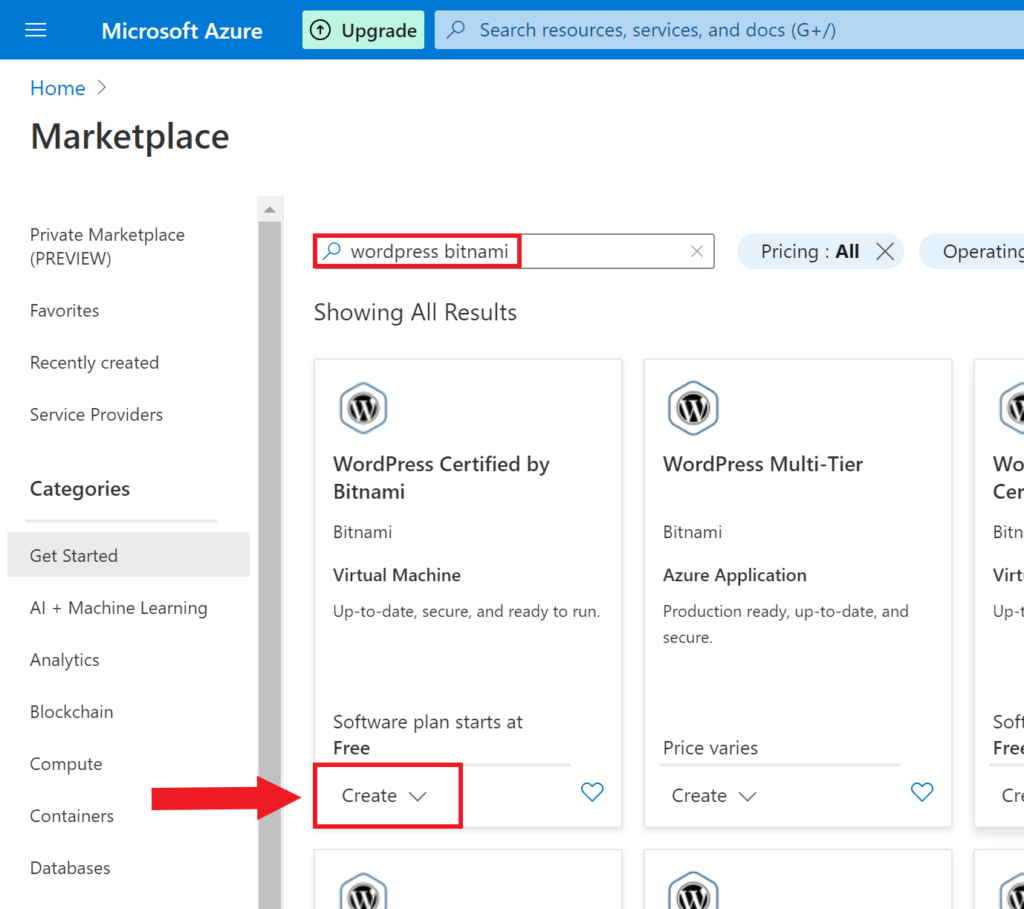
Step 2: Choose an Instance Type
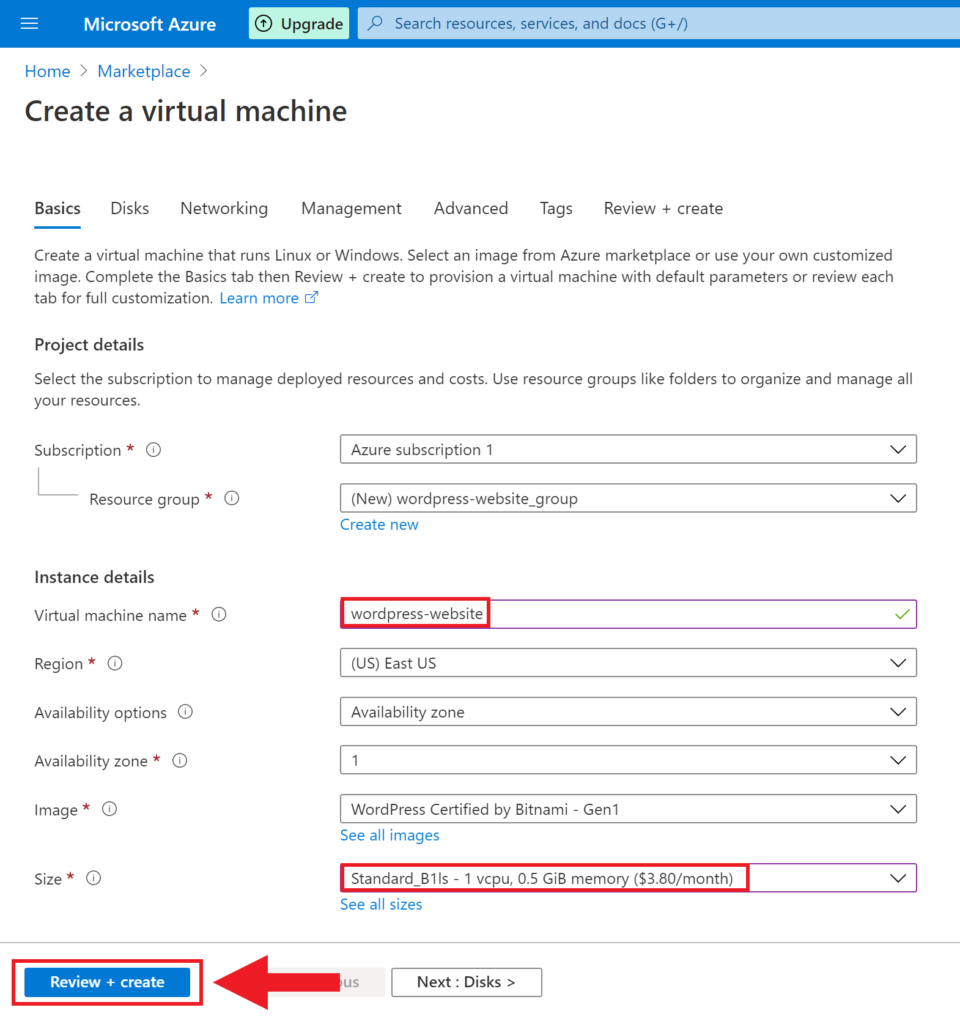
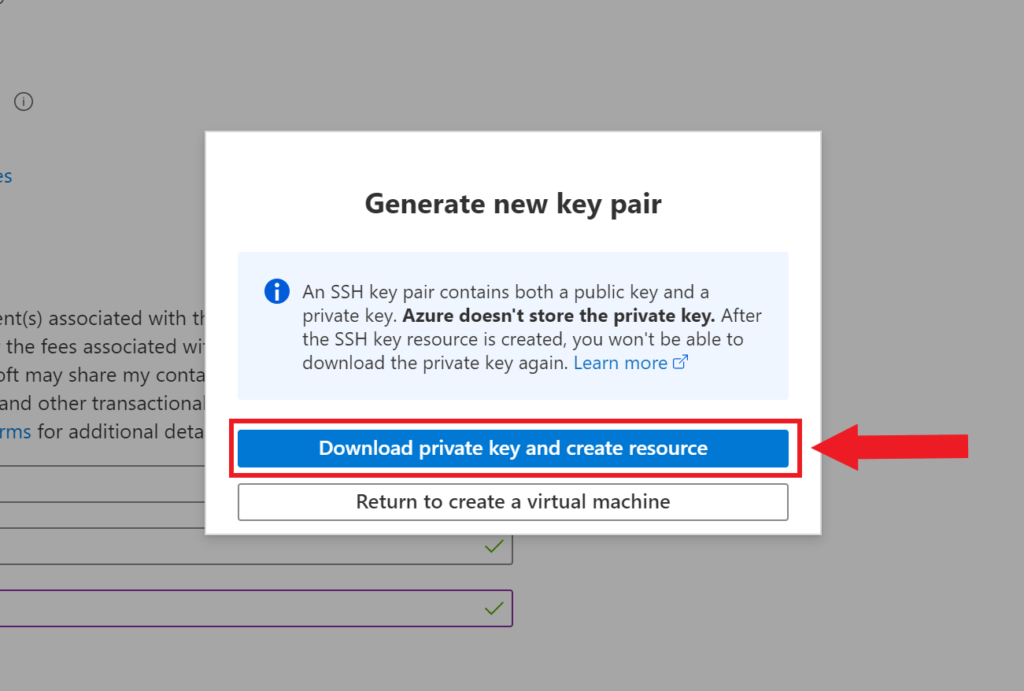
Step 3: Finalize deployment
PART II
Configure Domain
Configure Domain
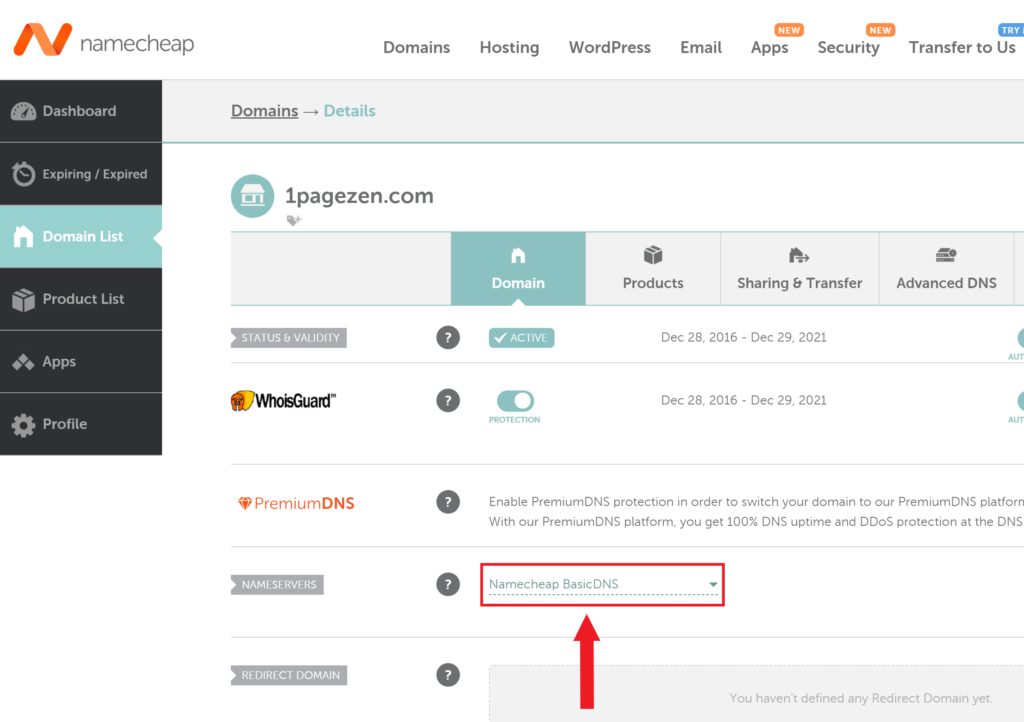
In this second part of the guide, you will configure a custom domain name for your WordPress website on Azure. The instructions below use Namecheap as the domain name provider (which we recommend), however, the same instructions will be applicable regardless of which domain name provider you choose to use.
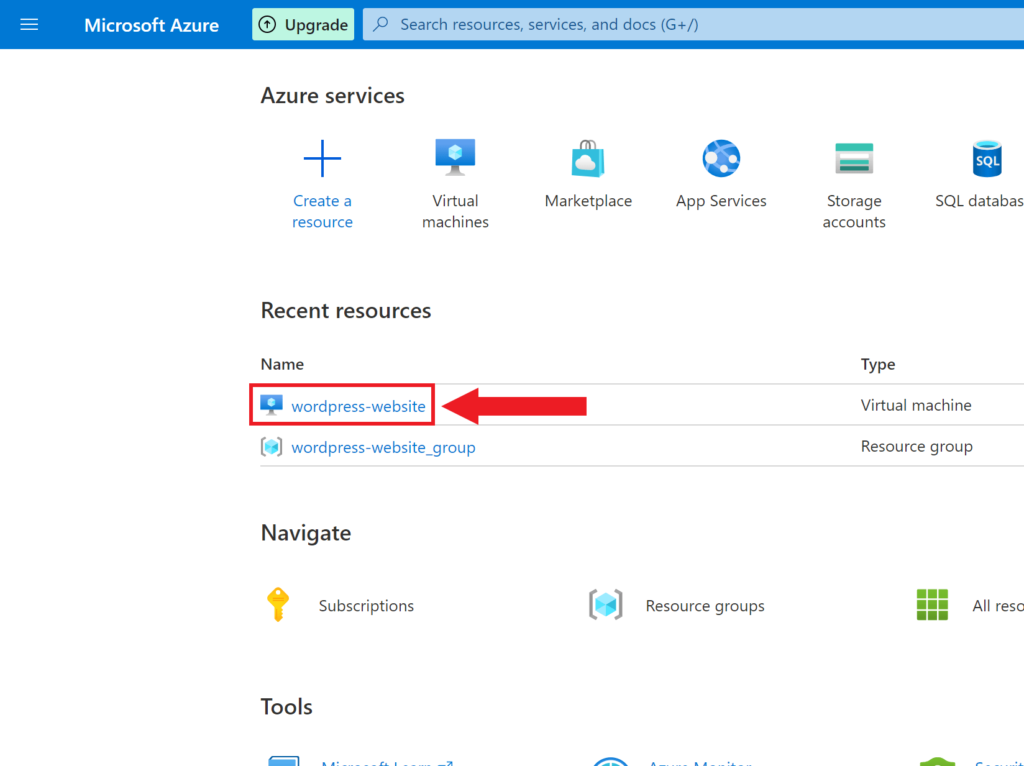
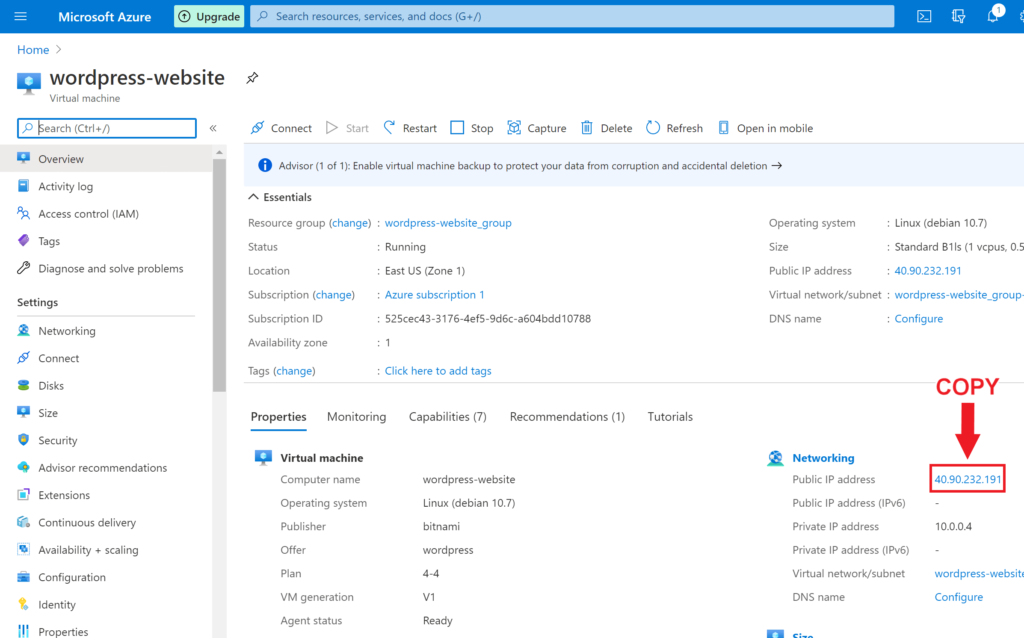
3. Copy Instance IP Address
4. Enable DNS Settings
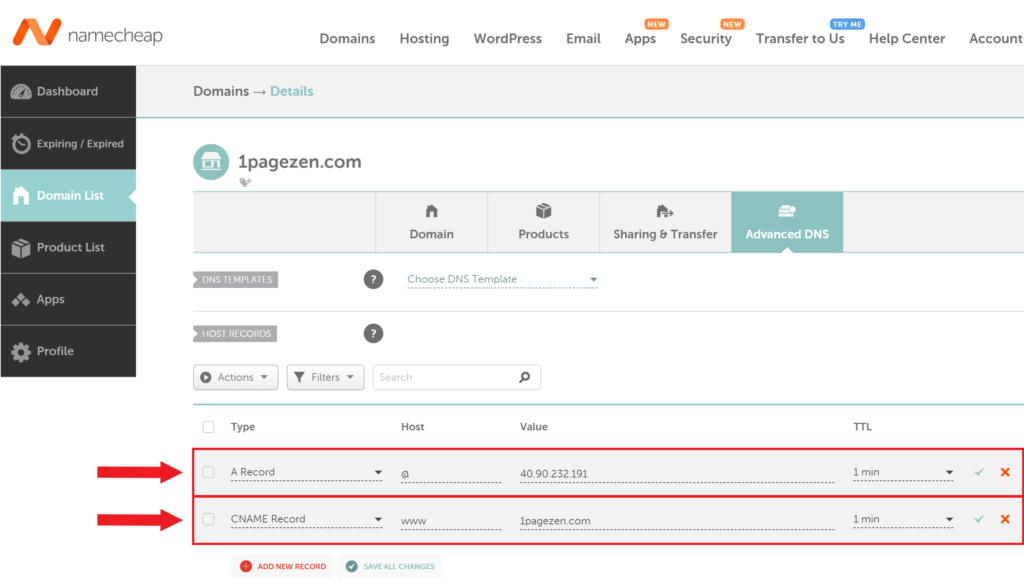
5. Create DNS Records
PART III
Configure SSL
Configure SSL
In this third part of the guide, you will connect to your WordPress instance via SSH in order to execute a script which will automate the process of configuring SSL certificates for your WordPress website.
6. Connect to WordPress Instance

cd Downloads/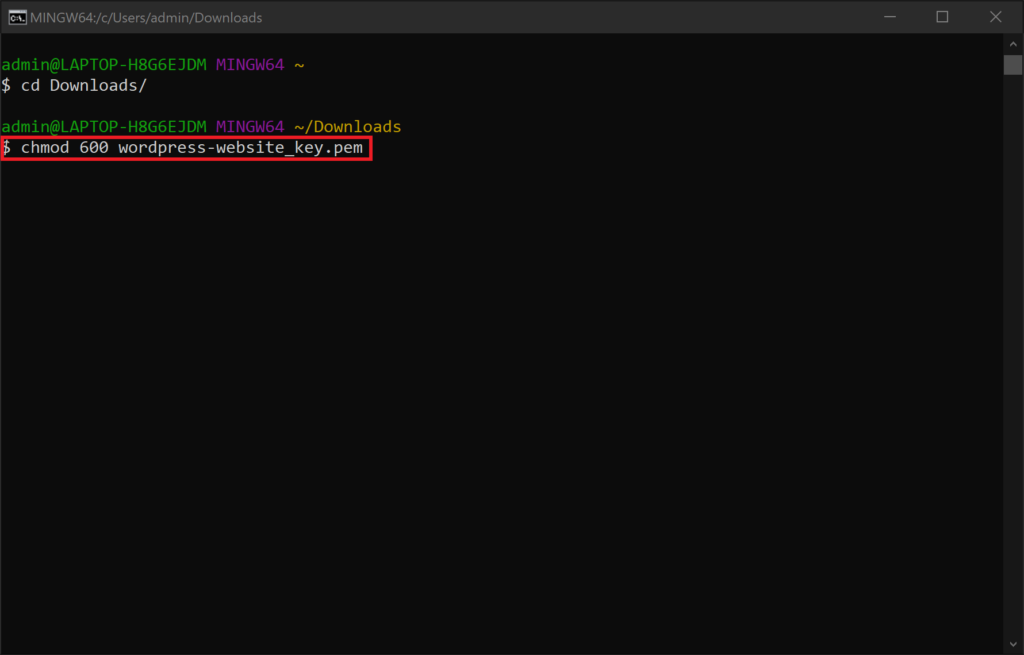
chmod 600 wordpress-website_key.pem
ssh -i "wordpress-website_key.pem" azure@[YOUR-INSTANCE-IP]7. Execute SSL Script

sudo /opt/bitnami/bncert-toolAfter you’ve pressed Enter the script will prompt you with a series of questions, which you will answer by entering either y (for yes), or n (for no). We recommend answering each question in the following way, remembering to replace each bolded instance of 1pagezen with your own domain name or email:
  Domain list []: 1pagezen.com www.1pagezen.com

  Enable HTTP to HTTPS redirection [Y/n]: y

  Enable non-www to www redirection [Y/n]: n

  Enable www to non-www redirection [y/N]: y

  Do you agree to these changes? [Y/n]: y

  E-mail address []: [email protected]

  Do you agree to the Let's Encrypt Subscriber Agreement? [Y/n]: y
Next Steps…
Well done! You’ve successfull deployed a fully-functional WordPress website on Azure, however, there are still some very important concepts that need to be covered. In this Next Steps… section of the guide you will learn how to retrieve your login credentials and login to your WordPress website, and optionally import an existing WordPress website.
8. Login to WordPress
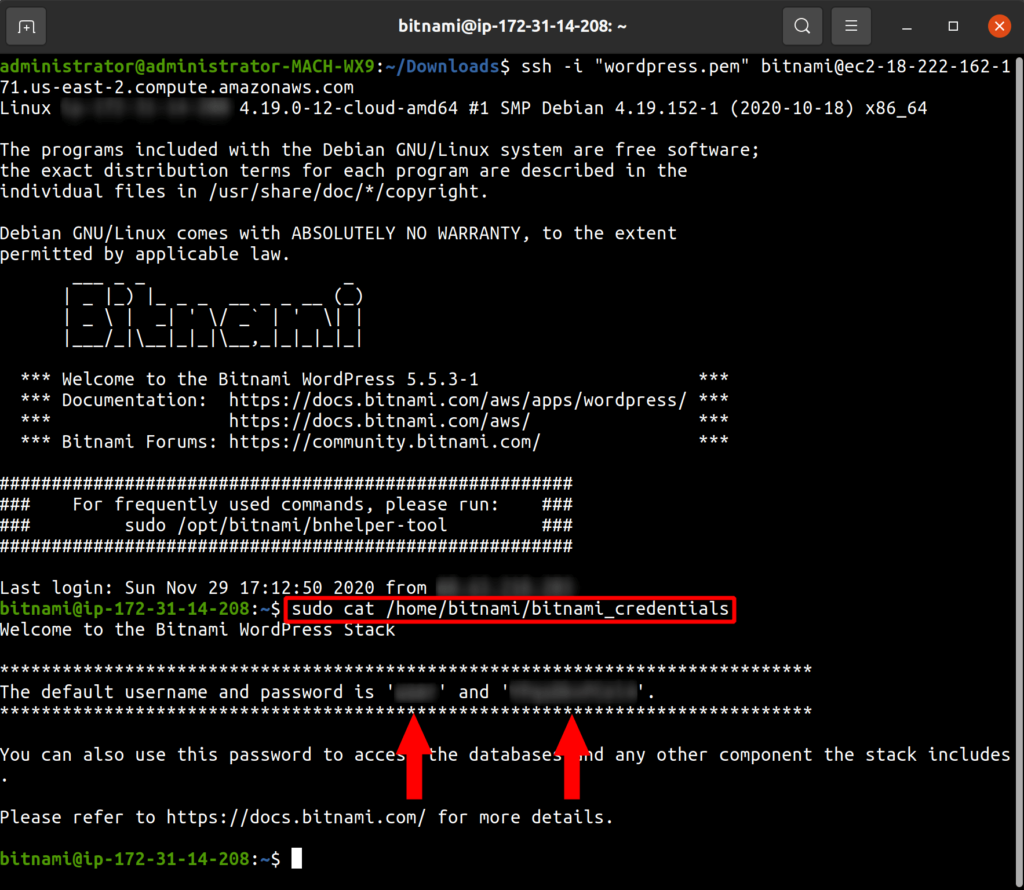
sudo cat /home/bitnami/bitnami_credentials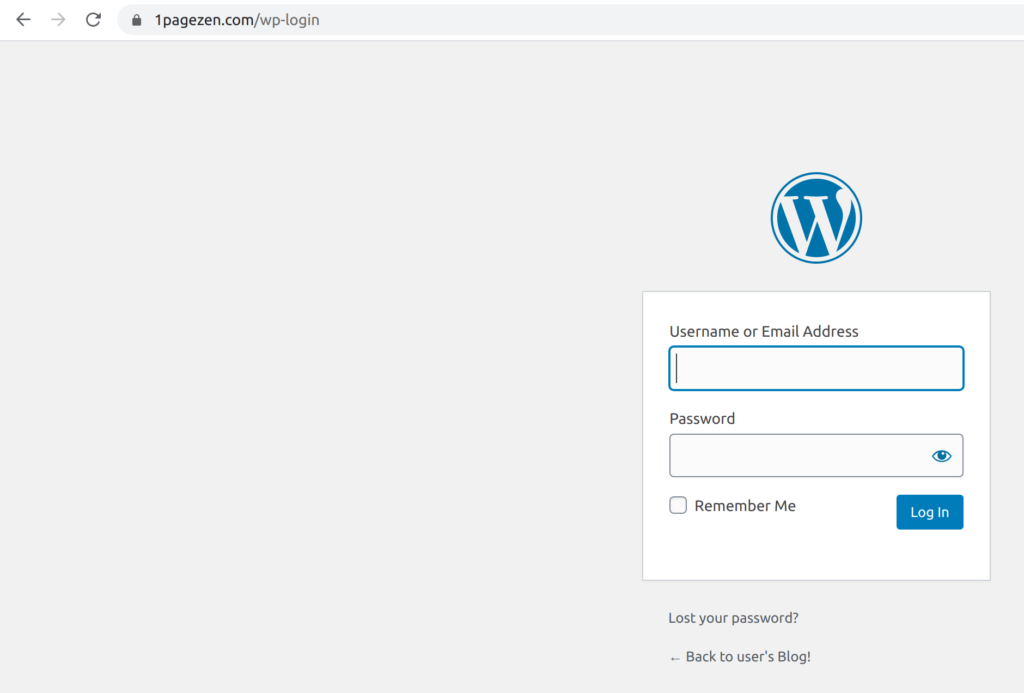
9. Import a WordPress Website
You can use the All-in-One WP Migration Unlimited Plugin to quickly export and import your existing WordPress website to it’s new location on Azure.
Check out this tutorial for a list of step-by-step instructions.
10. Get Community Support
If you need help with this tutorial (or any other tutorial), then make sure to join the WordPress Cloud Hosting support group on Facebook.
Did it work?
Now that you’re hosting WordPress on Azure, be sure to check out these other great WordPress on Azure tutorials.
If you have general questions or comments about this tutorial, please feel free to leave them below. If you get stuck on a specific tutorial, please post your questions and comments on that tutorial’s page.
Thanks,
![]()
Richard Martin Linga says
Hi, I’m lucky, I found this blog.
I completely migrated my old website to my new site, but I encountered errors during adding the SSL. How to Fix?
Leron Amin says
Hi Richard,
There are many potential SSL errors that you might encounter during a migration.
I’d recommend starting with this guide. If that doesn’t help, please provide additional details and I will try my best to help.
Let me know if you have other questions,
Joe
Milan Panchal says
Hi Can You Please let me know
Supppose I want to add Some file via FTP client FileZilla to my Created WordPress Site as You have done in this Tutorial
How Can I do That Can you Please let me know ?
Where I can get that Login Details to Log in to Filezilla And Access the WordPress site in FileZilla ?
Leron Amin says
Hi Milan,
Check out this tutorial for FileZilla FTP instructions.
Hope this helps,
Joe
Fola says
good lesson, but for some reason after step #6 , instead of normal page the website was displaying “404 Not Found
Please forward this error screen to WebMaster.
The server can not find the requested page:” saving my nameservers on the namecheap dashboard. what did I do wrong and do i need to do to fix this? Thanks for your help.
Leron Amin says
Hi Fola,
You will have to wait a good 10 minutes or so for the nameserver changes to take effect. Was your website working properly before configuring the domain name? You can check this by entering the VM’s external IP in your URL bar and seeing if your WordPress website loads correctly.
Talk to you soon,
Joe
fola says
i have check but it’s still bot online.
Fola Fabiyi says
i do notice that my type of azure is kind of different from the one in the video u posted. does that mean there’s been an update or i need another type of azure account?
Leron Amin says
Hi Fola,
They likely updated the user interface since I posted the video. However, the steps should be the same.
One thing I noticed is that you’re website is still loading a default ‘cPanel’ page, which makes me think the nameservers for your domain aren’t pointing to the Azure DNS nameservers. I’ve come to this conclusion because the Azure WordPress install doesn’t include cPanel.
Talk to you soon,
Joe
Fola says
do you have a tutorial on how to create cpanel on microsoft Azure? that would really be helpful
Leron Amin says
Hi Fola – unfortunately I don’t have a tutorial for cPanel on Azure.
Marvin says
Thanks for the helpful information.
When you transfer the main domain, does the subdomain transfer along with it? Or the subdomains should be transferred individually?
Leron Amin says
Hey Marvin,
You will have to create a CNAME record for any of the subdomains. You can add the CNAME records after domain has been transferred.
Hope this helps,
Joe
Rithvik says
Hello,
Is it necessary to use the Azure DNS? Or can I just change the A record and CNAME record at my current DNS provider?
Leron Amin says
It is not necessary – you can just change the A record and CNAME record at your current DNS provider.
Rithvik says
Thank you for this article as well as the article about setting up SSL. It was very helpful.
Leron Amin says
You’re welcome – I’m glad it was helpful to you! 😀
Adrian says
Hi how to upload my existing SSL certificate on microsoft azure using that wordpress by bitnami? thanks!
Leron Amin says
Hi Adrian,
The process would be to upload the certificate files to your VM (you can do this with FTP), then add the certificate files paths to your bitnami.conf file.
You should check out this tutorial to get an idea of how to configure SSL certificate for Bitnami stacks on Apache server. However, instead of issuing and using Let’s Encrypt certificates, you will be uploading and using certificates that were previously issued for your domain.
Hope this helps and let me know if you have any questions,
Joe
Adrian says
Hi Leron, thanks man, but I notice that the link you have given is for Google Cloud? https://onepagezen.com/free-ssl-certificate-wordpress-google-cloud-bitnami/
Can you give me something for Microsoft Azure? Thanks man, I appreciate your answer, and hoping that you’ll create a video about it too. thanks!
Leron Amin says
Hi Adrian,
Unfortunately I don’t have an SSL tutorial for Azure at the moment – but I hope to make one in the near future.
That being said, once connected to your VM instance, the instructions in the tutorial that take place within the SSH window are nearly the same. For instance, adding the the SSL file paths and redirect to the .conf file.
Hope this helps and I hope to have an Azure SSL tutorial soon.
Talk to you soon,
Joe
Lili says
Hello,
Thank you for the tutorials you made for WordPress migration here and the video as well, very clear.
How about transferring a WordPress website from localhost?
Should I ignore step no 6. Edit Domain Name Servers?
Thank you.
Leron Amin says
Hi Lili,
Even when migrating from localhost, you will still have to configure your domain name. So no, I wouldn’t recommend skipping step 6 if you plan to use a domain name with your website.
Hope this helps and let me know if you have questions,
Joe
Jay says
Hi Joe,
I’ve followed your tutorial regarding the domain name transfer to Azure DNS Zone. After following it closely. Ip address is still in effect instead of the name I picked. I’m using Godaddy.
Thanks for your help
Leron Amin says
Hi Jay,
It is common for browsers to show cached versions of web pages, meaning that your browser will show the old version of your website even if you’ve made updates to your DNS. My recommendation is to use a proxy service such as Strong Proxy or try viewing your website through a service such as hide.me .
Hope this helps and let me know if you have any questions,
Joe
Leron Amin says
What did you think of this tutorial?
Please share your questions and comments below!
Johan says
Great tutorial, but it would’ve been a nice addition to talk about FTP servers/accessing for this particular setup.
For us who aren’t familiar with Azure or Bitnami at all, it’s definitely not easy to find the right information. There’s some useful stuff on Bitnami that I’m reading right now and hopefully I can figure it out.
Leron Amin says
Hi Johan,
I agree that an FTP ‘section’ would be a good addition to the tutorial.
I’ve included these sections in the AWS and GCP WordPress tutorials, but neglected it in the Azure tutorial due to a lack of users deploying to Azure.
That being said, let me know if you have any questions and I will be happy to answer them.
Joe
Johan says
Thanks Joe,
I managed to find a solution from a rather unexpected source (from my favorite FTP client):
https://winscp.net/eng/docs/guide_microsoft_azure
Works like a charm, and so much easier than expected. If you know of a better, or safer, way I’d be interested to hear about it.
Leron Amin says
Hey Johan,
Thanks for sharing that link – it looks good to me.
Just make sure to always use SFTP over FTP for security reasons.
Talk to you soon,
Joe