In this tutorial I will show you how to remove the Bitnami corner banner that appears on your WordPress site after installing WordPress on Amazon AWS.
Before getting started with this tutorial, you should have already installed WordPress on Amazon AWS. For instructions on how to install WordPress on AWS, check out this tutorial.
For instructions on how to remove the corner banner once and for all, using the proper method, then follow along with this tutorial.
There are 6 steps in this tutorial:
- 1. Create SSH Key Pair
- 2. Convert File to .ppk Format
- 3. Configure PuTTY
- 4. SSH into EC2 Instance
- 5. Disable Banner
- 6. Restart Apache
Beginner Method:
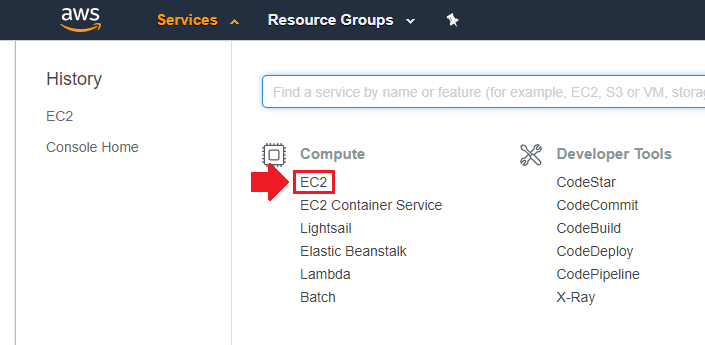
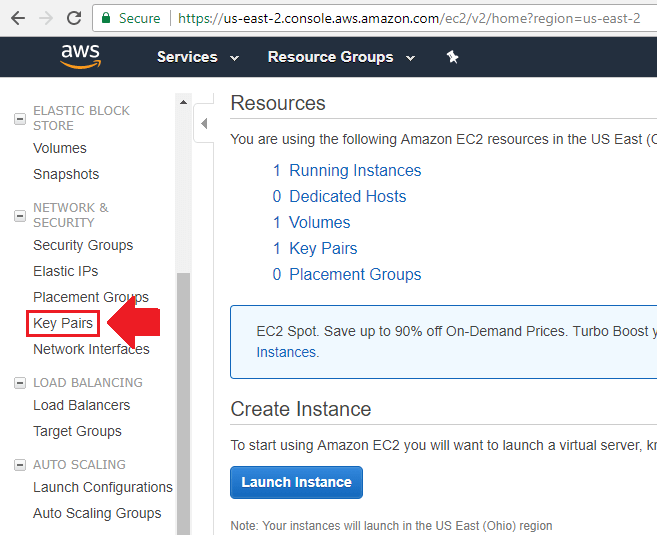
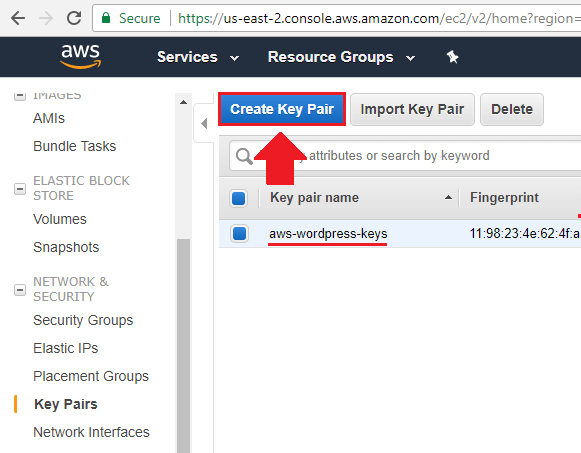
1. Create SSH Key Pair

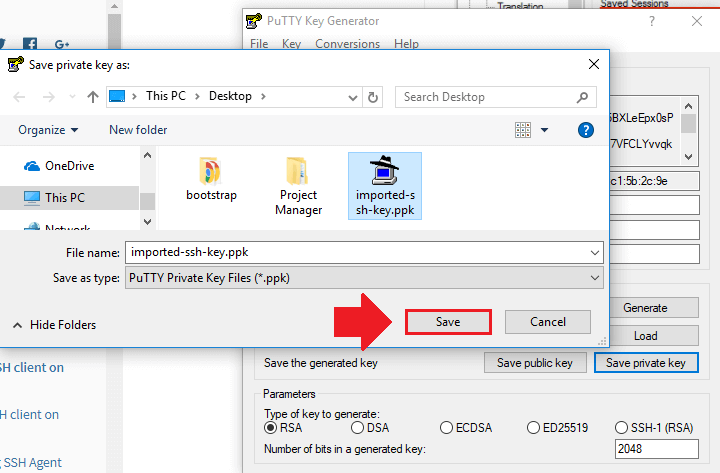
2. Convert File to .ppk Format
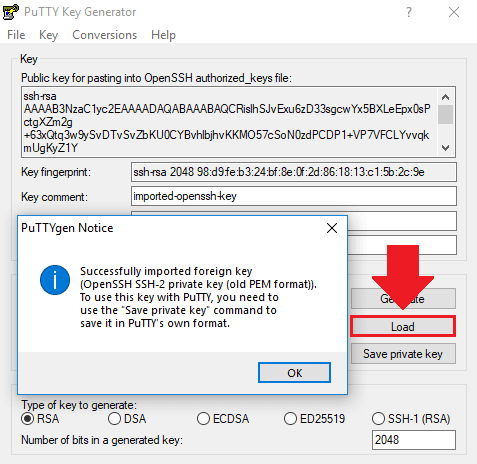

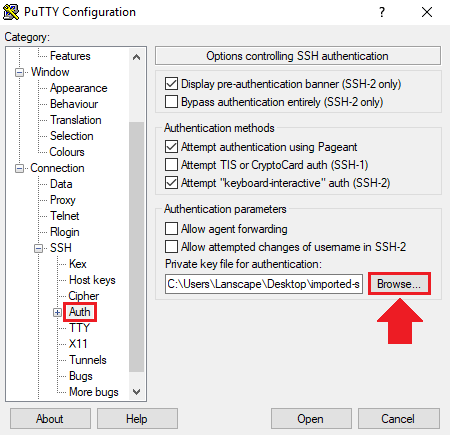
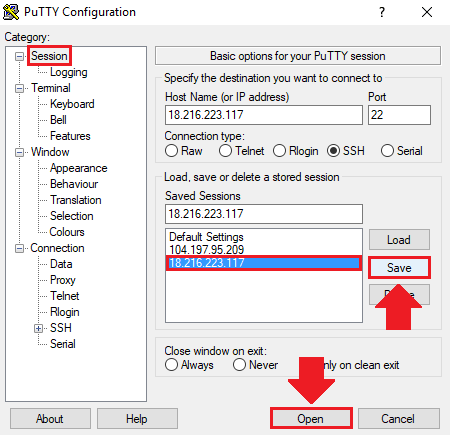
3. Configure PuTTY
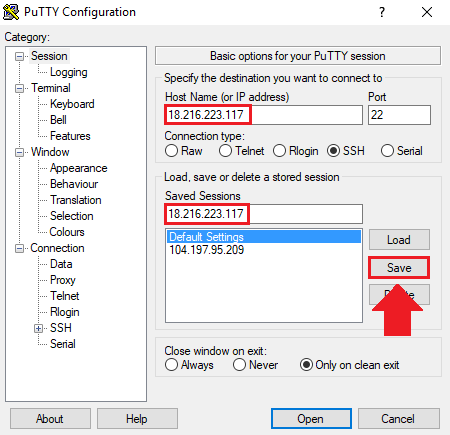
NOTE: To find your EC2 Instance’s public IP address, check out step 1 of this tutorial.

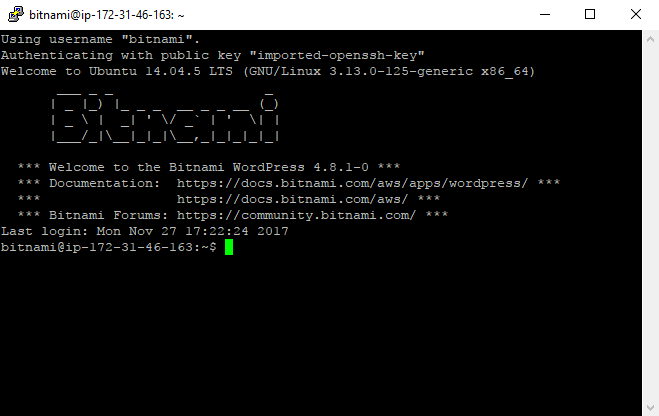
4. SSH into EC2 Instance
5. Disable Banner
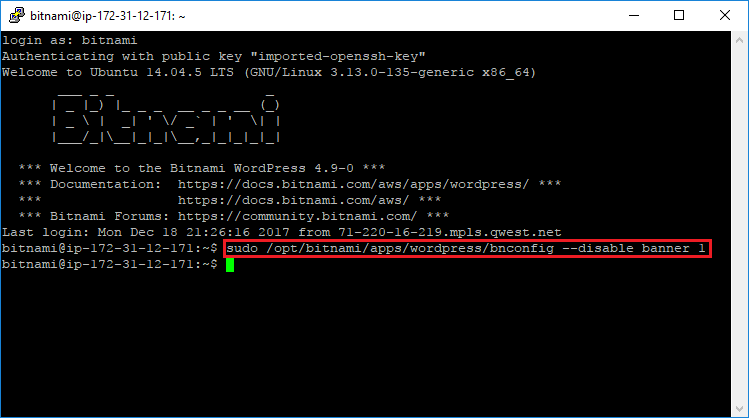
sudo /opt/bitnami/apps/wordpress/bnconfig --disable_banner 1NOTE: Use the right-click button to paste into putty.
6. Restart Apache

sudo /opt/bitnami/ctlscript.sh restartBeginner Method
Use Custom CSS
If you’re new to AWS and require a simple solution, you can use CSS to ‘hide’ the banner.
To hide the banner, simply enter the following code in your WordPress custom CSS:
#bitnami-banner {display:none;}Please be aware that although the corner banner is hidden, the script that generates the corner banner will still load with your website until it is properly disabled.
That’s it!
You’ve successfully disabled the Bitnami corner banner!
If you have any questions or comments about this tutorial, be sure to post them below!
Thanks,
![]()
BD Health says
Removing Bitnami Banner post has been so helpful to me. Thanks much
Pranab says
Hi,
Greetings from India. Been following your Youtube vids lately.
When I try to remove the Banner and run the following command, it asks for a password. The First Boot EC2 password (which is also the WordPress password), doesn’t seem to work.
Any idea what password it is asking for? I’m on a Macbook
Leron Amin says
Hi Pranab,
Did you create a password for sudo?
What happens when you try to run other commands as sudo – do you get prompted for a password?
Talk to you soon,
Joe
Gurpinder Singh says
run command to disable corner banner
sudo /opt/bitnami/apps/wordpress/bnconfig –disable_banner 1
but yourdomain.com/bitnami/index.html will be still accessible.
In File /opt/bitnami/apps/wordpress/conf/httpd-app.conf
put #/opt/bitnami/apps/wordpress/conf/banner.conf and then delete banner folder from /opt/bitnami/apps/bitnami/
Md Niyaz Hussain says
OMG It’s working! Thanks for sharing this trick.
Phil says
Love your tutorials!! They helped me to transfer my entire website to AWS.
Leron Amin says
Thanks for the feedback Phil – I’m glad to hear the tutorials were helpful to you!
Justin says
Thank you for creating this tutorial. The Bitnami banner has been removed successfully from my WordPress website.
Leron Amin says
Glad to hear it Justin – thanks for the feedback!
Paul says
I keep getting this error
Disconnected: No supported authentication methods avaialable.
I’ve noticed after downloading the key file the format .pem does not show up when I try to upload in to PuTTY. I end up changing the file extension before uploading as a result. Do you think that could be the reason? Also, I noticed the file you upload is named different that the one that was downloaded is that intentional? I’m just trying to identify if there’s anythign in the directions that’s causing the issue.
Leron Amin says
Hi Paul,
The purpose of importing the key into PuTTY the first time around is to convert it to .ppk format. Once this is done, save the file as a .ppk file and add it to your PuTTY auth credentials. And you can name the file whatever you like – it won’t affect anything.
Let me know if you have questions,
Joe
Kwami says
I was able to migrate my wordpress from shared hosting to lightsail and also disable bitnami banner using this tutorial. Thank you!
I am signing up for new tutorials.
Leron Amin says
Thanks for the feedback Kwami – I’m glad to hear the tutorials were helpful!
Prakash says
Hello Leron,
I successfully installed WordPress on AWS and transferred domain to AWS thanks for the details in your tutorials. While watching the video and reading the documentation on how to SSH into the EC2 instance, I believe there is a far easier way and wanted share that with you –
Step1.
On my Macbook terminal I opened the folder where I had saved my SSH keys and typed the command “chmod 400 new-ssh-key.pem” (This is also available in AWS EC2 Instance page)
Step 2.
I added the command –
ssh -i “new-ssh-key.pem” bitnami@ ( copied from the Instance Public DNS id)
Thats it. I followed the rest of the tutorial to include www. prefix. and remove Bitnami Banner.
Additionally, Can you please point me to a tutorial for adding Letsencrypt SSL to this wordpress installation?
Leron Amin says
Awesome – thanks for sharing this Prakash!
Nuwan Tharanga says
Thanks Joe,
This is worked for me.
Your instructions are very clear and simple to proceed… Really appreciate it…
Leron Amin says
Thanks for the feedback Nuwan – I’m glad to hear the tutorial was useful! 🙂
alhassan sibdow says
Awesome!!
It worked. I think the screen shots are very great
Thanks a lot
Leron Amin says
Thanks for the feedback Alhassan – I’m glad to hear it worked for you! 😀
Henning says
Thank you, Leron – the CSS prompt worked well. Very helpful, thanks, again,
Henning
Leron Amin says
Glad to hear it! Thanks for the feedback Henning. 🙂
Bashir says
Dear Leron,
Great tutorials on AWS and GCP,
Very detailed tutorials,
But this particular tutorial giving errors.
Please check this screen shot. https://s9.postimg.org/wy650ey2n/Fatal_Error.png
Can you give me alternative solution ?
Thing is I don’t see any Custom CSS option in my theme, I tried to search it everywhere,
Your help would be highly appreciated.
Regards,
Bashir
Leron Amin says
Hi Bashir,
For the sake of simplicity, I would recommend just adding the code to your custom CSS.
From your WordPress sidebar menu, navigate to Appearance > Customize > Additional CSS.
Just paste the CSS code in there.
Let me know if you have any questions,
Joe
Henning says
Hi Leron,
thanks a ton for your tutorial.
For me the server does not accept the public Key and this is where I am stuck:
“Using username “bitnami”.
and then PuTTy Fatal Error:
“Disconnected: No supported authentication methods available (server sent: publickey)”
can you help there?
thank you
Henning
Leron Amin says
Hi Henning,
This is a common issue and unfortunately could be caused by multiple factors.
I would go through the tutorial again and make sure that everything is configured properly, especially in steps 3 and 4.
Also, you can remove the auto-login username (step 3) and try “bitnami” or “ec2-user” when you’re prompted in the terminal.
As a quick fix, you can also disable the banner using css:
Unfortunately, the css method won’t disable the script from running in the background.
Let me know if you have any questions,
Joe
Leron Amin says
What did you think of this tutorial?
Share your questions and comments below!