With most cloud platforms, such as Google Cloud (GCP) or Microsoft Cloud (Azure), an SSH client is built-in. However, AWS does not include a built-in SSH client, and therefore requires you to use a third-party client in order to SSH into your EC2 instances.
In this tutorial you will learn how use a third-party SSH client (known as PuTTY) in order to SSH into your AWS EC2 instances.
Managing your AWS website’s files requires you to SSH into your EC2 instance. This can be achieved by using an SSH client such as PuTTY.
If you prefer to use a cloud platform with a built-in SSH client, check out the Google Cloud (GCP) or Microsoft Cloud (Azure) tutorials.
Before getting started with this tutorial, you should have already deployed an EC2 instance such as WordPress on Amazon AWS EC2.
There are 4 steps in this tutorial:
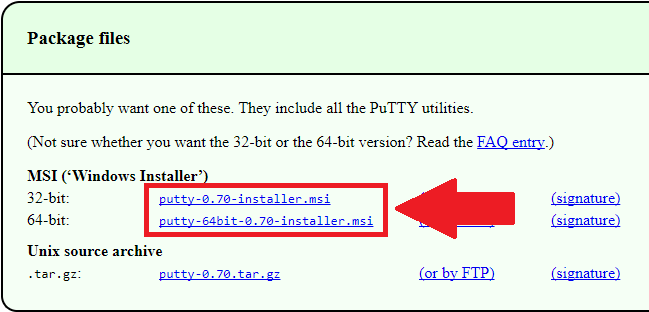
1. Download PuTTY
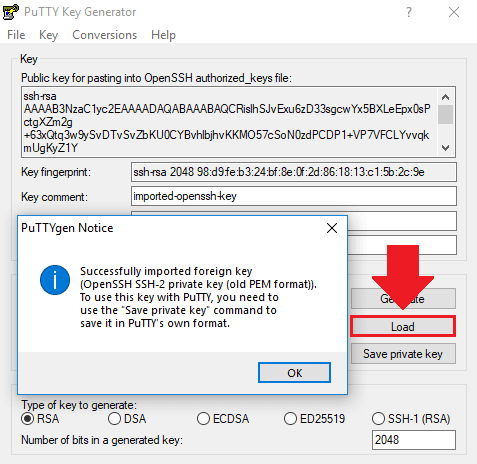
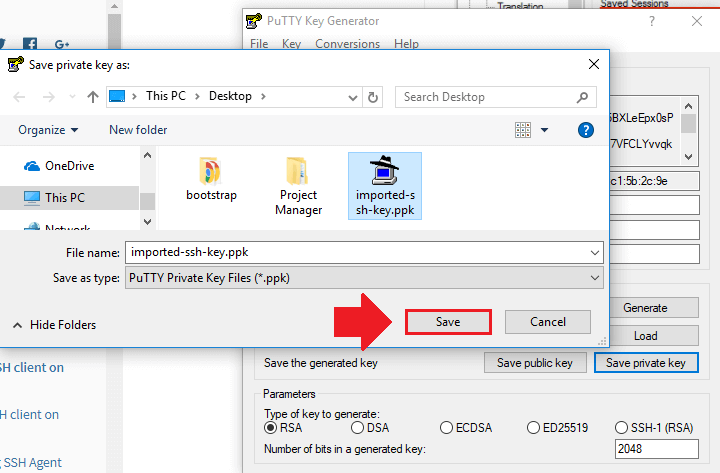
2. Convert SSH Key File

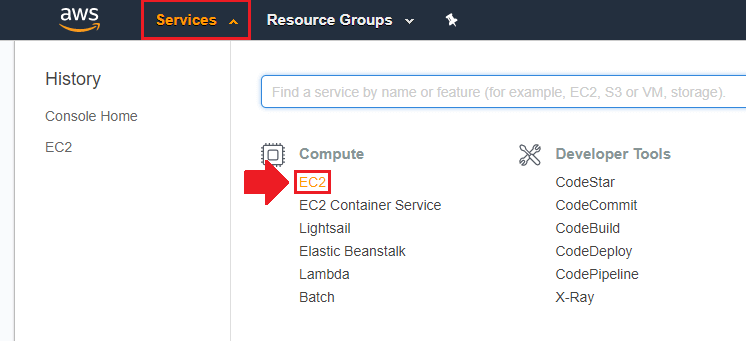
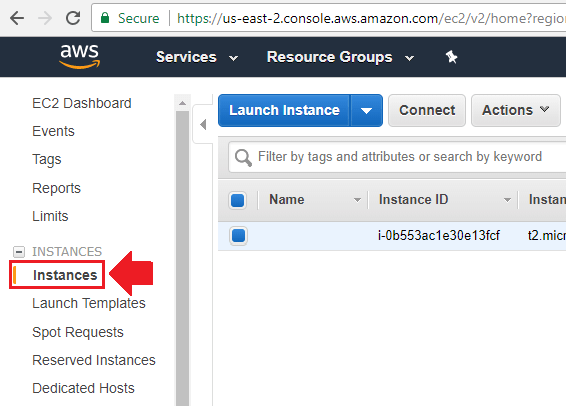
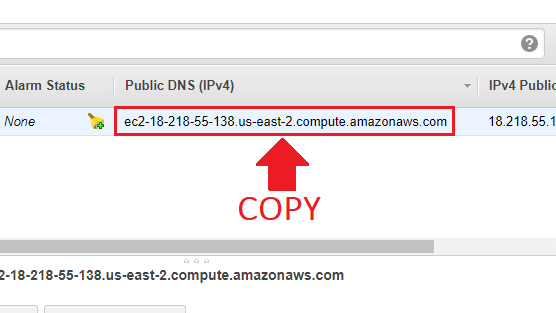
3. Copy DNS IP Address
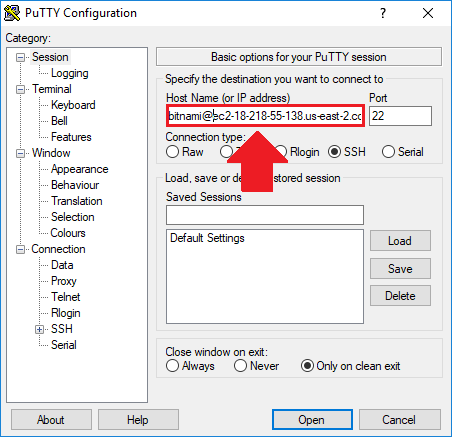
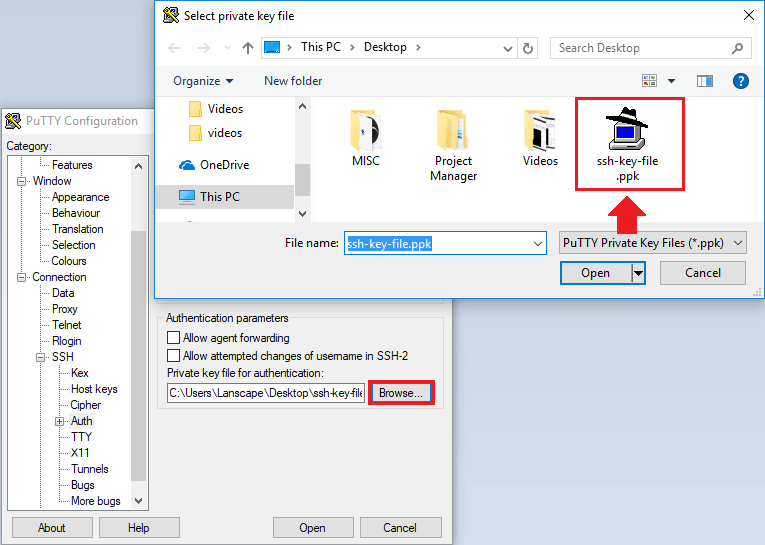
4. Configure PuTTY
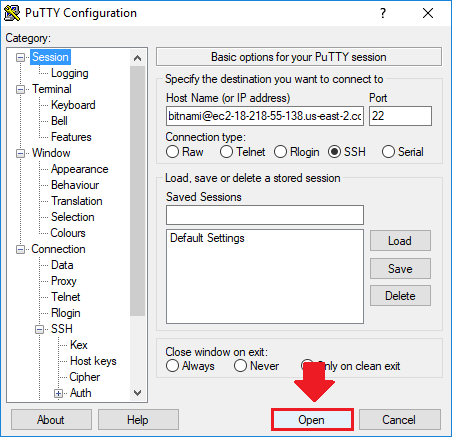
Don’t know your username?
- • For an Amazon Linux AMI, the user name is ec2-user.
- • For a RHEL AMI, the user name is ec2-user or root.
- • For an Ubuntu AMI, the user name is ubuntu or root.
- • For a Centos AMI, the user name is centos.
- • For a Fedora AMI, the user name is ec2-user.
- • For SUSE, the user name is ec2-user or root.
If ec2-user and root don’t work, check with the AMI provider.
Source: Amazon AWS User Guide
That’s it!
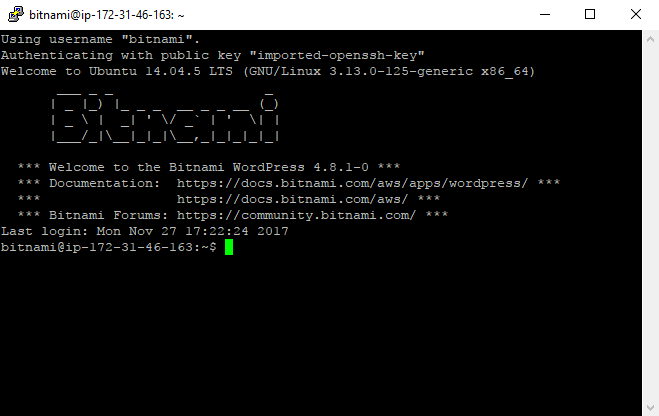
From this point forward, you’ll be able to quickly SSH into your EC2 instance simply by loading your instance’s saved Public IP address from the PuTTY dashboard.
If you have any questions or comments about this tutorial, be sure to post them below!
Thanks,
![]()
ansari abdullah says
I am not able to establish https connection for my wordpress website. i have an ssl certificate linked to my domain but its not working
Leron Amin says
Hi Ansari,
Please describe any error(s) that you’re seeing, and I will see how I can assist.
Thanks,
Joe
Ansar Ulhaq says
how to open server,s configuration file please? I am referring to your tutorial on you tube. The part which starts after this tutorial here.
Leron Amin says
Hi Ansar,
There is a server configuration file which you can open by running the following command:
Let me know if you have any questions,
Joe
Mike Lowe says
So should I now be seeing my website auto-switch from not having a www. to having one if I just enter the domain name? I did these steps (plus a few further ones like pasting text into Putty that i saw on another version of this tutorial), but I’m still not seeing this auto-switching take place when I type in my domain.
I just registered the URL today. Does it take a while? FWIW, it is showing up when I do either or, so it’s setup properly, but I just am not seeing this auto-switching.
Leron Amin says
Hi Mike,
At the end of part 2 of this tutorial, I include a section on how to configure the redirect to the www. version of your domain.
Also, remember to restart your Apache server after making the changes.
Hope this helps and let me know if you have any questions,
Joe
Mike Adamski says
That’s the tutorial I watched. I’ll try resetting the Apache server…but how do I do that????
Leron Amin says
Hi Mike,
Use the following script to restart your Apache server:
Hope this helps,
Joe
Mike Adamski says
Total noob here…where do I use this script? I literally have never even heard of this before, so details would be super helpful!
Leron Amin says
Hey Mike,
Watch the video at the top of this this page, starting with minute 12:00. I show step-by-step how to restart your Apache server using the following command:
Hope this helps,
Joe
Mike Adamski says
I got it to work! I think the confusion comes from what appears to be a copy/paste error in your instructions in which you say to “copy the three lines of code below” in two consecutive screenshots, when the second one is just that one code to reset the Apache server.
Leron Amin says
Sounds good Mike – I’m glad you got it working!
Also, thanks for the feedback – I will look into updating the tutorial.
Aden says
what can i use if i have a mac ? i can’t download putty
Leron Amin says
Hi Aden,
You will have to manually generate an SSH key pair through your terminal.
Check out this resource for more information.
Let me know if you have any questions,
Joe
Isabel says
Hey hey hey Leron, 😉
I want to test Amazon AWS thank you for your tutorials my friend.
Question:
Once the SSH is setup here, can I then follow the SSL certificate, Filezilla setup tutorials on the GCP Bitnami?
Regards,
Isabel
Leron Amin says
Hi Isabel,
The SSL certificate tutorial should work (don’t quote me because I haven’t tested it), but there might be slight differences in the file paths.
As far as the FTP tutorial is concerned, it will be similar but your username will probably be different (if bitnami doesn’t work, try ec2-user).
Let me know if you run into any issues! 😀
Joe
Preetham says
How do we create the ssh user. In your case it was bitnami
Leron Amin says
Hi Preetham,
The SSH usernames are issued by Amazon. There is a common list of usernames at the bottom of the tutorial page.
Check out the documentation for more information on connecting to your EC2 instances with SSH.
Talk to you soon,
Joe
Leron Amin says
What did you think of this tutorial?
Please share your questions and comments below!