This guide will take you step-by-step through the process of deploying a WordPress website to AWS.
Start by reading through the Introduction section of this guide to learn about hosting WordPress on AWS, then complete each of the three parts in this guide.
Let’s get started!
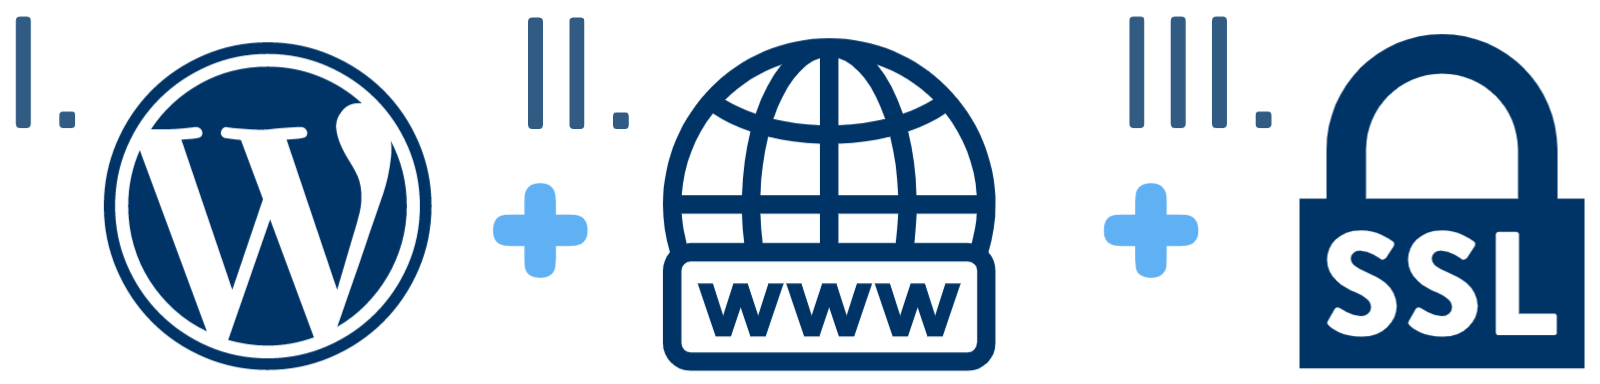
In the first section of this guide you’ll learn how to Configure WordPress on AWS. Then, in the second section, you’ll learn how to Configure a Domain Name. Lastly, in the third section, you’ll learn how to Configure SSL for your website.
Good luck, and don’t forget to reach out to the WordPress Cloud Hosting Support group if you get stuck on any section of the tutorial!
In this introduction section of the guide, you will learn about the pros and cons of moving to AWS. You will also learn about the costs of hosting WordPress on AWS, including the importance of deploying a solution that balances efficiency with performance.
After you’ve read through this introdution, the guide will then walk you through the process of deploying a WordPress website to AWS.
Why host WordPress on AWS?
AWS is an excellent platform for hosting WordPress websites that require scalability, resiliency, and performance.
Hosting WordPress on AWS means your website is powered by the same global network that powers Amazon’s various website websites.
The #1 reason why you should host WordPress on AWS is because you’re developing a website that you predict will grow in size and complexity over time, and you require a highly-scalable infrasture that can grow with your website.
Below is a list of pros and cons to consider when determining whether to host your WordPress website on AWS:
Pros of AWS hosting
Significantly Increased performance
Virtually unlimited scalability
Highly cost-effective for large projects
Greater control and flexibility
Native integration with AWS services
Cons of AWS hosting
Steep learning curve for beginners
Requires significant time investment
No customer support options included
Greater risk exposure for new users
Cost of Hosting WordPress on AWS
The cost of hosting WordPress websites on AWS (EC2) varies widely, and depends on many factors. Generally, the cost ranges between $1-$30 per month for typical WordPress websites.
Balancing efficiency and performance
When selecting the infrastucture to use for hosting your WordPress website on AWS, it’s important to understand the need for balancing efficiency and performance.
Before getting started, it’s important to understand that AWS, GCP, and Azure, offer different types of free-tiers. If your goal is to deploy a WordPress website for the lowest possible cost, per the efficiency model, then you should deploy on GCP, because it’s the only cloud provider to provide compute resources under it’s always-free tier.
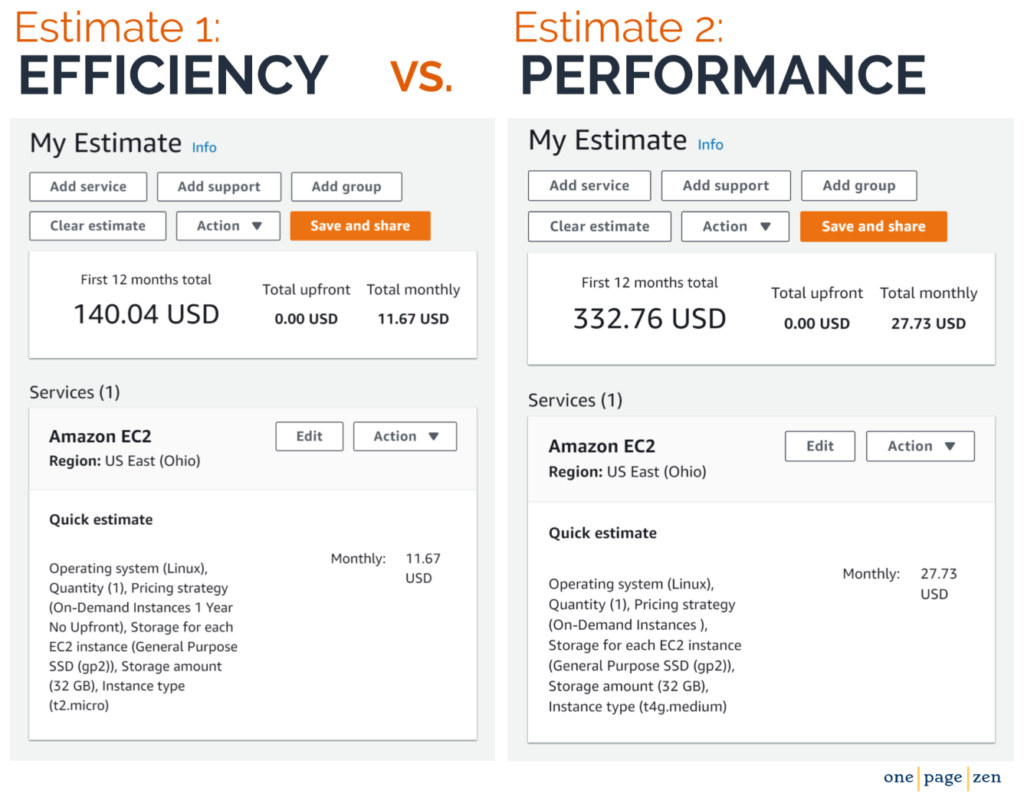
Below is a side-by-side comparison of an efficiency ($11.67/month) vs. performance ($27.73/month) based configuration for hosting WordPress on AWS.
A side-by-side cost comparison of an efficiency vs. performance configuration for hosting WordPress on AWS. Use the AWS Pricing Calculator to determine the costs of various configurations.
Efficiency Configuration
The efficiency configuration is optimal for low traffic websites (under 1000 daily users). This configuration takes full advantage of AWS’s 12-months free tier, which provides a t2-micro instance, as well as 30GiB of SSD persistent disk storage, all at no costfor 12-months.
This strictly efficiency-based model will allow you to host your WordPress website on AWS at a very low cost, however, larger websites strictly adhering to the efficiency model may incur performance issues.
Performance Configuration
The performance configuration is optimal for websites with higher traffic volumes (over 1000 daily users). However, unlike the efficiency configuration, the t4g.medium instance is not covered under AWS’s 12-months free tier.
This strictly performance-based model will allow for your website to out-perform the efficiency model, especially under heavy load. However, low-traffic websites that utlize this configuration may be allocating resources inefficiently.
Which configuration should you choose?
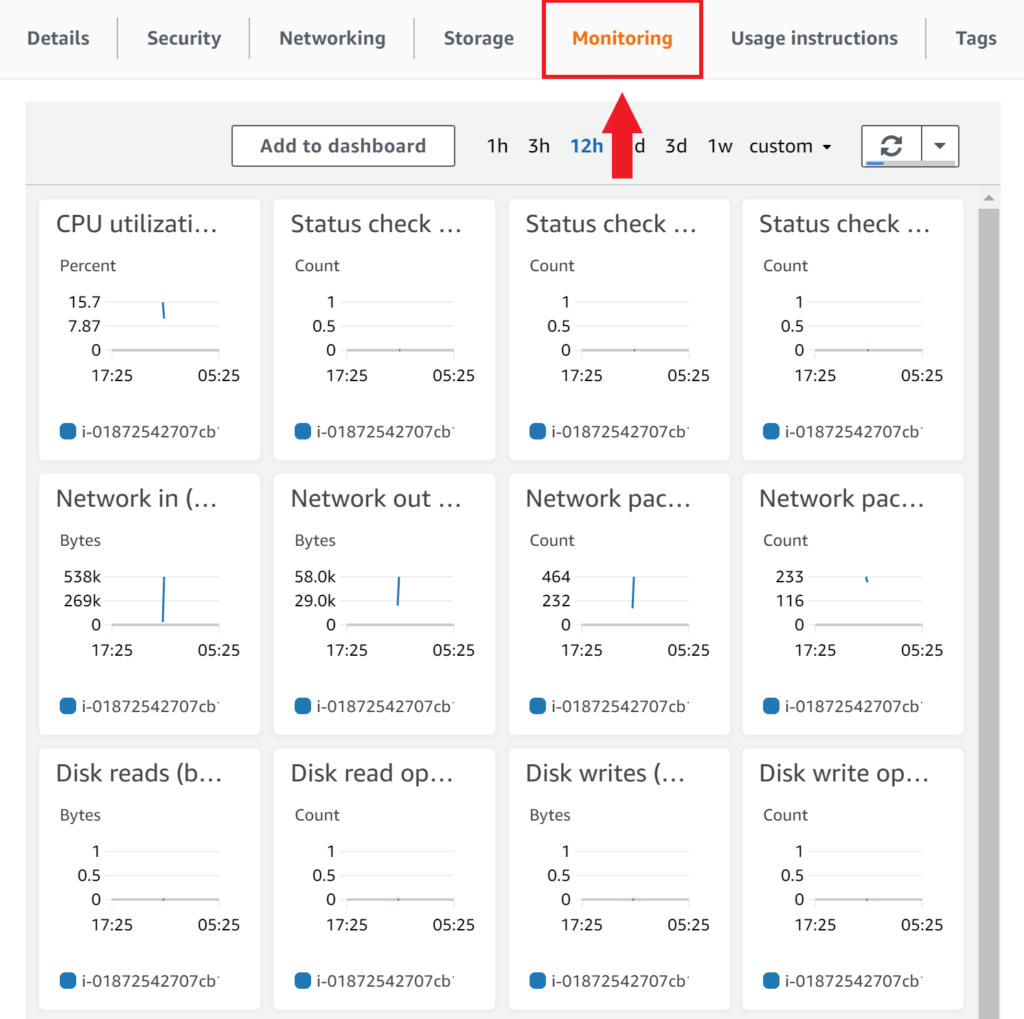
One of the benefits of migrating to AWS is that you can take advantage of their ‘pay-as-you-go’ model, which means only paying for the resources that your website requires, and nothing more. That being said, a good rule of thumb is to start small, and upgrade only when necessary. To determine whether upgrading is necessary, you will need to monitor your instance’s performance metrics.
To access your instance’s performance metrics, start from the AWS sidebar menu and navigate to EC2 > Instances, then click on your instance. From here, you’ll see a Monitoring tab towards the middle of the page, which links to a dashboard displaying your instance’s performance merics.
The EC2 dashboard contains a Monitoring dashboard complete with graphs of your instance’s performance metrics.
The most important metric to assessing the performance of your instance is CPU usage. CPU usage consistently under 60% is ideal. If CPU usage is consistently over 60%, you may want want to consider upgrading your machine size.
In addition to CPU usage, you’ll also want to monitor the free space available on your persistent disk. To check available disk space, use the df command, as shown in the Linux commands tutorial.
Now that you’ve learned about balancing costs with efficiency and performance considerations, it’s time to get started deploying your website.
PART I
Configure WordPress
In this section of the guide, you will deploy a WordPress website on AWS using the efficiency configuration, which consiststs of an t2.micro instance and a 32GB General Purpose SSD (gp2), at an estimated cost of around $1 per month (for 12 months only – if you need an Always-Free instance and storage, use Google Cloud instead).
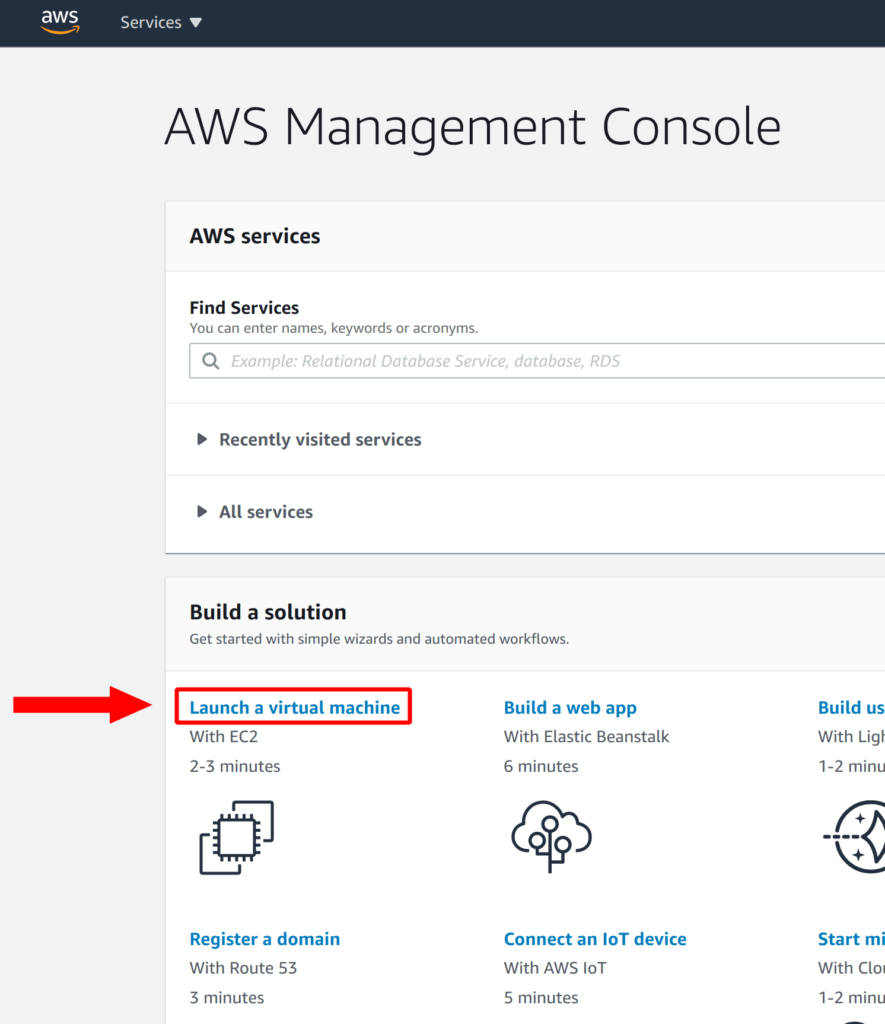
1. Deploy WordPress
From your AWS dashboard, click the Launch a Virtual Machine link.
2. Customize Deployment
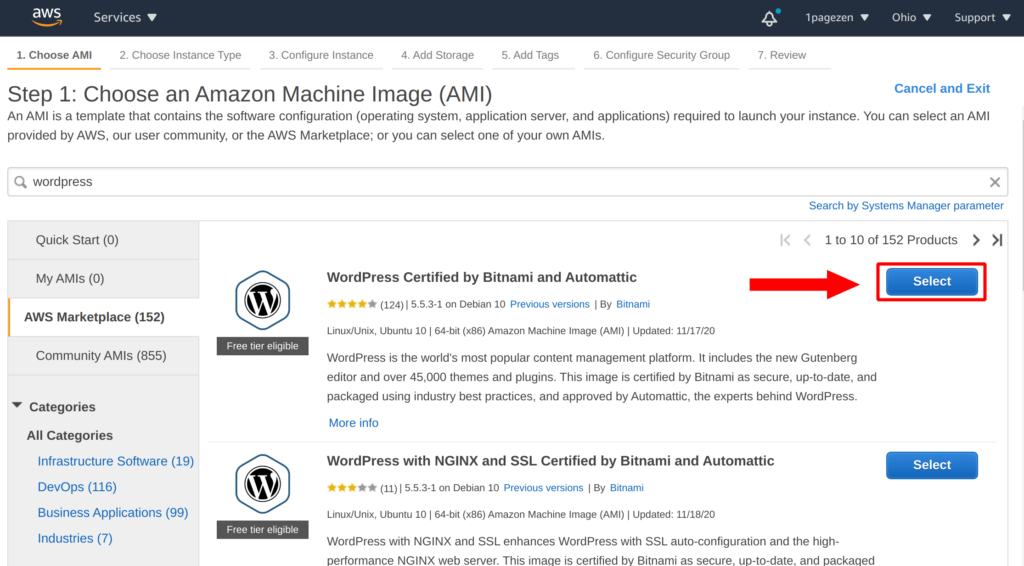
Step 1: Choose and Amazon Machine Image (AMI)
Search for wordpress in the search field, then locate the WordPress Certified by Bitnami and Automattic solution, then click the Select button.
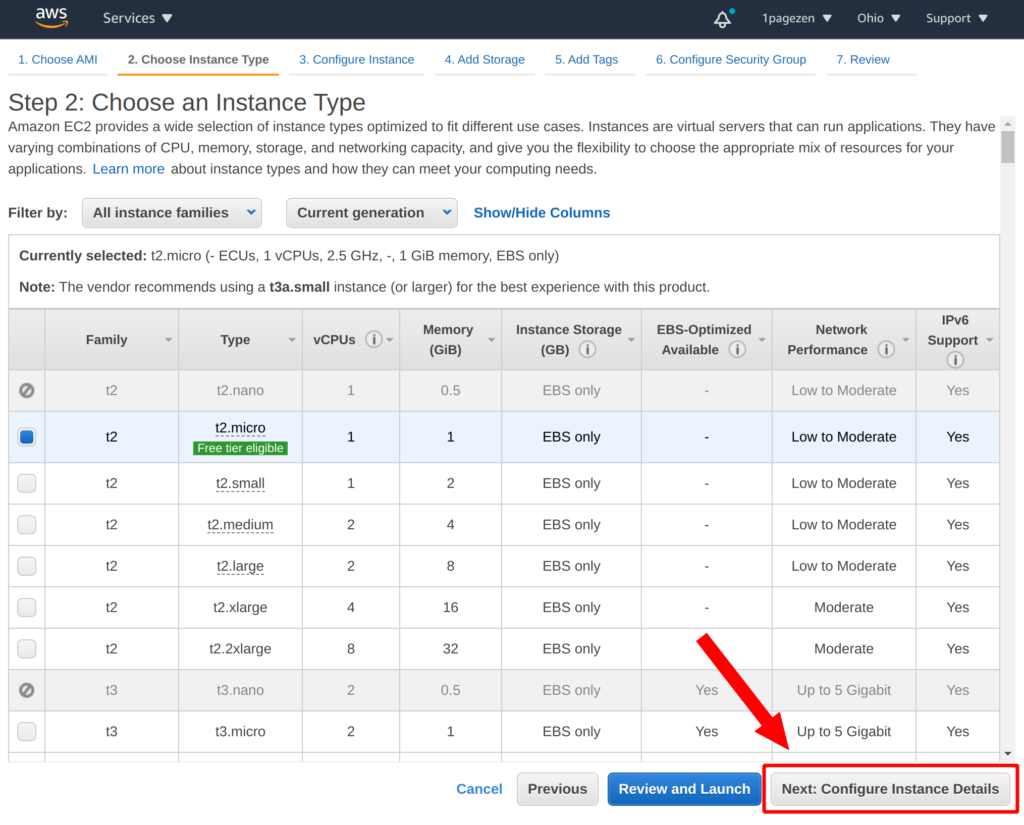
Step 2: Choose an Instance Type
Select the t2.micro instance, then click the Next: Configure Instance Details button.
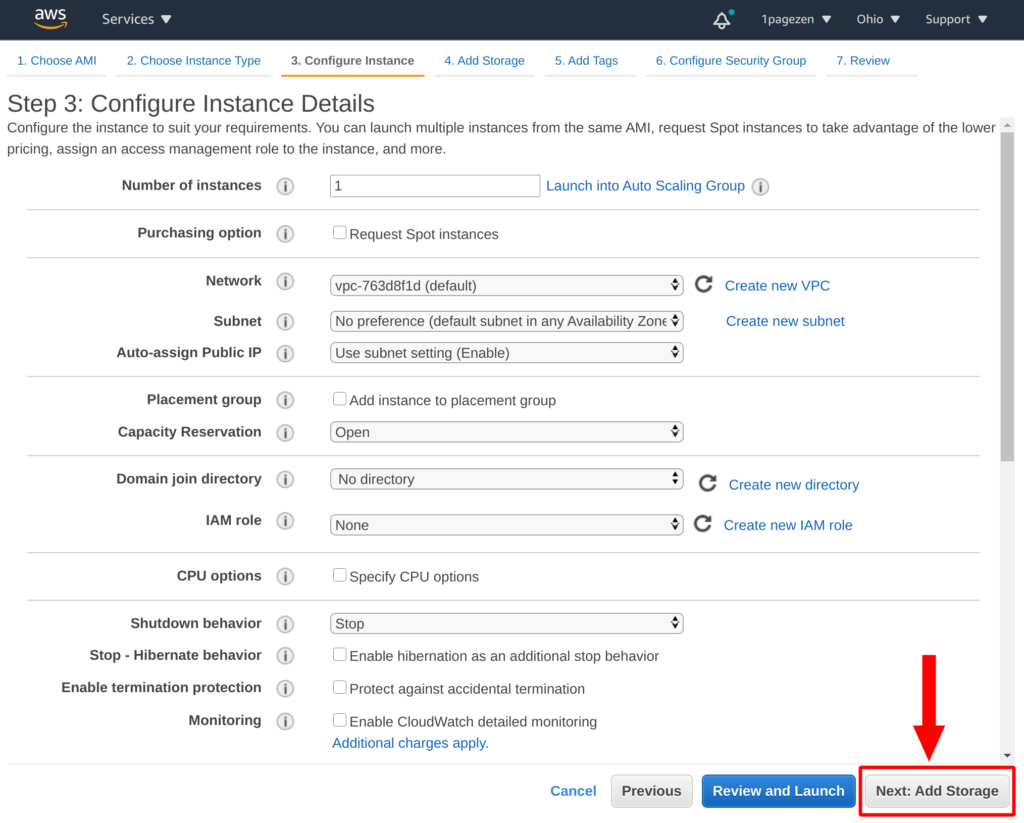
Step 3: Configure Instance Details
Next, on the Configure Instance Details screen, leave the default options then click the Next: Add Storage button.
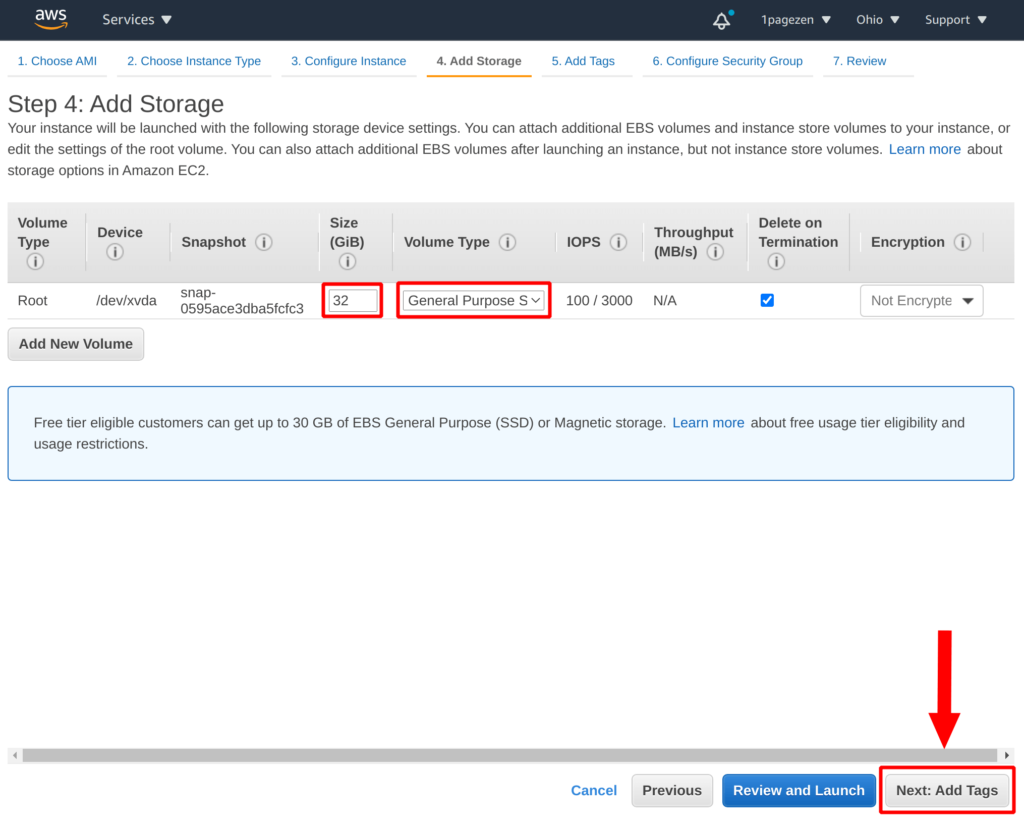
Step 4: Add Storage
On the Add Storage screen, select Size (GiB) between 10 and 32 GiB.
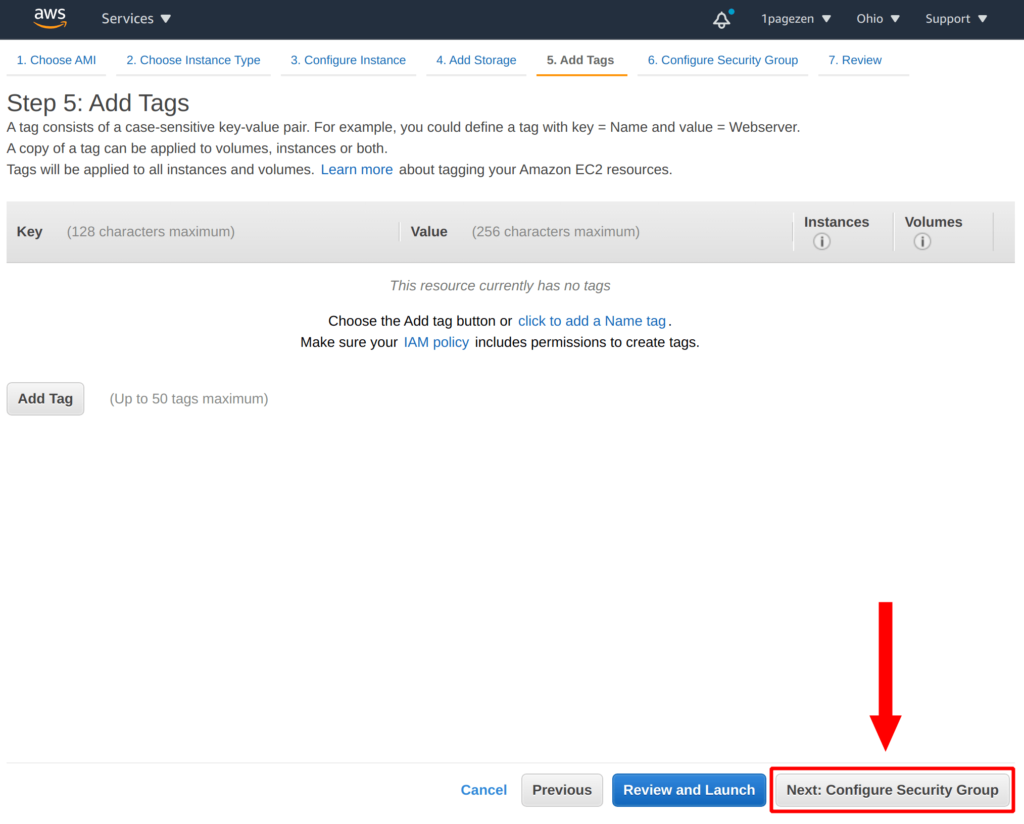
Step 5: Add Tags
On the Add Tags, leave the defaults as is, then click the Next: Configure Security Group button.
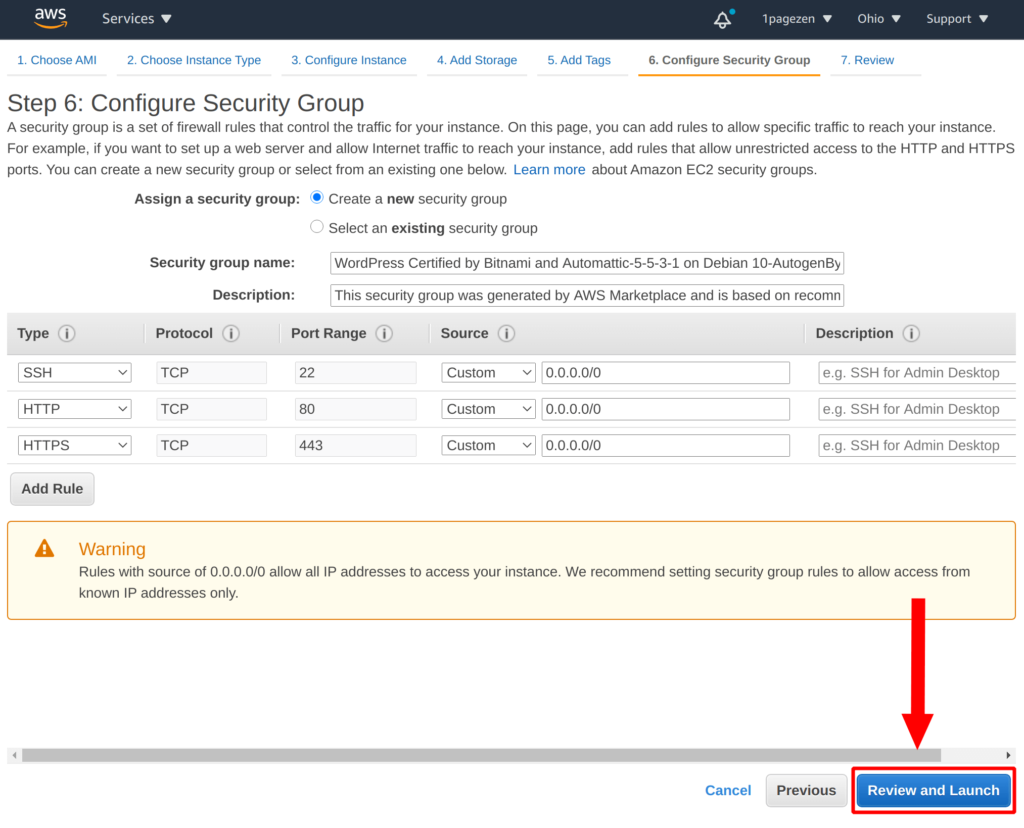
Step 6: Configure Security Group
Leave the default Configure Security Group settings, then click the Review and Launch button to deploy your instance.
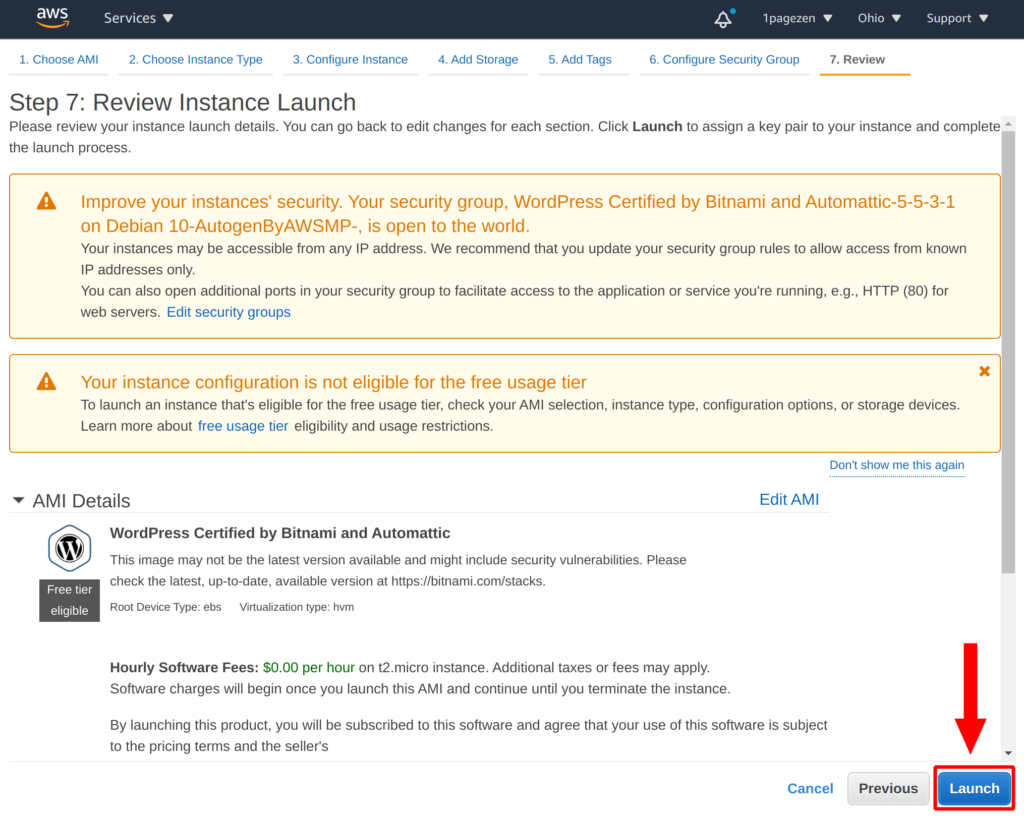
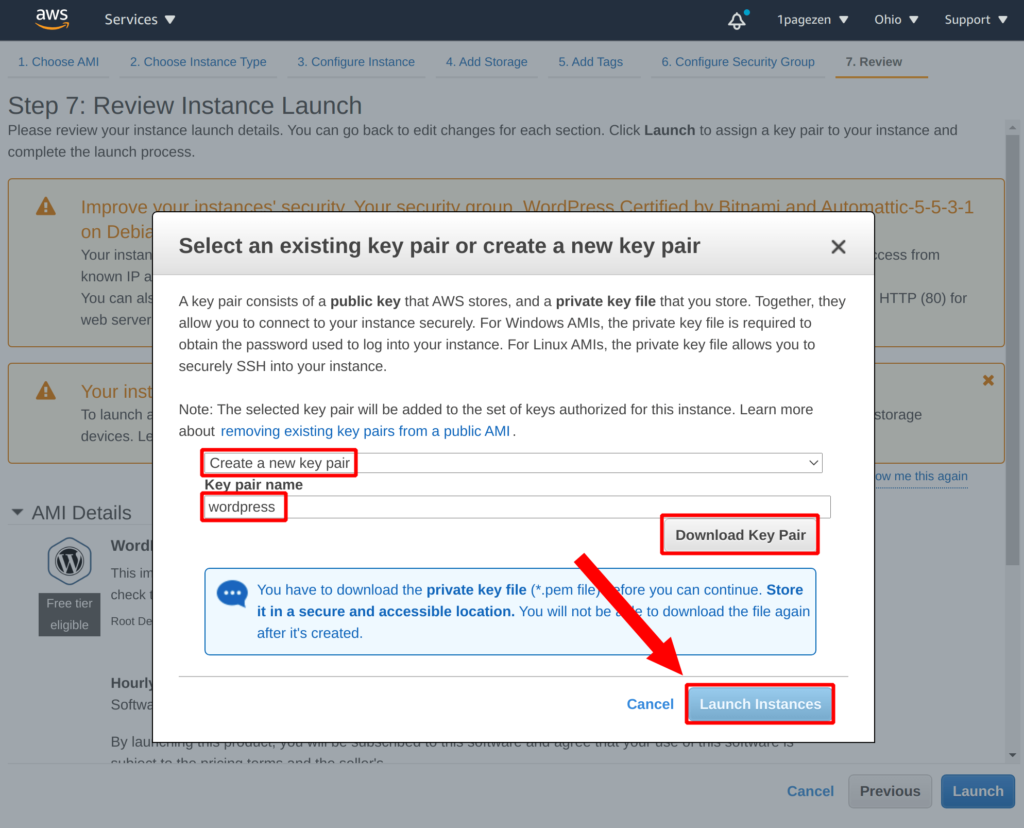
Step 7: Review Instance Launch
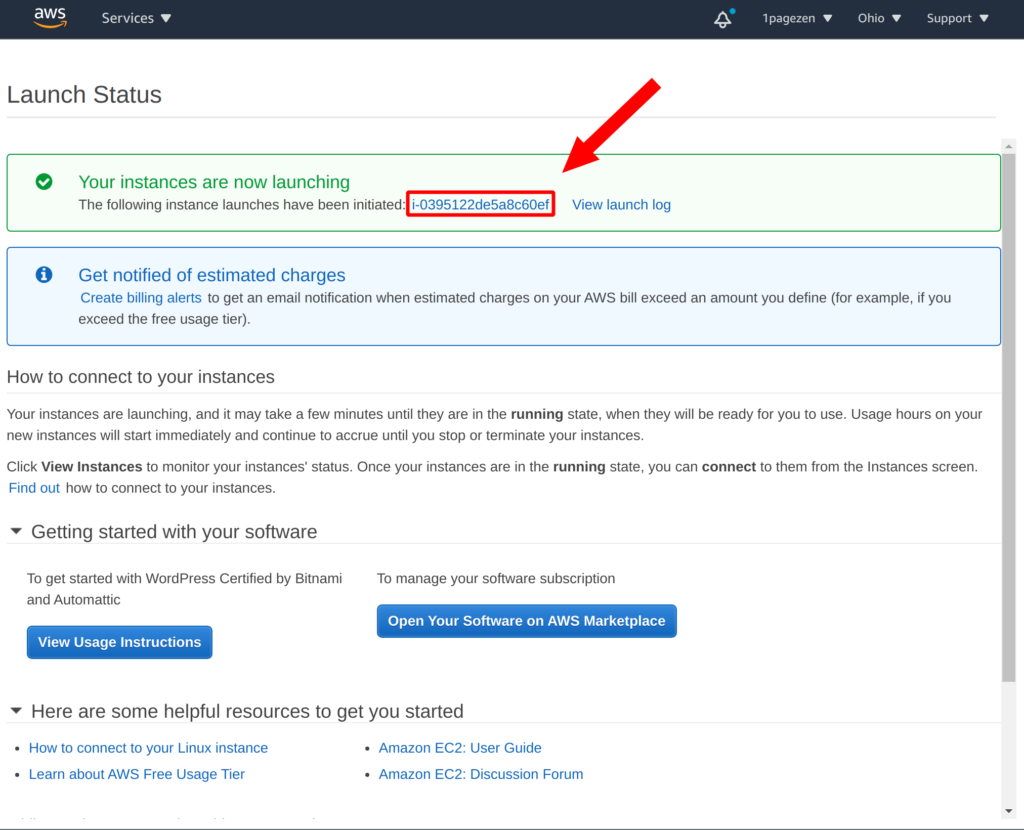
Review the instance details then click the Launch button, which will open a pop-up window prompting you to create a new SSH key pair.In the pop-up window, select Create a new key pair, and name the key pair wordpress. Then, click the Download Key Pair button, and finally click the Launch Instances button – which will re-direct you to the Launch Status screen.
PART II
Configure Domain
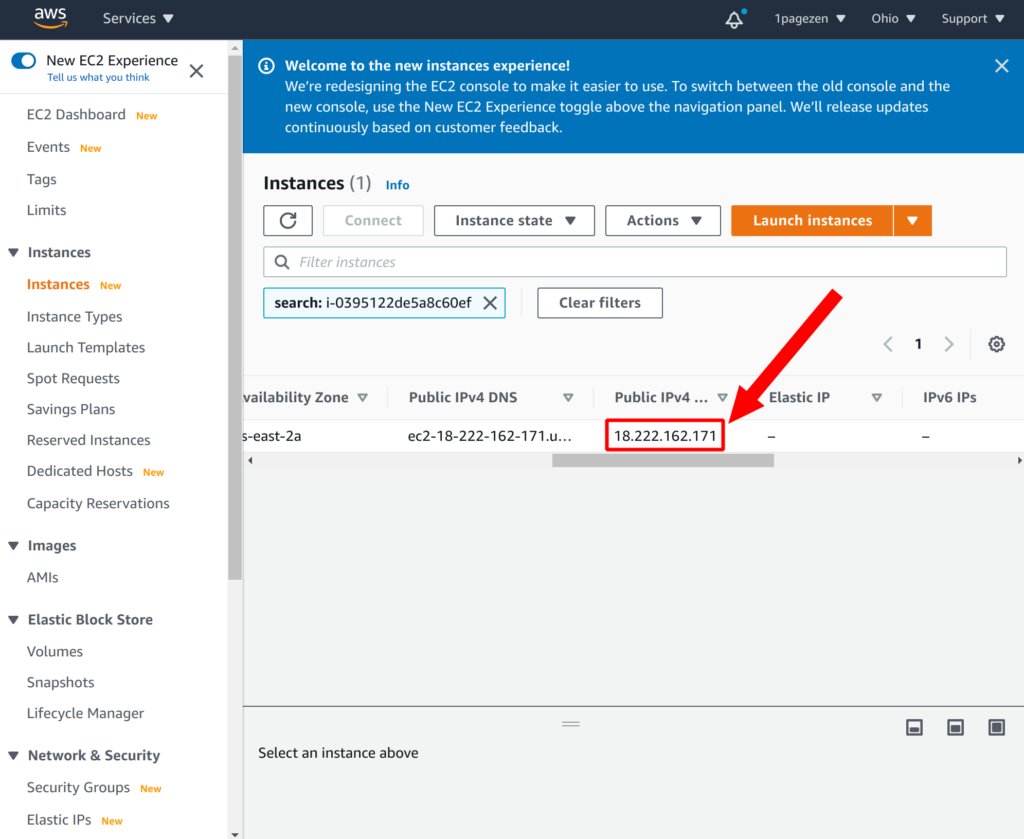
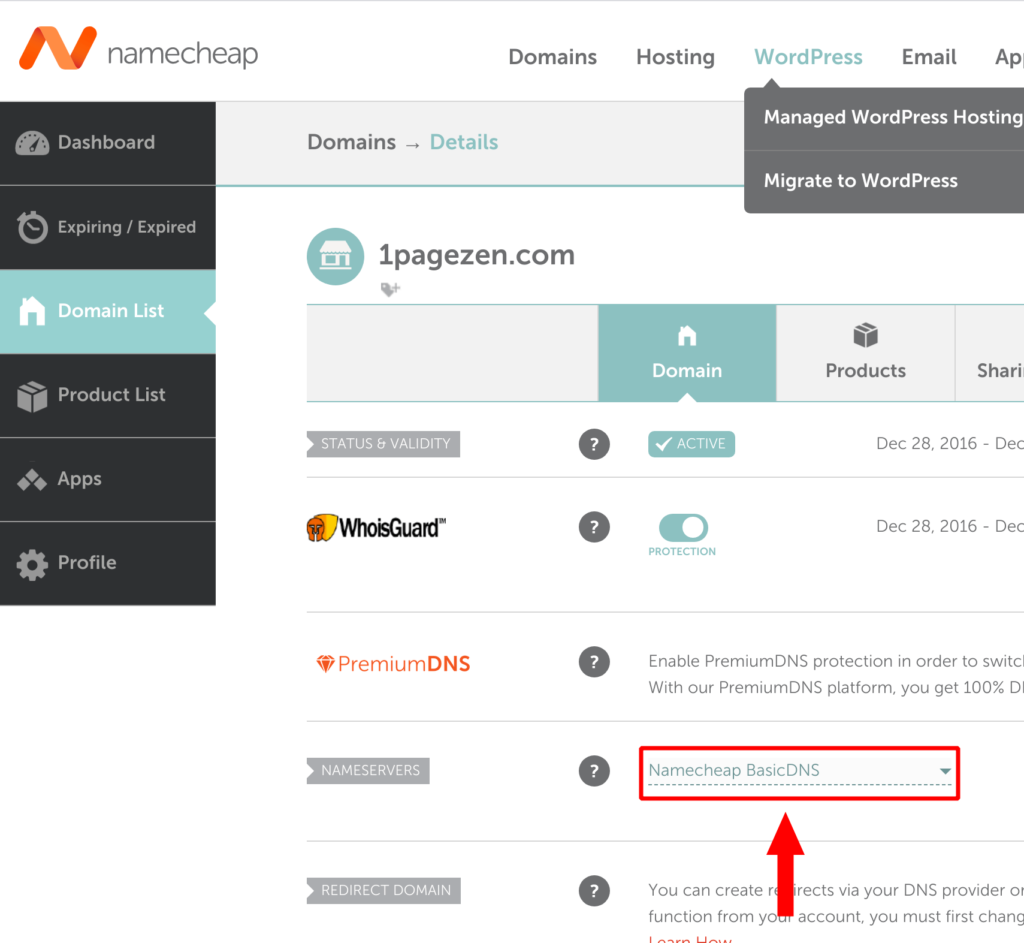
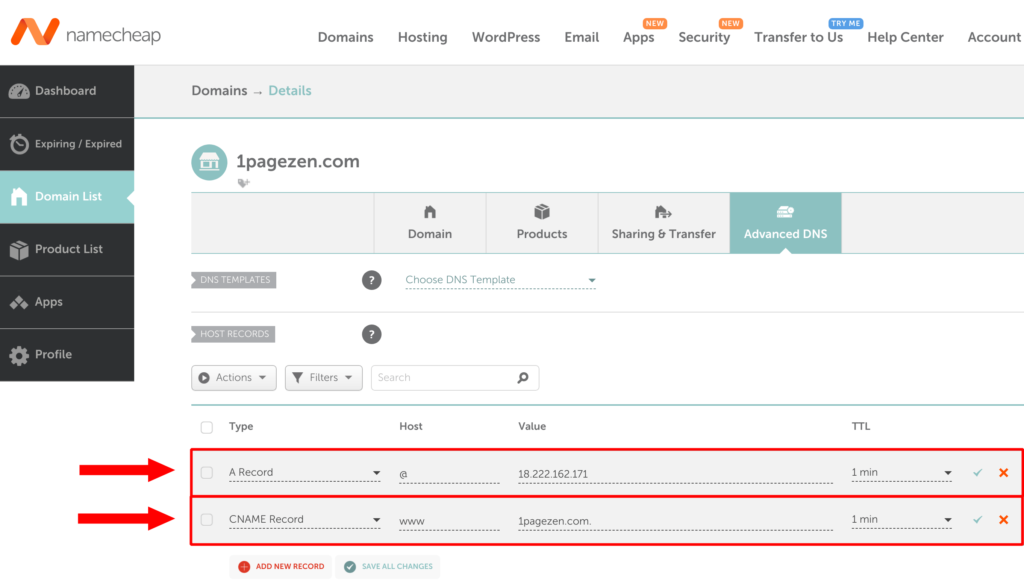
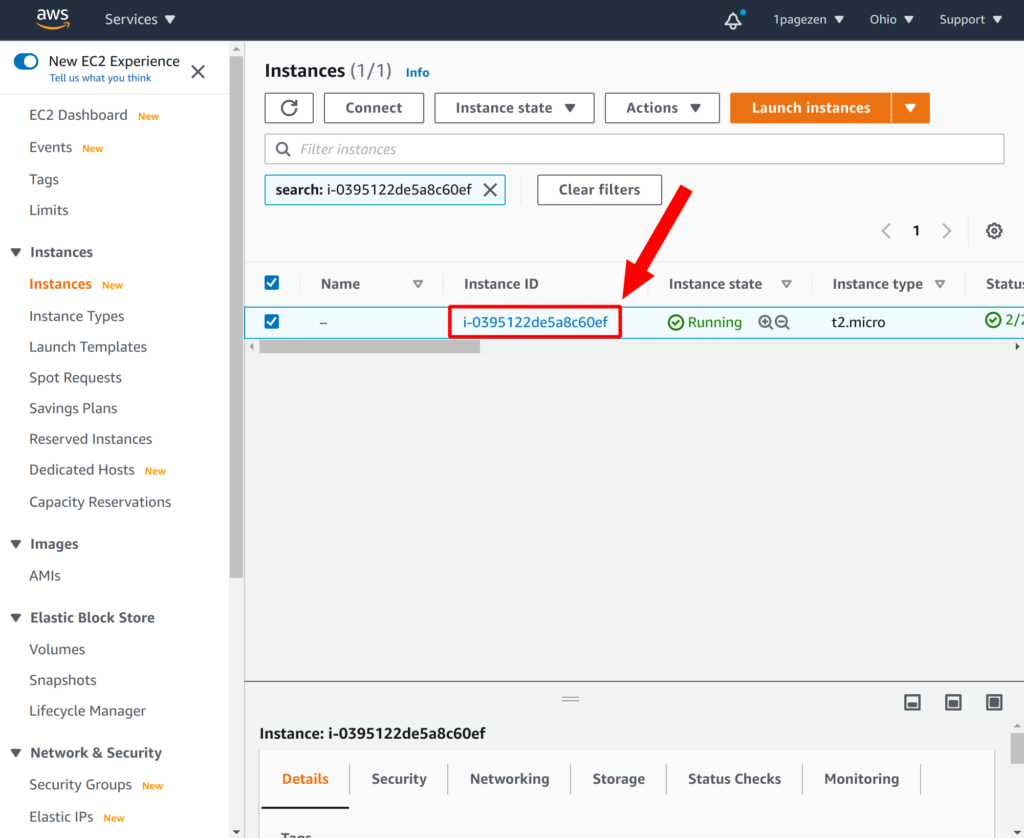
From the Launch Status screen, click on the link to your instance.From your Instances dashboard, copy your instance’s Public IPv4 address.From your web browser, navigate to your domain name provider (we recommend Namecheap. Navigate to the settings page for your domain, and select Namecheap BasicDNS from the NAMESERVERS row.Next, click on the Advanced DNS tab at the top-right of your domain name dashboard. Then, under the HOST RECORDS row, create a new A record as shown in the image, however, remember to replace the IP address in the image with the IPv4 address of your instance (which you copied in a previous step). Next, create a CNAME record record as shown in the image, however, remember to replace 1pagezen.com with your own domain name.
PART III
Configure SSL
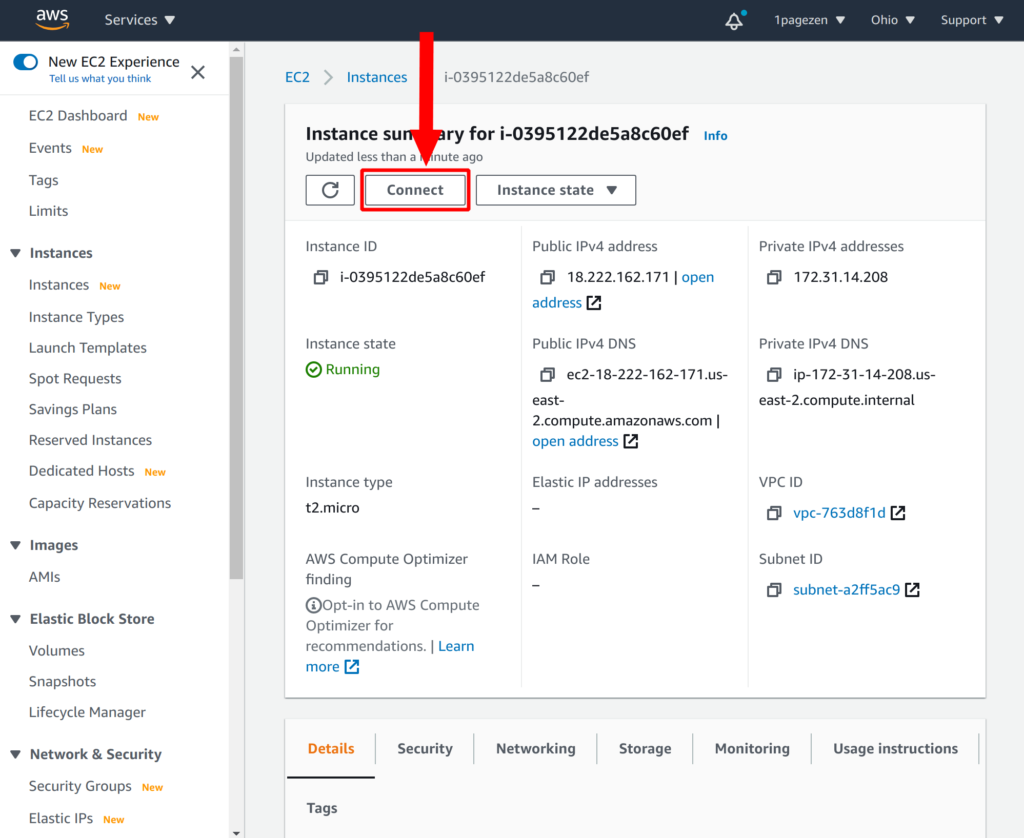
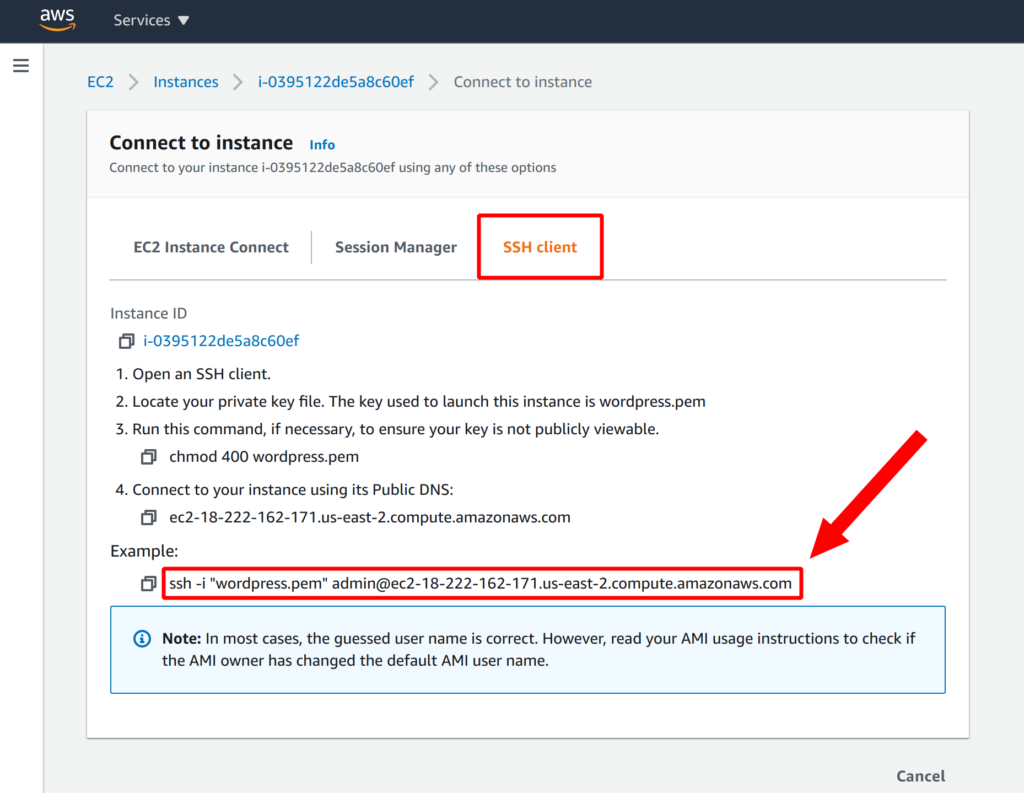
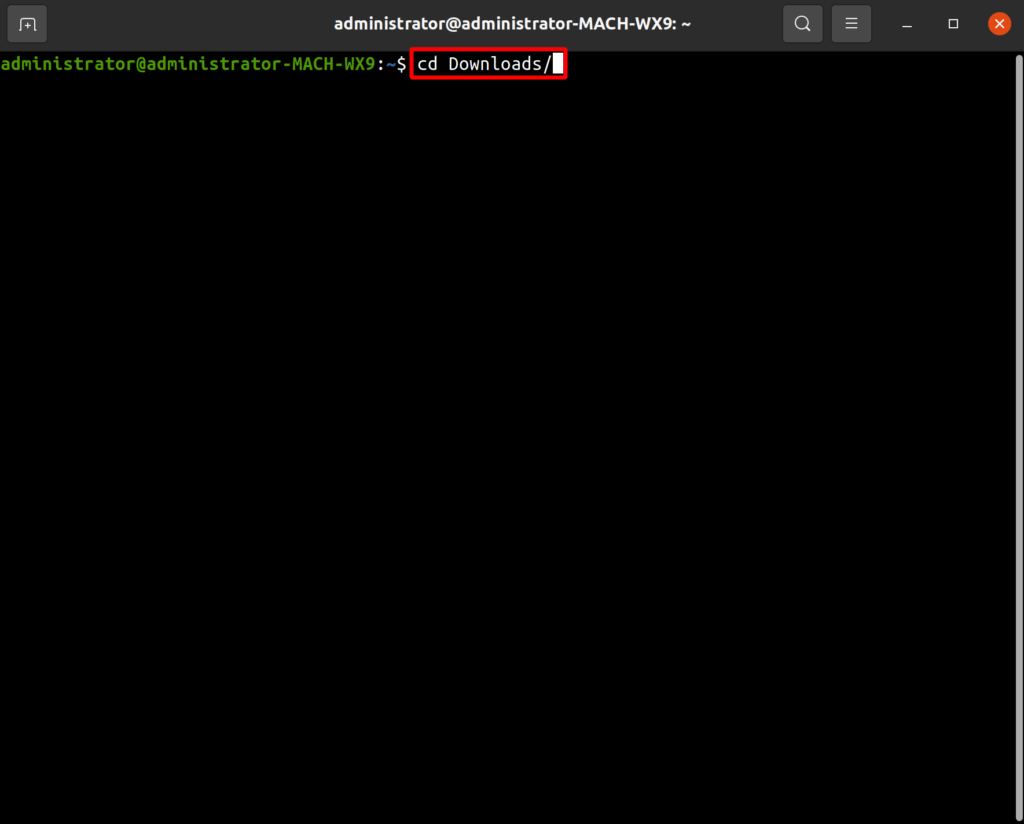
Return to your Instances dashboard and click on your Instance IDClick the Connect button at the top of your Instance summary page.From the Connect to instance screen, click on the SSH client tab, then copy the Example SSH command.Open your terminal and navigate to your Downloads directory (or whichever default directory you use for storing downloads) by entering the below command:
cd Downloads/
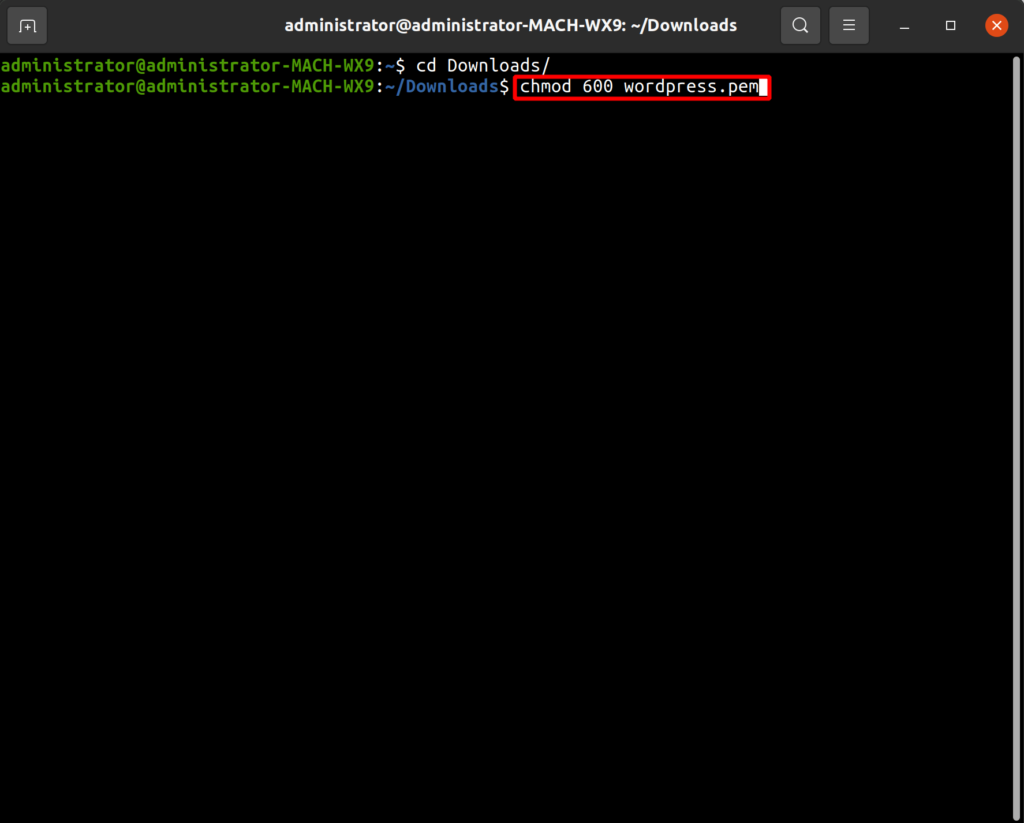
Now that you’ve navigated to your Downloads directory, execute the chmod command to change the permissions of the wordpress.pem file.
chmod 600 wordpress.pem
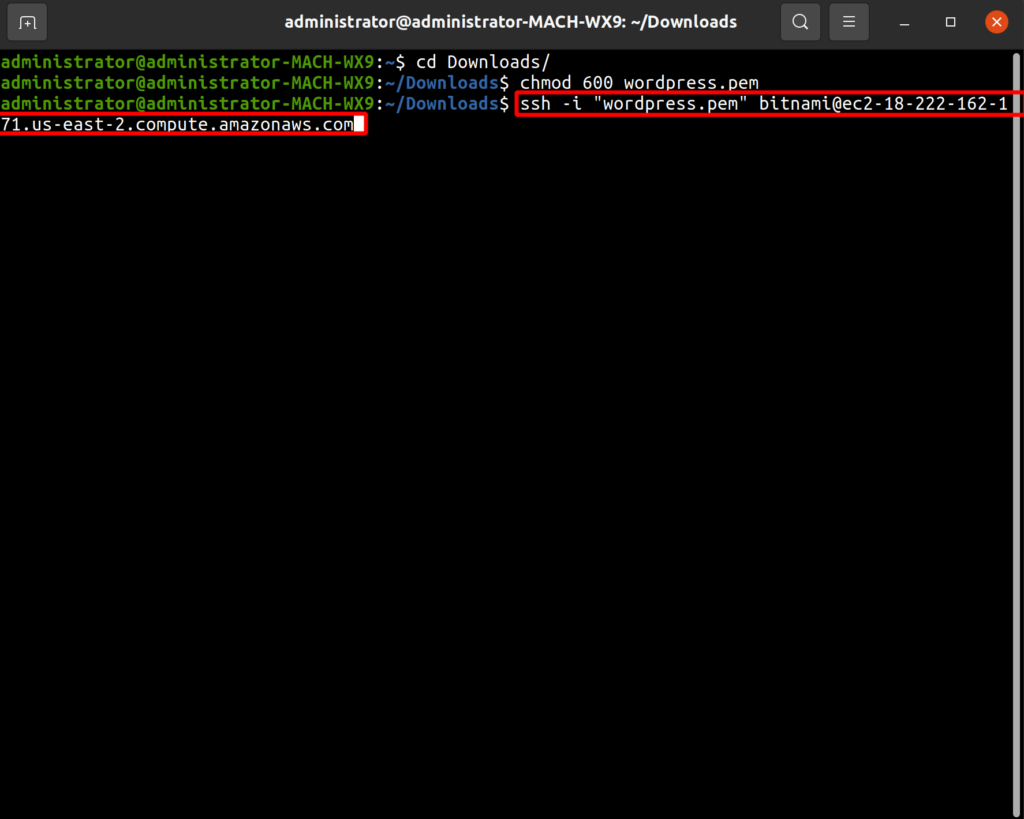
Paste the SSH command into the terminal, remembering to replace admin with bitnami, then press Enter to connect to your instance.
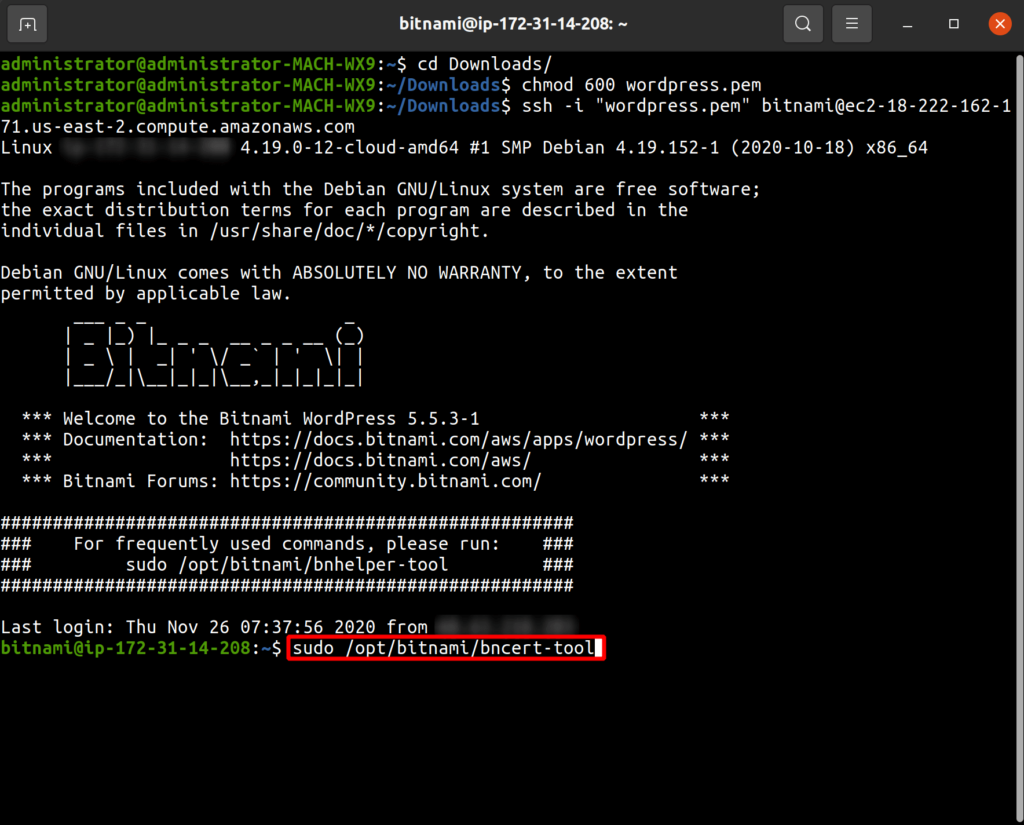
7. Execute SSL Script
Now that you’ve connected to your instance, copy the command from below and paste it into the terminal window, then press Enter.
sudo /opt/bitnami/bncert-tool
After you’ve pressed Enter the script will prompt you with a series of questions, which you will answer by entering either y (for yes), or n (for no). We recommend answering each question in the following way, remembering to replace each bolded instance of 1pagezen with your own domain name or email:
  Domain list []: 1pagezen.com www.1pagezen.com

  Enable HTTP to HTTPS redirection [Y/n]: y

  Enable non-www to www redirection [Y/n]: n

  Enable www to non-www redirection [y/N]: y

  Do you agree to these changes? [Y/n]: y

  E-mail address []: [email protected]

  Do you agree to the Let's Encrypt Subscriber Agreement? [Y/n]: y
Next Steps…
Well done! You’ve successfull deployed a fully-functional WordPress website on AWS, however, there are still some very important concepts that need to be covered. In this Next Steps… section of the guide you will learn how to retrieve your login credentials and login to your WordPress website, and optionally import an existing WordPress website.
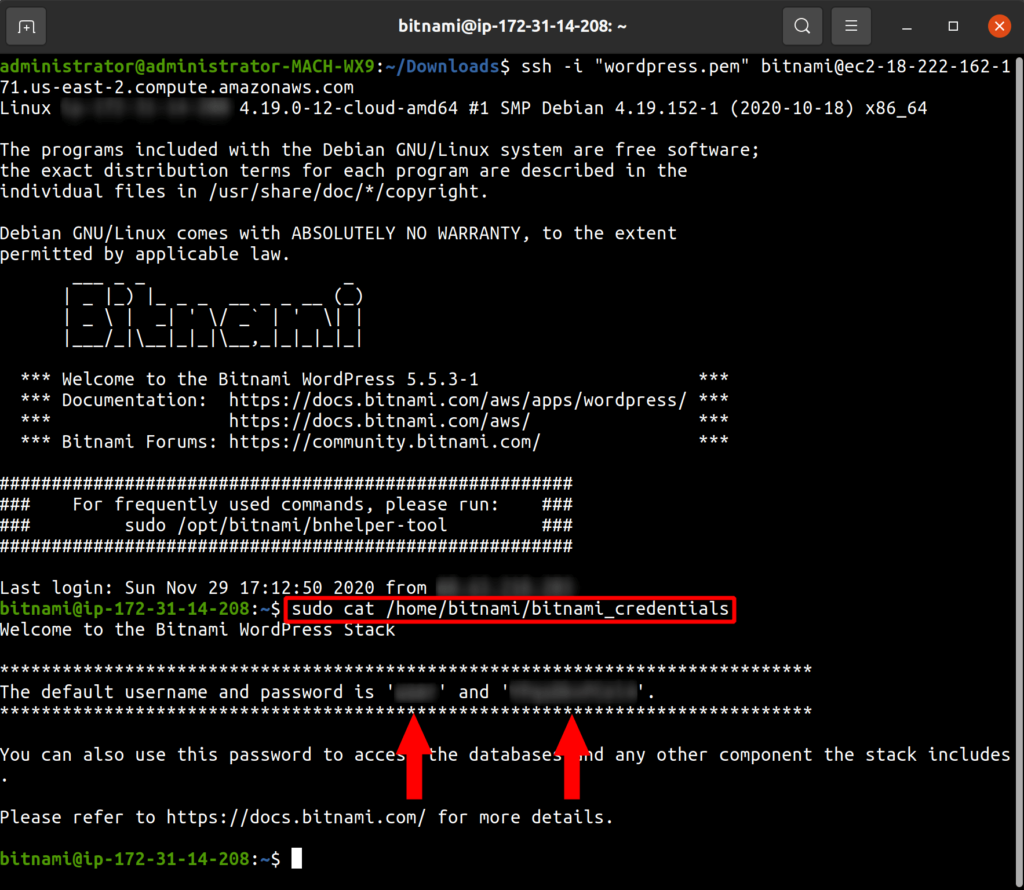
8. Login to WordPress
To view your WordPress login credentials, execute the following command while you’re still connected to your instance, then copy your username and password.
sudo cat /home/bitnami/bitnami_credentials
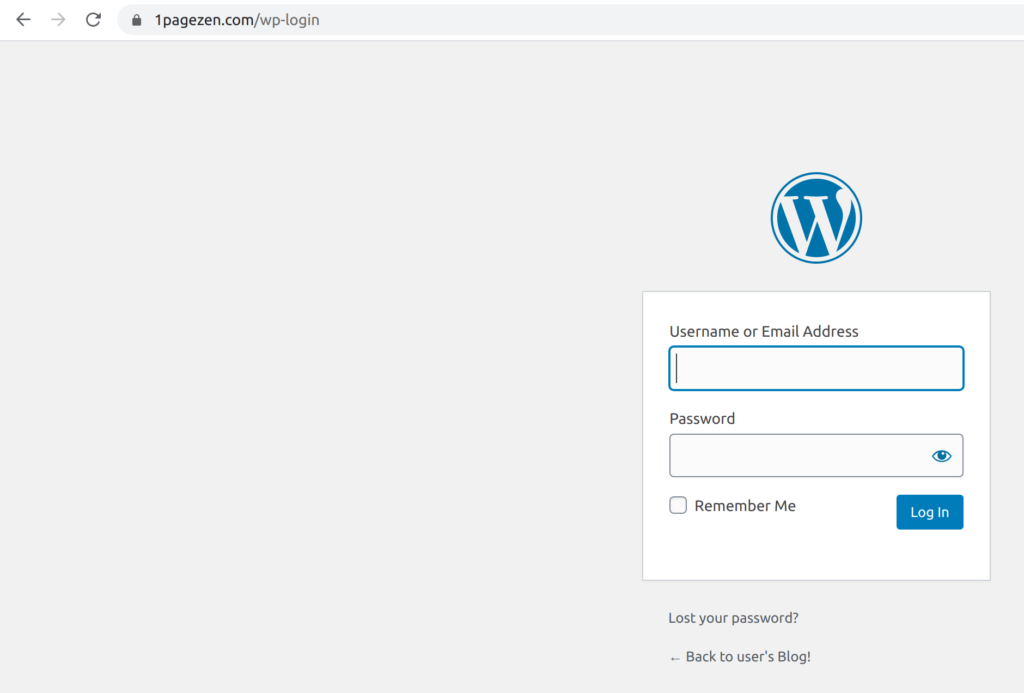
Visit your WordPress login page, then use the username and password that you copied from the last step to login to your website.
9. Assign a Static IP Address
By default, your WordPress instance is assigned an ephemeral IP address, which means that if your WordPress instance is ever stopped or restarted, it’s IP address will change. This is not desirable, and can cause networking problems for your website.
To prevent this issue, you need to reserve a static IP address (referred to as Elastic IPs on AWS) for your WordPress instance. To do this, follow these instructions.
Check out this tutorial for a list of step-by-step instructions.
11. Get Community Support
If you need help with this tutorial (or any other tutorial), then make sure to join the WordPress Cloud Hosting support group on Facebook.
Did it work?
Now that you’re hosting WordPress on AWS, be sure to check out these other great WordPress on AWS tutorials.
If you have general questions or comments about this tutorial, please feel free to leave them below. If you get stuck on a specific tutorial, please post your questions and comments on that tutorial’s page.
How can I configure the SSL Certificate on an AWS Bitnami instance? Could you upload the correct guide to install and configure an auto-renewable certificate please?
Hi Leron, this article looks pretty good. I was about to give it a try by myself, however I could see many things such as UI itself has been changed. Please update this tutorial whenever it is possible for you.
This tutorial has recently been updated for 2021. Give it a try and let me know if you have any questions!
Thanks,
Joe
Sashsays
Thanks for the video great guide.
I was wondering is there a technical reason for changing the configuration to serve the website with or without WWW? I do not mind that it can be viewed either way therefore thought of skipping those steps but wanted to check prior to making a potential mistake.
Thanks,
S
It’s best practice to configure a redirect to the preferred version of your domain. Failure to do could result in there being 2 versions of your website – both the www. and non-www. version – which can have adverse affects on your website’s SEO.
Thanks for the tutorial. I have followed your instructions, but I get stuck at the part of opening the server’s configuration file using bitnami’s command:
sudo nano /opt/bitnami/apache2/conf/bitnami/bitnami.conf
I get a message saying ‘ Directory ‘/opt/bitnami/apache2/conf/bitnami/bitnami.conf’ does not exist.
I have even tried restarting my instance. Any help with this will be greatly appreciated.
You can use this workaround published by Nick G. to increase the upload limit.
After you’ve downloaded the version that I linked to above, upload it to your WordPress plugins and follow the steps in this tutorial to increase the upload limit to unlimited.
Please let me know if you have any questions about this process!
Joe
Hi Adjie – which storage configuration are you referring to?
Aileensays
Hi there,
Great article, it helped me (mostly) to migrate my website (based on WP) from Hostgator to AWS. I am hoping you are reading this as I have a (probbaly rather stupid) question: How do I transfer my email addresses to AWS? I haven’t done the DHS change yet, I am worried that emails will be returned to the sender. I cannot find anything regarding this on the AWS console or the EC2 instance 🙁 Any help or links to help would be greatly appreciated. Thanks so much! ~A
That’s not a stupid question – setting up email can be quite tricky.
I’ve created this tutorial which goes over configuring email for a GCP instance using Zoho. While the steps aren’t identical for AWS, the general concepts are the same (such as the DNS configuration).
Hope this is helpful, and let me know if you have any questions!
Joe
Aileensays
Thank you so much, I’ll check it out!
Gandhisays
Wonderful learning tutorial. Thank you for sharing with public.
Thanks for your fantastic Article, I’ve a plan to launh a E-commerce website using wordpress and woocCommerce. Its possible to host with AWS or I’ll go with Bluehost. Please help me out. I’m expecting 20k visitors per day.
I followed every step and everything went smooth, but when I am trying to import my WordPress file it gets to 100% and then shows an error!
Any help is appreciated..
after i imported my webstie i cant log into wp admin anymore. states that the email in invalid and get errors for not being secure. any thought on how to fix this?
Make sure that you use the credentials of the website that you imported.
Let me know if you have questions,
Joe
Maxsays
Hi Joe,
This issue is persisting for me despite confirming that the imported site’s username and password are correct by logging in through the original wordpress portal.
Try logging in with the ‘admin’ username and corresponding password, instead of with an email.
Let me know if you have questions,
Joe
Maxsays
Have tried that many times as well. Still no luck. Have tried “user”, “admin”, and the only email registered with the WordPress account. Have tried each of these with both the bitnami password and the WordPress account password.
Maxsays
I have tried that as well. Works for my wordpress account login but not through this instance in S3. Any other ideas?
Why two domains are essential?
What if the first domain is yahoo.com? All information would be gone by the transformation mentioned in the second steps?
What do you mean by ‘two domain names’? Which step?
Moris Adamsays
Hey. Thanks for the awesome tutorial. But how do you increase max_upload_size in aws? I mean I couldn’t find the php.ini file? And how do you have the max upload to 512 MB? where as I just have 40 MB
I followed your tutorial, but after I got done with the Apache/SSH part and checked my domain it came back as “http://www.%(http_host)%(request_uri)/” and I don’t know how to fix it. Any advice here?
Will this work if the website is built on a subdomain on a different host than where the domain being used is. I have subdomain wp site on hostpapa, client domain through GoDaddy, and trying to host new website on AWS
I’m not sure Ryan – that sounds complicated. If you get it working, please let me know your process!
Thanks, Joe
abhisheksays
hey leron your tutorials are amazing.please make a tutorial on how to protect files from being downloaded from my website using aws s3.thanks for all the tutorials.
You will have to edit your Bucket policy according to your needs.
There is a helpful AWS tutorial here that covers some common configurations depending on your needs.
Let me know if you have any questions,
Joe
Davesays
Great tutorial. i have an eCommerce site. my site does not have www. it is (https://site.com) and i have ssl from Cloudflare. how can i do these without disrupting customers shopping on my site?
Practice a few times on a copy of the website and assign it to a dummy domain. Get it up-and-running a couple of times before going through with the Cloudflare configuration for the main website.
I went through step 1 successfully and logged into my wordpress using the default user “user.” I was able to migrate everything from my local host into my new instance. However, once i clicked out of that instance in WordPreass, I wasn’t able to log back in with the same user name and password I used before. This happened to me twice and I had to delete the instance and redo everything. Should I have done something else before closing out the window of my new instance?
This is a common issue that you’re describing; luckily, there’s as easy fix.
After you’ve performed the migration and you’re asked to log in again, you will have to log in with the username and password of the website that you imported, not the username and password of the AWS WordPress install. Does this make sense?
Let me know if you have questions,
Joe
Yamina Marlowsays
Aaah! That makes sense. Yes!!! I’m a happy happy girl! Thanks.
Stevesays
AMAZING! Thank you for creating and sharing this video, it is amazing. I am sooooo nervous about moving my site. We have a LMS and lots of data so any breaks create a major problem for us. Nevertheless, amazing video that makes me think that come Christmas, when things are quiet, I have a project
Glad to hear you enjoyed the tutorial Steve – thanks for sharing your feedback!
poorpaddysays
This was extremely helpful in getting my sites migrated from a share hosting setup and will probably save me hundreds. I have a few more sites to migrate but have not begin yet because they have ssl certs attached to them.
Is there a way to move those over to AWS as well and if so can you point me in the right direction?
You can move the certificate files as well – it shouldn’t cause any issues.
I don’t have a walk-through on the topic, but it should be as simple as transferring the certificate files to the new server, then making sure that the certificate paths (and permissions) are correct in your Apache configuration (which depends on which directory you upload the certificate files to).
If you’re using Let’s Encrypt certificates, then don’t bother with the process, and go ahead and re-issue new certificates.
Hope this helps and let me know if you have any questions,
Joe
Awesome – I’m glad to hear you were able to get it working! Also thanks for sharing the link – I’m sure other users are looking for a similar tutorial.
Pranitasays
Hi,
I am quite a beginner here.
I am confused with the exporting of website file.
Correct me if I am wrong. Here we are exporting wordpress website file from the wordpress site we already have & not the one we have launched on EC2??
If the above understanding is correct, I am not allowed to add plugin to my basic existing wordpress site.
You will export the migration file from the site you already have, not the one you’ve already launched on EC2.
Once you import the migration file into your your EC2 instance, all of your plugins/files/data will be overwritten by the contents from the new migration.
Hope this helps and let me know if you have any questions,
Joe
Pranita Jagtapsays
Thank you, Leron for your reply.
I think the problem with my website is that it is in the basic plan. So it doesn’t allow me to add/install any plugin. I contacted their customer service too. They asked me to upgrade the domain. However, as I am working on this as an assignment, I chose not to upgrade.
With some research, I was successful in exporting my wordpress.com site using settings–>tools. So the migration part looks good now.
Now I came across another problem. I am not allowed to change name servers settings in my wordpress.com domain settings. The reason is still the same that I need to upgrade my website by paying to a business plan.
Can you please help me here? Do you know how to not pay/upgrade and still be able to change the domain settings? Or any other way I can achieve Step 2 i.e. transfering the domain?
All of the tutorials on onepagezen.com are meant for users who are using the open-source WordPress (wordpress.org), not wordpress.com.
It appears that you’re using wordpress.com, so your first priority (before using any of the tutorials on onepagezen.com) needs to be migrating your website off of wordpress.com, and moving to the open-source version of WordPress. For instructions on how to do this, check out this guide.
Also – if your domain is something such as example.wordpress.com, you won’t be able to transfer it. WordPress.com owns those subdomains and you can’t use them outside of their site, regardless of whether you’re using a free plan.
Hope this helps and let me know if you have any questions,
Joe
Stansays
Very helpful tutorial!
I have one question:
If I am just moving to AWSwith same domain name When I export from the old WordPress, should I enter the same domain in the box Replace with?
If the existing site is already paired with the domain name, then there’s no need to use the ‘replace’ feature.
If it’s a new site without the domain name configured, then yes – you could replace either the IP (if no domain is configured) or the existing domain name with the domain name that you plan to use when the site is migrated.
Hope this helps and let me know if you have any questions,
Joe
If you open the file with the error in nano, you can use the keyboard command CTRL + SHIFT + – to jump to specific lines.
Once you’ve jumped to the lines that have been flagged, check for syntax errors.
You can also run the following command to get more information pertaining to the errors:
sudo apachectl configtest
Hope this helps and let me know if you have any questions,
Joe
Jorissays
Hi Leron,
Really great tutorial, a perfect step-to-step guide.
However i just have one question. Does this tutorial works only for bitnami version of wordpress or it can be used for other AMI ?
Thanks for letting me know.
If you get a good grasp on the concepts covered in the tutorial, you should be able to easily apply the concepts to other AMIs. Most differences will be found in file paths/directory structure.
Hope this helps and let me know if you have any questions!
Joe
I used a LAMP AMI that includes PhpMyAdmin. I installed new WP using their website’s instructions then imported the data from an existing WP install. I also used virtual hosts but that was only because I manage multiple WP blogs tied to different domain names.
Hello! I tried doing this process, but I am running into a problem as my business account and domain was bought through google. Do you have any suggestions?
What exactly isn’t working, is it the domain name or email? There shouldn’t be any issues configuring Gsuite and Google Domains with AWS, but if you provide additional details, I will see how I will be able to help.
Thanks so much for the awesome post!Everything was going swimmingly for me until it came time to use the password I copied from my system log. No matter how I enter it, it still says it’s incorrect? Any thoughts on a way to get around this …. such as changing the password somehow? Or perhaps what email it has this registered to so I can reset password?
I’m really not sure what could be causing your issue.
I would check out Google, StackOverflow, and the AWS troubleshooting docs and see what you find.
If you’re able to find the solution, please share it as I am curious to know!
Thanks,
Joe
Faizsays
Hey Leron, thanks for the nice and easy tutorial.
I’m by no means an expert at this stuff, but does the migration above cover SQL and my database? Or does Bitnami cover all that?
Hi Faiz,
The bundled LAMP (Linux, Apache, MySql <- DATABASE, PHP) stack that you install in this tutorial includes a MySQL database.
Please let me know if you have any other questions,
Joe
Faizsays
Okay, so I assume my database has already been uploaded to the new site as well?
I thought that you have to go through myPHP, edit the wp-config.php file, and then import the database. Is that still something I have to do, or is it already done by the WP All-in-one migration plugin?
I only ask because I don’t have back-end access to the hosting control panel of my current site, my website developers deal with that. So with migrating to AWS hosting, I’m just wondering whether I need to get anything from them on the back end, or is it completely done once I follow everything on the tutorial?
Hi Faiz,
The All-in-One WP Migration plugin takes care of moving your database.
That being said, hosting your WordPress website on the cloud requires you to be familiar using a Linux shell to edit your website’s files from the back-end. You will inevitably have to do this from time-to-time in order to change file permissions, increase upload limits, or edit default settings. For this reason I’d recommend checking out this tutorial on basic Linux commands, so that you can get comfortable with editing your website from the back-end.
Let me know if you have any questions,
Joe
Pravinsays
Hi Leron,
Thanks for the great post.
But i am getting an error when it logs to the server as below:
DocumentRoot “/opt/bitnami/apache2/htdocs”
Options Indexes FollowSymLinks
AllowOverride All
<IfVersion
Order allow,deny
Allow from all
= 2.3 >
Require all granted
# Error Documents
ErrorDocument 503 /503.html
# Bitnami applications installed with a prefix URL (default)
Include “/opt/bitnami/apache2/conf/bitnami/bitnami-apps-prefix.conf”
Hi Pravin,
This doesn’t look like a snippet from your error logs – it looks like a snippet from your bitnami.conf file.
What error messages are you seeing? What happens when you try to restart Apache? What do your error logs show when you run:
cat /var/log/syslog
Talk to you soon,
Joe
ruben snijdersays
Hi Leron,
I have my website through lightsail. I had it running with my domain w/o www. but now it doesn’t work anymore. How can I go back or add the http://www.?
Did you change the WordPress URLs (these are in your WordPress settings and/or wp-config.php file)?
If you made the change to add www without changing the WordPress URL settings, then this would cause an error, regardless of your virtualhost configuration.
Hi Yashir,
Unfortunately, transferring your certificate to a different server is a difficult process.
What I would recommend doing is looking into this tutorial. Also, try accessing Google and StackOverflow for additional information.
Let me know if you have any questions,
Joe
Hi Deepak,
Check out this tutorial here.
If this isn’t the solution you were looking for, please provide more details about the issue that you’re trying to fix.
Thanks,
Joe
Thanks Leon for your reply. I already solved this issue but now I’m facing a problem.. huuuh!
I installed and migrate my website perfectly but when I checked my website’s settings > general there’s another issue happens. I can’t change my website URL and apart from that also I tried to change my email address because it showing me like [email protected] I changed it to new email but I haven’t not received any confirmation email and without confirmation email it will be the same. I don’t know why things like this happened to me every time! 😑
But now tried new thing I don’t it is good or bad. I tried to install cpanel on my server so, I can do everything in that but cpanel installation also stuck at a point.
I installed cpanel through SSH but when I entered https://myipaddress:/2087 in my browser to change my cpanel password it gave me a 404 error….
I don’t know what it happing with can you please guide me what to do now?
Should I install cpanel for WP in ec2 because I can’t change my email and URL in simple WP installation or there’s any solution for that?
Hi Deepak,
There are many issues that you will run into when trying to configure cPanel on AWS. Most of the tutorials I’ve seen on the subject appear to be lacking. Regardless, I would not recommend installing cPanel on EC2.
To change your WordPress domain name, check out step 2 of this tutorial. Even though the tutorial is for GCP, the same concept applies to AWS: SSH into your instance, open you wp-config.php file, and then add the WP_SITEURL and WP_HOME definitions to the file.
Also, you can’t use default mail ports on AWS or GCP, so you will have to configure SMTP for your instance. The good news is that there’s a simple tutorial on the subject available here.
Good luck and let me know if you have any general questions,
Joe
Thanks Amin, finally I win and installed the WordPress with www. And with my own mail through SMTP. Now, I just have one question is there’s way to connect let’s encrypt SSL I mean is it the same process like you did in GCP?
Hi Deepak,
The instructions for configuring SSL on GCP vs. AWS are nearly identical.
Just that you will be using Route53 for your DNS instead of Google’s Cloud DNS.
Good luck and let me know if you’re able to get it working.
Joe
Great tutorial, Leron. I have question, how should I change a wordpress password. I did try to do it as usually unfortunatly I was not able to access my app, could you so kind advising.
Hi Leron, the tutorial looks great. About to try it out for myself but i noticed the part about Bitnami WordPress. I see in the screenshot that there’s a bunch of charge totals on the rightmost column.
Does this mean that I have to pay to use this? Sorry for the confusion.
Great article. Thank you for taking the time to share. I am migrating three WP blogs to an Amazon EC2 instance with a LAMP stack AMI and opted not use Bitnami but used Apache virtual hosts instead.
It sounds to me like there is an additional www. somewhere in your Apache configuration.
I would check your bitnami.conf file from the section of the tutorial titled “How to Include WWW. Prefix”. Try deactivating the ‘rewrite engine’ section by putting a # symbol to the left of each of the three lines of code in order to deactivate them – as shown:
Alberto Antezano says
How can I configure the SSL Certificate on an AWS Bitnami instance? Could you upload the correct guide to install and configure an auto-renewable certificate please?
Leron Amin says
Hi Alberto,
This guide was updated in January of 2021 to include the addition of auto-renewing SSL certificates.
Let me know if you have any questions,
Joe
Chris says
As of 2021, I’ve noticed that “Get System Log” button is now inside the “Monitor and troubleshoot” section of “Actions”
Leron Amin says
Thank you for the update Chris!
Alberto Antezano says
how do i install ssl certificate on my website, any info on that?
Leron Amin says
Hi Alberto,
This tutorial has recently been updated to include SSL setup.
Let me know if you have other questions,
Joe
Programmer says
Hi Leron, this article looks pretty good. I was about to give it a try by myself, however I could see many things such as UI itself has been changed. Please update this tutorial whenever it is possible for you.
Thanks a lot!
Leron Amin says
Hello Programmer,
This tutorial has recently been updated for 2021. Give it a try and let me know if you have any questions!
Thanks,
Joe
Sash says
Thanks for the video great guide.
I was wondering is there a technical reason for changing the configuration to serve the website with or without WWW? I do not mind that it can be viewed either way therefore thought of skipping those steps but wanted to check prior to making a potential mistake.
Thanks,
S
Leron Amin says
Hi Sash,
It’s best practice to configure a redirect to the preferred version of your domain. Failure to do could result in there being 2 versions of your website – both the www. and non-www. version – which can have adverse affects on your website’s SEO.
Let me know if you have other questions,
Joe
Isidro Y says
Thanks for the tutorial. I have followed your instructions, but I get stuck at the part of opening the server’s configuration file using bitnami’s command:
sudo nano /opt/bitnami/apache2/conf/bitnami/bitnami.conf
I get a message saying ‘ Directory ‘/opt/bitnami/apache2/conf/bitnami/bitnami.conf’ does not exist.
I have even tried restarting my instance. Any help with this will be greatly appreciated.
Leron Amin says
Hi Isidro,
Are you sure you’re using the Bitnami single-site WordPress solution, and not the multisite solution?
Try changing directory levels one step at a time and see how far you get, for instance:
then
Let me know if you have questions,
Joe
TKW says
HI,
It is a great tutorial. But my case the wordpress file is larger than the 40MB. Since i’m new for this can you tell me a way to import my file
Leron Amin says
Hi TKW,
You can use this workaround published by Nick G. to increase the upload limit.
After you’ve downloaded the version that I linked to above, upload it to your WordPress plugins and follow the steps in this tutorial to increase the upload limit to unlimited.
Please let me know if you have any questions about this process!
Joe
Adjie Purbojati says
Hi, I can’t found storage configuration. Is there any settings for this?
Thank you
Leron Amin says
Hi Adjie – which storage configuration are you referring to?
Aileen says
Hi there,
Great article, it helped me (mostly) to migrate my website (based on WP) from Hostgator to AWS. I am hoping you are reading this as I have a (probbaly rather stupid) question: How do I transfer my email addresses to AWS? I haven’t done the DHS change yet, I am worried that emails will be returned to the sender. I cannot find anything regarding this on the AWS console or the EC2 instance 🙁 Any help or links to help would be greatly appreciated. Thanks so much! ~A
Leron Amin says
Hi Aileen,
That’s not a stupid question – setting up email can be quite tricky.
I’ve created this tutorial which goes over configuring email for a GCP instance using Zoho. While the steps aren’t identical for AWS, the general concepts are the same (such as the DNS configuration).
Hope this is helpful, and let me know if you have any questions!
Joe
Aileen says
Thank you so much, I’ll check it out!
Gandhi says
Wonderful learning tutorial. Thank you for sharing with public.
Leron Amin says
My pleasure – I’m glad to hear you found it useful!
Raakesh V says
Hello,
Thanks for your fantastic Article, I’ve a plan to launh a E-commerce website using wordpress and woocCommerce. Its possible to host with AWS or I’ll go with Bluehost. Please help me out. I’m expecting 20k visitors per day.
Leron Amin says
Hi Raakesh,
If you’re looking for a lower maintenance solution, then yes – go with a managed provider.
Considering you’ll be running an e-commerce solution and not a blog, I’d recommend going the managed route for security and performance purposes.
Hope this helps and let me know if you have questions,
Joe
Raakesh V says
Hi Joe,
Much appreciated, thanks for your suggestion. I’m decided to go with managed bluehost hosting.
Thank you very muh.
vicky says
I followed every step and everything went smooth, but when I am trying to import my WordPress file it gets to 100% and then shows an error!
Any help is appreciated..
Nick says
after i imported my webstie i cant log into wp admin anymore. states that the email in invalid and get errors for not being secure. any thought on how to fix this?
Leron Amin says
Hi Nick,
Make sure that you use the credentials of the website that you imported.
Let me know if you have questions,
Joe
Max says
Hi Joe,
This issue is persisting for me despite confirming that the imported site’s username and password are correct by logging in through the original wordpress portal.
Do you know what may be going wrong?
Leron Amin says
Hi Max,
Try logging in with the ‘admin’ username and corresponding password, instead of with an email.
Let me know if you have questions,
Joe
Max says
Have tried that many times as well. Still no luck. Have tried “user”, “admin”, and the only email registered with the WordPress account. Have tried each of these with both the bitnami password and the WordPress account password.
Max says
I have tried that as well. Works for my wordpress account login but not through this instance in S3. Any other ideas?
Leron Amin says
Hi Max,
Try changing the admin password by editing the database directly, as instructed in the second part of this tutorial.
Hope this helps and let me know if you have questions,
Joe
Sibi Paul says
Hello,
I saw Your YouTube Video…
Kindly Post the SSL Tutorial asap.
Pedro says
Hello, I have a mac and the putty preview you suggested is only for windows and not mac. So, how to I obtain the SSH connection?
Leron Amin says
Hi Pedro,
Check out the comment here for more information.
Let me know if you have questions,
Joe
Ted says
Why two domains are essential?
What if the first domain is yahoo.com? All information would be gone by the transformation mentioned in the second steps?
Leron Amin says
What do you mean by ‘two domain names’? Which step?
Moris Adam says
Hey. Thanks for the awesome tutorial. But how do you increase max_upload_size in aws? I mean I couldn’t find the php.ini file? And how do you have the max upload to 512 MB? where as I just have 40 MB
Felipe says
I have the same problem, did you find a solution?
ColmC says
Check out
https://docs.bitnami.com/bch/apps/wordpress-pro/troubleshooting/increase-upload-limit-php/
Jim says
Hello,
I followed your tutorial, but after I got done with the Apache/SSH part and checked my domain it came back as “http://www.%(http_host)%(request_uri)/” and I don’t know how to fix it. Any advice here?
Ryan Chmura says
Will this work if the website is built on a subdomain on a different host than where the domain being used is. I have subdomain wp site on hostpapa, client domain through GoDaddy, and trying to host new website on AWS
Leron Amin says
I’m not sure Ryan – that sounds complicated. If you get it working, please let me know your process!
Thanks, Joe
abhishek says
hey leron your tutorials are amazing.please make a tutorial on how to protect files from being downloaded from my website using aws s3.thanks for all the tutorials.
Leron Amin says
Hi Abhiskek,
You will have to edit your Bucket policy according to your needs.
There is a helpful AWS tutorial here that covers some common configurations depending on your needs.
Let me know if you have any questions,
Joe
Dave says
Great tutorial. i have an eCommerce site. my site does not have www. it is (https://site.com) and i have ssl from Cloudflare. how can i do these without disrupting customers shopping on my site?
Leron Amin says
Hi Dave,
Practice a few times on a copy of the website and assign it to a dummy domain. Get it up-and-running a couple of times before going through with the Cloudflare configuration for the main website.
Let me know if you have questions,
Joe
gnaneshwar says
how to setup SSL from amazon aws. please help
Leron Amin says
Hi Gnaneshwar – I will be doing an SSL on AWS tutorial in the near future!
Ansar Ulhaq says
Hi
Thanks for the material. Can you please make a tutorial regarding SSL certificate for aws please.
Best regards
Leron Amin says
Hi Ansar,
Yes I will make an SSL tutorial for WordPress on AWS.
Thanks for the suggestion,
Joe
Kwami says
+1 on SSl tuts
Thanks!
yamina says
I went through step 1 successfully and logged into my wordpress using the default user “user.” I was able to migrate everything from my local host into my new instance. However, once i clicked out of that instance in WordPreass, I wasn’t able to log back in with the same user name and password I used before. This happened to me twice and I had to delete the instance and redo everything. Should I have done something else before closing out the window of my new instance?
Leron Amin says
Hi Yamina,
This is a common issue that you’re describing; luckily, there’s as easy fix.
After you’ve performed the migration and you’re asked to log in again, you will have to log in with the username and password of the website that you imported, not the username and password of the AWS WordPress install. Does this make sense?
Let me know if you have questions,
Joe
Yamina Marlow says
Aaah! That makes sense. Yes!!! I’m a happy happy girl! Thanks.
Steve says
AMAZING! Thank you for creating and sharing this video, it is amazing. I am sooooo nervous about moving my site. We have a LMS and lots of data so any breaks create a major problem for us. Nevertheless, amazing video that makes me think that come Christmas, when things are quiet, I have a project
Leron Amin says
Glad to hear you enjoyed the tutorial Steve – thanks for sharing your feedback!
poorpaddy says
This was extremely helpful in getting my sites migrated from a share hosting setup and will probably save me hundreds. I have a few more sites to migrate but have not begin yet because they have ssl certs attached to them.
Is there a way to move those over to AWS as well and if so can you point me in the right direction?
Leron Amin says
Hi Poorpaddy,
You can move the certificate files as well – it shouldn’t cause any issues.
I don’t have a walk-through on the topic, but it should be as simple as transferring the certificate files to the new server, then making sure that the certificate paths (and permissions) are correct in your Apache configuration (which depends on which directory you upload the certificate files to).
If you’re using Let’s Encrypt certificates, then don’t bother with the process, and go ahead and re-issue new certificates.
Hope this helps and let me know if you have any questions,
Joe
poorpaddy says
Thanks, I followed this tutorial to install a new one. Worked great: https://www.youtube.com/watch?v=hCeQqXfUt6A
Leron Amin says
Awesome – I’m glad to hear you were able to get it working! Also thanks for sharing the link – I’m sure other users are looking for a similar tutorial.
Pranita says
Hi,
I am quite a beginner here.
I am confused with the exporting of website file.
Correct me if I am wrong. Here we are exporting wordpress website file from the wordpress site we already have & not the one we have launched on EC2??
If the above understanding is correct, I am not allowed to add plugin to my basic existing wordpress site.
Thanks,
Pranita
Leron Amin says
Hey Pranita,
You will export the migration file from the site you already have, not the one you’ve already launched on EC2.
Once you import the migration file into your your EC2 instance, all of your plugins/files/data will be overwritten by the contents from the new migration.
Hope this helps and let me know if you have any questions,
Joe
Pranita Jagtap says
Thank you, Leron for your reply.
I think the problem with my website is that it is in the basic plan. So it doesn’t allow me to add/install any plugin. I contacted their customer service too. They asked me to upgrade the domain. However, as I am working on this as an assignment, I chose not to upgrade.
With some research, I was successful in exporting my wordpress.com site using settings–>tools. So the migration part looks good now.
Now I came across another problem. I am not allowed to change name servers settings in my wordpress.com domain settings. The reason is still the same that I need to upgrade my website by paying to a business plan.
Can you please help me here? Do you know how to not pay/upgrade and still be able to change the domain settings? Or any other way I can achieve Step 2 i.e. transfering the domain?
Thanks,
Pranita
Leron Amin says
Hi Pranita,
All of the tutorials on onepagezen.com are meant for users who are using the open-source WordPress (wordpress.org), not wordpress.com.
It appears that you’re using wordpress.com, so your first priority (before using any of the tutorials on onepagezen.com) needs to be migrating your website off of wordpress.com, and moving to the open-source version of WordPress. For instructions on how to do this, check out this guide.
Also – if your domain is something such as example.wordpress.com, you won’t be able to transfer it. WordPress.com owns those subdomains and you can’t use them outside of their site, regardless of whether you’re using a free plan.
Hope this helps and let me know if you have any questions,
Joe
Stan says
Very helpful tutorial!
I have one question:
If I am just moving to AWSwith same domain name When I export from the old WordPress, should I enter the same domain in the box Replace with?
Leron Amin says
Hi Stan,
If the existing site is already paired with the domain name, then there’s no need to use the ‘replace’ feature.
If it’s a new site without the domain name configured, then yes – you could replace either the IP (if no domain is configured) or the existing domain name with the domain name that you plan to use when the site is migrated.
Hope this helps and let me know if you have any questions,
Joe
Rob says
Hello,
When I try to restart the apache I get an error on line 563 and line 210, what should I do to fix this.
Thanks,
Leron Amin says
Hi Rob,
If you open the file with the error in nano, you can use the keyboard command CTRL + SHIFT + – to jump to specific lines.
Once you’ve jumped to the lines that have been flagged, check for syntax errors.
You can also run the following command to get more information pertaining to the errors:
Hope this helps and let me know if you have any questions,
Joe
Joris says
Hi Leron,
Really great tutorial, a perfect step-to-step guide.
However i just have one question. Does this tutorial works only for bitnami version of wordpress or it can be used for other AMI ?
Thanks for letting me know.
Leron Amin says
Hey Joris,
Thanks for the feedback!
If you get a good grasp on the concepts covered in the tutorial, you should be able to easily apply the concepts to other AMIs. Most differences will be found in file paths/directory structure.
Hope this helps and let me know if you have any questions!
Joe
Max Edmiston says
Joris,
I used a LAMP AMI that includes PhpMyAdmin. I installed new WP using their website’s instructions then imported the data from an existing WP install. I also used virtual hosts but that was only because I manage multiple WP blogs tied to different domain names.
Shef says
Hello! I tried doing this process, but I am running into a problem as my business account and domain was bought through google. Do you have any suggestions?
Leron Amin says
Hi Shef,
Were you able to get the issue resolved?
What exactly isn’t working, is it the domain name or email? There shouldn’t be any issues configuring Gsuite and Google Domains with AWS, but if you provide additional details, I will see how I will be able to help.
Thanks and talk to you soon,
Joe
Craig Gibson says
Leron, this worked flawlessly for me. Thanks for taking the time to share your knowledge, including providing solutions for all the roadblocks!
Leron Amin says
Glad to hear it Graig – thanks for the feedback and I’m glad the tutorial helped you!
Brandon says
Thanks so much for the awesome post!Everything was going swimmingly for me until it came time to use the password I copied from my system log. No matter how I enter it, it still says it’s incorrect? Any thoughts on a way to get around this …. such as changing the password somehow? Or perhaps what email it has this registered to so I can reset password?
Leron Amin says
Hi Brandon,
Did you make sure that you’re using the correct username? Try both user and admin for usernames.
Talk to you soon,
Joe
Eduard says
Hi,
Tried both admin and user multiple times and still not working
Any other suggestions?
Thanks.
Leron Amin says
Hi Eduard,
I’m really not sure what could be causing your issue.
I would check out Google, StackOverflow, and the AWS troubleshooting docs and see what you find.
If you’re able to find the solution, please share it as I am curious to know!
Thanks,
Joe
Faiz says
Hey Leron, thanks for the nice and easy tutorial.
I’m by no means an expert at this stuff, but does the migration above cover SQL and my database? Or does Bitnami cover all that?
Leron Amin says
Hi Faiz,
The bundled LAMP (Linux, Apache, MySql <- DATABASE, PHP) stack that you install in this tutorial includes a MySQL database. Please let me know if you have any other questions, Joe
Faiz says
Okay, so I assume my database has already been uploaded to the new site as well?
I thought that you have to go through myPHP, edit the wp-config.php file, and then import the database. Is that still something I have to do, or is it already done by the WP All-in-one migration plugin?
I only ask because I don’t have back-end access to the hosting control panel of my current site, my website developers deal with that. So with migrating to AWS hosting, I’m just wondering whether I need to get anything from them on the back end, or is it completely done once I follow everything on the tutorial?
Leron Amin says
Hi Faiz,
The All-in-One WP Migration plugin takes care of moving your database.
That being said, hosting your WordPress website on the cloud requires you to be familiar using a Linux shell to edit your website’s files from the back-end. You will inevitably have to do this from time-to-time in order to change file permissions, increase upload limits, or edit default settings. For this reason I’d recommend checking out this tutorial on basic Linux commands, so that you can get comfortable with editing your website from the back-end.
Let me know if you have any questions,
Joe
Pravin says
Hi Leron,
Thanks for the great post.
But i am getting an error when it logs to the server as below:
DocumentRoot “/opt/bitnami/apache2/htdocs”
Options Indexes FollowSymLinks
AllowOverride All
<IfVersion
Order allow,deny
Allow from all
= 2.3 >
Require all granted
# Error Documents
ErrorDocument 503 /503.html
# Bitnami applications installed with a prefix URL (default)
Include “/opt/bitnami/apache2/conf/bitnami/bitnami-apps-prefix.conf”
Please suggest how to proceed further?
Leron Amin says
Hi Pravin,
This doesn’t look like a snippet from your error logs – it looks like a snippet from your bitnami.conf file.
What error messages are you seeing? What happens when you try to restart Apache? What do your error logs show when you run:
Talk to you soon,
Joe
ruben snijder says
Hi Leron,
I have my website through lightsail. I had it running with my domain w/o www. but now it doesn’t work anymore. How can I go back or add the http://www.?
c# Default Virtual Host configuration.
<IfVersion
NameVirtualHost *:80
NameVirtualHost *:443
RewriteEngine On
RewriteCond %{HTTP_HOST} !^www\. [NC]
RewriteRule ^(.*)$ http://www.%{HTTP_HOST}%{REQUEST_URI} [R=301,L]
DocumentRoot “/opt/bitnami/apache2/htdocs”
Options Indexes FollowSymLinks
AllowOverride All
<IfVersion
Order allow,deny
Allow from all
= 2.3 >
Require all granted
Leron Amin says
Hi Ruben,
Did you change the WordPress URLs (these are in your WordPress settings and/or wp-config.php file)?
If you made the change to add www without changing the WordPress URL settings, then this would cause an error, regardless of your virtualhost configuration.
Let me know if you have questions,
Joe
filippo says
Great tutorial
Leron Amin says
Thanks Filippo!
Tushar Bhor says
Great article. Thank you
Leron Amin says
Thanks for the feedback Tushar – I’m glad you liked the article. 🙂
yasir khan says
Great article Leron. Thanks for this great post. Can you please let me know how can I also transfer my SSL certificate to AWS?
Leron Amin says
Hi Yashir,
Unfortunately, transferring your certificate to a different server is a difficult process.
What I would recommend doing is looking into this tutorial. Also, try accessing Google and StackOverflow for additional information.
Let me know if you have any questions,
Joe
Deepak says
Great article, Thanks! but I’m exporting my website but it is showing you’re out of space what to now?
Leron Amin says
Hi Deepak,
Check out this tutorial here.
If this isn’t the solution you were looking for, please provide more details about the issue that you’re trying to fix.
Thanks,
Joe
Deepak says
Thanks Leon for your reply. I already solved this issue but now I’m facing a problem.. huuuh!
I installed and migrate my website perfectly but when I checked my website’s settings > general there’s another issue happens. I can’t change my website URL and apart from that also I tried to change my email address because it showing me like [email protected] I changed it to new email but I haven’t not received any confirmation email and without confirmation email it will be the same. I don’t know why things like this happened to me every time! 😑
But now tried new thing I don’t it is good or bad. I tried to install cpanel on my server so, I can do everything in that but cpanel installation also stuck at a point.
I installed cpanel through SSH but when I entered https://myipaddress:/2087 in my browser to change my cpanel password it gave me a 404 error….
I don’t know what it happing with can you please guide me what to do now?
Should I install cpanel for WP in ec2 because I can’t change my email and URL in simple WP installation or there’s any solution for that?
Please help me!
Leron Amin says
Hi Deepak,
There are many issues that you will run into when trying to configure cPanel on AWS. Most of the tutorials I’ve seen on the subject appear to be lacking. Regardless, I would not recommend installing cPanel on EC2.
To change your WordPress domain name, check out step 2 of this tutorial. Even though the tutorial is for GCP, the same concept applies to AWS: SSH into your instance, open you wp-config.php file, and then add the WP_SITEURL and WP_HOME definitions to the file.
Also, you can’t use default mail ports on AWS or GCP, so you will have to configure SMTP for your instance. The good news is that there’s a simple tutorial on the subject available here.
Good luck and let me know if you have any general questions,
Joe
Deepak says
Thanks Amin, finally I win and installed the WordPress with www. And with my own mail through SMTP. Now, I just have one question is there’s way to connect let’s encrypt SSL I mean is it the same process like you did in GCP?
Leron Amin says
Hi Deepak,
The instructions for configuring SSL on GCP vs. AWS are nearly identical.
Just that you will be using Route53 for your DNS instead of Google’s Cloud DNS.
Good luck and let me know if you’re able to get it working.
Joe
Patrick says
Thank you this is an amazing guide. I couldn’t imagine the transfer being any easier. Do you have any resources for moving a Drupal site to AWS?
Nino says
Great tutorial, Leron. I have question, how should I change a wordpress password. I did try to do it as usually unfortunatly I was not able to access my app, could you so kind advising.
Leron Amin says
Hi Nino,
Make sure to use the login username and password from the OLD website that you imported.
Let me know if you have any questions,
Joe
Nino says
Thank you Leron for your advise.
Leron Amin says
No problem – I’m happy to help 🙂
Ken says
Hi Leron, the tutorial looks great. About to try it out for myself but i noticed the part about Bitnami WordPress. I see in the screenshot that there’s a bunch of charge totals on the rightmost column.
Does this mean that I have to pay to use this? Sorry for the confusion.
Leron Amin says
Hi Ken,
AWS provides you with a free year of EC2 (one machine) – so you won’t end up paying for most of those things.
You will still have to pay for your networking, which would likely cost around $1 or so per month.
Hope this helps,
Joe
Kevin says
Great tutorial, Leron. Maybe I missed it (I was jumping around), but might want to add something about changing the password on AWS’s WP instance.
Otherwise smooth sailing. Great job and thanks for the help.
Leron Amin says
Hi Kevin,
Thanks for the feedback – I will look into the suggestion!
Also, I’m glad to here that the tutorial worked for you. 😀
Max Edmiston says
Great article. Thank you for taking the time to share. I am migrating three WP blogs to an Amazon EC2 instance with a LAMP stack AMI and opted not use Bitnami but used Apache virtual hosts instead.
Leron Amin says
Thanks for the feedback Max!
Leron Amin says
What did you think of this tutorial?
Share your questions and comments below!
Edet Samuel says
I appreciate you for this tutorial. I am following you on all your videos and posts.
I have a challenge. I followed closely but got it wrong at the point of making adding ‘www’ to the domain name.
Mine is in double e.g. http://www.www.example.com.
Kindly help me out with procedures to remove the ‘www.www’ completely.
Thank you sir.
Leron Amin says
Hi Edet,
It sounds to me like there is an additional www. somewhere in your Apache configuration.
I would check your bitnami.conf file from the section of the tutorial titled “How to Include WWW. Prefix”. Try deactivating the ‘rewrite engine’ section by putting a # symbol to the left of each of the three lines of code in order to deactivate them – as shown:
Then, save the file (CTRL + X, then Y, then Enter), and then restart Apache:
Let me know if you have any questions,
Joe