Are you running a WordPress installation on Google Cloud Platform? If so, it is important that you have a system to remotely manage your WordPress files on Google Cloud.
For those of you who are experienced WordPress users, you’ve probably broken your site before. You’re well aware that a simple plugin malfunction or php code error can lock you out of your WordPress site.
When a plugin or code error breaks your WordPress site, you’ll need to be able to manage WordPress files on Google Cloud using a back-end method.
In this type of situation, when you’re unable to access your WordPress dashboard, don’t lose hope. You can still access your WordPress files remotely using an SFTP client.
In the video above I show you step-by-step how to configure an SFTP client for your WordPress Google Cloud installation.
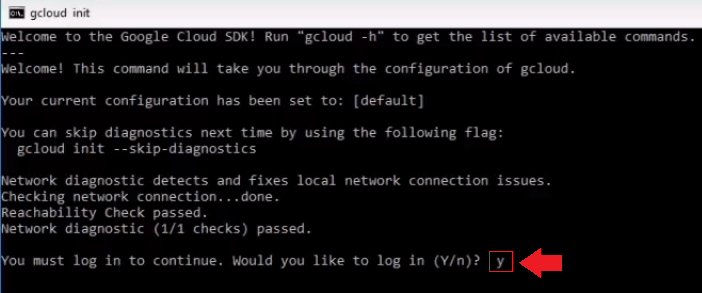
2. Link SDK to your Google Account
After installing Google Cloud SDK, the terminal will open, and you will be asked to log in. Type y and press Enter. Your browser will open up your Google accounts page, asking you to grant permissions for the Google Cloud SDK.
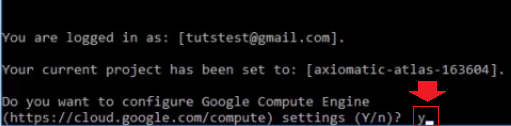
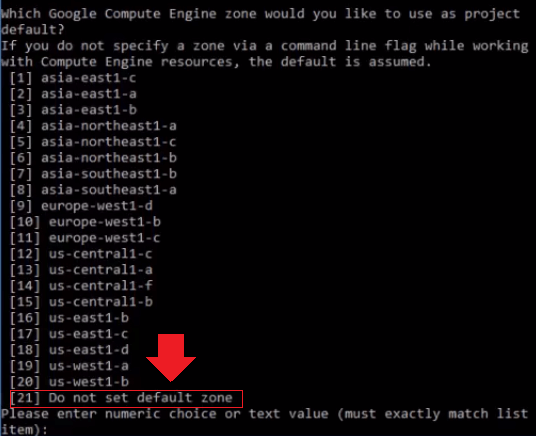
3. Configure Compute Engine
The Google Cloud SDK will now ask if you want to configure Google Compute Engine. Type y and press Enter to continue.Next you will be prompted to select a zone. Either choose the zone that you selected when setting up your instance, or choose 21 to not set a default zone.
4. Run gcloud Command
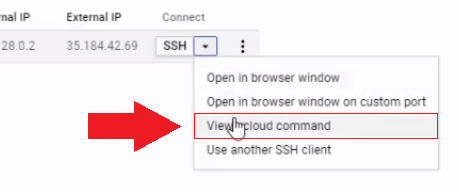
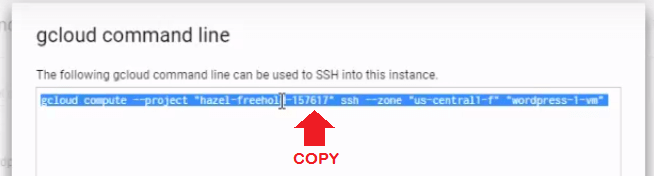
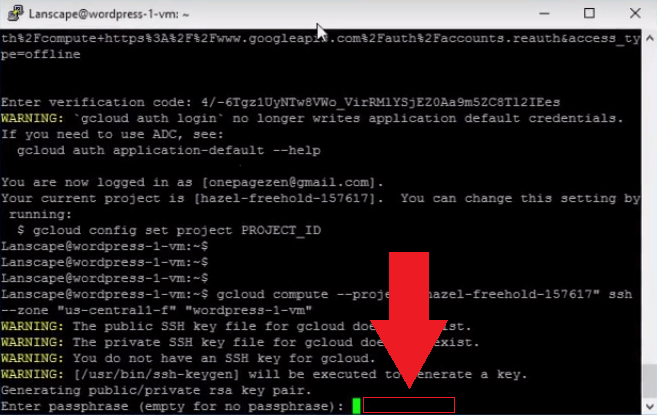
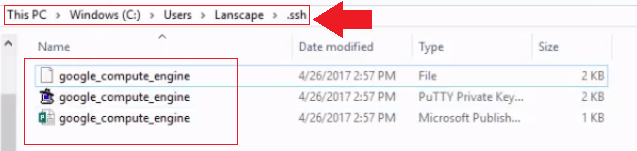
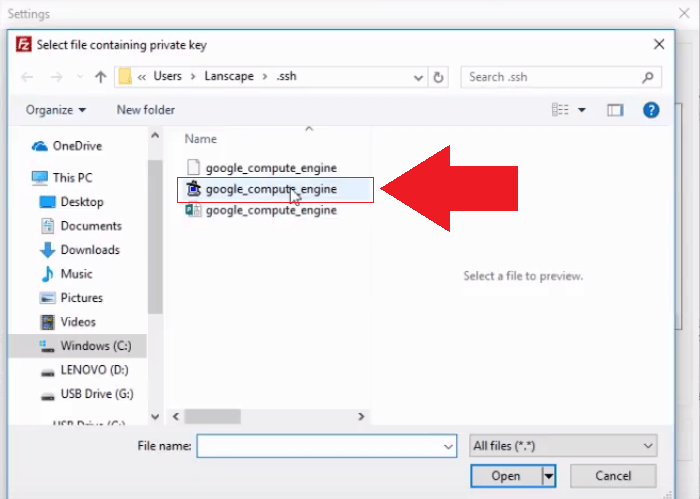
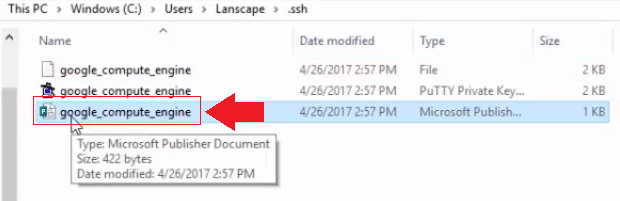
After selecting your zone, go back to your Google Cloud Platform instance dashboard, and click the arrow next to the SSH button and select View gcloud command.Select and copy your gcloud command.Go back to your SDK terminal and paste the gcloud command.After you paste your gcloud command into the SDK terminal, a PuTTY terminal will launch. Paste you gcloud command into the PuTTY terminal. The PuTTY terminal will generate SSH keys. When asked if you want to enter a passphrase, leave the field empty and press Enter.Your SSH key files will be saved into your computer files. You can locate your keys at: Windows (C:) > users > yourusername > .ssh.
5. Configure SSH Keys in FileZilla
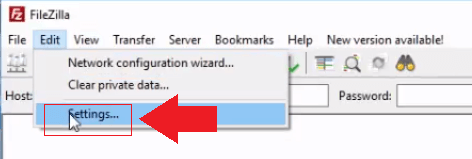
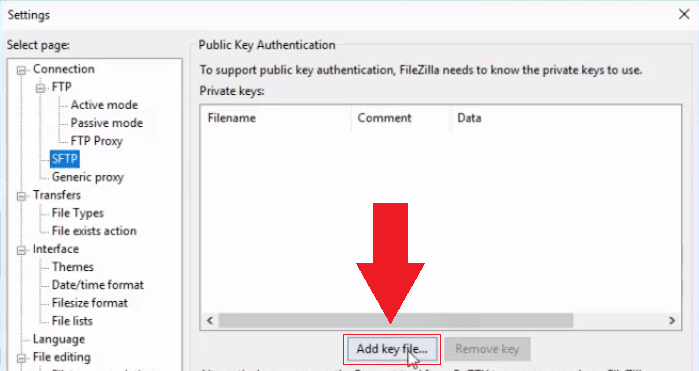
Open FileZilla, and go to Edit > Settings. If you don’t have FileZilla installed, you can download it here.In the settings page, under Connection > SFTP, click on Add key file… to upload your SSH key file.Choose the middle SSH PuTTY key file.
6. Link SSH Key to Google Cloud
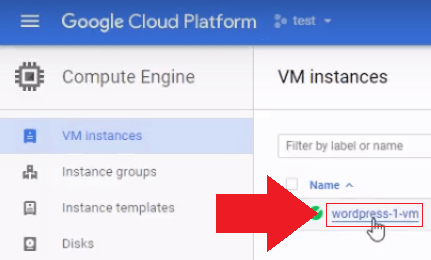
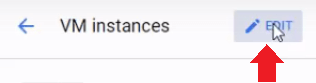
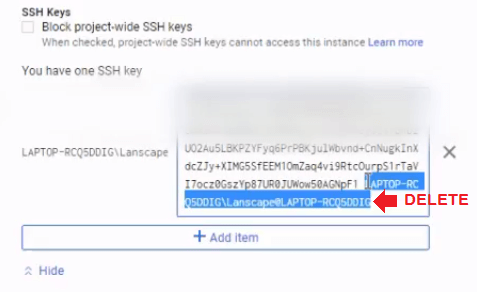
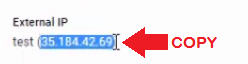
Go back to your Google Cloud platform VM instances page, and click on your WordPress instance.Click on the EDIT button on the top of the page next to the VM instances header.Scroll down to the middle of the page where it says You have one SSH key. Click on Show and edit.Go back to your directory where your SSH keys are saved (Windows (C:) > users > yourusername > .ssh) and select the bottom SSH key file. Open the file, and copy the entire text.Paste the entire contents of the key file into the SSH text area on your VM instance page. Select the very last part of the text (which identifies your PC), and delete it.Replace the deleted text with the name of your WordPress installation. If you’re using the Bitnami WordPress installation, you will add bitnami at the end of the text.Next, go up towards the middle of the page and copy the external IP address. Then, scroll to the bottom of the page and click the Save button.
7. Connect to FileZilla
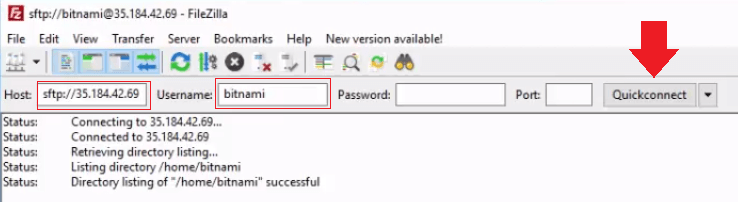
Go back to FileZilla, and paste the external IP address in the host field. Make sure to put sftp:// before it (see picture). In the username field enter bitnami, and click the Quick Connect button to connect your WordPress instance.Success! You are now connected to your WordPress instance and will be able to use the FileZilla SFTP client to easily manage your WordPress files.
Did it work?
If you run into permission errors, click here to fix the problem.
If you are looking for the quick-start version of this tutorial, you can check it out here.
I have used one click wordpress deployment to install word press on GCP.
I can’t seem to figure out what text do I use to replace the text at the end of the SSH key. I used the project ID,, but while it does connect me to the server using Filezilla, I don’t see any files.
I can’t seem to find what is the name of my wordpress installation if it’s not the project ID ?
It sounds like you were able to establish the FTP connection without errors.
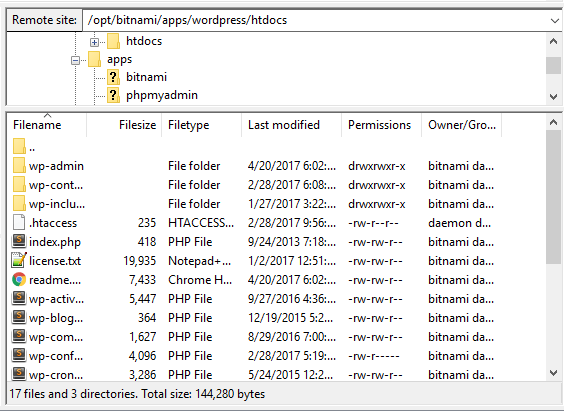
Once connected, accessing your website files is not an intuitive process. You have to click on the folder on the ‘Remote site’ (right site) of the screen. This will then toggle a list of all of the files/folders in your remote project’s root directory.
Let me know if you have other questions,
Joe
Awais Ahmadsays
I see this error
how to fix it
ERROR: (gcloud.beta.compute.ssh) Could not fetch resource:
– Insufficient Permission: Request had insufficient authentication scopes.
I was generating public/private key by Google Shell command and now my GCP SSH Bash stopped working!!
When I go to VM instance> click on “SSH” it always shows “Transferring SSH Keys to VM…” and continuosly looping the same process…
Issue is, I’m unable to access SSH bash now, before that it was working perfectly!!
The database lives in your virtual machine. You can connect to it by running the following command:
mysql -u root -p
Keep in mind that you will be prompted to enter the root mysql password after executing that command. Let me know if you need help locating your mysql root password from the instance settings page.
Talk to you soon,
Joe
Shahbaazsays
google cloud is unable to fetch my sitemap.xml generated by plugins. So i created it with an online service. Now i need to upload it to the domain root folder of my site. How to access domain root folder in google cloud hosting ?
Hi!! I found this web tutorials very useful, and they had help me through my wordpress web develoment process, and I need a little more help right now!!
After the migration of my website to the google cloud compute engine host I got error 404 on all pages except home, even on one I created after the migration directly on compute engine wordpress, I already updated the permalinks, tried to change permissions on .htaccess file from Filezilla to 666 and got this error: set attributes for /var/www/html/.htaccess: permission denied, then from SSH tried the next codes on SSH:
Kept getting the same error, but now the .htaccess file is missing for some reason, wpcontent and the other ones inside html too, but the page is still online
Tried to upload .htaccess file to filezilla (I got a backup on my laptop) but I get Error: /var/www/html/.htaccess: open for write: permission denied and failed file transfer
What should I do?? Now if I enter a code it tells me the files does not exist
There could be one or more issues at play, but it doesn’t sound like it will be a quick fix.
Did you change the URL of the website when you did the migration? Typically when I’ve seen 404’s after migrations it’s due to URL mismatches in the database. In all honestly, I’ve seen database issues from time-to-time when using the All-in-One WP Migration tool.
I’d recommend trying the migration again, making sure to disable/remove as many plugins as possible beforehand.
Good luck and please reach out if you have questions,
Joe
Julyansays
Hi Leron,
This tutorial is very helpful and it works.
However, when I’m finally connected via sftp, there’s no wordpress related files under /var/www/html ..
I’ve also checked all the comments one by one, but I haven’t found any solution to my problem.
Hope you can help me find out why there’s no wp files under that directory.
In many WordPress LAMP configurations, the WordPress ‘root’ directory is located in /var/www/html – however, this isn’t always the case. For instance, the WordPress core files for Bitnami’s WordPress solution are installed to /opt/bitnami/apps/wordpress/htdocs/ – my point being, that the location of your WordPress core files is entirely dependent on the configuration of the solution that you’re using. Since you appear to be using a third-party solution, I’d recommend checking their documentation to learn more about their directory structure.
Hope this helps and let me know if you have questions,
Joe
Dude, I followed every single step it’s connecting perfectly. but, but, but.
When I’m trying to delete WordPress theme or any file it says: permission denied https://i.imgur.com/FMoa5NB.jpg
You will need to first edit the permissions of those files in order to delete them.
Hope this helps and let me know if you have questions,
Joe
tgroellsays
Hi guys!
I followed all the first 5 steps without any problem but at step 6 when checking the VM Instances page i don’t have “You have one SSH key” but “You have 0 SSH key”. Any idea what could have gone wrong?
I had the “Could not fetch resource: – Insufficient Permission” error messaged but i followed Leron Amin’s recommendation of ‘gcloud auth login’ to go past it. So shouldn’t be the reason why.
I had a “Error establishing a database connection” issue when I tried to open my website.
I am trying to look into wp-config.php
I followed this “Manage WordPress Files on Google Cloud Platform” tutorial to the end.
However, I am unable to find my wp-config.php file or WordPress root directory. I do not know where is it. Do you have any suggestion on how to find it?
What I have tried:
1. manually open the file folders – nothing found …
2. I noticed that there is a “root” file folder (which I do not know whether it is even relevant…). However, when I tried to open it, I get the following error message.
Status: Retrieving directory listing of “/root”…
Command: cd “/”
Response: New directory is: “/”
Command: cd “root”
Error: Directory /root: permission denied
Error: Failed to retrieve directory listing
3. The links below show all the file folders in my remote GCP site.
I would recommend that you view/edit the file in the terminal, that way you won’t face any permissions issues. If you try to edit the file through FileZilla, is it likely that you will run into permissions issues.
Hope this helps and let me know if you have any questions,
Joe
I’m not using the Bitnami version of WordPress. I selected the click-to-deploy from within Google Cloud.
I tried entering “Bitnami” at the end of the SSH key because you used this word in your tutorial. I don’t know the name of my WordPress installation. I saw a comment that we can replace “Bitnami” with any username we fancy. I also read a feedback that that person had to use a username associated with his vm instance. I don’t know if this impacts access to files.
I managed to find my WordPress files at /var / html. Only when I tried to upload a modified wp-config.php file did I realise that all the WordPressfiles are read only. In Filezilla, I could see an option to change file read/write/execute permission when I right-clicked on the files. However, I was denied permission to make any changes. I was not able to upload a modified wp-config.php file.
Any suggestions for how to proceed for non-Bitnami WordPress?
I would recommend using this version of the FTP tutorial – it’s a bit more straightforward. When you paste your public key file contents (as shown in step 6), it should automatically include a username. Copy this default username that appears next to the keyfile and add it to the FileZilla username field when you connect to your instance.
Also, you will need to change the permissions of the directories before you are able to edit them.
Hope this helps and please let me know if you have any questions,
Joe
I won’t be doing a Mac version of the tutorial, but if you look through the comments section for this tutorial, some other users have already provided links to tutorials which show how to implement an FTP/SFTP solution on Mac.
Hope this helps,
Joe
MDsays
Dear Leron,
First of all thanks for the specific and stepwise information. Great Work.
I am not able to see or fetch the wordpress structure. No wp-admin or other folders are visible.
Hi MD,
Make sure to click the folder in the Remote site box, as this will expand to display all of your other website files.
Hope this helps and let me know if you have any other questions,
Joe
gauravsays
Hey Leron
i am facing a issue
ERROR: (gcloud.compute.ssh) Could not fetch resource:
– Insufficient Permission tell me how to solve it i change the permission
777 but problem is same how to i solve it.
I have installed wordpress installation on gcp and not bitnami. However, I followed your command. Is that fine?
Secondly, I got access through filezilla to wordpress instance. However, the folder with wordpress files is still out of my reach. I am facing issues in “error establishing database connection”. I need to fix those files as soon as possible.
Hi Niraj,
Did you make sure that you uploaded your private key file to FileZilla (step 5) and that you added your public key to your GCP VM instance (step 6)?
Also, that database error may indicate a problem in your wp-config.php file with your database credentials. First thing I would do is check your credentials in the file (database name, username, password, etc.), and then do a google search for “wordpress error establishing database connection” – as I’m sure you’ll find many more resources on how to fix the problem.
Hope this helps and let me know if you have any questions,
Joe
I tried creating a subdomain on my WordPress site hosted on GCP but at the end of it all I was unable to successfully create the sub-domain but instead broke my site as I can’t access the home page anymore nor my WP admin. Pls help. The site url is https://veva.online
Please provide additional details about the process you used to configure your subdomain, that way I can target where the error is likely originating. Also, please use this Facebook forum for further discussion, as your issue is unrelated to this tutorial.
Talk to you soon,
Joe
Davesays
Thanks for responding. I have been able to resolve the problem. Apparently it was just a simple Apache configuration setting error.
Can you make a tutorial on how to create a sub-domain in GCP? I’m sure it’d be helpful to the community.
Salam alaikum, forgive us if you bother me with my questions
I changed my website to WordPress and I was forced in the real problem occurred while raising the ability of the processor and the site was a quick ephemeral “via Google hosting” and thank God able to link the site on the site but I brought the problem of my site when I try a slot from Google browser via the laptop you have prepared But it opens but if you enter from the mobile, in other words, the Safari browser opens in about a quarter of an hour.
I entered the settings of the board php and changed the IBI from the board I said this can help but to no avail Is there another way to now get my site and it is closed I can not include new articles I am afraid to dull visitors, especially I am marketing oil derivatives and visitors are very limited Top visits There were 500 visitors.
Are there any ideas about this problem that I will be denying you?
Hi Ahmed,
I don’t understand your question.
Please provide a more concise description of the issue you’re experiencing and I will see how I can help.
Talk to you soon,
Joe
Thank you for your tutorial and the heads up to follow this one Joe. Even though I am on a Mac I was able to get connect to gcloud and my instance via FileZilla. Thank you very much. (Merry Christmas)
However, there were a couple of minor differences. One was at the end of step 4. Run gcloud Command, I didn’t have to go through Putty to do that, I did it in the Terminal. Also i learnt to use some ‘vi’ commands to open up the .rsa key. Another difference was that I couldn’t use ‘bitnami’ as the name of the public key it had to be the one generated for me such as my username as it was associated with the instance of the vm such as ‘benjaminwaller@moodle-1-vm:~$’
But overall it was very enlightening experience (to use a Zen metaphor) and although I ran into a few differences, i got it to work with a little searching and investigating! and I learnt a few other things along the way. I worked out how to log back into my instance in the Terminal using the following command: gcloud compute ssh –zone once logged in.
I can’t reiterate enough how useful this tutorial was in helping me get through to step 7 successfully. It was definitely the right way to install the Google Cloud SDK then link the SDK to your Google Account even though I didn’t have a WordPress installation it still worked for my Moodle vm install.
I am glad to hear that you were able to figure everything out! I know that having to generate a key pair through the terminal can be a bit of a hassle, but it’s great that you were able to figure it out.
That being said – I haven’t had to use Mac for most of the stuff that I do, so I may have to reference your comment at some point if I ever end up doing GCP configurations on a Mac – so thanks for the great tips!
Also, I’m glad to hear you were able to get your Moodle project running on Google Cloud. I know it took a bit of ‘tweaking’, but I have a feeling you will be impressed with the performance.
Anyways, thanks again for the updates and I look forward to hearing from you again soon,
Joe
Marksays
Hi Benjamin & Leron,
First of all, thank you Leron for this another detailed tutorial but since I’m using Mac I’m not sure if I have properly followed your instructions.
I believe the 1st file is the same as the middle SSH PuTTY key file on your screenshot while the 2nd file is the same as the bottom SSH key file.
In step 5, I added the SSH key file ‘google_compute_engine’ without the .pub extension on FileZilla.
In step 6, I opened ‘google_compute_engine.pub’ file using Google Chrome and copied the entire content and paste it on the SSH text area on my VM instance page.
1st try, I replaced the last part of the text with any name that I want.
2nd try, I did not change the last part of the text so it is in this format ‘[email protected]’
3rd try, I replaced the last part of the text with Benjamin Waller’s recommendation ‘markxxxxx@wordpress-1-vm:~$’
In step 7 (which you still labeled as step 6), I used below as entries but all failed to connect:
HOST: sftp://External IP address
USERNAME: Used the username that I used in the SSH text area on my VM instance page. Tested different versions as mentioned above.
@Benjamin, I believe you have some idea on this issue hope you can help me on this.
Hopefully someone has some idea on how to fix this issue.
Benjamin Wallersays
Hi Mark,
I didn’t use the Quickconnect feature in FileZilla. I used the File Manager to set my connect up. I don’t think the Quickconnect will work.
I have uploaded a screenshot of my settings page and have only blurred out the host address but all the other setting appear there.
The main thing is to point to the local .rsa key file.
See my screenshot below. https://www.sugarsync.com/pf/D6922769_08201020_765538
And I used the following video as a guide it is on connecting via SSH and SFTP using FileZilla on a Mac. https://www.youtube.com/watch?v=R8C66NwMJLs
All the best,
Benjamin
Marksays
Hi Benjamin,
I’ve been waiting for this answer.
Thanks a lot!
That solved my issue.
More power to you and to Leron!
Cheers,
Mark
Juliosays
Joe,
Thank you for your tutorials. They have been very useful for me. They are very well explained. They are a great asset for the whole community.
I wish you the best, and the best for OnePageZen.com
Thanks for the feedback Julio!
I am glad to hear the tutorials have been helpful to you!
Best regards, 🙂
Joe
Johnnysays
Joe, This has been an amazing tutorial. Thanks for the time you put into it! I followed along, ran into the same spot of trouble that the above commenter ran into (insufficient permissions) and your suggestions for him worked for me as well.
I hope that you can help me, though, with an expected complication. When I connected through file zilla there were no APP files (really no files at all in the bitnami file folder or the other file folder that had my username) and now when I connect to my wordpress site (using the external ip) it can’t connect. I seem to have lost the entire site.
I have a hard copy backup on my computer but before I go through that process I was hoping it was something simple that I could do to restore what I had.
Did you reserve a static IP for your website? If not, that may have caused the issue.
I don’t think your entire site would be lost due to establishing a connection with Filezilla, there are likely other factors at play.
What happens when you try to access your website? What does the page look like, and what error is it showing? The more details you provide the more easily I will be able to help you address the problem.
Talk to you soon, 🙂
Joe
Johnny Spanglersays
Thanks for the reply!
I get the classic “this site can’t re be reached” error in the web browser. This is the case even when I use the external IP (35.164.215.223) found on my compute engine details (I also wondered about a change of IP, but it seems to be the same I have forwarded as always).
Let’s see, more details…
I used http://www.cloud.google.com/wordpress/ to set up the wordpress set on google cloud.
I associated a domain I have with the site using google domains
The site was working before I tried started to play around with key pairs and after I got filezilla connected I couldn’t find the site anymore.
Other than that I am not sure what other information may be helpful. Any advice is welcome. The only thing I can guess is I messed up access to the site with key pairs (if that is even a thing)
Is your A record in your Cloud DNS pointing to 35.164.215.223? Also make sure your VM is running.
If you didn’t have a static IP address reserved for your instance and you stopped your instance for any amount of time, it could have been assigned a new external IP (different from the one your A record is currently pointing to).
So the first thing I would recommend doing is to going to your Cloud DNS, checking your A record, and making sure it matches the external IP assigned to your virtual machine.
Let me know how it goes.
Talk to you soon, 🙂
Joe
Rachelsays
Hi Joe,
When I tried to install google cloud SDK, it always has the same error: failed to fetch listing components from server.
What’s the difference between
Manage WordPress Files on Google Cloud Platform and Google Cloud FTP Setup with FileZilla (Quick Start) ?
Are they serve the same functions?
The Manage WordPress files on Google Cloud tutorial integrates two separate tools: FileZilla and Cloud SDK. However, a lot of users only want to use FTP and not Cloud SDK, which is why I created the FileZilla Quickstart.
In your situation, you should likely be using the FileZilla Quickstart tutorial. If your Google Cloud projects become more complex over time, then you might look into installing SDK as well.
Hope this answer helps, and feel free to reach out if you have additional questions! 🙂
I’ve followed you on your youtube channel and your videos have been a lot of help to me. i’ve successfully connected to my wordpress files through filezilla but i tried deleting and editting some of those files, and i couldn’t…i always get this error of permission denied…don’t know what to do…would appreciate if you help on this case… thanks
Hi Phillip,
Check out this tutorial about fixing permission errors on FTP.
Let me know if you have any questions!
Best regards,
Joe
Fahimsays
hey sir help me i am getting error in filezill about permission denied.I tried your tutorial to fix permissions problem but it does not work. can u make a video about it please
Hello Fahim,
Check out this tutorial on how to fix FTP permission errors.
Let me know if you have questions!
Thanks,
Joe
Sususays
Hi Joe,
Thanks for these great guides, you are so kind to do this 🙂
I follow every video to do the work. When I was doing this part (Install the Google Cloud SDK), I made a mistake, I’d prefer to use the zone as when I set up my instance or select 21. But I accidently wrote 12. Are you able to show me how to edit it? I have read few articles, but I’m still confusing…
Thanks for your time 🙂
Hi Susu,
I am glad you have found the tutorials helpful! 😀
The default zone properties are stored in the MetaData section of your Google Cloud project.
to edit these setting, run the command in the documentation here.
This is the command you are looking for: gcloud compute project-info add-metadata \
--metadata google-compute-default-region=europe-west1,google-compute-default-zone=europe-west1-b
Just make sure to change the command with the default region and zone that you wish to use for your projects.
Let me know if you have any other questions!
Thanks,
Joe
Ronaldsays
Hi ! Thank you very much! I followed you here from your youtube channel. I want to know how can I find the path of wordpress files in Google Click-to-deploy type installation, I’m trying to find the principal folder and I don’t find it. Hope you can help me! Thanks!
Hello Joe
I followed your tutorial and now I cannot access my website anymore. It shows “Apache2 Debian Default Page” saying “It works!”
https version is not accessible at all.
What should I do? Thanks
Thanks for the reply Joe
I am using bitnami configuration. I executed “sudo /opt/bitnami/ctlscript.sh restart apache” and got this output:
“Unmonitored apache
Syntax OK
/opt/bitnami/apache2/scripts/ctl.sh : apache not running
Syntax OK
(98)Address already in use: AH00072: make_sock: could not bind to address 0.0.0.0:80
no listening sockets available, shutting down
AH00015: Unable to open logs
/opt/bitnami/apache2/scripts/ctl.sh : httpd could not be started
Monitored apache”
I did not, I just pressed enter like you did in the video regarding SSL on bitnami configuration. I have All-in-one WP migration backup so it is not a big deal, I can set a new one but if I can get this one back I would be super thankful
It was this tutorial that caused the problem. I successfully installed SSH and had https version of website. But after this tutorial I got this error. But I will set it up again, I have a backup so I will configure SSL, email and this tutorial. I messed something up most likely because I have followed this tutorial many times before on another websites and it worked everytime. Thank you for your support, amazing work with onepagezen, don’t know what I would do without your tutorials.
Have a nice day, Toni
Hey Eric,
Will do! If you’re planning on running multiple WordPress sites on GCP I would recommend using the Multisite pre-built solution.
However, running WordPress on a subdomain of a domain with more than one CMS would be more complicated to configure.
Thanks for the idea!
Best regards,
Joe
Pedrosays
Joe, please help me.
When I’m goin’ to connect with Filezilla appears
“Disconnected: No supported authentication methods available (server sent: publickey)”
What should I do?
Hi Pedro,
This means that there was an authentication issue.
Make sure that you’re using the correct login credentials when trying to access your site via FileZilla.
Talk to you soon,
Joe
Hi Joe,
Brilliant step-by-step explanation. Many thanks. My website is down at the moment and I need back-end access. One thing I’m not sure about is the bit about
“Replace the deleted text with the name of your WordPress installation. If you’re using the Bitnami WordPress installation, you will add “bitnami” at the end of the text.”
I used “Google click to deploy” to install WordPress. How exactly do I find out the “name of the WordPress installation”? It’s not the project name? Or VM instance? I’m sure this has a simple explanation, but I’m not sure what it is!
Hi Mark,
I’m glad the tutorials have been helpful for you 🙂
“bitnami” is simply the username used for authentication. You can change “bitnami” to whatever you want the username to be when you connect to your instance via FileZilla.
Hope this helps!
Thanks,
Joe
Benjamin Wallersays
Hello Joe,
Great tutorial again. I have a few questions. After setting up a site on GCP with SSL certificates, what is the best way to manage images? Should I be uploading them within the WordPress dashboard or do I have to use FTP (FileZilla) for the SSL to work correctly? Or as an alternative, would it be better to store these image files into a storage Container on GCP and link to them that way?
Hi Benjamin,
I often ask myself this question, and unfortunately I don’t have a good answer for you. For a basic WordPress blog, I’d recommend just uploading images to your WordPress database through the WordPress dashboard. If you will be running a ‘database’ style website, with an expansive library of large files, you may want to consider configuring storage buckets to serve the data. It just depends on the size and type of site you will be running. Hope this helps a bit, and thanks for posting this comment.
Joe
Hi Joe,
Thank you again, I found where was the problem. I had pointed the A record to a wrong IP. It should have been pointed to my account IP at Bluehost. Now it works, though I need to rework many pages, slides and images.
Again I appreciate your great tutorials.
Abbas
Hi Joe
Thank you for your excellent tutorials, so clear and easy to follow. I have learned so much from your videos. Basically I did everything to transfer my sites from Bluehost to Google Cloud Platform, by following your step by step tutorials. However, I am stuck with one final thing and that is changing IP address to my real domain URL. While I can access my sites through WP admin, I get error by trying to access using URLs. I really appreciate all you have done to train ignorant folks like me, and will be grateful if you could give me a hint to solve this conundrum.
Kindest regards,
Abbas
Hi Luu,
In FileZilla, you can change permissions settings by right clicking on a folder and changing the permission levels.
Check out this tutorial about what the numbers mean.
Let me know if you have additional questions,
Joe
Mohamed Haksays
Hi Joe,
when I right click to change permission, I get error : set attrs for /opt/bitnami/wordpress/wp-content/uploads/2017/10: permission denied
Then you can try again to edit the files in FileZilla.
Hope this helps, 🙂
Joe
Mohamed Haksays
Hey Joe,
Thank you for taking the time and answer and also writing tutorials in the first place, You are the only guide on the internet for this topic.
Yes I tried to change the permissions through Filezilla by right-clicking on the folder and selecting file permissions instead of the SSH.
My real problem is that I have a plugin problem and the developer asked for my FTP account and password to fix it.
Can you tell me please how can I provide him with this information?
Will he be able to upload the plugin by FTP if I give him the access or I have to change permissions first?
Last question is, as you can see I only succeeded to get this far only because of your help and amazing tutorials, Do You think I am better of with platform like cloudways? Is there alot of things I need to know about to run my woocommerce site on google cloud by myself?
They would need your private key file, your IP of your instance, and the username attached to the keyfile (which was bitnami in the example I sent you).
Also – they won’t be able to upload plugins unless you change the default permissions of your plugins directory.
I don’t know much about Cloudways, but here is a break down of the cost of Cloudways vs self-hosting:
Using Cloudways’ most basic plan (1.7GB RAM 1 vCPU machine) would cost $34.17 per month. Self-hosting on GCP would cost $21.73 for that same configuration.
The catch, however, is that a 1vCPU 1.7GB machine is overkill for most WordPress websites. Most of the WordPress websites that I run on GCP are using a micro 0.6GB share 1vCPU machine, which costs around $5.00 per month to run. Also, if you self-host on Google Cloud you can always upgrade your machine and specs if you ever need to.
For that reason I would not use Cloudways if you feel comfortable enough hosting your own websites on GCP, because it will save you a great deal of money in the long run. The reason companies like Cloudways exist in the first place is because most people don’t feel comfortable using GCP on their own, or using the command-line-interface, but it seems like you’ve already overcome that hurdle.
Anyways, I hope this information helps. If you do end up using Cloudways, please let me know how their service is, as I haven’t heard much about them until now.
Talk to you soon, 🙂
Joe
Mohamed Haksays
Hey Joe,
Really thank you for getting back to me,
So before I consider going to cloudways which I hope not for the all the reasons you mentioned, How can I create multiple SFTP accounts so that I can share with developers who need access to the site?
I am asking this because when I try to find answer to this on internet they show how to do it easily in cpanel which I don’t have in GCP.
So how can I create an account for them then deleted later after they are done?
What you could do is create SSH key pairs with unique usernames; these are technically “accounts”.
You would add the public key in the SSH keys section of your VM instance’s “edit” page. Then, the plugin developers can use your instance’s IP and the key username (aka “comment”) to access your instance via SFTP.
This assumes, however, that you’ve sent the developer your private key and that they added it to FileZilla.
To prevent them from accessing your project after they’ve finished working, just remove the public key from your instance’s “edit” page.
Ideally, if you are hiring an experienced developer to work on your Google Cloud Platform website, what you would do is follow this tutorial.
The developer can decide themselves if they require an SFTP interface, and then configure it themselves if they need to.
To delete the user after they’ve finished working, just go to your IAM section and remove their Gmail account from the list; then, they will no longer be able to access your project.
Hope this helps and good luck 🙂
Joe
David Leesays
Hi Leron,
Thank for providing so much useful video about google cloud platform.
This is a common issue, that may or may not have to do with the formatting or your key file text.
If you still haven’t resolved the problem, check out these tutorials for possible solutions and see if they help.
As I help you through the problem I need to know: did you already generate key files? Or was this your first attempt at doing so? Check to see if you have key files located at C:/users/yourusername/.ssh. Based on the nature of the error, it is likely that SSH key files already exist.
Let me know.
-Joe
Michaelsays
Hi, Leron,
excellent video, thanks 🙂
Ran into a problem: after pasting gcloud command into the PuTTY terminal:
ERROR: (gcloud.compute.ssh) Could not fetch instance:
– Insufficient Permission
Hi Michael,
Your insufficient permission error likely has to do with your access scopes.
To change them, follow these steps as outlined in the Google Cloud documentation:
1. Go to the VM instances page in the Compute Engine.
2. Click on the VM instance for which you want to change the service account.
3. If the instance is not stopped, click the Stop button. Wait for the instance to be stopped.
4. Next, click the Edit button.
5. Scroll down to the Service Account section.
6. From the dropdown menu, select the desired service account.
7. To change scopes, in the Access scopes section, set the appropriate scopes for your needs. As a best practice, specify only the access scopes that your VM instance requires. If you’re not sure of the proper access scopes to set, choose Allow full access to all Cloud APIs and then make sure to restrict access by setting IAM roles.
8. Click the Save button to save your changes.
Hi Jane,
The key generating tools it not ‘connected’ to your website’s VM or server, so generating a key is not likely the reason why your site went offline.
There may be other underlying issues with your server, or VM, that may need to be addressed. The first place I would check is your server logs at /var/log and check what error number your browser is displaying. For example: NX_domain, HTTP 500 Server Error, etc.
Let me know if you have any questions,
Joe
I installed wordpress on google cloud hosting, but when I replaced the ip address with the domain, then after I login to the admin panel, my login details are incorrect.But I filled all the details correctly, yet it is telling wrong and the password is not reset as well


Furqan says
Hi
I have used one click wordpress deployment to install word press on GCP.
I can’t seem to figure out what text do I use to replace the text at the end of the SSH key. I used the project ID,, but while it does connect me to the server using Filezilla, I don’t see any files.
I can’t seem to find what is the name of my wordpress installation if it’s not the project ID ?
Thank you
Leron Amin says
Hi Furquan,
It sounds like you were able to establish the FTP connection without errors.
Once connected, accessing your website files is not an intuitive process. You have to click on the folder on the ‘Remote site’ (right site) of the screen. This will then toggle a list of all of the files/folders in your remote project’s root directory.
Let me know if you have other questions,
Joe
Awais Ahmad says
I see this error
how to fix it
ERROR: (gcloud.beta.compute.ssh) Could not fetch resource:
– Insufficient Permission: Request had insufficient authentication scopes.
Leron Amin says
Hi Awais,
Try running the following command from your terminal:
If this doesn’t work, you will need to change the access scopes of your authenticated user. See this tutorial for additional information.
Let me know if you have other questions,
Joe
Awais Ahmad says
I actually didn’t do anything. It automatically gets fixed.
Ajendra says
I was generating public/private key by Google Shell command and now my GCP SSH Bash stopped working!!
When I go to VM instance> click on “SSH” it always shows “Transferring SSH Keys to VM…” and continuosly looping the same process…
Issue is, I’m unable to access SSH bash now, before that it was working perfectly!!
What should I do now??
Leron Amin says
Hi Ajendra,
Navigate to Compute Engine and restart your instance. This should hopefully fix the issue.
Let me know if you have other questions,
Joe
sam says
Thanks, so Where do I see the database?
Leron Amin says
Hi Sam,
The database lives in your virtual machine. You can connect to it by running the following command:
Keep in mind that you will be prompted to enter the root mysql password after executing that command. Let me know if you need help locating your mysql root password from the instance settings page.
Talk to you soon,
Joe
Shahbaaz says
google cloud is unable to fetch my sitemap.xml generated by plugins. So i created it with an online service. Now i need to upload it to the domain root folder of my site. How to access domain root folder in google cloud hosting ?
Leron Amin says
Hi Shabaz,
Your domain’s webroot directory will be different depending on the stack/solution that you’re using.
For Bitnami:
For most other Apache configurations:
Hope this helps and let me know if you have questions,
Joe
Gloria Daza says
Hi!! I found this web tutorials very useful, and they had help me through my wordpress web develoment process, and I need a little more help right now!!
After the migration of my website to the google cloud compute engine host I got error 404 on all pages except home, even on one I created after the migration directly on compute engine wordpress, I already updated the permalinks, tried to change permissions on .htaccess file from Filezilla to 666 and got this error: set attributes for /var/www/html/.htaccess: permission denied, then from SSH tried the next codes on SSH:
ls -la /var/www
sudo chmod 777 /var/www/html -R
sudo chgrp -R www-data /var/www/html sudo gpasswd -a username www-data sudo chmod -R 777 /var/www/html
Kept getting the same error, but now the .htaccess file is missing for some reason, wpcontent and the other ones inside html too, but the page is still online
Tried to upload .htaccess file to filezilla (I got a backup on my laptop) but I get Error: /var/www/html/.htaccess: open for write: permission denied and failed file transfer
What should I do?? Now if I enter a code it tells me the files does not exist
Leron Amin says
Hi Gloria,
There could be one or more issues at play, but it doesn’t sound like it will be a quick fix.
Did you change the URL of the website when you did the migration? Typically when I’ve seen 404’s after migrations it’s due to URL mismatches in the database. In all honestly, I’ve seen database issues from time-to-time when using the All-in-One WP Migration tool.
I’d recommend trying the migration again, making sure to disable/remove as many plugins as possible beforehand.
Good luck and please reach out if you have questions,
Joe
Julyan says
Hi Leron,
This tutorial is very helpful and it works.
However, when I’m finally connected via sftp, there’s no wordpress related files under /var/www/html ..
I’ve also checked all the comments one by one, but I haven’t found any solution to my problem.
Hope you can help me find out why there’s no wp files under that directory.
Thank you so much Leron.
Leron Amin says
Hi Julyan,
In many WordPress LAMP configurations, the WordPress ‘root’ directory is located in /var/www/html – however, this isn’t always the case. For instance, the WordPress core files for Bitnami’s WordPress solution are installed to /opt/bitnami/apps/wordpress/htdocs/ – my point being, that the location of your WordPress core files is entirely dependent on the configuration of the solution that you’re using. Since you appear to be using a third-party solution, I’d recommend checking their documentation to learn more about their directory structure.
Hope this helps and let me know if you have questions,
Joe
Sanju shah says
Dude, I followed every single step it’s connecting perfectly. but, but, but.
When I’m trying to delete WordPress theme or any file it says: permission denied
https://i.imgur.com/FMoa5NB.jpg
Leron Amin says
Hi Sanju,
You will need to first edit the permissions of those files in order to delete them.
Hope this helps and let me know if you have questions,
Joe
tgroell says
Hi guys!
I followed all the first 5 steps without any problem but at step 6 when checking the VM Instances page i don’t have “You have one SSH key” but “You have 0 SSH key”. Any idea what could have gone wrong?
I had the “Could not fetch resource: – Insufficient Permission” error messaged but i followed Leron Amin’s recommendation of ‘gcloud auth login’ to go past it. So shouldn’t be the reason why.
Andrew says
I had a “Error establishing a database connection” issue when I tried to open my website.
I am trying to look into wp-config.php
I followed this “Manage WordPress Files on Google Cloud Platform” tutorial to the end.
However, I am unable to find my wp-config.php file or WordPress root directory. I do not know where is it. Do you have any suggestion on how to find it?
What I have tried:
1. manually open the file folders – nothing found …
2. I noticed that there is a “root” file folder (which I do not know whether it is even relevant…). However, when I tried to open it, I get the following error message.
Status: Retrieving directory listing of “/root”…
Command: cd “/”
Response: New directory is: “/”
Command: cd “root”
Error: Directory /root: permission denied
Error: Failed to retrieve directory listing
3. The links below show all the file folders in my remote GCP site.
http://i67.tinypic.com/r8t7o4.jpg
http://tinypic.com/r/r8t7o4/9
Have I made a mistake somewhere? Can you suggest what should I do?
Thank you.
Leron Amin says
Hey Andrew,
Since you’re using Bitnami, you can open your wp-config.php file for editing by running the following command:
I would recommend that you view/edit the file in the terminal, that way you won’t face any permissions issues. If you try to edit the file through FileZilla, is it likely that you will run into permissions issues.
Hope this helps and let me know if you have any questions,
Joe
Andrew says
I’m not using the Bitnami version of WordPress. I selected the click-to-deploy from within Google Cloud.
I tried entering “Bitnami” at the end of the SSH key because you used this word in your tutorial. I don’t know the name of my WordPress installation. I saw a comment that we can replace “Bitnami” with any username we fancy. I also read a feedback that that person had to use a username associated with his vm instance. I don’t know if this impacts access to files.
I managed to find my WordPress files at /var / html. Only when I tried to upload a modified wp-config.php file did I realise that all the WordPressfiles are read only. In Filezilla, I could see an option to change file read/write/execute permission when I right-clicked on the files. However, I was denied permission to make any changes. I was not able to upload a modified wp-config.php file.
Any suggestions for how to proceed for non-Bitnami WordPress?
Leron Amin says
Hey Andrew,
I would recommend using this version of the FTP tutorial – it’s a bit more straightforward. When you paste your public key file contents (as shown in step 6), it should automatically include a username. Copy this default username that appears next to the keyfile and add it to the FileZilla username field when you connect to your instance.
Also, you will need to change the permissions of the directories before you are able to edit them.
Hope this helps and please let me know if you have any questions,
Joe
faresh sheikh says
i use mac can you do it for mac as well thank you
Leron Amin says
Hi Faresh,
I won’t be doing a Mac version of the tutorial, but if you look through the comments section for this tutorial, some other users have already provided links to tutorials which show how to implement an FTP/SFTP solution on Mac.
Hope this helps,
Joe
MD says
Dear Leron,
First of all thanks for the specific and stepwise information. Great Work.
I am not able to see or fetch the wordpress structure. No wp-admin or other folders are visible.
Leron Amin says
Hi MD,
Make sure to click the folder in the Remote site box, as this will expand to display all of your other website files.
Hope this helps and let me know if you have any other questions,
Joe
gaurav says
Hey Leron
i am facing a issue
ERROR: (gcloud.compute.ssh) Could not fetch resource:
– Insufficient Permission tell me how to solve it i change the permission
777 but problem is same how to i solve it.
Leron Amin says
Hi Gaurav,
Try to authenticate with:
Then try again.
Niraj says
Hi Leron
I have installed wordpress installation on gcp and not bitnami. However, I followed your command. Is that fine?
Secondly, I got access through filezilla to wordpress instance. However, the folder with wordpress files is still out of my reach. I am facing issues in “error establishing database connection”. I need to fix those files as soon as possible.
Please help.
Leron Amin says
Hi Niraj,
Did you make sure that you uploaded your private key file to FileZilla (step 5) and that you added your public key to your GCP VM instance (step 6)?
Also, that database error may indicate a problem in your wp-config.php file with your database credentials. First thing I would do is check your credentials in the file (database name, username, password, etc.), and then do a google search for “wordpress error establishing database connection” – as I’m sure you’ll find many more resources on how to fix the problem.
Hope this helps and let me know if you have any questions,
Joe
Dave says
Hi Leron I need your help ASAP.
I tried creating a subdomain on my WordPress site hosted on GCP but at the end of it all I was unable to successfully create the sub-domain but instead broke my site as I can’t access the home page anymore nor my WP admin. Pls help. The site url is https://veva.online
Thanks
Leron Amin says
Hi Dave,
Please provide additional details about the process you used to configure your subdomain, that way I can target where the error is likely originating. Also, please use this Facebook forum for further discussion, as your issue is unrelated to this tutorial.
Talk to you soon,
Joe
Dave says
Thanks for responding. I have been able to resolve the problem. Apparently it was just a simple Apache configuration setting error.
Can you make a tutorial on how to create a sub-domain in GCP? I’m sure it’d be helpful to the community.
Respect.
Leron Amin says
Will do! Thanks for the feedback and I’m happy to hear that you were able to get your website working.
Ahmed Bazuhair says
Salam alaikum, forgive us if you bother me with my questions
I changed my website to WordPress and I was forced in the real problem occurred while raising the ability of the processor and the site was a quick ephemeral “via Google hosting” and thank God able to link the site on the site but I brought the problem of my site when I try a slot from Google browser via the laptop you have prepared But it opens but if you enter from the mobile, in other words, the Safari browser opens in about a quarter of an hour.
I entered the settings of the board php and changed the IBI from the board I said this can help but to no avail Is there another way to now get my site and it is closed I can not include new articles I am afraid to dull visitors, especially I am marketing oil derivatives and visitors are very limited Top visits There were 500 visitors.
Are there any ideas about this problem that I will be denying you?
Leron Amin says
Hi Ahmed,
I don’t understand your question.
Please provide a more concise description of the issue you’re experiencing and I will see how I can help.
Talk to you soon,
Joe
Ahmed Bazuhir says
I have resolved to solve the problem Thank you for your response
Leron Amin says
Great – I’m glad that you were able to get the problem resolved!
Aly says
Hello
how can i use ftp on AWS
Leron Amin says
Hi Aly,
Check out this thread for instructions on configuring FTP on AWS.
Let me know if you have any questions,
Joe
Benjamin Waller says
Hello Joe,
Thank you for your tutorial and the heads up to follow this one Joe. Even though I am on a Mac I was able to get connect to gcloud and my instance via FileZilla. Thank you very much. (Merry Christmas)
However, there were a couple of minor differences. One was at the end of step 4. Run gcloud Command, I didn’t have to go through Putty to do that, I did it in the Terminal. Also i learnt to use some ‘vi’ commands to open up the .rsa key. Another difference was that I couldn’t use ‘bitnami’ as the name of the public key it had to be the one generated for me such as my username as it was associated with the instance of the vm such as ‘benjaminwaller@moodle-1-vm:~$’
But overall it was very enlightening experience (to use a Zen metaphor) and although I ran into a few differences, i got it to work with a little searching and investigating! and I learnt a few other things along the way. I worked out how to log back into my instance in the Terminal using the following command: gcloud compute ssh –zone once logged in.
I can’t reiterate enough how useful this tutorial was in helping me get through to step 7 successfully. It was definitely the right way to install the Google Cloud SDK then link the SDK to your Google Account even though I didn’t have a WordPress installation it still worked for my Moodle vm install.
Thanks again Joe. Have a lovely day.
Leron Amin says
Hey Ben,
I am glad to hear that you were able to figure everything out! I know that having to generate a key pair through the terminal can be a bit of a hassle, but it’s great that you were able to figure it out.
That being said – I haven’t had to use Mac for most of the stuff that I do, so I may have to reference your comment at some point if I ever end up doing GCP configurations on a Mac – so thanks for the great tips!
Also, I’m glad to hear you were able to get your Moodle project running on Google Cloud. I know it took a bit of ‘tweaking’, but I have a feeling you will be impressed with the performance.
Anyways, thanks again for the updates and I look forward to hearing from you again soon,
Joe
Mark says
Hi Benjamin & Leron,
First of all, thank you Leron for this another detailed tutorial but since I’m using Mac I’m not sure if I have properly followed your instructions.
I installed the Google Cloud SDK by using the Google’s guide for MAC OS X Interactive Installation here – https://cloud.google.com/sdk/docs/downloads-interactive
I was able to follow steps 1, 2 and 3 though some parts are not totally the same as your guide since I’m using Mac.
On step 4, I’m using Mac’s default terminal instead of PuTTY terminal. Below is the screenshot of the output of the terminal.
https://goo.gl/H1mhSz
One of the SSH key file generated was different from your screenshot in step 4. Below are the SSH key files generated by Mac’s default terminal.
https://goo.gl/LNkP2U
I believe the 1st file is the same as the middle SSH PuTTY key file on your screenshot while the 2nd file is the same as the bottom SSH key file.
In step 5, I added the SSH key file ‘google_compute_engine’ without the .pub extension on FileZilla.
In step 6, I opened ‘google_compute_engine.pub’ file using Google Chrome and copied the entire content and paste it on the SSH text area on my VM instance page.
1st try, I replaced the last part of the text with any name that I want.
2nd try, I did not change the last part of the text so it is in this format ‘[email protected]’
3rd try, I replaced the last part of the text with Benjamin Waller’s recommendation ‘markxxxxx@wordpress-1-vm:~$’
In step 7 (which you still labeled as step 6), I used below as entries but all failed to connect:
HOST: sftp://External IP address
USERNAME: Used the username that I used in the SSH text area on my VM instance page. Tested different versions as mentioned above.
Below pops-up after I click ‘Quickconnect’:
https://goo.gl/hLQZgh
Below errors also appears on FileZilla:
https://goo.gl/T7ncti
@Benjamin, I believe you have some idea on this issue hope you can help me on this.
Hopefully someone has some idea on how to fix this issue.
Benjamin Waller says
Hi Mark,
I didn’t use the Quickconnect feature in FileZilla. I used the File Manager to set my connect up. I don’t think the Quickconnect will work.
I have uploaded a screenshot of my settings page and have only blurred out the host address but all the other setting appear there.
The main thing is to point to the local .rsa key file.
See my screenshot below.
https://www.sugarsync.com/pf/D6922769_08201020_765538
And I used the following video as a guide it is on connecting via SSH and SFTP using FileZilla on a Mac.
https://www.youtube.com/watch?v=R8C66NwMJLs
All the best,
Benjamin
Mark says
Hi Benjamin,
I’ve been waiting for this answer.
Thanks a lot!
That solved my issue.
More power to you and to Leron!
Cheers,
Mark
Julio says
Joe,
Thank you for your tutorials. They have been very useful for me. They are very well explained. They are a great asset for the whole community.
I wish you the best, and the best for OnePageZen.com
Reagards,
Leron Amin says
Thanks for the feedback Julio!
I am glad to hear the tutorials have been helpful to you!
Best regards, 🙂
Joe
Johnny says
Joe, This has been an amazing tutorial. Thanks for the time you put into it! I followed along, ran into the same spot of trouble that the above commenter ran into (insufficient permissions) and your suggestions for him worked for me as well.
I hope that you can help me, though, with an expected complication. When I connected through file zilla there were no APP files (really no files at all in the bitnami file folder or the other file folder that had my username) and now when I connect to my wordpress site (using the external ip) it can’t connect. I seem to have lost the entire site.
I have a hard copy backup on my computer but before I go through that process I was hoping it was something simple that I could do to restore what I had.
Thanks
Johnny
Leron Amin says
Hi Johnny,
Did you reserve a static IP for your website? If not, that may have caused the issue.
I don’t think your entire site would be lost due to establishing a connection with Filezilla, there are likely other factors at play.
What happens when you try to access your website? What does the page look like, and what error is it showing? The more details you provide the more easily I will be able to help you address the problem.
Talk to you soon, 🙂
Joe
Johnny Spangler says
Thanks for the reply!
I get the classic “this site can’t re be reached” error in the web browser. This is the case even when I use the external IP (35.164.215.223) found on my compute engine details (I also wondered about a change of IP, but it seems to be the same I have forwarded as always).
Let’s see, more details…
I used http://www.cloud.google.com/wordpress/ to set up the wordpress set on google cloud.
I associated a domain I have with the site using google domains
The site was working before I tried started to play around with key pairs and after I got filezilla connected I couldn’t find the site anymore.
Other than that I am not sure what other information may be helpful. Any advice is welcome. The only thing I can guess is I messed up access to the site with key pairs (if that is even a thing)
Thanks again.
Leron Amin says
Hi Johnny,
Is your A record in your Cloud DNS pointing to 35.164.215.223? Also make sure your VM is running.
If you didn’t have a static IP address reserved for your instance and you stopped your instance for any amount of time, it could have been assigned a new external IP (different from the one your A record is currently pointing to).
So the first thing I would recommend doing is to going to your Cloud DNS, checking your A record, and making sure it matches the external IP assigned to your virtual machine.
Let me know how it goes.
Talk to you soon, 🙂
Joe
Rachel says
Hi Joe,
When I tried to install google cloud SDK, it always has the same error: failed to fetch listing components from server.
I have set up filezilla according the following tutorial though, not sure if I need to install google SDK again?
https://onepagezen.com/google-cloud-ftp-filezilla-quick-start/
What’s the difference between
Manage WordPress Files on Google Cloud Platform and Google Cloud FTP Setup with FileZilla (Quick Start) ?
Are they serve the same functions?
Look forward your reply, thanks.
Leron Amin says
Hey Rachel,
The Manage WordPress files on Google Cloud tutorial integrates two separate tools: FileZilla and Cloud SDK. However, a lot of users only want to use FTP and not Cloud SDK, which is why I created the FileZilla Quickstart.
In your situation, you should likely be using the FileZilla Quickstart tutorial. If your Google Cloud projects become more complex over time, then you might look into installing SDK as well.
Hope this answer helps, and feel free to reach out if you have additional questions! 🙂
Joe
Phillip Samuel says
Hi Joe,
I’ve followed you on your youtube channel and your videos have been a lot of help to me. i’ve successfully connected to my wordpress files through filezilla but i tried deleting and editting some of those files, and i couldn’t…i always get this error of permission denied…don’t know what to do…would appreciate if you help on this case… thanks
Phillip
Leron Amin says
Hi Phillip,
Check out this tutorial about fixing permission errors on FTP.
Let me know if you have any questions!
Best regards,
Joe
Fahim says
hey sir help me i am getting error in filezill about permission denied.I tried your tutorial to fix permissions problem but it does not work. can u make a video about it please
Leron Amin says
Hello Fahim,
Check out this tutorial on how to fix FTP permission errors.
Let me know if you have questions!
Thanks,
Joe
Susu says
Hi Joe,
Thanks for these great guides, you are so kind to do this 🙂
I follow every video to do the work. When I was doing this part (Install the Google Cloud SDK), I made a mistake, I’d prefer to use the zone as when I set up my instance or select 21. But I accidently wrote 12. Are you able to show me how to edit it? I have read few articles, but I’m still confusing…
Thanks for your time 🙂
Leron Amin says
Hi Susu,
I am glad you have found the tutorials helpful! 😀
The default zone properties are stored in the MetaData section of your Google Cloud project.
to edit these setting, run the command in the documentation here.
This is the command you are looking for:
gcloud compute project-info add-metadata \--metadata google-compute-default-region=europe-west1,google-compute-default-zone=europe-west1-b
Just make sure to change the command with the default region and zone that you wish to use for your projects.
Let me know if you have any other questions!
Thanks,
Joe
Ronald says
Hi ! Thank you very much! I followed you here from your youtube channel. I want to know how can I find the path of wordpress files in Google Click-to-deploy type installation, I’m trying to find the principal folder and I don’t find it. Hope you can help me! Thanks!
Ronald says
Finally I’ve found it: /var/www/html
Thanks a lot for your helpfull videos!
Leron Amin says
Hi Ronald,
I’m glad you found it!
Best regards,
Joe
Toni says
Hello Joe
I followed your tutorial and now I cannot access my website anymore. It shows “Apache2 Debian Default Page” saying “It works!”
https version is not accessible at all.
What should I do? Thanks
Leron Amin says
Hi Toni,
Sounds like your Apache service isn’t running. If you’re using the Bitnami version of WP on GCP, try restarting it by executing:
sudo /opt/bitnami/ctlscript.sh restart apache
If you’re using Click-to-Deploy, try restarting it by executing:
sudo service apache2 restart
You will receive an error message notifying you if Apache is unable to restart.
Let me know if you have any other questions.
Thanks,
Joe
Toni says
Thanks for the reply Joe
I am using bitnami configuration. I executed “sudo /opt/bitnami/ctlscript.sh restart apache” and got this output:
“Unmonitored apache
Syntax OK
/opt/bitnami/apache2/scripts/ctl.sh : apache not running
Syntax OK
(98)Address already in use: AH00072: make_sock: could not bind to address 0.0.0.0:80
no listening sockets available, shutting down
AH00015: Unable to open logs
/opt/bitnami/apache2/scripts/ctl.sh : httpd could not be started
Monitored apache”
Any suggestions?
Thanks, Toni
Leron Amin says
Hey Toni,
Did you configure a password for your SSL certitificate?
Toni says
I did not, I just pressed enter like you did in the video regarding SSL on bitnami configuration. I have All-in-one WP migration backup so it is not a big deal, I can set a new one but if I can get this one back I would be super thankful
Leron Amin says
Hey Toni,
Did you see this support thread?
Check out the first solution and see if it works.
Thanks,
Joe
Toni says
I get this after running “killall -9 httpd”:
httpd: no process found
Leron Amin says
Hi Toni,
Run the command: sudo netstat -ltnp | grep ‘:80’
What does it say?
Toni says
I get this:
“tcp 0 0 0.0.0.0:80 0.0.0.0:* LISTEN 513/apache2 ”
Thank you for your replies, really means a lot.
Leron Amin says
Ok,
If you’re using Bitnami, run the following:
sudo kill -9 513
sudo /opt/bitnami/ctlscript.sh restart apache
Next run: sudo netstat -lpAinet
What is the output?
Toni says
This is the output:
http://imgur.com/a/85acB
Looks messy if I post it directly here.
Leron Amin says
Ok – What was the tutorial that you were working on that caused the problem? The SSL tutorial?
Toni says
It was this tutorial that caused the problem. I successfully installed SSH and had https version of website. But after this tutorial I got this error. But I will set it up again, I have a backup so I will configure SSL, email and this tutorial. I messed something up most likely because I have followed this tutorial many times before on another websites and it worked everytime. Thank you for your support, amazing work with onepagezen, don’t know what I would do without your tutorials.
Have a nice day, Toni
Leron Amin says
Sounds great Toni!
I’m glad to hear the tutorials have been helpful to you!
Best regards,
Joe
zion says
Hi Joe,
When I make access permission in failzilla
There is an error “set attrs for /var/www/html: permission denied”
please help me
Thanks
Leron Amin says
Hi Zion,
Where are you getting the error? In the FileZilla or PuTTY dashboard?
Thanks,
Joe
zion says
FileZilla
zion says
Hey I’ve been able to solve the problem
I wrote this line in shll
sudo chown username:username -R /var/www
That’s a solution I found here:
https://askubuntu.com/questions/178231/permissions-issue-when-trying-to-save-file-to-var-www
Leron Amin says
Hi Zion,
I am glad you figured it out!
Also, thanks for sharing the solution.
Myself and many others will find it very useful!
Thanks,
Joe
eric says
hey bro can you create a tutorial on how to create a sub domain with wordpress on it?
Leron Amin says
Hey Eric,
Will do! If you’re planning on running multiple WordPress sites on GCP I would recommend using the Multisite pre-built solution.
However, running WordPress on a subdomain of a domain with more than one CMS would be more complicated to configure.
Thanks for the idea!
Best regards,
Joe
Pedro says
Joe, please help me.
When I’m goin’ to connect with Filezilla appears
“Disconnected: No supported authentication methods available (server sent: publickey)”
What should I do?
Leron Amin says
Hi Pedro,
This means that there was an authentication issue.
Make sure that you’re using the correct login credentials when trying to access your site via FileZilla.
Talk to you soon,
Joe
Mark Wattchow says
Hi Joe,
Brilliant step-by-step explanation. Many thanks. My website is down at the moment and I need back-end access. One thing I’m not sure about is the bit about
“Replace the deleted text with the name of your WordPress installation. If you’re using the Bitnami WordPress installation, you will add “bitnami” at the end of the text.”
I used “Google click to deploy” to install WordPress. How exactly do I find out the “name of the WordPress installation”? It’s not the project name? Or VM instance? I’m sure this has a simple explanation, but I’m not sure what it is!
Thanks,
Mark
Leron Amin says
Hi Mark,
I’m glad the tutorials have been helpful for you 🙂
“bitnami” is simply the username used for authentication. You can change “bitnami” to whatever you want the username to be when you connect to your instance via FileZilla.
Hope this helps!
Thanks,
Joe
Benjamin Waller says
Hello Joe,
Great tutorial again. I have a few questions. After setting up a site on GCP with SSL certificates, what is the best way to manage images? Should I be uploading them within the WordPress dashboard or do I have to use FTP (FileZilla) for the SSL to work correctly? Or as an alternative, would it be better to store these image files into a storage Container on GCP and link to them that way?
Leron Amin says
Hi Benjamin,
I often ask myself this question, and unfortunately I don’t have a good answer for you. For a basic WordPress blog, I’d recommend just uploading images to your WordPress database through the WordPress dashboard. If you will be running a ‘database’ style website, with an expansive library of large files, you may want to consider configuring storage buckets to serve the data. It just depends on the size and type of site you will be running. Hope this helps a bit, and thanks for posting this comment.
Joe
Abbas Mehran says
Hi Joe,
Thank you again, I found where was the problem. I had pointed the A record to a wrong IP. It should have been pointed to my account IP at Bluehost. Now it works, though I need to rework many pages, slides and images.
Again I appreciate your great tutorials.
Abbas
Leron Amin says
Hi Abbas,
I am glad to hear that the tutorials have helped you!
Let me know if you any other questions as I would be happy to help!
Thanks,
Joe
Abbas Mehran says
Hi Joe
Thank you for your excellent tutorials, so clear and easy to follow. I have learned so much from your videos. Basically I did everything to transfer my sites from Bluehost to Google Cloud Platform, by following your step by step tutorials. However, I am stuck with one final thing and that is changing IP address to my real domain URL. While I can access my sites through WP admin, I get error by trying to access using URLs. I really appreciate all you have done to train ignorant folks like me, and will be grateful if you could give me a hint to solve this conundrum.
Kindest regards,
Abbas
Luu Vu says
“permission denied” when I made any changes on filezilla. Please help me
Leron Amin says
Hi Luu,
In FileZilla, you can change permissions settings by right clicking on a folder and changing the permission levels.
Check out this tutorial about what the numbers mean.
Let me know if you have additional questions,
Joe
Mohamed Hak says
Hi Joe,
when I right click to change permission, I get error : set attrs for /opt/bitnami/wordpress/wp-content/uploads/2017/10: permission denied
What is the problem and How can I fix it?
Thank you
Leron Amin says
Hey Mohamed,
Are you trying to change permissions from the FileZilla console? I don’t know how to do that, or if it’s possible with GCP.
What you will have to do is connect to your VM instance via SSH and change the permissions of the uploads directory:
sudo chmod -R 777 /opt/bitnami/wordpress/wp-content/uploads
Then you can try again to edit the files in FileZilla.
Hope this helps, 🙂
Joe
Mohamed Hak says
Hey Joe,
Thank you for taking the time and answer and also writing tutorials in the first place, You are the only guide on the internet for this topic.
Yes I tried to change the permissions through Filezilla by right-clicking on the folder and selecting file permissions instead of the SSH.
My real problem is that I have a plugin problem and the developer asked for my FTP account and password to fix it.
Can you tell me please how can I provide him with this information?
Will he be able to upload the plugin by FTP if I give him the access or I have to change permissions first?
Last question is, as you can see I only succeeded to get this far only because of your help and amazing tutorials, Do You think I am better of with platform like cloudways? Is there alot of things I need to know about to run my woocommerce site on google cloud by myself?
I really can’t thank you enough.
Best regards,
Mohamed
Leron Amin says
Hey Mohamed,
They would need your private key file, your IP of your instance, and the username attached to the keyfile (which was bitnami in the example I sent you).
Also – they won’t be able to upload plugins unless you change the default permissions of your plugins directory.
I don’t know much about Cloudways, but here is a break down of the cost of Cloudways vs self-hosting:
Using Cloudways’ most basic plan (1.7GB RAM 1 vCPU machine) would cost $34.17 per month. Self-hosting on GCP would cost $21.73 for that same configuration.
The catch, however, is that a 1vCPU 1.7GB machine is overkill for most WordPress websites. Most of the WordPress websites that I run on GCP are using a micro 0.6GB share 1vCPU machine, which costs around $5.00 per month to run. Also, if you self-host on Google Cloud you can always upgrade your machine and specs if you ever need to.
For that reason I would not use Cloudways if you feel comfortable enough hosting your own websites on GCP, because it will save you a great deal of money in the long run. The reason companies like Cloudways exist in the first place is because most people don’t feel comfortable using GCP on their own, or using the command-line-interface, but it seems like you’ve already overcome that hurdle.
Anyways, I hope this information helps. If you do end up using Cloudways, please let me know how their service is, as I haven’t heard much about them until now.
Talk to you soon, 🙂
Joe
Mohamed Hak says
Hey Joe,
Really thank you for getting back to me,
So before I consider going to cloudways which I hope not for the all the reasons you mentioned, How can I create multiple SFTP accounts so that I can share with developers who need access to the site?
I am asking this because when I try to find answer to this on internet they show how to do it easily in cpanel which I don’t have in GCP.
So how can I create an account for them then deleted later after they are done?
Thanks alot
Mohamed
Leron Amin says
Hey Mohamed,
What you could do is create SSH key pairs with unique usernames; these are technically “accounts”.
You would add the public key in the SSH keys section of your VM instance’s “edit” page. Then, the plugin developers can use your instance’s IP and the key username (aka “comment”) to access your instance via SFTP.
This assumes, however, that you’ve sent the developer your private key and that they added it to FileZilla.
To prevent them from accessing your project after they’ve finished working, just remove the public key from your instance’s “edit” page.
Ideally, if you are hiring an experienced developer to work on your Google Cloud Platform website, what you would do is follow this tutorial.
The developer can decide themselves if they require an SFTP interface, and then configure it themselves if they need to.
To delete the user after they’ve finished working, just go to your IAM section and remove their Gmail account from the list; then, they will no longer be able to access your project.
Hope this helps and good luck 🙂
Joe
David Lee says
Hi Leron,
Thank for providing so much useful video about google cloud platform.
need your help.
have an error : server refused our key.
here is the video about the error https://youtu.be/hwzMFZsQ7bY
thanks for help,
David Lee
Leron Amin says
Hey David,
This is a common issue, that may or may not have to do with the formatting or your key file text.
If you still haven’t resolved the problem, check out these tutorials for possible solutions and see if they help.
https://askubuntu.com/questions/204400/ssh-public-key-no-supported-authentication-methods-available-server-sent-publ (answer number 1)
http://stackoverflow.com/questions/20294381/google-server-putty-connect-disconnected-no-supported-authentication-methods-a
As I help you through the problem I need to know: did you already generate key files? Or was this your first attempt at doing so? Check to see if you have key files located at C:/users/yourusername/.ssh. Based on the nature of the error, it is likely that SSH key files already exist.
Let me know.
-Joe
Michael says
Hi, Leron,
excellent video, thanks 🙂
Ran into a problem: after pasting gcloud command into the PuTTY terminal:
ERROR: (gcloud.compute.ssh) Could not fetch instance:
– Insufficient Permission
thanks for help,
Michael
Leron Amin says
Hi Michael,
Your insufficient permission error likely has to do with your access scopes.
To change them, follow these steps as outlined in the Google Cloud documentation:
1. Go to the VM instances page in the Compute Engine.
2. Click on the VM instance for which you want to change the service account.
3. If the instance is not stopped, click the Stop button. Wait for the instance to be stopped.
4. Next, click the Edit button.
5. Scroll down to the Service Account section.
6. From the dropdown menu, select the desired service account.
7. To change scopes, in the Access scopes section, set the appropriate scopes for your needs. As a best practice, specify only the access scopes that your VM instance requires. If you’re not sure of the proper access scopes to set, choose Allow full access to all Cloud APIs and then make sure to restrict access by setting IAM roles.
8. Click the Save button to save your changes.
Source: https://cloud.google.com/compute/docs/access/create-enable-service-accounts-for-instances#changeserviceaccountandscopes:
Let me know if this fixes your problem.
-Joe
Jane says
done. the key is generated but now the site goes offline
Leron Amin says
Hi Jane,
The key generating tools it not ‘connected’ to your website’s VM or server, so generating a key is not likely the reason why your site went offline.
There may be other underlying issues with your server, or VM, that may need to be addressed. The first place I would check is your server logs at /var/log and check what error number your browser is displaying. For example: NX_domain, HTTP 500 Server Error, etc.
Let me know if you have any questions,
Joe
G.L.Gurjar says
I installed wordpress on google cloud hosting, but when I replaced the ip address with the domain, then after I login to the admin panel, my login details are incorrect.But I filled all the details correctly, yet it is telling wrong and the password is not reset as well