IMPORTANT: There is an updated version of this tutorial available here.
In this tutorial you will learn how to configure free, auto-renewing SSL certificates for WordPress websites that are hosted on Google Cloud Platform using the Click-to-Deploy version of WordPress.
If you’re using the Bitnami version of WordPress on Google Cloud Platform, you can view that SSL certificate tutorial here.
Before getting started with this tutorial, you should have already installed WordPress on Google Cloud Platform, and set up a domain name for your WordPress website.
There are 10 steps in this tutorial:
1. Connect to WordPress via SSH
2. Install Git
3. Install CertBot Client
4. Generate Certificates
5. Setup Certificate Auto-Renewal
6. Configure the Certificates
7. Configure HTTPS Redirect
8. Restart your Apache Server
9. Edit WordPress Settings
10. Change Permalink Structure
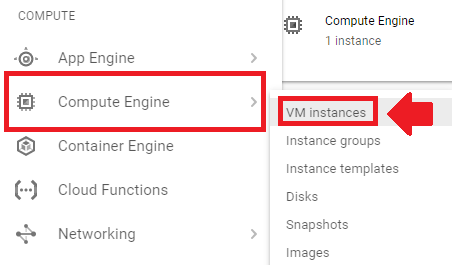
1. Connect to WordPress via SSH
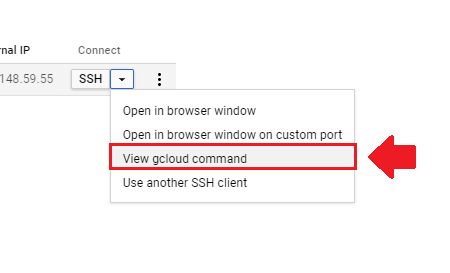
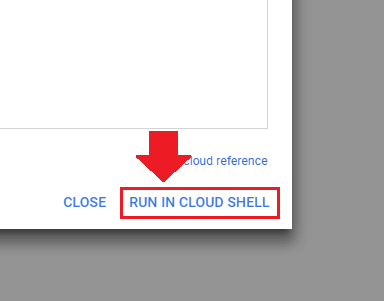
Go to your Google Compute homepage and click the hamburger menu in the upper left-hand corner.Go to your Compute Engine, then to VM instances to access your WordPress installation.Once inside your Compute Engine, click on the arrow next to the SSH button and select “View gcloud command”.After clicking on “View gcloud command”, click on the RUN IN CLOUD SHELL link in the pop-up window that appears.
2. Install Git
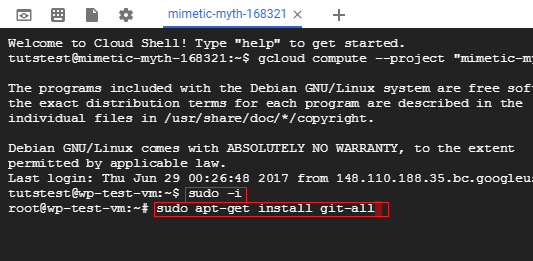
Once you’ve connected to your instance, press enter to run the gcloud command. Next, you will run the commands below to tell Apache to install Git. The Sudo -i command will put you in root mode, and the apt-get command will tell Apache to download Git. Press “ENTER” after entering each command.
sudo -i

sudo apt-get install git-all
3. Install CertBot Client
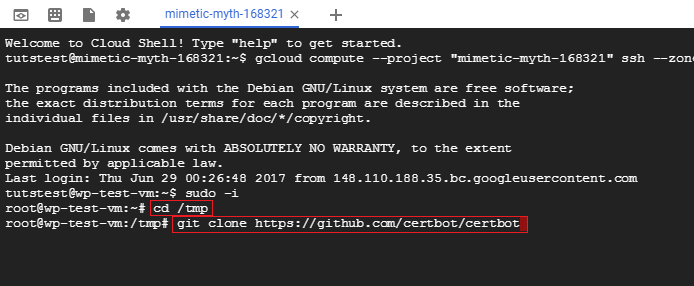
Now that you’ve installed Git, you will enter the “cd /tmp” command to navigate to your temporary file directory. Next, you will run the “git clone …” command to download the certbot files.
cd /tmp

git clone https://github.com/certbot/certbot
After running each of these commands, you can stay in the same SSH window or exit and open a new one.
4. Generate Certificates
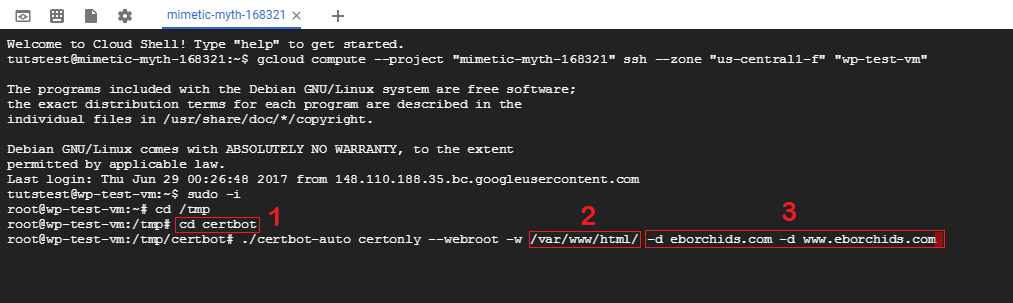
In this step, you are going to generate your certificates. Based on the picture, figure 1 represents the command to access your certbot directory. Figures 2 and 3 are part of one command, where 2 is the path to your website’s root directory, and 3 is your website’s domain name. In this case, you will be securing both the non-www and the www-version of your domain.
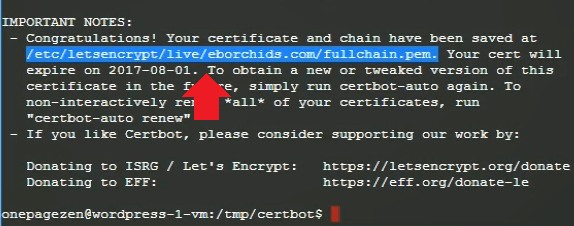
After entering these commands, your certificates will be generated. Take note of the directory where your certificates are installed.
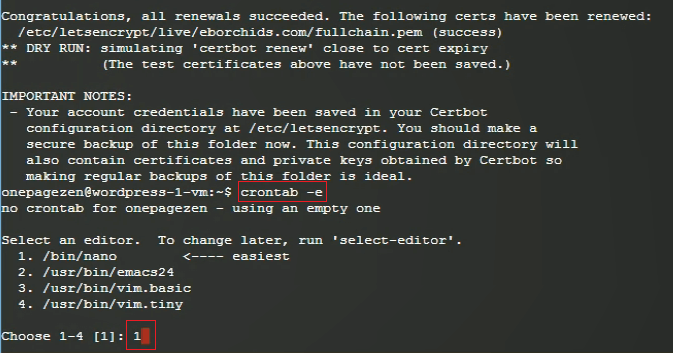
5. Setup Certificate Auto-Renewal
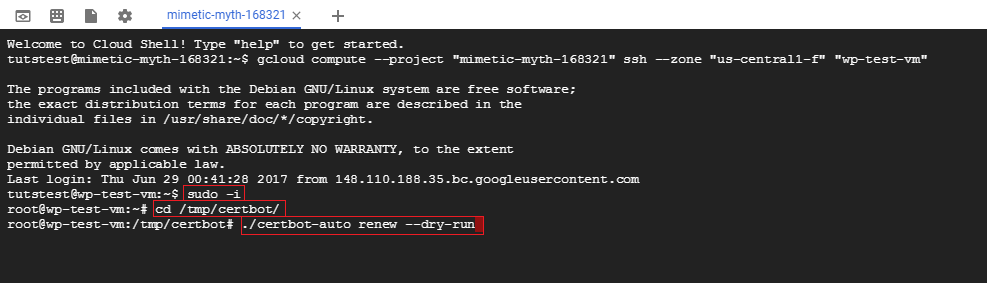
Before setting up auto-renewal for your certificates, you are first going to run the commands below in order to test the auto-renew function.
sudo -i


cd /tmp/certbot/


./certbot-auto renew --dry-run
Next, you will use the crontab command to set a schedule for checking for renewals. Then, you will enter 1 to choose nano as our text editor to edit our crontab file.
crontab -e


1
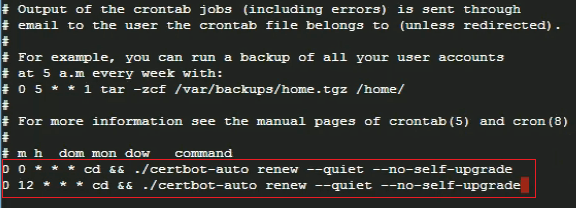
Next, the crontab file will open and you will enter a command that tells the server to check for certificate renewals two times per day.
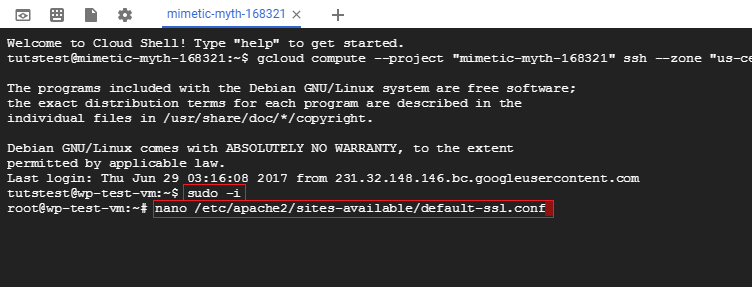
6. Configure the Certificates
The next step is to configure your certificates. You will run the first command to enable root access, then the second command to edit your SSL configuration file.
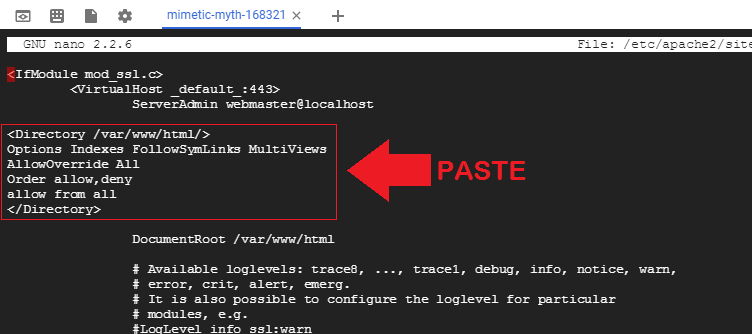
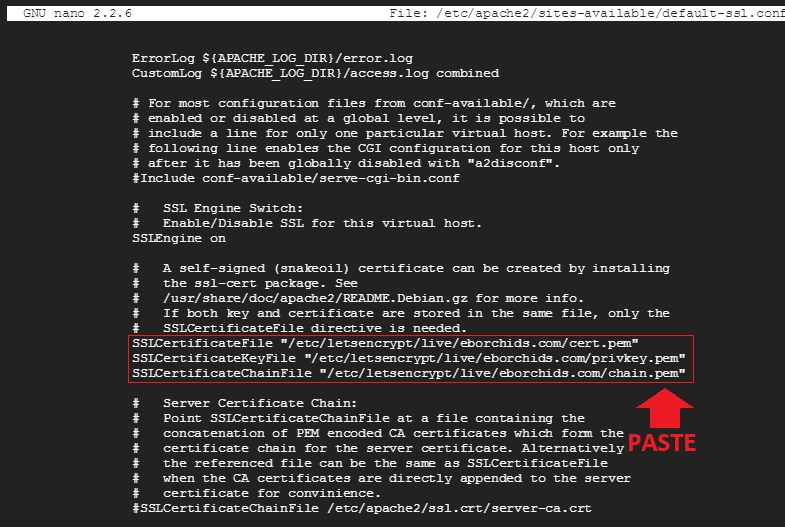
Once you're inside of the default-ssl.conf file, you will paste the lines of code below towards the top of the file.
<Directory /var/www/html/>

Options Indexes FollowSymLinks MultiViews

AllowOverride All

Order allow,deny

allow from all

</Directory>
While you're still inside of the default-ssl.conf file, use the arrow key to scroll down and identify the existing two certificates. Delete the existing SSL certificate file paths, and replace them with the three file paths as shown below. Remember to switch out eborchids.com with your own domain name.
After adding this code, enter ctrl+o to save changes, followed by ctrl+x to exit back to your home screen.
7. Configure HTTPS Redirect
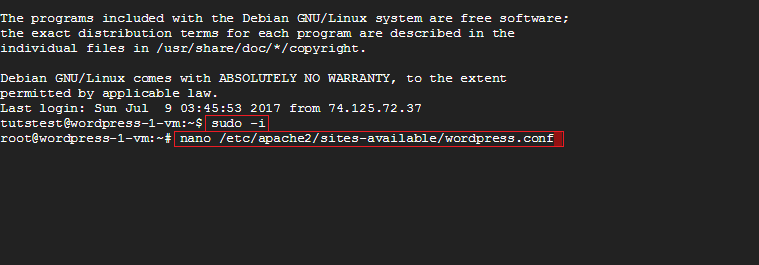
The next thing you will do is configure your Apache server to only serve the HTTPS version of your website. To do this, you will edit your wordpress.conf file, which you can access by running the following commands:
sudo -i


nano /etc/apache2/sites-available/wordpress.conf
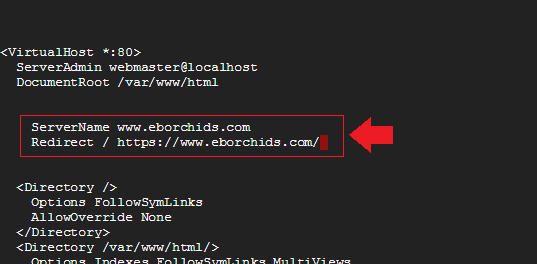
Once inside of the wordpress.conf file, you will add the code below to tell your server to only serve the HTTPS version of your site. Replace "eborchids" with your website's domain name.
After adding the code to your wordpress.conf file, enter ctrl+o to save your changes.
8. Restart your Apache Server
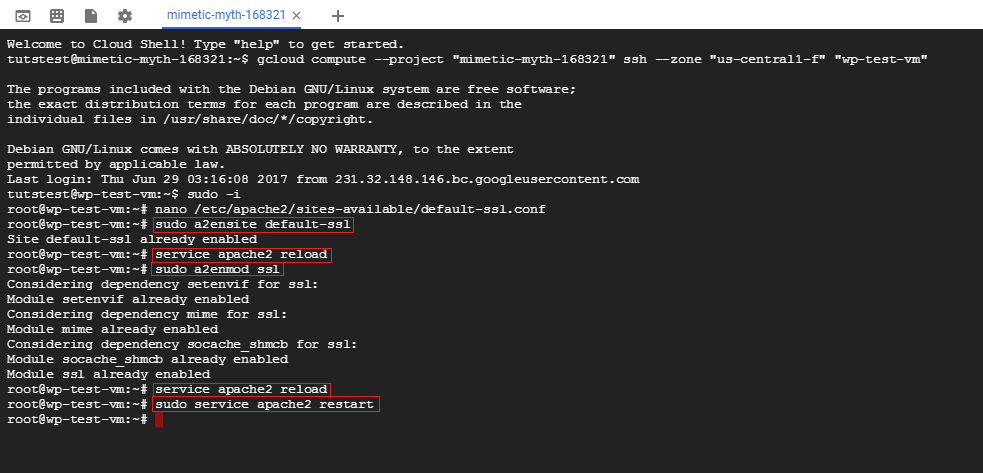
In order for your certificate changes to take effect, you need to restart you Apache server by entering the following commands as shown below.
sudo a2ensite default-ssl

service apache2 reload

sudo a2enmod ssl

service apache2 reload

sudo service apache2 restart
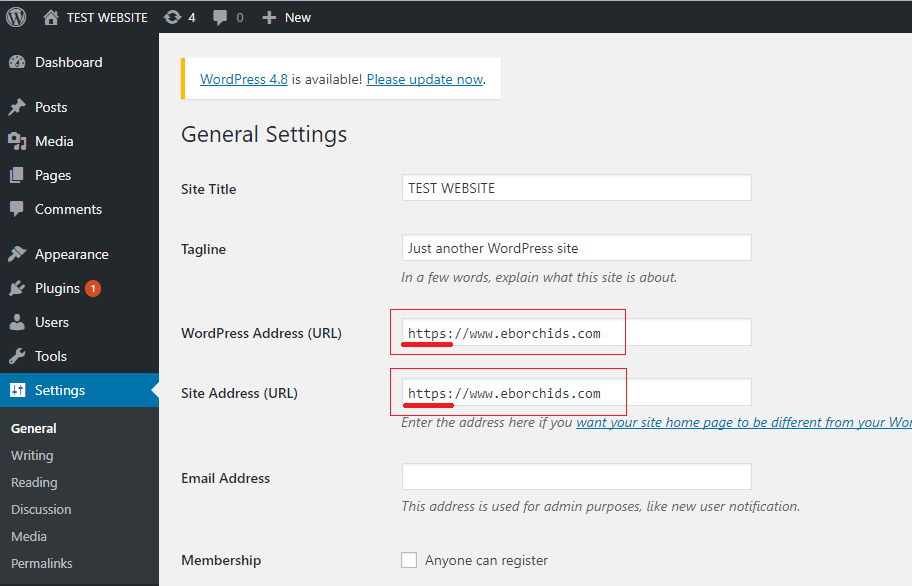
9. Edit WordPress Settings
The last step in this tutorial is to go into WordPress > Settings > General, and replace your current domain name with the https:// version. Click to save changes. If your SSL certificate isn't working, check your configuration at www.ssllabs.com/ssltest/.
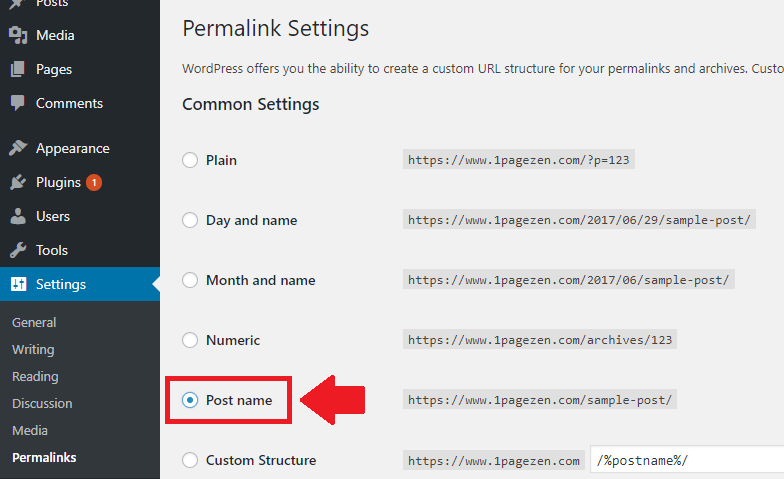
10. Change Permalink Structure
It is recommended that you change your permalink structure to "Post name" after setting up your SSL certificates.
Did it Work?
If your SSL certificates were configured properly, you will notice that your website is being loaded with a green padlock icon.
Because you configured auto-renewal for your certificates, you don't ever need to renew them or setup new ones.
If you have questions or comments, please leave them below!
The video you watched is different from the steps and video outlined in this tutorial.
Unfortunately, I am unable to load your website, which means there is probably a syntax error or possibly a DNS error somewhere in your configuration. You will need to resolve this error before you’ll be able to connect to your server. A good place to start is to check your Apache configuration for errors by running the following command:
No SSL certificates were found on colorwale.in. Make sure that the name resolves to the correct server and that the SSL port (default is 443) is open on your server’s firewall.
Verify that your instance is allowing HTTPS traffic.
Go to your VM instances dashboard. Click on your instance. Next, click the ‘Edit’ button at the top of the page and make sure that the box that says “Allow HTTPS Traffic” is checked. Then click the “Save” button at the bottom of the page.
The certificate is not trusted in all web browsers. You may need to install an Intermediate/chain certificate to link it to a trusted root certificate. Learn more about this error. The fastest way to fix this problem is to contact your SSL provider.
I looked up your certificates and the issuer is displaying as “Fake LE Intermediate X1”.
I did a Google search on the issue and it appears to be a common problem with a number of causes. Out of the resources I’ve found, I’d recommend checking out the following two: [1][2].
The first thing I would do, as mentioned in the first link, is to check the staging settings in the /etc/letsencrypt/cli.ini file.
there is no such file cli.ini in /etc/letsencrypt/ also i tried 1st
this solution and made changes acccordingly and restart server
The settings are stored in /etc/letsencrypt/renewal/*.conf. You can review or change them using any text editor. The relevant setting for staging vs. production would be the server line, for which the production value is:
That looks like a very nice hotel – I will have to there stay next time I am in Vietnam!
Anyways, I ran a test for the domain and it’s not recognizing any of the certificates on the server. So there is an underlying issue with the certificate configuration.
Also – there is an updated version of the tutorial, which you can view here. It should be slightly less complicated to follow.
Hope this helps and let me know if you have any questions,
Joe
Great article! It helped me get my certificate setup a few months ago. Today for some reason my site says the certificate expired. I ran through this again to make sure auto-renew was setup correctly and it is.
Follow the instructions in this tutorial for instructions on how to renew your certificate.
Please let me know if you have any questions,
Joe
Tonysays
Thanks Joe! Got it renewed and everything back in order. Thanks for these fantastic tutorials. You guys are the only site that had this info on setting up SSL with google cloud click to deploy wordpress!
I can’t acess my site. I have the follow error: SSLCertificateKeyFile: file ‘/etc/letsencrypt/papelariagaby.com.br/privkey.pem’ does not exist or is empty
Action ‘configtest’ failed.
I found this very informative. I became confident to migrate our website from GoDaddy to Google Cloud in 2 days after reading your blog. I have a question. My current website is live with the SSL I purchased & renewed from GoDaddy. Now since I built the website in Google Compute Engine want to use that same SSL on the website. How can I use that certificate in GC WordPress? In GoDaddy certificate, it provides .crt file where I can upload those file Google WordPress? Or I need to generate a new certificate in Google? If so is this required for pricing or free?
You can import the certificate to your Google Cloud server and use it on your Google Cloud website.
I don’t have a tutorial for this, and I don’t offer support for this either. I would recommend just using a free Let’s Encrypt certificate unless it’s for an EV certificate. I say this because the basic ‘positive’ SSL certificate from GoDaddy doesn’t offer any benefits over the free Let’s Encrypt certificates.
When you issued the certificate, you need to replace example.com with your own domain name. Additionally, the SSL checker isn’t recognizing the certificates on your server, so either they weren’t added, or their file paths are incorrect.
I would recommend going through the tutorial again, step-by-step, and trying to find any errors from your first time through.
This is a difficult tutorial, so please reach out to me if you have any specific questions about the configuration.
Actually if I try to reinstall the certificate . It says the certificate already exists for the domain name and it give two options to choose from one is to renew and other is to renew and exit .. so firstly I want to remove the installed certificate and then try to install it . So it’s a request to guide me through removing of certificate at the First place .
You will have to navigate to the directory where your certificates are saved (cd /etc/letsencrypt/live/iqrainnovators.com/) and use the rm command to delete the certificates from inside of the directory. For example, from within the directory, you would run the command rm fullchain.pem to delete the fullchain file, and you would run that same command as well for the other certificates.
If you’re not comfortable doing this or if you run into any problems, try brushing up on your Linux commands by using this tutorial here.
Go into your wp-config.php file and add the 2 lines of code shown in step 7 of this tutorial. Make sure you add the lines with http only – this will give access to your website again. Then, once you fix the problem, go back into your wp-config.php file and delete the lines of code that you added.
Hope this helps,
Joe
Jaredsays
Hey, I just seriously wanted to thank you for putting this out there. I never would have figured this out without you.
I’m glad you found the tutorial helpful! And yes I know how to set up G Cloud with Comodo SSL.
In my experience, the only reason to spend the extra time and money configuring a Comodo certificate as opposed to a free Let’s Encrypt SSL certificate is when you need Wildcard or Extended Validation (EV).
Let me know if you have any questions,
Talk to you soon,
Joe
Jaredsays
I unfortunately have no choice.
I’m transitioning a stage version hosted on G Cloud to production on a domain that already has a Comodo SSL paid a few years out. The stakeholders in charge of that just renewed a couple months ago and that’s what I’m stuck with.
Part of the site speed improvements were switching to a new, faster host (i.e. Google Cloud).
The process is similar, it just takes longer because you have to wait around for the certificate authority to actually issue them (~1 day), and the certificates have to be uploaded manually.
Let me know if you have any questions or run into any issues as you configure the certificates and I will try to help.
This is a wonderful tutorial and I have gone over it many, many times. However, after days with my business on pause, I cannot get it. Now I am down with the flu on fewer working brain cells and my Comodo SSL certificate expires on 2.15.2018. (Also, I don’t think I ever got it installed correctly and paid for months of Cloud support without remedying it then)
Is it possible to simply hire you/someone to complete it for me?
I would be most grateful!
It is a single, small site on Google Compute Engine.
I have set up http to https redirect as per the steps.
But when I check the header response code it says ‘302’ which is not found for http to https redirect.
Hi Leron,
thank you for this fantastic step-by-step manual it’s very detailed but I guess all our websites are slightly different and in my case, I failed on couple of levels:
1. I had the issue with ssh key not found – solved, I have used the command panel in browser window.
2. I have completed the 2nd step and installed git. Than I had to turn down the window with command panel and got back to the process but in gcloud command.
3. When I was type the: “git clone https://github.com/cerbot/cerbot
I was asked to type the username and password. So I created the account on github and type the data. The password was not visible while typing. But it turned out that the username or password is incorrect.
You don’t have this step in your guide.
I would like to kindly ask you for help. Thank you,
Lidia
Hi Lidia,
You shouldn’t be required to enter your username and password when downloading the certbot repository.
Check out the updated version of the tutorial, where the certbot repository is downloaded from a different location.
Try downloading it from the new location, and see how it goes.
Let me know if you have any questions. 🙂
ansrisays
Do you have tutorial on adding Google Cloud CDN to wordpress hosted on Google cloud?
Not at the current moment, however, is on the list of future tutorials. 🙂
RAGHAV BHALLAsays
Hey. First of all thanks a ton for your wonderful tutorials and videos. There is literally no other source out there that has such detailed tutorials on wordpress for Google cloud.
For a personal like me who has always used cpanel and wordpress your articles have been really really helpful.
I have one question regarding this specific tutorial. I’ve already set up 6 wordpress instances on my Google cloud project and am about to enable SSL on them using this article.
Before I even followed step one of this (basically the moment I opened ssh via google) it gave me a message saying no ssh keys found, and asked me if I’d like to create them or not. I typed in Y and after this it said please enter passphrase or press enter to continue without passphrase. For some reason at this point I wasn’t able to type in anything so when I closed the window and opened it again it didn’t ask me to set up a password and automatically opens the window like it does in your video.
Am I safe running ssh without any password? I’m the only admin of my Google account and used the Google way to connect via ssh as shown in your tutorial. I really have no idea about ssh and how importantant setting it’s passwords is, please guide me with this. Thanks.
You aren’t required to put a password on your SSH keys, it’s just an option available to those who require the extra layer of security. Check out this thread for more information about the security implications of not using passwords on SSH keys.
That being said, you are generally safe running SSH without a password. It would be a different story if you were protecting very sensitive information, or if you were running are large website with multiple admins that was frequently under attack from hackers.
When you say in your comment “For some reason at this point I wasn’t able to type in anything”, here is the thing: when you type passwords into a Linux terminal, you won’t see the text that you are typing, but the text is still being typed into terminal.
So, even though you were not seeing the password text, you were still typing a password.
Another thing – use the updated SSL certificate tutorials:
Just one more thing, anyway to reset the password now? I tried deleting the ssh keys from the Metadat tab of the project but after deleting that whenever I open ssh on any virtual machine it saying “updating ssh metadata” and the password less keys are back into the metadata.
What’s the best way to delete them in Google cloud so it asks me to set password again?
I am not sure how to put a password on an SSH key after it has already been generated, but I can point you in the right direction.
Here is the Google Cloud documentation on editing SSH keys. Also check out this thread for more information about generating passwords for existing key pairs.
Hope this helps! 🙂
Joe
RAGHAV BHALLAsays
Thanks. Did go through all of that but it kinda goes over my head completely. Never used SSH before, anyway I’m guessing since I have no other admin and this google command prompt SSH cannot be used without the google account login credentials so I’m safe even with SSH keys without any passphrases. So will just leave it at that and now actually go ahead with your SSL tutorial on all websites.
You should be fine! I wouldn’t worry about not having a password on your SSH key.
Let me know if you run into any issues in the SSL tutorials – they can be challenging!
Talk to you soon!
Joe
cineramasays
Hi Leron
First, your blog is a must need resource for those moving to gcloud. What typically took me hours (or days in some cases) to work through in the past, literally took me minutes with the info you’ve provided. I think you are on to something and I am sure you will gain much traffic (and popularity) over time. Thank you!
Secondly, question: What is the reason you recommend changing to “Post Name” in the Permalinks?
I am glad that you’ve found the tutorials helpful. 😀
The reason I advocated for using “Post Name” as the permalink structure is because it is good way of keeping your URLs clean and simple, which is generally good for SEO.
sir, after 4 step ,bymistake i closed my windows , now my website is unable to load … but in IP it is opening [ http://35.202.118.229/ ] but in domain name [ asiadigitalnews.com ] it is not opening . please help me
Hey Priya,
I will try my best to help you with the problem.
First of all, what does your DNS look like?
Is your domain name configured as instructed in this tutorial?
Talk to you soon,
Joe
You may have to re-do the tutorial. Do you have a backup of your website?
You should create a new VM instance and configure it according to the tutorials, including configuring your IP address for the new domain name.
There are so many things that could have gone wrong, which would need to be addressed by accessing your server. Unfortunately, that falls outside the scope of what I offer for customer support.
Please let me know if you have questions, 🙂
Talk to you soon,
Joe
jony beensays
step :service apache2 reload
error : Job for apache2.service failed. See ‘systemctl status apache2.service’ and ‘journalctl -xn’ for details.
Hey Jony,
The “service apache2 reload” command doesn’t appear to work with all Apache configurations.
For step 8 of the tutorial, just run these following commands individually:
sudo a2ensite default-ssl

sudo a2enmod ssl

sudo service apache2 restart
Run the following commands, one at a time, and check each output to locate where the error is:
cd var/log/ && cat syslog
systemctl status apache2.service
journalctl -xn
Try to fix the error yourself, using resources such as Google and StackOverflow. As a last resort, if you’re unable to fix the error, I can help you as long as you outline the steps that you took to try and diagnose/fix the error yourself.
Talk to you soon,
Joe
Georgisays
Hi Leron
Thanks for your good work!
I have done both steps for the domain registration and still having this error.
Can you please help me?
– The following errors were reported by the server:
To fix these errors, please make sure that your domain name was
entered correctly and the DNS A/AAAA record(s) for that domain
contain(s) the right IP address.
Hi Georgi,
This is an issue with your DNS configuration.
The domain you want to setup is mydomain.dk? And you own this domain name, correct?
Check to see if your DNS records are configured properly according to this tutorial.
Talk to you soon,
Joe
Georgisays
Hi Leron
Thank you for your reply.
the domain is domain name and I have configured flowing you tutorial bu still no success.
Do you have any suggestions to guide me or help me out?
Best regards
Georgi
Hey Georgi,
It appears that the certificates were not issued properly. You server certificates are issued for http://www.example.com, but your domain is dantjesnester.dk This is based on the information provided here. You will need to repeat the tutorial and make sure that when you issue the certificates, you replace eborchids.com (or example.com) with domain name.
Hope this helps 🙂
Joe
Hi Farukh,
The setup instructions from the Bitnami WordPress SSL tutorial would be almost the same if you used Bitnami’s Ghost stack.
Best regards,
Joe
Youlong CHeysays
I fail when I tried : Restart your Apache Server
Job for apache2.service failed. See ‘systemctl status apache2.service’ and ‘journalctl -xn’ for details.
Hi Youlong,
Please copy and paste the exact command that you pasted in the terminal, and the error message that resulted.
I will take a look and help you resolve the issue!
Best,
Joe
Youlong Cheysays
Dear Joe,
Thanks for your response.
I have done carefully all of your step by step.
So I found it my false that for get change to my domain in step 6.
Domain: http://www.dunamisgirardot.com
Type: connection
Detail: Fetching http://www.dunamisgirardot.com/.well-known/acme-challenge/OucMWcgY2iRiqEcr_I87seJyaSSOte76XmE6P5yO-AA:
Connection refused
To fix these errors, please make sure that your domain name was
entered correctly and the DNS A/AAAA record(s) for that domain
contain(s) the right IP address. Additionally, please check that
your computer has a publicly routable IP address and that no
firewalls are preventing the server from communicating with the
client. If you’re using the webroot plugin, you should also verify
that you are serving files from the webroot path you provided.
Hello Jose,
Did you configure your domain name on Google Cloud before setting up SSL?
The tutorial to configure a domain name on Google Cloud is here, and needs to be completed before setting up SSL.
The next tutorial you need to complete is to configure your domain name, here.
Talk to you soon,
Joe
<meta name="viewport" content="width=devi"
To fix these errors, please make sure that your domain name was
entered correctly and the DNS A/AAAA record(s) for that domain
contain(s) the right IP address.
– Your account credentials have been saved in your Certbot
configuration directory at /etc/letsencrypt. You should make a
secure backup of this folder now. This configuration directory will
also contain certificates and private keys obtained by Certbot so
making regular backups of this folder is ideal.
Hey Jose,
I will help you solve this problem?
First things first: did you configure your Cloud DNS records as shown in this tutorial here?
Also, did you reserve a static IP address for your Google Cloud instance, as shown in this tutorial here?
Talk to you soon,
Joe
Click to deploy. Although I may have built it myself. I was trying a bunch of different things before I settled on a package. It is not Bitnami
I would have been following someones instructions on how to do it. I am not a coder
Hi Glen,
The root directory must’ve been changed somehow from the default of var/www/html.
In this situation, you may have to navigate your file directories to find your root directory, and then configure your certificates based on whatever your root directory is.
Let me know if you need further help with this.
Thanks,
Joe
To fix these errors, please make sure that your domain name was
entered correctly and the DNS A/AAAA record(s) for that domain
contain(s) the right IP address.
root@techbacks-vm:/tmp/certbot#
Hi Farukh,
This error likely means that your system is trying to configure SSL for a domain that isn’t properly linked to your instance’s external IP.
Did you link your domain name to your Google Cloud instance as shown in this tutorial here?
Did you also reserve a static IP address for your instance, as shown in this tutorial here?
Both of these things need to be configured beforehand for the SSL installation to work properly.
Talk to you soon,
Joe
Hello,
I was able to transfer the backup, but my old site was https and now I can not log in without a panel, download the error “Privacy Error” I just need to do the correct SSL configuration step by step?
Hi Paul,
Use the video as a guide, and copy and paste the commands directly from the body of the tutorial into your SSH terminal.
You will only have to change the domain name from eborchids.com to yourdomain.com.
Let me know if you have other questions!
Thanks,
Joe
Thanks for this tutorial. I’m trying to wrap my head around self-hosting a webpage, and I agree with GCloud to be a nice and cheap solution. I believe I configured my certificate the wrong way, maybe by only issuing the certbot command for bugsandbytes.com, not for both bugsandbytes.com and http://www.bugsandbytes.com. I had to add an exception when connecting to the webpage (does not make you look good). I purchased my domain with Google domains.
Hi Carlos,
The only issue with this is that the www. version of your site is not listed in the certificate files, and therefor the browser will show a security warning if you try to access the site via https. You should re-issue the certificates according to the tutorial and overwrite the old ones with the new ones. The new ones should have a request for both the www and non-www versions of bugsandbytes.com.
Let me know if you have other questions.
Joe
I think I finally got it, after reading the Certbot documentation (duh!). I just needed to expand the set of domains, I believe. Thanks for the inspiration!
Hi Leron,
When I follow all these steps and complete all the procedure, My website not running and give response that ‘server can not be reached’. Then I am unable to open my website and wp-admin. it is completely not work.
I am not able to access phpmyadmin also.
what s the issue and how can I fix it.
Hi Sanjay,
There is likely an error in one of the files that you edited.
Try restarting your Apache service and let me know what happens:
sudo service apache2 restart
Let me know and I will help you through it.
Thanks,
Joe
when i scan my Https on ssllabtest .. there it was showing that my SSL will expire in 2 months !
is that ssl is not for 1 year ??
or
should i renew it every 2 months ?
Hi Leo,
These are auto-renewing certificates that are issued for 3 month periods.
It makes no difference whether they expire in 3 months or 10 years.
Let me know if you have any other questions!
Thanks,
Joe
Hi Janis,
I’m glad to know that everything worked out!
Thanks so much for the positive feedback and for sharing the website – it is very much appreciated!
Best regards,
Joe
Hi Johannes,
Thanks so much for the comment; I was happy to see your name pop up!
Also thanks for linking to the guide on your blog – I very much appreciate it 😀
Best regards,
Joe
Not Found
<p"
To fix these errors, please make sure that your domain name was
entered correctly and the DNS A record(s) for that domain
contain(s) the right IP address.
– Your account credentials have been saved in your Certbot
configuration directory at /etc/letsencrypt. You should make a
secure backup of this folder now. This configuration directory will
also contain certificates and private keys obtained by Certbot so
making regular backups of this folder is ideal.
root@cloudshell:/tmp/certbot$
Hi Janis,
What did the command that you entered in step 4 look like?
(This one ->./certbot-auto certonly –webroot -w /var/www/html/ -d eborchids.com -d http://www.eborchids.com)
Talk to you soon,
Joe
The only mistake I see it that http:// was included in the domain name.
Let me know if this was a typo in your response, otherwise try again without using http:// in the command.
hmm, that is not the case, still struggling to get things up and running, but will dig around to find the solution.
Last error i got looks like this:
root@ozolins-me-vm:/tmp/certbot# ./certbot-auto certonly –webroot -w /var/www/html/ -d ozolins.com -d http://www.ozolins.me
usage:
certbot-auto [SUBCOMMAND] [options] [-d DOMAIN] [-d DOMAIN] …
Certbot can obtain and install HTTPS/TLS/SSL certificates. By default,
it will attempt to use a webserver both for obtaining and installing the
certificate.
certbot: error: unrecognized arguments: –webroot
root@ozolins-me-vm:/tmp/certbot#
Hi Alex,
If you accidentally issued the certificates for the wrong domain, try re-issuing the certificates again using the proper domain and make sure that the right certificates are getting called in your .conf folder.
Let me know if you have additional questions,
Joe

Priya says
Thanks a lot for awesome tutorial sir
Leron Amin says
Thanks for the feedback – I’m glad you enjoyed it!
santosh says
after 10 hrs
i have follow all command given in https://www.youtube.com/watch?v=qEgTUL5ZLV4 your tuts all run successfully but ssl test on https://www.ssllabs.com/ssltest/analyze.html?d=colorwale.in
Assessment failed: Unable to connect to the server
Leron Amin says
Hi Santosh,
The video you watched is different from the steps and video outlined in this tutorial.
Unfortunately, I am unable to load your website, which means there is probably a syntax error or possibly a DNS error somewhere in your configuration. You will need to resolve this error before you’ll be able to connect to your server. A good place to start is to check your Apache configuration for errors by running the following command:
Let me know if you have questions,
Joe
santosh says
root@colorwalessl2-vm:~# sudo apachectl configtest
Syntax OK
root@colorwalessl2-vm:~#
santosh says
i have installed evrything given in tutorials
No SSL certificates were found on colorwale.in. Make sure that the name resolves to the correct server and that the SSL port (default is 443) is open on your server’s firewall.
why this msg shoen whn ssl checking
Leron Amin says
Verify that your instance is allowing HTTPS traffic.
Go to your VM instances dashboard. Click on your instance. Next, click the ‘Edit’ button at the top of the page and make sure that the box that says “Allow HTTPS Traffic” is checked. Then click the “Save” button at the bottom of the page.
santosh says
The certificate is not trusted in all web browsers. You may need to install an Intermediate/chain certificate to link it to a trusted root certificate. Learn more about this error. The fastest way to fix this problem is to contact your SSL provider.
Leron Amin says
Hi Santosh,
I looked up your certificates and the issuer is displaying as “Fake LE Intermediate X1”.
I did a Google search on the issue and it appears to be a common problem with a number of causes. Out of the resources I’ve found, I’d recommend checking out the following two: [1][2].
The first thing I would do, as mentioned in the first link, is to check the staging settings in the
/etc/letsencrypt/cli.inifile.Let me know if you have questions,
Joe
santosh says
there is no such file cli.ini in /etc/letsencrypt/ also i tried 1st
this solution and made changes acccordingly and restart server
The settings are stored in /etc/letsencrypt/renewal/*.conf. You can review or change them using any text editor. The relevant setting for staging vs. production would be the server line, for which the production value is:
server = https://acme-v01.api.letsencrypt.org/directory
this changes
khach san thanh hoa says
sudo a2ensite default-ssl
With the above command line, default-ssl was not found
website: http://palmhotel.vn still not valid with https
help, thanks!
Leron Amin says
Hello Khach,
That looks like a very nice hotel – I will have to there stay next time I am in Vietnam!
Anyways, I ran a test for the domain and it’s not recognizing any of the certificates on the server. So there is an underlying issue with the certificate configuration.
Also – there is an updated version of the tutorial, which you can view here. It should be slightly less complicated to follow.
Hope this helps and let me know if you have any questions,
Joe
Tony says
Great article! It helped me get my certificate setup a few months ago. Today for some reason my site says the certificate expired. I ran through this again to make sure auto-renew was setup correctly and it is.
Any thoughts or things to check?
Leron Amin says
Hey Tony,
Follow the instructions in this tutorial for instructions on how to renew your certificate.
Please let me know if you have any questions,
Joe
Tony says
Thanks Joe! Got it renewed and everything back in order. Thanks for these fantastic tutorials. You guys are the only site that had this info on setting up SSL with google cloud click to deploy wordpress!
Best,
Tony
Douglas says
I can’t acess my site. I have the follow error: SSLCertificateKeyFile: file ‘/etc/letsencrypt/papelariagaby.com.br/privkey.pem’ does not exist or is empty
Action ‘configtest’ failed.
Leron Amin says
Hi Douglas,
Try changing the permission level of the file to 755. Run the command:
Let me know if this fixes the problem,
Joe
Swapan Kumar Manna says
Hello,
I found this very informative. I became confident to migrate our website from GoDaddy to Google Cloud in 2 days after reading your blog. I have a question. My current website is live with the SSL I purchased & renewed from GoDaddy. Now since I built the website in Google Compute Engine want to use that same SSL on the website. How can I use that certificate in GC WordPress? In GoDaddy certificate, it provides .crt file where I can upload those file Google WordPress? Or I need to generate a new certificate in Google? If so is this required for pricing or free?
Answer from you will be highly appreciated.
Leron Amin says
Hi Swapan,
You can import the certificate to your Google Cloud server and use it on your Google Cloud website.
I don’t have a tutorial for this, and I don’t offer support for this either. I would recommend just using a free Let’s Encrypt certificate unless it’s for an EV certificate. I say this because the basic ‘positive’ SSL certificate from GoDaddy doesn’t offer any benefits over the free Let’s Encrypt certificates.
Hope this helps and good luck,
Joe
Swapan Kumar Manna says
Hi Leron,
Many thanks for your reply and help.
Leron Amin says
No problem Swapan! 🙂
faresh sheikh says
hello ,
i have installed the certificate , but browser restricts opening of the website ,
error message is self signed certificate .
i want to uninstall the certificate .
please help
ssl installed into
http://www.iqrainnovators.com
Leron Amin says
Hi Faresh,
When you issued the certificate, you need to replace example.com with your own domain name. Additionally, the SSL checker isn’t recognizing the certificates on your server, so either they weren’t added, or their file paths are incorrect.
I would recommend going through the tutorial again, step-by-step, and trying to find any errors from your first time through.
This is a difficult tutorial, so please reach out to me if you have any specific questions about the configuration.
Talk to you soon,
Joe
MOHAMMED FARESH SHEIKH says
Hello,
Leron Amin ,
Actually if I try to reinstall the certificate . It says the certificate already exists for the domain name and it give two options to choose from one is to renew and other is to renew and exit .. so firstly I want to remove the installed certificate and then try to install it . So it’s a request to guide me through removing of certificate at the First place .
Thank you and regards
Leron Amin says
Hi Mohammed,
You will have to navigate to the directory where your certificates are saved (cd /etc/letsencrypt/live/iqrainnovators.com/) and use the rm command to delete the certificates from inside of the directory. For example, from within the directory, you would run the command rm fullchain.pem to delete the fullchain file, and you would run that same command as well for the other certificates.
If you’re not comfortable doing this or if you run into any problems, try brushing up on your Linux commands by using this tutorial here.
Hope this information helps,
Joe
MOHAMMED FARESH SHEIKH says
Thanks a ton !!
It was great help !
I reinstalled and it’s working now !!
Thank you !!
You have great explaining skill !!
Keep going !!
Leron Amin says
Great – glad it was helpful Mohammed 🙂
lin says
hello I watched this video finally forget to modify https to your web site, so I can not log in Admin, you have a better way to help me?
Leron Amin says
Hi Lin,
Go into your wp-config.php file and add the 2 lines of code shown in step 7 of this tutorial. Make sure you add the lines with http only – this will give access to your website again. Then, once you fix the problem, go back into your wp-config.php file and delete the lines of code that you added.
Hope this helps,
Joe
Jared says
Hey, I just seriously wanted to thank you for putting this out there. I never would have figured this out without you.
Blessings on you, sir.
Leron Amin says
Hey Jared,
I’m glad to hear the tutorial helped you!
Best regards, 🙂
Joe
Jared says
Dude, you’re a lifesaver.
Hey, quick question. Do you happen to know how to set up G Cloud with a Comodo SSL?
Thanks,
Jared
Leron Amin says
Hi Jared,
I’m glad you found the tutorial helpful! And yes I know how to set up G Cloud with Comodo SSL.
In my experience, the only reason to spend the extra time and money configuring a Comodo certificate as opposed to a free Let’s Encrypt SSL certificate is when you need Wildcard or Extended Validation (EV).
Let me know if you have any questions,
Talk to you soon,
Joe
Jared says
I unfortunately have no choice.
I’m transitioning a stage version hosted on G Cloud to production on a domain that already has a Comodo SSL paid a few years out. The stakeholders in charge of that just renewed a couple months ago and that’s what I’m stuck with.
Part of the site speed improvements were switching to a new, faster host (i.e. Google Cloud).
Leron Amin says
Hi Jared,
That makes sense.
The process is similar, it just takes longer because you have to wait around for the certificate authority to actually issue them (~1 day), and the certificates have to be uploaded manually.
Let me know if you have any questions or run into any issues as you configure the certificates and I will try to help.
Talk to you soon,
Joe
Jeannie Hill says
Hi Leron Amin,
This is a wonderful tutorial and I have gone over it many, many times. However, after days with my business on pause, I cannot get it. Now I am down with the flu on fewer working brain cells and my Comodo SSL certificate expires on 2.15.2018. (Also, I don’t think I ever got it installed correctly and paid for months of Cloud support without remedying it then)
Is it possible to simply hire you/someone to complete it for me?
I would be most grateful!
It is a single, small site on Google Compute Engine.
Leron Amin says
Hi Jeanine,
I sent you an email regarding the services you requested.
Let me know if you have any questions.
Thanks,
Joe
ansri says
I am trying to integrate fastly. and they have a step where they ask for ‘Certificate hostname’
to get ‘certificate hostname’ they asked my to type in
‘openssl x509 -inform pem -in YOUR_CERT_FILE_HERE.pem -noout -subject’
I tried cert.pem but did not work
Leron Amin says
Hi,
Based on how the certs were configured in the tutorial, your hostname would be yourdomain.com
Good luck!
Tim says
Unreal. This is one of the best tutorials I have ever come across! Moved from GoDaddy in no time.
Leron Amin says
Glad to hear it Tim! 🙂
ansri says
I have set up http to https redirect as per the steps.
But when I check the header response code it says ‘302’ which is not found for http to https redirect.
How do I send 301 response code?
Leron Amin says
Hi Ansri,
Try using the redirect code from step 7 of this tutorial instead and see if that fixes the problem.
Talk to you soon,
Joe
Lidia says
Hi Leron,
thank you for this fantastic step-by-step manual it’s very detailed but I guess all our websites are slightly different and in my case, I failed on couple of levels:
1. I had the issue with ssh key not found – solved, I have used the command panel in browser window.
2. I have completed the 2nd step and installed git. Than I had to turn down the window with command panel and got back to the process but in gcloud command.
3. When I was type the: “git clone https://github.com/cerbot/cerbot
I was asked to type the username and password. So I created the account on github and type the data. The password was not visible while typing. But it turned out that the username or password is incorrect.
You don’t have this step in your guide.
I would like to kindly ask you for help. Thank you,
Lidia
Leron Amin says
Hi Lidia,
You shouldn’t be required to enter your username and password when downloading the certbot repository.
Check out the updated version of the tutorial, where the certbot repository is downloaded from a different location.
Try downloading it from the new location, and see how it goes.
Let me know if you have any questions. 🙂
ansri says
Do you have tutorial on adding Google Cloud CDN to wordpress hosted on Google cloud?
Leron Amin says
Not at the current moment, however, is on the list of future tutorials. 🙂
RAGHAV BHALLA says
Hey. First of all thanks a ton for your wonderful tutorials and videos. There is literally no other source out there that has such detailed tutorials on wordpress for Google cloud.
For a personal like me who has always used cpanel and wordpress your articles have been really really helpful.
I have one question regarding this specific tutorial. I’ve already set up 6 wordpress instances on my Google cloud project and am about to enable SSL on them using this article.
Before I even followed step one of this (basically the moment I opened ssh via google) it gave me a message saying no ssh keys found, and asked me if I’d like to create them or not. I typed in Y and after this it said please enter passphrase or press enter to continue without passphrase. For some reason at this point I wasn’t able to type in anything so when I closed the window and opened it again it didn’t ask me to set up a password and automatically opens the window like it does in your video.
Am I safe running ssh without any password? I’m the only admin of my Google account and used the Google way to connect via ssh as shown in your tutorial. I really have no idea about ssh and how importantant setting it’s passwords is, please guide me with this. Thanks.
Leron Amin says
Hey Raghav,
Thanks for posting a comment!
You aren’t required to put a password on your SSH keys, it’s just an option available to those who require the extra layer of security. Check out this thread for more information about the security implications of not using passwords on SSH keys.
That being said, you are generally safe running SSH without a password. It would be a different story if you were protecting very sensitive information, or if you were running are large website with multiple admins that was frequently under attack from hackers.
When you say in your comment “For some reason at this point I wasn’t able to type in anything”, here is the thing: when you type passwords into a Linux terminal, you won’t see the text that you are typing, but the text is still being typed into terminal.
So, even though you were not seeing the password text, you were still typing a password.
Another thing – use the updated SSL certificate tutorials:
Bitnami version
Click-to-Deploy version
I hope you find this information helpful 🙂
Joe
RAGHAV BHALLA says
Thanks for the quick and resourceful reply.
Just one more thing, anyway to reset the password now? I tried deleting the ssh keys from the Metadat tab of the project but after deleting that whenever I open ssh on any virtual machine it saying “updating ssh metadata” and the password less keys are back into the metadata.
What’s the best way to delete them in Google cloud so it asks me to set password again?
Leron Amin says
Hi Raghav,
I am not sure how to put a password on an SSH key after it has already been generated, but I can point you in the right direction.
Here is the Google Cloud documentation on editing SSH keys. Also check out this thread for more information about generating passwords for existing key pairs.
Hope this helps! 🙂
Joe
RAGHAV BHALLA says
Thanks. Did go through all of that but it kinda goes over my head completely. Never used SSH before, anyway I’m guessing since I have no other admin and this google command prompt SSH cannot be used without the google account login credentials so I’m safe even with SSH keys without any passphrases. So will just leave it at that and now actually go ahead with your SSL tutorial on all websites.
Thanks for all the help. 🙂
Leron Amin says
Hey Raghav,
You should be fine! I wouldn’t worry about not having a password on your SSH key.
Let me know if you run into any issues in the SSL tutorials – they can be challenging!
Talk to you soon!
Joe
cinerama says
Hi Leron
First, your blog is a must need resource for those moving to gcloud. What typically took me hours (or days in some cases) to work through in the past, literally took me minutes with the info you’ve provided. I think you are on to something and I am sure you will gain much traffic (and popularity) over time. Thank you!
Secondly, question: What is the reason you recommend changing to “Post Name” in the Permalinks?
Thank you again…
Leron Amin says
Hey Cinerama,
Thanks for the feedback.
I am glad that you’ve found the tutorials helpful. 😀
The reason I advocated for using “Post Name” as the permalink structure is because it is good way of keeping your URLs clean and simple, which is generally good for SEO.
Check out these resource for other arguments on which permalink structure is best for SEO:
https://yoast.com/wordpress-seo-url-permalink/
https://www.elegantthemes.com/blog/tips-tricks/wordpress-permalinks
https://moz.com/blog/15-seo-best-practices-for-structuring-urls
Let me know if you have any other questions! 😀
Best regards,
Joe
Priya Chris says
sir, after 4 step ,bymistake i closed my windows , now my website is unable to load … but in IP it is opening [ http://35.202.118.229/ ] but in domain name [ asiadigitalnews.com ] it is not opening . please help me
Leron Amin says
Hey Priya,
I will try my best to help you with the problem.
First of all, what does your DNS look like?
Is your domain name configured as instructed in this tutorial?
Talk to you soon,
Joe
Priya Chris says
yea ….in DNS it is correct … but still it is not solved ?
Leron Amin says
Hi Priya,
You may have to re-do the tutorial. Do you have a backup of your website?
You should create a new VM instance and configure it according to the tutorials, including configuring your IP address for the new domain name.
There are so many things that could have gone wrong, which would need to be addressed by accessing your server. Unfortunately, that falls outside the scope of what I offer for customer support.
Please let me know if you have questions, 🙂
Talk to you soon,
Joe
jony been says
step :service apache2 reload
error : Job for apache2.service failed. See ‘systemctl status apache2.service’ and ‘journalctl -xn’ for details.
Leron Amin says
Hey Jony,
The “service apache2 reload” command doesn’t appear to work with all Apache configurations.
For step 8 of the tutorial, just run these following commands individually:
That will fix the problem.
Hope this helps, 🙂
Joe
Prassant says
sudo service apache2 restart
as you said ran only these three atlast steps but got this errors :
root@partiesmania-vm:~# sudo a2ensite default-ssl
Site default-ssl already enabled
root@partiesmania-vm:~# sudo a2enmod ssl
Considering dependency setenvif for ssl:
Module setenvif already enabled
Considering dependency mime for ssl:
Module mime already enabled
Considering dependency socache_shmcb for ssl:
Module socache_shmcb already enabled
Module ssl already enabled
root@partiesmania-vm:~# sudo service apache2 restart
Job for apache2.service failed. See ‘systemctl status apache2.service’ and ‘journalctl -xn’ for details.
site is not running : partiesmania.com
please let me know asap what should i do
Leron Amin says
Hi Prassant,
Run the following commands, one at a time, and check each output to locate where the error is:
Try to fix the error yourself, using resources such as Google and StackOverflow. As a last resort, if you’re unable to fix the error, I can help you as long as you outline the steps that you took to try and diagnose/fix the error yourself.
Talk to you soon,
Joe
Georgi says
Hi Leron
Thanks for your good work!
I have done both steps for the domain registration and still having this error.
Can you please help me?
– The following errors were reported by the server:
Domain: http://www.mydomain.dk
Type: unauthorized
Detail: Invalid response from
http://www.mydomain.dk/.well-known/acme-challenge/gHzZ3nz58o1XfgflHUm5N-DIbG17ANqVi_NPYN1VQOw:
”
<meta name="viewport" content="width=devi"
Domain: mydomain.dk
Type: unauthorized
Detail: Invalid response from
http://mydomain.dk/.well-known/acme-challenge/zkFx2UHovHBYiH9BKfKjRH-bamuYCq3WNCp3WY8KVTk:
"
<meta name="viewport" content="width=devi"
To fix these errors, please make sure that your domain name was
entered correctly and the DNS A/AAAA record(s) for that domain
contain(s) the right IP address.
Leron Amin says
Hi Georgi,
This is an issue with your DNS configuration.
The domain you want to setup is mydomain.dk? And you own this domain name, correct?
Check to see if your DNS records are configured properly according to this tutorial.
Talk to you soon,
Joe
Georgi says
Hi Leron
Thank you for your reply.
the domain is
domain nameand I have configured flowing you tutorial bu still no success.Do you have any suggestions to guide me or help me out?
Best regards
Georgi
Leron Amin says
Hey Georgi,
It appears that the certificates were not issued properly. You server certificates are issued for http://www.example.com, but your domain is dantjesnester.dk This is based on the information provided here. You will need to repeat the tutorial and make sure that when you issue the certificates, you replace eborchids.com (or example.com) with
domain name.Hope this helps 🙂
Joe
FARUKH KHAN says
can i setup ssl certificate in Ghost CMS
Leron Amin says
Hi Farukh,
The setup instructions from the Bitnami WordPress SSL tutorial would be almost the same if you used Bitnami’s Ghost stack.
Best regards,
Joe
Youlong CHey says
I fail when I tried : Restart your Apache Server
Job for apache2.service failed. See ‘systemctl status apache2.service’ and ‘journalctl -xn’ for details.
Leron Amin says
Hi Youlong,
Please copy and paste the exact command that you pasted in the terminal, and the error message that resulted.
I will take a look and help you resolve the issue!
Best,
Joe
Youlong Chey says
Dear Joe,
Thanks for your response.
I have done carefully all of your step by step.
So I found it my false that for get change to my domain in step 6.
SSLCertificateFile “/etc/letsencrypt/live/eborchids.com/cert.pem”
SSLCertificateKeyFile “/etc/letsencrypt/live/eborchids.com/privkey.pem”
SSLCertificateChainFile “/etc/letsencrypt/live/eborchids.com/chain.pem”
But It working for me well.
Your Post are very helpful.
Thanks
Youlong Chey
Leron Amin says
Hi Youlong,
I am very glad you were able to fix the issue!
Thank you for letting me know. 😀
Best regards,
Joe
jose sanchez says
por seguir este tuto se me daño la pagina web
jose sanchez says
please
Domain: http://www.dunamisgirardot.com
Type: connection
Detail: Fetching
http://www.dunamisgirardot.com/.well-known/acme-challenge/OucMWcgY2iRiqEcr_I87seJyaSSOte76XmE6P5yO-AA:
Connection refused
To fix these errors, please make sure that your domain name was
entered correctly and the DNS A/AAAA record(s) for that domain
contain(s) the right IP address. Additionally, please check that
your computer has a publicly routable IP address and that no
firewalls are preventing the server from communicating with the
client. If you’re using the webroot plugin, you should also verify
that you are serving files from the webroot path you provided.
I have this problem
Leron Amin says
Hello Jose,
Did you configure your domain name on Google Cloud before setting up SSL?
The tutorial to configure a domain name on Google Cloud is here, and needs to be completed before setting up SSL.
The next tutorial you need to complete is to configure your domain name, here.
Talk to you soon,
Joe
jose sanchez says
Friend el servicio se daño puedes ayudarme te puedo enviar mi usuario y contraseña para que lo revises y me ayudes por favor gracias
Leron Amin says
Hola José,
¿Qué tutorial causó el problema? También, describa el problema y el mensaje de error.
Gracias,
Joe
josesanchez08 says
Hello friend can you help me
”
<meta name="viewport" content="width=devi"
To fix these errors, please make sure that your domain name was
entered correctly and the DNS A/AAAA record(s) for that domain
contain(s) the right IP address.
– Your account credentials have been saved in your Certbot
configuration directory at /etc/letsencrypt. You should make a
secure backup of this folder now. This configuration directory will
also contain certificates and private keys obtained by Certbot so
making regular backups of this folder is ideal.
Leron Amin says
Hey Jose,
I will help you solve this problem?
First things first: did you configure your Cloud DNS records as shown in this tutorial here?
Also, did you reserve a static IP address for your Google Cloud instance, as shown in this tutorial here?
Talk to you soon,
Joe
David lee says
i work for me perfectly…. thank you joe
Leron Amin says
Hi David,
I’m glad it worked for you 🙂
Thanks for commenting!
Joe
Glen says
Hi Leron
Thanks for the help
I am at step 4 and get this message when installing and generating the certificates
Installation succeeded.
/var/www/html/ does not exist or is not a directory
root@cloudshell:/tmp/certbot$
Get this message before I would have to enter my email. This directory exists . Don’t know how to find the proper directory
Any help would be appreciated
Thanks
Leron Amin says
Hi Glen,
Are you using the Click-to-Deploy version of WordPress on Google Cloud, or the Bitnami version?
Talk to you soon,
Joe
Glen says
Click to deploy. Although I may have built it myself. I was trying a bunch of different things before I settled on a package. It is not Bitnami
I would have been following someones instructions on how to do it. I am not a coder
Leron Amin says
Hi Glen,
The root directory must’ve been changed somehow from the default of var/www/html.
In this situation, you may have to navigate your file directories to find your root directory, and then configure your certificates based on whatever your root directory is.
Let me know if you need further help with this.
Thanks,
Joe
FARUKH KHAN says
Hi,
I got this error in step 4., not sure how to fix. Any ideas?
IMPORTANT NOTES:
– The following errors were reported by the server:
Domain: techbacks.com
Type: unauthorized
Detail: Invalid response from
http://techbacks.com/.well-known/acme-challenge/iZ3Dio2KLP-TDSOBsK-wzorsvaCoIxmDz2lFg5xZ1oU:
”
<meta name="viewport" content="width=devi"
Domain: http://www.techbacks.com
Type: unauthorized
Detail: Invalid response from
http://www.techbacks.com/.well-known/acme-challenge/i9W8jlgRR1AfKZHAzbr-9KhLsvtKlV9sHyrrcCRjyGo:
"
<meta name="viewport" content="width=devi"
To fix these errors, please make sure that your domain name was
entered correctly and the DNS A/AAAA record(s) for that domain
contain(s) the right IP address.
root@techbacks-vm:/tmp/certbot#
Leron Amin says
Hi Farukh,
This error likely means that your system is trying to configure SSL for a domain that isn’t properly linked to your instance’s external IP.
Did you link your domain name to your Google Cloud instance as shown in this tutorial here?
Did you also reserve a static IP address for your instance, as shown in this tutorial here?
Both of these things need to be configured beforehand for the SSL installation to work properly.
Talk to you soon,
Joe
Paul says
Hello,
I was able to transfer the backup, but my old site was https and now I can not log in without a panel, download the error “Privacy Error” I just need to do the correct SSL configuration step by step?
Leron Amin says
Hi Paul,
Use the video as a guide, and copy and paste the commands directly from the body of the tutorial into your SSH terminal.
You will only have to change the domain name from eborchids.com to yourdomain.com.
Let me know if you have other questions!
Thanks,
Joe
Hamza says
DUDE!!! Thank you Thank you Thank you!
Leron Amin says
Hi Hamza,
I’m glad the tutorial helped you!
Best regards,
Joe
Carlos E. Figueroa Castro says
Thanks for this tutorial. I’m trying to wrap my head around self-hosting a webpage, and I agree with GCloud to be a nice and cheap solution. I believe I configured my certificate the wrong way, maybe by only issuing the certbot command for bugsandbytes.com, not for both bugsandbytes.com and http://www.bugsandbytes.com. I had to add an exception when connecting to the webpage (does not make you look good). I purchased my domain with Google domains.
Leron Amin says
Hi Carlos,
The only issue with this is that the www. version of your site is not listed in the certificate files, and therefor the browser will show a security warning if you try to access the site via https. You should re-issue the certificates according to the tutorial and overwrite the old ones with the new ones. The new ones should have a request for both the www and non-www versions of bugsandbytes.com.
Let me know if you have other questions.
Joe
Carlos E. Figueroa Castro says
I think I finally got it, after reading the Certbot documentation (duh!). I just needed to expand the set of domains, I believe. Thanks for the inspiration!
Sanjay says
Hi Leron,
When I follow all these steps and complete all the procedure, My website not running and give response that ‘server can not be reached’. Then I am unable to open my website and wp-admin. it is completely not work.
I am not able to access phpmyadmin also.
what s the issue and how can I fix it.
Leron Amin says
Hi Sanjay,
There is likely an error in one of the files that you edited.
Try restarting your Apache service and let me know what happens:
sudo service apache2 restart
Let me know and I will help you through it.
Thanks,
Joe
leo says
when i scan my Https on ssllabtest .. there it was showing that my SSL will expire in 2 months !
is that ssl is not for 1 year ??
or
should i renew it every 2 months ?
Leron Amin says
Hi Leo,
These are auto-renewing certificates that are issued for 3 month periods.
It makes no difference whether they expire in 3 months or 10 years.
Let me know if you have any other questions!
Thanks,
Joe
Janis says
Hi,
Just did it all over again and all was ok, thank you so much for help, I will share this site to all my friends who are migrating to Google Cloud.
Have a great day. 🙂
leo says
yeah you are right .. this Website is an unique website 🙂
Leron Amin says
Thanks Leo! 🙂
Leron Amin says
Hi Janis,
I’m glad to know that everything worked out!
Thanks so much for the positive feedback and for sharing the website – it is very much appreciated!
Best regards,
Joe
Richard says
Gracias eternamente…
Leron Amin says
De nada Richard!
Dime si tienes preguntas,
Joe
Johannes says
Thanks for the wonderful guide! I will link to this in my blog! 🙂
Leron Amin says
Hi Johannes,
Thanks so much for the comment; I was happy to see your name pop up!
Also thanks for linking to the guide on your blog – I very much appreciate it 😀
Best regards,
Joe
Janis says
Hi,
I got this error in step 4., not sure how to fix. Any ideas?
IMPORTANT NOTES:
– The following errors were reported by the server:
Domain: ozolins.com
Type: unauthorized
Detail: Invalid response from
http://ozolins.com/.well-known/acme-challenge/gowIBteHqsEld0_C3u4JOfSjfspQhi4u9z_4EgBijxw:
”
404 Not Found
<body style="color: #444; margin:0;font:"
Domain: http://www.ozolins.me
Type: unauthorized
Detail: Invalid response from
http://www.ozolins.me/.well-known/acme-challenge/QsazCyS67z1wPAW9EQHmp9chDN_UO5kmwUHBMkQs0uU:
"
404 Not Found
Not Found
<p"
To fix these errors, please make sure that your domain name was
entered correctly and the DNS A record(s) for that domain
contain(s) the right IP address.
– Your account credentials have been saved in your Certbot
configuration directory at /etc/letsencrypt. You should make a
secure backup of this folder now. This configuration directory will
also contain certificates and private keys obtained by Certbot so
making regular backups of this folder is ideal.
root@cloudshell:/tmp/certbot$
Leron Amin says
Hi Janis,
What did the command that you entered in step 4 look like?
(This one ->./certbot-auto certonly –webroot -w /var/www/html/ -d eborchids.com -d http://www.eborchids.com)
Talk to you soon,
Joe
Janis says
Hi,
Thanks for quick reply. It looked like this:
root@cloudshell:/tmp/certbot$ ./certbot-auto certonly –webroot -w /var/www/html/ -d ozolins.com -d http://www.ozolins.me
Leron Amin says
Hi Janis,
Your command should look like:
./certbot-auto certonly –webroot -w /var/www/html/ -d ozolins.com -d http://www.ozolins.com
The only mistake I see it that http:// was included in the domain name.
Let me know if this was a typo in your response, otherwise try again without using http:// in the command.
Joe
Janis says
hmm, that is not the case, still struggling to get things up and running, but will dig around to find the solution.
Last error i got looks like this:
root@ozolins-me-vm:/tmp/certbot# ./certbot-auto certonly –webroot -w /var/www/html/ -d ozolins.com -d http://www.ozolins.me
usage:
certbot-auto [SUBCOMMAND] [options] [-d DOMAIN] [-d DOMAIN] …
Certbot can obtain and install HTTPS/TLS/SSL certificates. By default,
it will attempt to use a webserver both for obtaining and installing the
certificate.
certbot: error: unrecognized arguments: –webroot
root@ozolins-me-vm:/tmp/certbot#
alex says
SSLCertificateFile “/etc/letsencrypt/live/eborchids.com/cert.pem”
SSLCertificateKeyFile “/etc/letsencrypt/live/eborchids.com/privkey.pem”
SSLCertificateChainFile “/etc/letsencrypt/live/eborchids.com/fullchain.pem”
i forgotten to change to my website name… now i got error.. ~_~
Leron Amin says
Hi Alex,
If you accidentally issued the certificates for the wrong domain, try re-issuing the certificates again using the proper domain and make sure that the right certificates are getting called in your .conf folder.
Let me know if you have additional questions,
Joe
alex says
i got wrong step…. how do i start over… i can’t do it any more.. help my site can’t connect anymore..
Job for apache2.service failed. See ‘systemctl status apache2.service’ and ‘journalctl -xn’ for details.
sudo a2ensite default-ssl
Site default-ssl already enabled ( how can i disable it and enabled it..
Leron Amin says
Hi Alex,
I am assuming you figured it out because your site is loading secure, and your certificates appear to be configured properly.
Let me know how else I can help,
Joe
Marcelo says
how do do I change in SITE ADRESS the IP for the DOMAIN NAME? Just as the SITE ADRESS (URL)
Leron Amin says
Hi Marcelo,
This needs to be configured in your cloud DNS.
You can learn how to configure your DNS here.