In this quick-start tutorial you will learn how to configure free, auto-renewing SSL certificates for WordPress websites that are hosted on Google Cloud compute engine using the Click-to-Deploy version of WordPress on Google Cloud.
1. Connect to WordPress via SSH
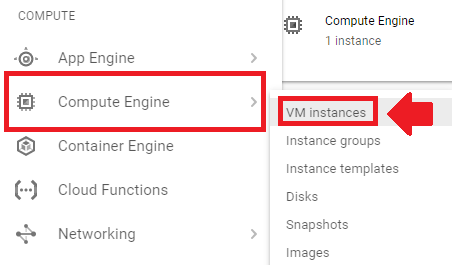
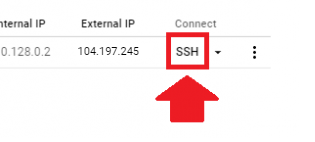
Go to your Google Compute homepage and click the hamburger menu in the upper left-hand corner.Navigate to Compute Engine, then to VM instances to access your WordPress installation.Click the SSH button to connect to your VM instance.
2. Check Operating System
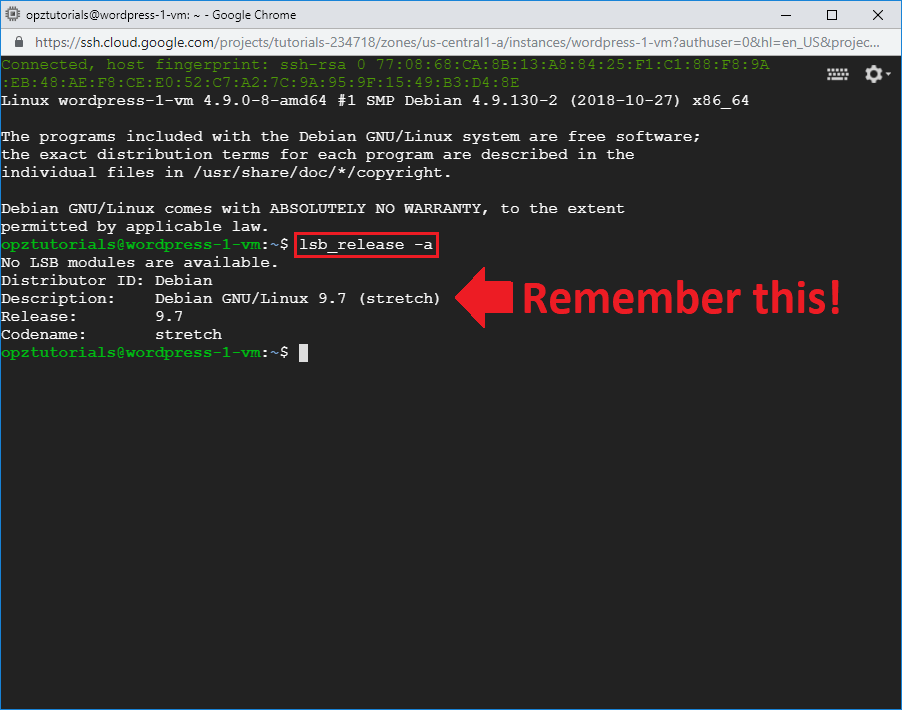
Now that you’ve connected to your VM instance, paste the command below in your terminal in order to check your operating system. After running the command, take note of the operating system, which is Debian 9.7 (stretch) in this example.
lsb_release -a
3. Generate Certificate Instructions
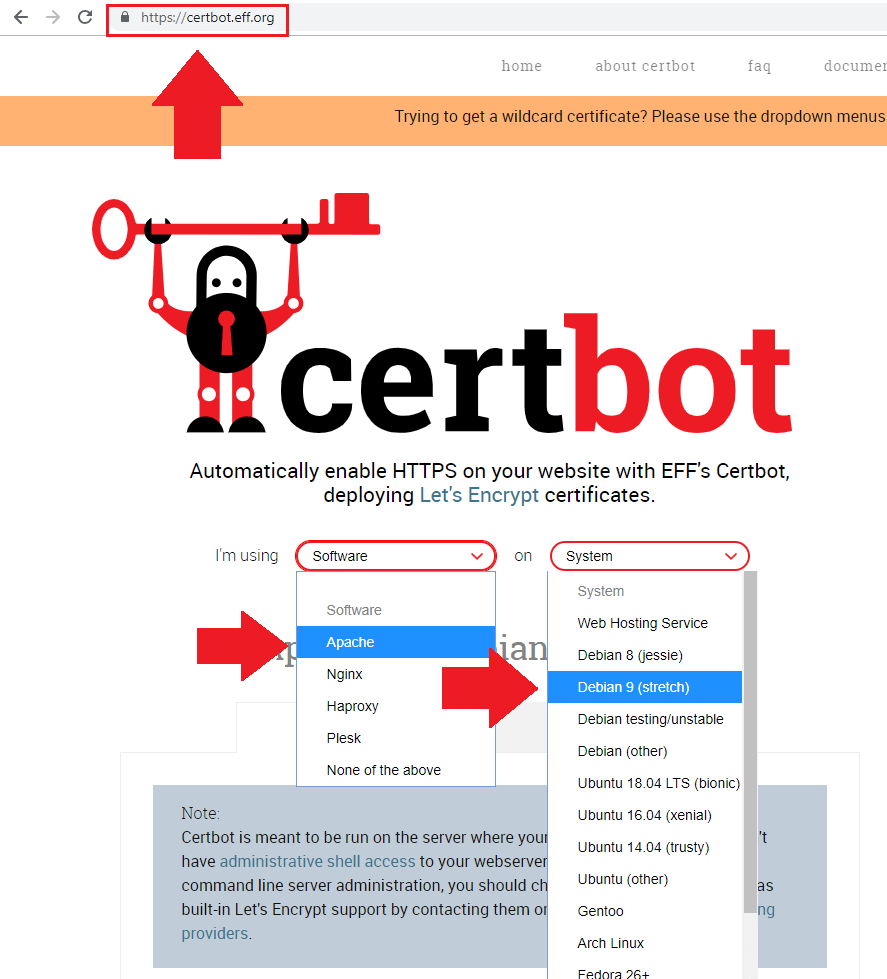
Return to your web browser and navigate to certbot.eff.org and select Apache from the Software dropdown, then select the correct operating system based on the output from Step 2 – which was Debian 9.7 (stretch) in this example.
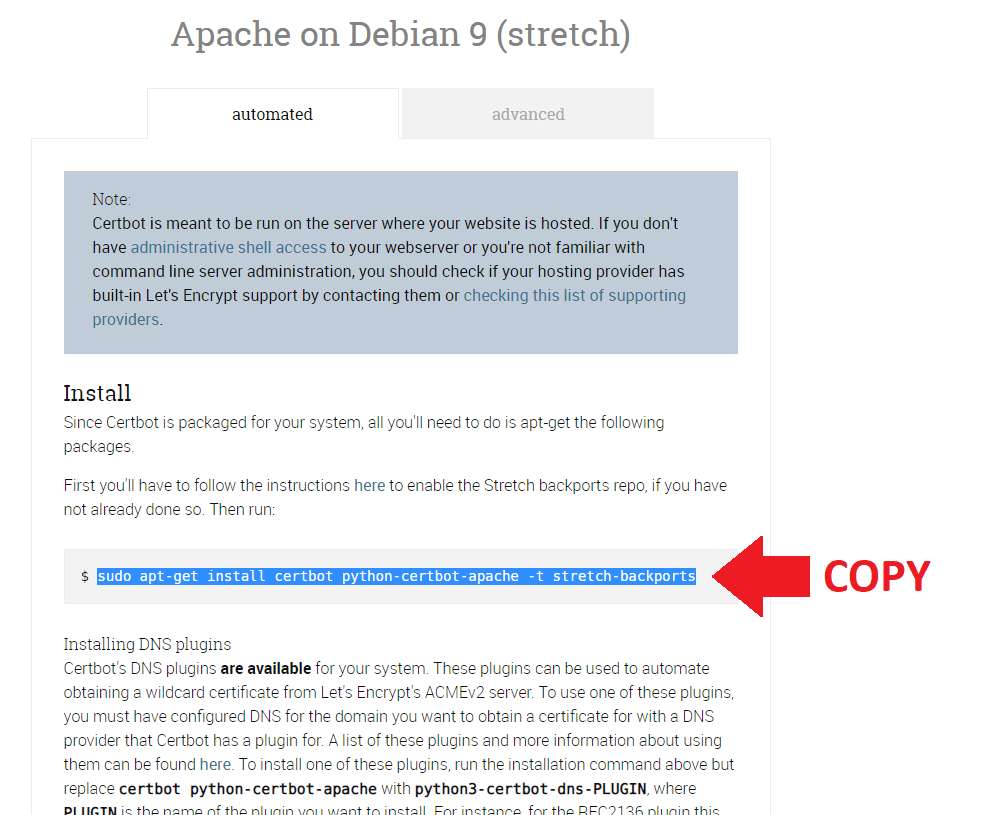
4. Install Certbot
After selecting your system specifications from the dropdowns, scroll down the page and copy the the command to install Certbot.Next, go back to your SSH terminal and paste the command that you copied, then press Enter to execute the command.
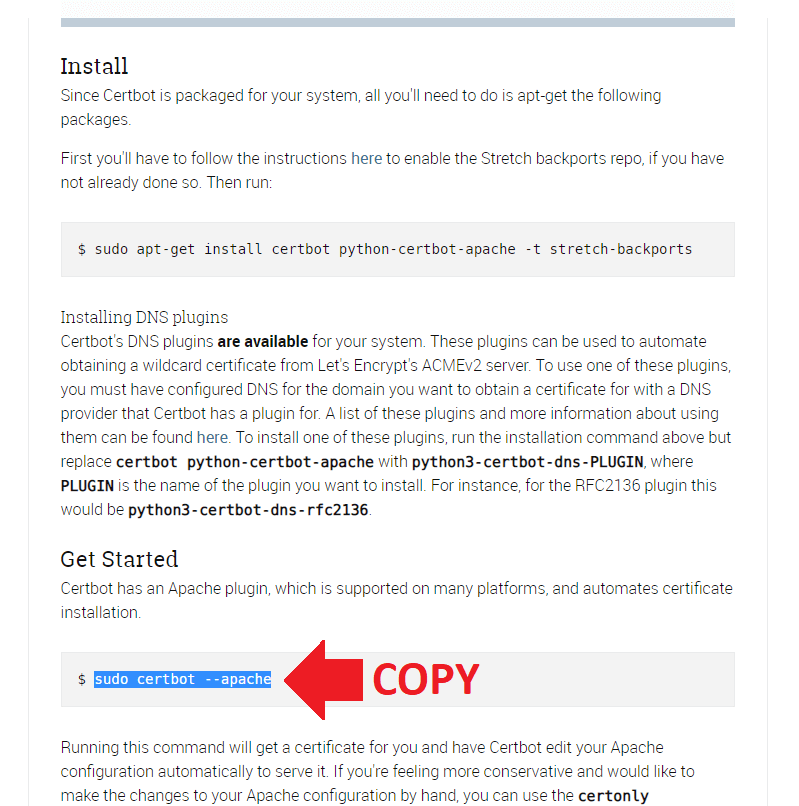
5. Generate SSL Certificates
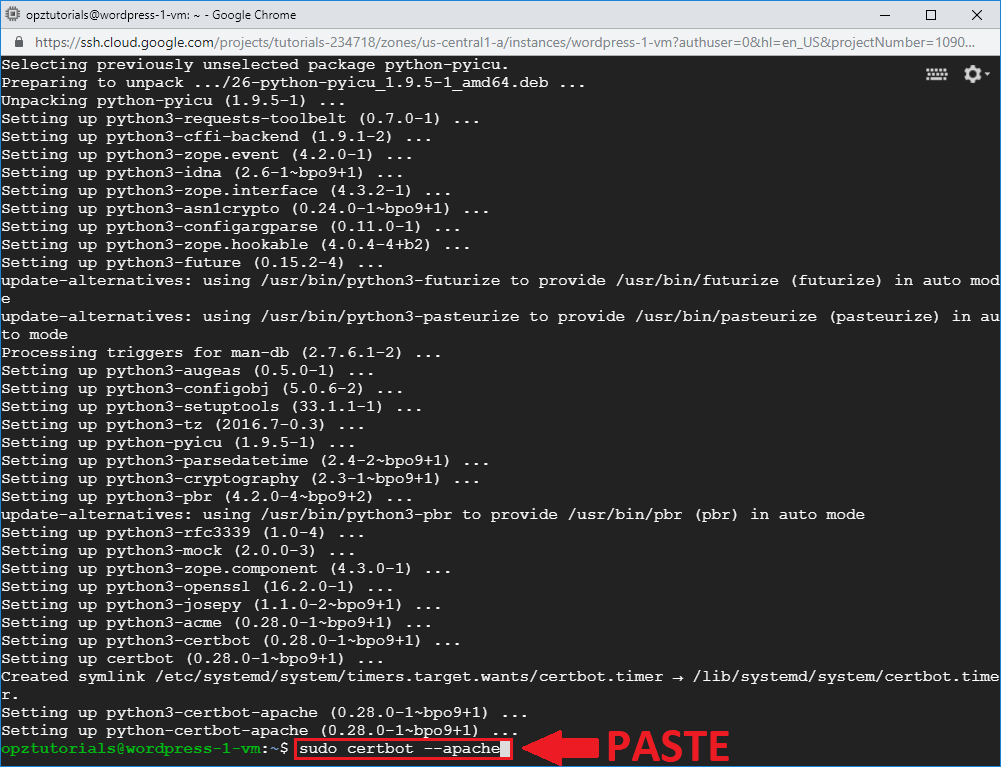
Now that you’ve installed Certbot, the next step is to generate the SSL certificates. Return to the certbot.eff.org website and copy the second command.Return to your SSH terminal and paste the command that you copied in order to generate the SSL certificates, then press Enter.
sudo certbot --apache
Now that you’ve pasted the certificate issuing command, you will be prompted with a series of questions. Answer the questions according to the the numbers in the image above, making sure to replace [email protected] with your own email address, and 1pagezen.com with your own domain name.
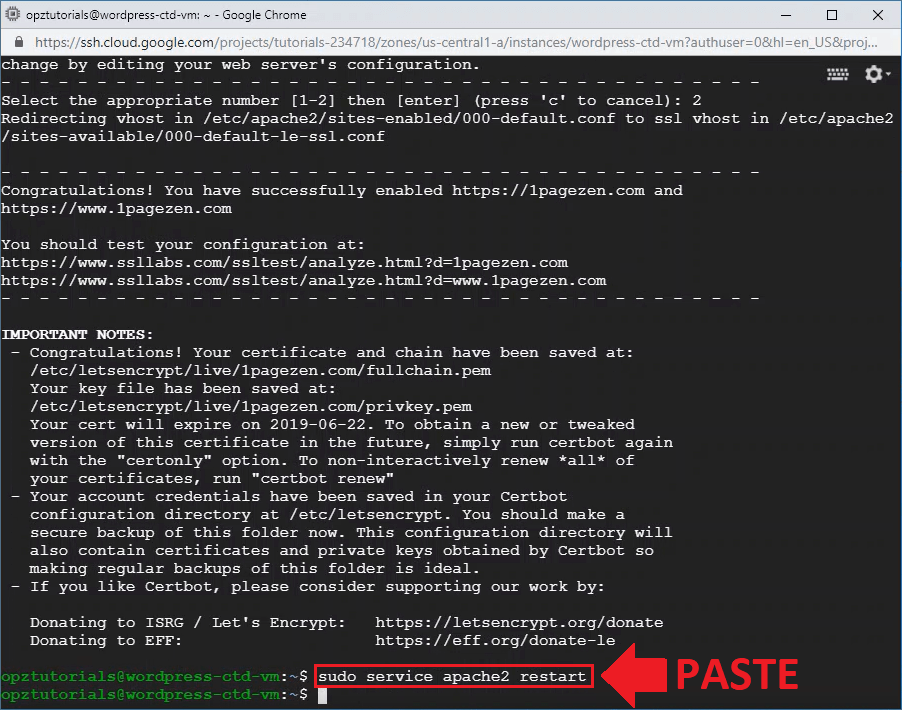
6. Restart Apache Server
In order for your certificate changes to take effect, you need to update/restart you Apache server by executing the following command:
sudo service apache2 restart
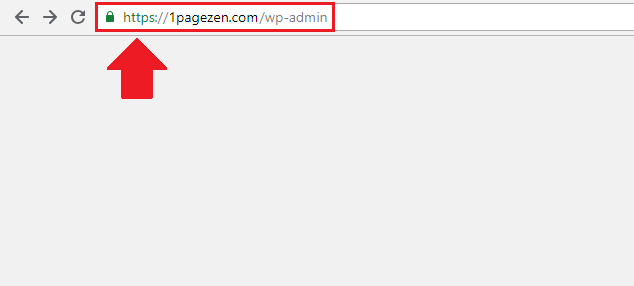
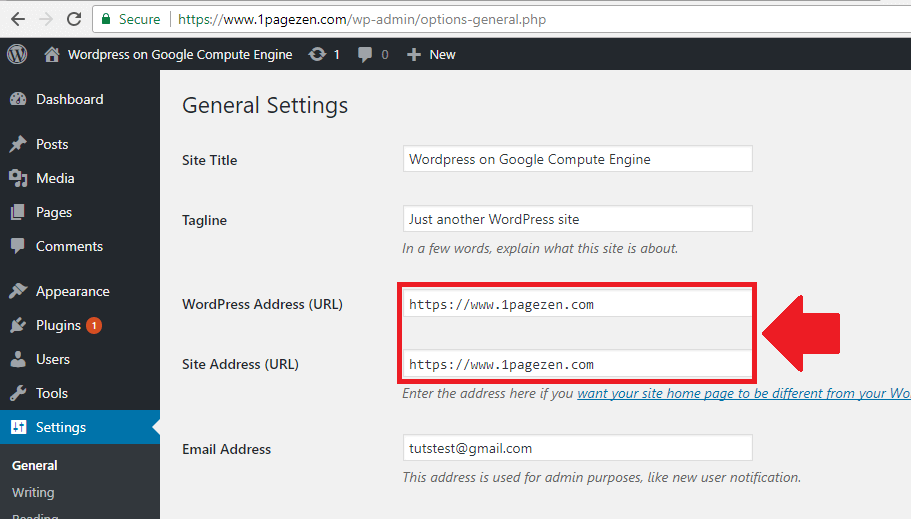
7. Update WordPress URLs
In your browser, enter the URL to your WordPress dashboard (with https://).Log in to your WordPress account, then navigate to Settings > General, and replace your current domain name with the https:// version - with or without www. infront. Then, scroll to the bottom of the page and click the Save Changes button.
That's it!
If you run into any issues with your certificates and want to verify that they're configured properly, check out the SSL Checker tool. Also check out this tutorial on how to fix SSL errors.
If you have any questions or comments, please post them below!
You don’t need to recover it – you can simply re-issue the certificates and it will prompt you to overwrite the existing certificates. So essentially you could re-install certbot:
sudo apt-get install certbot
Keep in mind, if it didn’t work the first time, it probably won’t work if you try it again. Did you verify that you’re following the instructions for the correct operating system (from step 2)?
hey,
will you please explain how can i change phpmyadmin login url. i am using wordpress google click to deploy cms. I searched Google for a solution but I could not find a solution.
i tried to locate phpmyadmin in wordpress apache server but i didn’t get.
if you know the exact location then please share me the details.
I wouldn’t recommend changing the URL – instead, put it behind a Captcha challenge to prevent any exploitation from bots.
I recommend using Cloudflare for this purpose. You can configure a firewall rule in Cloudflare to present a challenge whenever users hit the /wp-admin endpoint.
Let me know if you have questions,
Joe
Elisays
Hi, thanks for the walkthrough!
Am having an issue around your Step 5. `lsb_release -a` says that we are on: “Description: Debian GNU/Linux 10 (buster)”.
Also I am pretty sure this vm is using NGINX vs apache as the login message includes:
“Welcome to the Bitnami WordPress with NGINX and SSL 5.4.2-3”.
So on your Step 5 we are using:
`sudo certbot –nginx` (vs your `sudo certbot –apache`)
But receiving the error:
$ sudo certbot –nginx
Saving debug log to /var/log/letsencrypt/letsencrypt.log
The nginx plugin is not working; there may be problems with your existing configuration.
The error was: NoInstallationError(“Could not find a usable ‘nginx’ binary. Ensure nginx exists, the binary is executable, and your PATH is set correctly.”)
I think the problem is that certbot is not finding the right path to nginx but am unsure how to fix or point it to the right location:
$ which nginx
/opt/bitnami/nginx/sbin/nginx
Any thoughts or advice on how to proceed? Thanks again!
Can I use the google certificate for my site? And if this is how I can change the one that I have already installed in the console for the one from google?
I do not recommend using the Google certificates for your site. I would instead recommend issuing new Let’s Encrypt certificates and configuring them according to the instructions in the tutorial. Keep in mind, the certificates are configured to renew automatically when issued according to the instructions in the tutorial.
Hi! Thanks for this tutorial. I have a valid certificate, for the nxt 89 days, but the SSL on the site is still not working!
Found the following certs:
Certificate Name: seniortravelbuddies.com
Serial Number: 3c71ae9841c101c5d0a5b80a733efe142f4
Domains: seniortravelbuddies.com http://www.seniortravelbuddies.com
Expiry Date: 2021-01-23 06:58:53+00:00 (VALID: 89 days)
Certificate Path: /etc/letsencrypt/live/seniortravelbuddies.com/fullchain.pem
Private Key Path: /etc/letsencrypt/live/seniortravelbuddies.com/privkey.pem
There are multiple causes of this issue. I recommend referring tothis article for additional information.
Let me know if you have other questions,
Joe
Ben Bsays
Hello, I followed your previous tutorial, but if you type http into the url it won’t automatically change to https (except the root domains AND admin areas, which work fine for some reason). I am at a bit of a loss on how to proceed, I’ve tried every solution under the sun from StackOverflow with no luck.
Should I just do your new tutorial instead and hopefully resolve the issue? If so, do I need to do anything to reverse the changes I made with your previous tutorial, or just start the new tutorial from the beginning and it will overwrite the previous tutorial’s changes?
You will need to configure a non-https to https redirect in your Apache configuration.
Check out step 5 of this tutorial. You will need to add the lines starting with ServerName and ending with Redirect permanent to your wordpress.conf file.
I followed your previous article for my WordPress multi site click to deploy and everything works except that the sub pages http display an Apache 404 error instead of redirecting to the https version (root url works for all sites but not sub pages)
I tried many tricks with the htaccess file and nothing works.
I’m wondering if I should try to fix that implementation, or use this new method instead?
If I’m going to use this new method, do I need to do something to revert to the old settings that I created with your old tutorial or can I just start with this new one and it will override the other settings without issue?
Will you please tell how to auto renew on amazon lightsail ?
Google recently increased price for hosting, charging for static ip, so i switched to lightsail.
All went well except the auto renew part.
Thanks,
I tried the exact same steps from the tutorials, also i checked all the above comments regarding the issue..
This page isn’t working redirected you too many times.
Try clearing your cookies.
ERR_TOO_MANY_REDIRECTS
And i waited for 2 days as well but still i’m getting same issue, Could you please help me regarding the same or please let me know the way that i can remove this SSL.
The ERR_TOO_MANY_REDIRECTS message indicates that you have multiple redirects in your application, which is causing a re-direct loop. If you already had a redirect configured for your domain, and then you added the additional re-direct when you configured Certbot – then that would cause the redirect issue. I’d recommend finding (and removing) the old redirect, since it’s likely been replaced by the new one.
Will you be making an updated tutorial for auto renewing the certificate?
Your other tutorial for auto renewing doesn’t appear to work for the latest Bitnami deployments.
The latest Bitnami tutorial includes auto-renewal configured by default. In step 3 of the tutorial, you’ll be prompted as to whether you’d like to have auto-renewal enabled for your certificates.
Bitnami’s latest WordPress stack includes the bncert tool, which makes the process even easier. To activate the bncert tool, make sure your website is running properly with a domain and HTTP, then run the following command to configure SSL:
sudo /opt/bitnami/bncert-tool
Keep in mind, the bncert tool script also has the option for enabling auto-renewal.
Note: My issue is my SSL expire. What I have to do to renue it.
(Y)es/(N)o: n
No names were found in your configuration files. Please enter in your domain
name(s) (comma and/or space separated) (Enter ‘c’ to cancel): sushenbiswas.com http://www.sushenbiswas.com
Obtaining a new certificate
Performing the following challenges:
http-01 challenge for sushenbiswas.com
http-01 challenge for http://www.sushenbiswas.com
Enabled Apache rewrite module
Error while running apache2ctl graceful.
httpd not running, trying to start
Action ‘graceful’ failed.
The Apache error log may have more information.
AH00558: apache2: Could not reliably determine the server’s fully qualified domain name, using 127.0.0.1. Set the ‘
ServerName’ directive globally to suppress this message
(98)Address already in use: AH00072: make_sock: could not bind to address [::]:80
(98)Address already in use: AH00072: make_sock: could not bind to address 0.0.0.0:80
no listening sockets available, shutting down
AH00015: Unable to open logs
Unable to restart apache using [‘apache2ctl’, ‘graceful’]
Cleaning up challenges
Error while running apache2ctl graceful.
httpd not running, trying to start
Action ‘graceful’ failed.
The Apache error log may have more information.
AH00558: apache2: Could not reliably determine the server’s fully qualified domain name, using 127.0.0.1. Set the ‘
ServerName’ directive globally to suppress this message
(98)Address already in use: AH00072: make_sock: could not bind to address [::]:80
(98)Address already in use: AH00072: make_sock: could not bind to address 0.0.0.0:80
no listening sockets available, shutting down
AH00015: Unable to open logs
It looks like there’s a process already running on port 80. You can first try stopping then restarting all services, and it that doesn’t work, try stopping and re-starting your instance.
After an aliped SSL certificate this type of error showing.
<?php /** * Front to the WordPress application. This file doesn't do anything, but loads * wp-blog-header.php which does and tells WordPress to load the theme. * * @package WordPress */ /** * Tells WordPress to load the WordPress theme and output it. * * @var bool */ define( 'WP_USE_THEMES', true ); /** Loads the WordPress Environment and Template */ require __DIR__ . '/wp-blog-header.php';
Hi
I previously install ssl certificate from go Daddy. It has been expired. Now I want to try free ssl from let”s encrypt. Can you tell me how to do it? Where do I have to start?
Note: i’m using WordPress click to deploy. My engine is Debian 8 (jessie). Thank you
I hosted on Google Cloud and installed wordpress through sentora Zpanel, I have also pointed my domain to the cloud engine and my site is ready now to kickoff
If i use this method can i still get the ssl on my domain or if there is any better method for me please direct me.
I am not familiar with Sentora ZPanel. I checked their documentation and there’s instructions for installing SSL, but they seem very dated (Ubuntu 12.04), and I can’t attest to whether or not those instructions will work with the more current Linux distributions. For your reference, you can find those instructions here.
Thanks for your tutorials, they are 5 stars and helped me with the migration!
I managed to activate ssl-certificates, it turns out that the root byronsd.com appears as insecure, but all other pages for example https://byronsd.com/?page_id=8 are safe. Can you help with this matter?
Looks like you were able to get it fixed – what was the issue?
Tamoursays
hi how are you and thanks for helping everyone out. U r doing nice work.
im getting following error while installing ssl certificates
sudo certbot –apache
Saving debug log to /var/log/letsencrypt/letsencrypt.log
Error while running apache2ctl configtest.
Action ‘configtest’ failed.
The Apache error log may have more information.
apache2: Syntax error on line 225 of /etc/apache2/apache2.conf: Syntax error on line 35 of /etc/apache2/sites-enabl
ed/wordpress.conf: without matching section
The apache plugin is not working; there may be problems with your existing configuration.
The error was: MisconfigurationError(“Error while running apache2ctl configtest.\nAction ‘configtest’ failed.\nThe
Apache error log may have more information.\n\napache2: Syntax error on line 225 of /etc/apache2/apache2.conf: Synt
ax error on line 35 of /etc/apache2/sites-enabled/wordpress.conf: without matching sec
tion\n”,)
If you look at the error, it mentions that there’s a syntax error on line 225 of your /etc/apache2/apache2.conf file, and another syntax error on line 35 of /etc/apache2/sites-enabled/wordpress.conf file. Fix the syntax errors of these files at their respective line numbers, and then restart your server.
Let me know if you have questions,
Joe
silassays
Thanks for your super useful website !!!
This is great information, for free, with youtube videos, you really rock man !
Such great content is rare on the Internet. Very happy that I found you.
Keep up the good work!
have you thought of monetizing your blog with ads or donate button?
Thanks for the feedback, Silas – I’m happy to hear you enjoyed the tutorials!
Sagarsays
HI,
I get an error on my website after setup the SSL certification of this tutorial.
Home page is working fine but other page is not opening, those page shows 404 error.
Hi it seems to have work I followed all the steps.
the only issue is that on the browser I still get a message:
View site information Info or Not secure
NOT SECURED
Your connection to this site is not fully secured.
HI there, I had an issue with the ssl installating as per your previos post how to instal ssl certificate. ( I have left comment on the other articul) Nontheless, searching for the solution I have found one, reinstaling the apache, so I did it, and went OK. Than as per instruction in this post, I set up the ssl certificatas all good, set and running. When I go to step to connect to my wordpress and finish the instalation, I put my address to chrome browser and good a php code insted of the usual WP login interface. Any help on this one? Really apreciate your site, I have started with google coloud last week, it really helpful. But as usual with coding, not always goes everything as planned. Attached is what appears in browser once I trie to go to my website http://www.salavalacerveza.es
Thanks Jan
$help = '’ . __( ‘Welcome to your WordPress Dashboard! This is the screen you will see when you log in to your site, and gives you access to all the site management features of WordPress. You can get help for any screen by clicking the Help tab above the screen title.’ ) . ”;
This is an amazing site. I’m a beginner (no programming knowledge whatsoever) and was able to setup a WordPress site using google cloud with free ssl following your tutorials. Keep them coming!
You should set a tip jar up to show you some appreciation.
Well done David – I’m glad to hear that the tutorials were helpful!
Montysays
Hi mate great post and frankly a bunch of your content on how to get stuff done on GCP is super helpful, even if you’re a complete beginner, thank you for that!
I was trying to get this done on the WordPress on LEMP 7 Max Performance setup which I believe is on nginx so I’ve selected Nginx and Debia 9 (stretched) but this happens after I try to install Certbot via SSH.
Any ideas how to solve this problem? 🙏🙏🙏
—
Job for nginx.service failed because the control process exited with error code.
See “systemctl status nginx.service” and “journalctl -xe” for details.
invoke-rc.d: initscript nginx, action “start” failed.
● nginx.service – A high performance web server and a reverse proxy server
Loaded: loaded (/lib/systemd/system/nginx.service; enabled; vendor preset: enabled)
Active: failed (Result: exit-code) since Sat 2020-04-11 11:50:32 UTC; 10ms ago
Docs: man:nginx(8)
Process: 25535 ExecStart=/usr/sbin/nginx -g daemon on; master_process on; (code=exited, status=1/FAILURE)
Process: 25533 ExecStartPre=/usr/sbin/nginx -t -q -g daemon on; master_process on; (code=exited, status=0/SUCCESS)
Apr 11 11:50:30 homey-wordpress4-lemp7-1-vm nginx[25535]: nginx: [emerg] bind() to 0.0.0.0:80 failed (98: Add… use)
Apr 11 11:50:30 homey-wordpress4-lemp7-1-vm nginx[25535]: nginx: [emerg] bind() to 0.0.0.0:80 failed (98: Add… use)
Apr 11 11:50:31 homey-wordpress4-lemp7-1-vm nginx[25535]: nginx: [emerg] bind() to 0.0.0.0:80 failed (98: Add… use)
Apr 11 11:50:31 homey-wordpress4-lemp7-1-vm nginx[25535]: nginx: [emerg] bind() to 0.0.0.0:80 failed (98: Add… use)
Apr 11 11:50:32 homey-wordpress4-lemp7-1-vm nginx[25535]: nginx: [emerg] bind() to 0.0.0.0:80 failed (98: Add… use)
Apr 11 11:50:32 homey-wordpress4-lemp7-1-vm nginx[25535]: nginx: [emerg] still could not bind()
Apr 11 11:50:32 homey-wordpress4-lemp7-1-vm systemd[1]: nginx.service: Control process exited, code=exited status=1
Apr 11 11:50:32 homey-wordpress4-lemp7-1-vm systemd[1]: Failed to start A high performance web server and a r…rver.
Apr 11 11:50:32 homey-wordpress4-lemp7-1-vm systemd[1]: nginx.service: Unit entered failed state.
Apr 11 11:50:32 homey-wordpress4-lemp7-1-vm systemd[1]: nginx.service: Failed with result ‘exit-code’.
Hint: Some lines were ellipsized, use -l to show in full.
dpkg: error processing package nginx-full (–configure):
subprocess installed post-installation script returned error exit status 1
dpkg: dependency problems prevent configuration of nginx:
nginx depends on nginx-full (<< 1.10.3-1+deb9u3.1~) | nginx-light (<< 1.10.3-1+deb9u3.1~) | nginx-extras (<= 1.10.3-1+deb9u3) | nginx-light (>= 1.10.3-1+deb9u3) | nginx-extras (>= 1.10.3-1+deb9u3); however:
Package nginx-full is not configured yet.
Package nginx-light is not installed.
Package nginx-extras is not installed.
dpkg: error processing package nginx (–configure):
dependency problems – leaving unconfigured
dpkg: dependency problems prevent configuration of python3-certbot-nginx:
python3-certbot-nginx depends on nginx; however:
Package nginx is not configured yet.
Package nginx-full which provides nginx is not configured yet.
dpkg: error processing package python3-certbot-nginx (–configure):
dependency problems – leaving unconfigured
dpkg: dependency problems prevent configuration of python-certbot-nginx:
python-certbot-nginx depends on python3-certbot-nginx; however:
Package python3-certbot-nginx is not configured yet.
dpkg: error processing package python-certbot-nginx (–configure):
dependency problems – leaving unconfigured
Processing triggers for libc-bin (2.24-11+deb9u3) …
Processing triggers for sgml-base (1.29) …
Errors were encountered while processing:
nginx-full
nginx
python3-certbot-nginx
python-certbot-nginx
E: Sub-process /usr/bin/dpkg returned an error code (1)
I haven’t tested the certbot scripts on NGINX servers. I did, however, take a look at the WordPress LEMP Max Performance stack offered by Jetware, and wasn’t impressed with their documentation. The stack comes pre-installed with the LetsEncypt SSL package, but I couldn’t find any useful instructions in the documentation on how to implement it.
In the future, I’d recommend sticking with solutions from providers who provide comprehensive documentation, such as Bitnami or OpenLiteSpeed.
If you’re able to get it working, please share the solution, as I’m sure others will find it helpful!
Talk to you soon,
Joe
Aazimsays
Hi Leron,
First of all i would like to say that your tutorials are very helpful for cloud hosting.
And Could you please help me out in aws route53 problem?
I have successfully routed my instance’s IP to my xyz.com with cloudflare, but my website and its admin panel are available on both IP address and domain. And when i modified my WP_SITEURL & WP_HOME with domain then at least admin panel is become unavailable from IP but still website public urls availible on both.
This latest guide to install ssl certificates on gcp is better than your previous one. In the latest one there is no need to worry about auto-renew. Really helpful.
To configure auto-renewal with the earlier versions of the tutorial, follow the instructions in this tutorial.
Let me know if you have questions,
Joe
Stan Luccisays
Your videos are awesome and educative.
Would you please make a video on how to download a pentest tool, like Gophish, on Azure? It would be very valuable to my work.
Thanks.
I appreciate your videos anyways.
Hi. Thanks for your blog… its really useful. My SSL works fine. But when i try to activate the autorenewal says “mv: cannot stat ‘certbot-auto’: No such file or directory” . What can i do?
In this version of the tutorial, the auto-renewal cronjob is configured automatically – so you don’t need to do anything else to configure auto-renewal.
You can test if auto-renewal is working properly by running the following command:
That error typically means that the certificate was issued for the incorrect domain. For example, you issued a certificate for ‘example.com’ and your domain is ‘mywebsite.com’.
This typically happens when a user runs the certificate issuing command without changing the domain name in the command.
You can verify if the certificate is issued for the correct domain by checking the certificate here.
Let me know if you have questions,
Joe
yesays
hey bro i followed the tutorial but i got an issue after this command : sudo certbot –apache
During handling of the above exception, another exception occurred:
Traceback (most recent call last):
File “/usr/lib/python3/dist-packages/urllib3/connectionpool.py”, line 594, in urlopen
chunked=chunked)
File “/usr/lib/python3/dist-packages/urllib3/connectionpool.py”, line 350, in _make_request
self._validate_conn(conn)
File “/usr/lib/python3/dist-packages/urllib3/connectionpool.py”, line 837, in _validate_conn
conn.connect()
File “/usr/lib/python3/dist-packages/urllib3/connection.py”, line 281, in connect
conn = self._new_conn()
File “/usr/lib/python3/dist-packages/urllib3/connection.py”, line 147, in _new_conn
self, “Failed to establish a new connection: %s” % e)
requests.packages.urllib3.exceptions.NewConnectionError: : Failed to establish a new connection:
[Errno 101] Network is unreachable
During handling of the above exception, another exception occurred:
Traceback (most recent call last):
File “/usr/lib/python3/dist-packages/requests/adapters.py”, line 423, in send
timeout=timeout
File “/usr/lib/python3/dist-packages/urllib3/connectionpool.py”, line 643, in urlopen
_stacktrace=sys.exc_info()[2])
File “/usr/lib/python3/dist-packages/urllib3/util/retry.py”, line 363, in increment
raise MaxRetryError(_pool, url, error or ResponseError(cause))
requests.packages.urllib3.exceptions.MaxRetryError: HTTPSConnectionPool(host=’acme-v02.api.letsencrypt.org’, port=443): Max retries exceeded with url: /directory (Caused by NewConnecti
onError(‘: Failed to establish a new connection: [Errno 101] Network is unreachable’,))
During handling of the above exception, another exception occurred:
Traceback (most recent call last):
File “/usr/lib/python3/dist-packages/acme/client.py”, line 1103, in _send_request
response = self.session.request(method, url, *args, **kwargs)
File “/usr/lib/python3/dist-packages/requests/sessions.py”, line 488, in request
resp = self.send(prep, **send_kwargs)
File “/usr/lib/python3/dist-packages/requests/sessions.py”, line 609, in send
r = adapter.send(request, **kwargs)
File “/usr/lib/python3/dist-packages/requests/adapters.py”, line 487, in send
raise ConnectionError(e, request=request)
requests.exceptions.ConnectionError: HTTPSConnectionPool(host=’acme-v02.api.letsencrypt.org’, port=443): Max retries exceeded with url: /directory (Caused by NewConnectionError(‘: Failed to establish a new connection: [Errno 101] Network is unreachable’,))
During handling of the above exception, another exception occurred:
ValueError: Requesting acme-v02.api.letsencrypt.org/directory: Network is unreachable
Please see the logfiles in /var/log/letsencrypt for more details.
can you tell me how to solve this issue knowing im using :
Are you attempting to renew an existing/expired certificate or are you trying to issue an entirely new certificate?
Keep in mind that before being able to issue the certificate, your website must be online and accessible via either HTTP or HTTPS. This is required in order for Certbot to validate your domain and ultimately issue the certificate.
Please provide the requested information if you need additional support.
Duplicator Pro moved my site but when I click on any link I get a requested url not found. Try to upload a plugin and told directory does not exist or is not writable. Would be a great video for you to do next as so many people who move will want to migrate their site. I carry on trying to find a solution to see what occurs.
Joe thanks for the guide.
I have taken time to go through the comments but none of the issues relates to mine.
This is mine;
I was migrating a site from bluehost to Goggle cloud, I have installed wordpress, set static IP address, then activate the “All-in-One Wp Migration” plugin so that I can can import.
Migration was completed.
But am so frustrated that I trying using the step to generate SSL certificate to the site i have just migrated and imported, and its not working. I have deleted my deployment more than 10times to do a fresh one still did not work.
these are part of the error mesage;
During handling of the above exception, another exception occurred:
Traceback (most recent call last):
File “/usr/lib/python3/dist-packages/certbot/error_handler.py”, line 108, in _call_registered
self.funcs[-1]()
File “/usr/lib/python3/dist-packages/certbot/auth_handler.py”, line 316, in _cleanup_challenges
self.auth.cleanup(achalls)
File “/usr/lib/python3/dist-packages/certbot_apache/configurator.py”, line 2311, in cleanup
self.restart()
File “/usr/lib/python3/dist-packages/certbot_apache/configurator.py”, line 2174, in restart
self._reload()
File “/usr/lib/python3/dist-packages/certbot_apache/configurator.py”, line 2202, in _reload
raise errors.MisconfigurationError(error)
certbot.errors.MisconfigurationError: Error while running apache2ctl graceful.
httpd not running, trying to start
Action ‘graceful’ failed.
The Apache error log may have more information.
AH00558: apache2: Could not reliably determine the server’s fully qualified domain name, using 127.0.0.1. Set the ‘
ServerName’ directive globally to suppress this message
(98)Address already in use: AH00072: make_sock: could not bind to address [::]:80
(98)Address already in use: AH00072: make_sock: could not bind to address 0.0.0.0:80
no listening sockets available, shutting down
AH00015: Unable to open logs
Error while running apache2ctl graceful.
httpd not running, trying to start
Action ‘graceful’ failed.
The Apache error log may have more information.
AH00558: apache2: Could not reliably determine the server’s fully qualified domain name, using 127.0.0.1. Set the ‘
ServerName’ directive globally to suppress this message
(98)Address already in use: AH00072: make_sock: could not bind to address [::]:80
(98)Address already in use: AH00072: make_sock: could not bind to address 0.0.0.0:80
no listening sockets available, shutting down
AH00015: Unable to open logs
please what can i do?
i have tried using the step without any importation and it worked, but once i import and try the step it fails.
First of all, it looks like there’s already a process running on port 80. On top of that, your Apache isn’t configured with a ServerName – so the system doesn’t know which domain name is attached to your VM instance. Was your website working correctly without HTTPs before you tried issuing the certificates? This is essential, as the script will only work assuming the website is up-and-running on port 80.
If have experience with troubleshooting Linux systems, I’d recommend searching for the errors through a search engine – start with the port issue, then move to the errors with the Certbot script.
Let me know how else I can help,
Joe
Emmysays
ok, thanks so smuch for your repond. All fixed now
OMG thanks for this, saved my life. However you might want to update this page to reflect the new setup, the old page sent me down the wrong path for quite a while.
The WordPress install, domain, and SSL setup have recently been consolidated into a single tutorial, which you can view here.
Let me know if you have any questions,
Joe
Shailsays
Hi there,
We have install the ssl certificates as you mentioned above steps but we need to enable ssl for all subdomains(*) on google cloud. Please let know the command line to enable it.
Check out the Bitnami documentation for WordPress Multisite – it has everything you need and more.
Let me know if you have questions,
Joe
Shailsays
Hi Leron,
We have configured letsencrypt to work on my website. It’s working fine but the problem is that I am setting up nodejs on it and to setup a socket connection and need to use different ports than 80.
Example: https://www.example.com:1337
How do I configure letsencrypt to allow for different ports?
An unexpected error occurred:
There were too many requests of a given type :: Error creating new order :: too many certificates already issued fo
r exact set of domains: tranchautravel.vn,www.tranchautravel.vn: see https://letsencrypt.org/docs/rate-limits/
Please see the logfiles in /var/log/letsencrypt for more details.
…. Help me, thanks !
The certificate is renewed automatically after 90 days.
If you’re concerned about whether or not the certificates will renew, you can follow the instructions at the end of this tutorial to learn about testing the auto-renewal process.
Hope this helps and let me know if you have any questions,
Joe
Mohitsays
hey,
I have followed all the steps above mentioned in this tutorial. the SSL was successfully installed on my website but the website is showing cache files. why this is going to happen please check my website URL and reply to me.
theindianpaper.com
What do you mean by ‘the website is showing cache files?’ Please provide further details and I will see how I can help!
Joe
yxsays
hi there, I go this error on apache 2 server. any clue how I can reinstall my apache2 server? I think I messed it up while adding the SSL certificates.
oot@adventurematching-vm:~# systemctl status apache2.service
● apache2.service – The Apache HTTP Server
Loaded: loaded (/lib/systemd/system/apache2.service; enabled; vendor preset: enabled)
Active: failed (Result: exit-code) since Sun 2019-10-13 16:14:41 UTC; 7s ago
Process: 1945 ExecStart=/usr/sbin/apachectl start (code=exited, status=1/FAILURE)
Oct 13 16:14:41 adventurematching-vm systemd[1]: Starting The Apache HTTP Server…
Oct 13 16:14:41 adventurematching-vm apachectl[1945]: apache2: Could not open configuration file /etc/apache2/apach
Oct 13 16:14:41 adventurematching-vm apachectl[1945]: Action ‘start’ failed.
Oct 13 16:14:41 adventurematching-vm apachectl[1945]: The Apache error log may have more information.
Oct 13 16:14:41 adventurematching-vm systemd[1]: apache2.service: Control process exited, code=exited status=1
Oct 13 16:14:41 adventurematching-vm systemd[1]: Failed to start The Apache HTTP Server.
Oct 13 16:14:41 adventurematching-vm systemd[1]: apache2.service: Unit entered failed state.
Oct 13 16:14:41 adventurematching-vm systemd[1]: apache2.service: Failed with result ‘exit-code’.
Were you able to get the issue resolved? Do you remember what caused the issue?
Typically you won’t have to reinstall Apache when there’s an error, as this would involve re-configuring your entire VM instance.
The first thing I’d recommend doing is checking your Apache log files for any additional information regarding what caused the error (typically located in /var/log/apache2 or /var/log/httpd).
Let me know if you have any additional questions!
Joe
amitsays
Invalid email address: .
Enter email address (used for urgent renewal and security notices)
You mean when you try to log in, it’s showing incorrect email?
Let me know,
Joe
Dianasays
Excellent video tutorial.
I have a basic question: can I use the static IP address rather than assigned domain name to generate the certificates?
I’m using GCP compute engine with wordpress click and deploy and I hve the static IP address. I’m running student project and would rather not purchase a domain name.
You can list all of your subdomains in the certificate, or use a Wildcard certificate – it just depends on which would work better for your situation. For instance, if you know exactly which subdomains you’ll be using, I’d recommend simply adding the additional subdomains to the existing certificate. If you plan on regularly introducing new subdomains, I’d recommend using a Wildcard certificate.
Hope this helps and let me know if you have questions,
Joe
I write to you from Chile. Apply the latest Virtual Machine WordPress tutorial on Google Cloud. SSL Certificate works perfect on the Web but I want to know what are the commands for automatic certificate renewal for Debian 9.9 Stretch.
The only problem that was presented to me is that I lost the permanent links. I have not been able to restore them under the input format by name, they only work in a simple way. I look forward to your help or suggestion.
This was so helpful. Though I still got Lil worried I don’t know if it’s something to worry about or it’s gonna be OK later on. When I log in to my dashboard,my website will get the green lock but at the front end, it says not secured.. Any help?
Hey there.
After I performed your given steps on how to fix SSL errors on wordpress, my wordpress dashboard and also the website is giving me an error: ERR_TOO_MANY_REDIRECTS. At first I thought it would take a little time to update but its been 2 days and its still not opening up.
Make sure you only have a single redirect rule in your Apache configuration files. For instance, if you went through the steps of this tutorial, but already have an existing SSL configuration on your server, then chances are that’s what’s causing the issue. You will need to locate the Apache configuration file with the original redirect and remove it, as the certbot-auto tool used in this tutorial automatically configures the HTTPS redirect.
Let me know if you have questions,
Joe
Arushi Sonisays
Please tell me how to remove the existing SSL configuration so that I can replace them with the new ones. Now that I have tried to install the new ones too, there are two certbot-auto packages i.e, certbot-auto and certbot-auto.1
I just responded to another comment with the same issue.
In step 5 of the earlier tutorial, you were instructed to configure an HTTPs redirect in your wordpress.conf file. Look for the following three lines of code, and then add a # symbol to the left of them, as shown below:
Then cert. expired, and I installed using the one on this page. However, now I’m receiving a “too many redirects error” although ssl cert. checks show that it is installed properly. What steps can I take to resolve this?
I took some time to look into the issue. To fix the problem, first undo the changes to your wordpress.conf file – you’re going to leave that redirect as it stands. Next, open your wordpress-le-ssl.conf for editing by running the following command:
Once inside of this file, comment out the following three lines of code, just as you did before except now in the wordpress-le-ssl.conf file instead of the wordpress.conf file:
I followed your older “Setup Free SSL for WordPress on Google Cloud (Click-to-Deploy)”. As there were some error messages, I was not sure if everything went well.
I chanced upon this tutorial, and tried to run the SSL installation again. Ended up with the same “too many redirects error” that Ross, Arushi, and Konqueror mentioned. It’s a bit shocking when I tried to fix an issue and made things worse…
Your solution worked.
I’ll suggest that you put a huge red warning at the top for people who ran one of your older “free SSL” tutorial.
Thanks for the suggestion Darren – I’m glad to hear you were able to get the issue resolved.
I will add a notification at the top of the older tutorials in order to point users to the latest version.
Let me know if you have any other questions,
Joe
Mariosays
Thanks for the tutorial. I am wondering if this works as well with a site hosted on Google Domains, how will that work.
What would be the best approach to generate the SSL certificates for a domain, this domain was verified already on App Engine, do you know if that can be done without the VM?
This tutorial won’t be applicable for managed hosting providers, which is what Google Domains offers.
Most managed hosting providers offer a 1-click SSL solution, so most of the time manually configuring SSL for your site (as demonstrated in this tutorial) is not necessary.
Hope this helps and let me know if you have questions,
Joe
The best tutorial well done! It worked for me like a charm. I just have a quick question I have just bought a new domain and would like to register it for the same site and make sure it is secure as well. What will be the best approach?
Yes to my 2nd new domain. I have done it correctly read through the documents and did it well. Thanks a lot Bro. Please keep it up we need people like you everyday.
It looks like a database connection issue; a problem for which there could be a variety of causes.
Do a Google search for ‘WordPress error establishing a database connection’ and you will find many resources. The first thing I’d check, however, is that the database credentials in your wp-config.php file are correct.
Let me know if you have questions,
Joe
Singhamsays
Error while running apache2ctl graceful.
httpd not running, trying to start
Action ‘graceful’ failed.
The Apache error log may have more information.
AH00558: apache2: Could not reliably determine the server’s fully qualified domain name, using 127.0.0.1. Set the ‘ServerName’ directive globally to suppress this message
(98)Address already in use: AH00072: make_sock: could not bind to address [::]:80
(98)Address already in use: AH00072: make_sock: could not bind to address 0.0.0.0:80
no listening sockets available, shutting down
AH00015: Unable to open logs
IMPORTANT NOTES:
– Your account credentials have been saved in your Certbot
configuration directory at /etc/letsencrypt. You should make a
secure backup of this folder now. This configuration directory will
also contain certificates and private keys obtained by Certbot so
making regular backups of this folder is ideal.
Try adding a ServerName directive to your Apache configuration file, and see if that fixes the issue.
See this resource for additional information, and let me know if you’d like additional clarification.
Thanks,
Joe
Coreysays
Hey Leron, thank you for all of these tutorials and all of this help! You’ve enable me to be my own admin (both good and bad). I followed your older instructions to get the auto-cert setup:https://onepagezen.com/free-ssl-certificate-wordpress-google-cloud-click-to-deploy/
After I did that, I moved my DNS from GoDaddy to Google. Everything was fine for a few months. I started getting an email that my cert was set to expire. I attempted to renew it, but was getting access errors. I thought I might be able to renew them by following the steps outlined in this tutorial, but I think I’ve done more harm than good. I followed this guide exactly and I was able to update the cert, but something is wrong, my cert is still showing the old one that is expiring in a few days on this checker: https://www.sslshopper.com/ssl-checker.html#hostname=latitudelabs.io
And I am getting an odd redirect error. I can no longer access my site at all, nor the admin page. When I attempt to get to the admin page the “/” is missing and I get “.iowp-admin”. I also get a crazy number of https redirects, 19!
Since I can’t access the admin, I tried editing the wp-config.php file to force the site address, but that didnt help
define(‘WP_SITEURL’, ‘https://latitudelabs.io/’);
define(‘WP_HOME’, ‘https://latitudelabs.io/’);
I checked my .htaccess file and it is this:
# BEGIN WordPress
If you have certbot configured properly, you should be able to renew by executing the following command from the directory that contains the certbot script:
certbot renew
For older implementations using certbot-auto, the script would be:
Fantastic as usual! Your tutorials are in a class of their own. Really, it’s a pleasure learning from them. This is how it should be done. Clear and concise, step-by-step, with video walk-through, illustrated graphic elements and everything. Impressive!
We used your previous (now old) tutorial on this exact same theme: Free self-updating SSL for WordPress on Google Cloud (Click-to-Deploy). Depending solely on your clear descriptions we configured WordPress Multisite Network with many websites on it and it all works flawlessly, all websites and sub-sites SSL are self-updating with no issues, for almost a year now.
We are also continuously adding new websites and sub-sites on the network and will now switch to using this new way, because it seems even simpler.
Thank you very much for all your brilliant tips & always highest-quality tutorials!
They make seemingly complicated procedures easy as peanuts!
Thank you for the great feedback! I’m happy to hear the tutorials have been helpful to you, and I appreciate you taking the time to share your experience!
I tried installation of SSL through SSH console. The process is easy. However, the whole website gets distorted. The home page gets ruined. This thing I faced at Digital Ocean as well as Google Cloud. Why is it so?
That could be caused by ‘mixed content’ errors, which will cause some of your content not to display if it’s being served with an HTTP prefix (instead of HTTPS).
You can learn more about ‘mixed content’ errors, and how to fix them, by checking out step 1 of this tutorial.


Bridger says
I tried to install SSL Certificates. I followed the steps but
Chrome siad this site can’t be reached, Ittook too long to respond.
Please tell me how to use SSH to fix it ?
Leron Amin says
Hi Bridger,
The changes will take awhile to take effect after you’ve implemented SSL.
You use this SSL checker tool to verify whether or not the certificates were configured properly.
Let me know if you have other questions,
Joe
Bridger says
I already Remove certbot by SSH “sudo apt-get remove certbot”
Because I got no respond from the my website.
But I still don’t know the way to recover it.
Leron Amin says
Hi Bridger,
You don’t need to recover it – you can simply re-issue the certificates and it will prompt you to overwrite the existing certificates. So essentially you could re-install certbot:
Keep in mind, if it didn’t work the first time, it probably won’t work if you try it again. Did you verify that you’re following the instructions for the correct operating system (from step 2)?
Let me know if you have questions,
Joe
Mohit kachhwaha says
hey,
will you please explain how can i change phpmyadmin login url. i am using wordpress google click to deploy cms. I searched Google for a solution but I could not find a solution.
i tried to locate phpmyadmin in wordpress apache server but i didn’t get.
if you know the exact location then please share me the details.
Thankyou
Leron Amin says
Hi Mohit,
I wouldn’t recommend changing the URL – instead, put it behind a Captcha challenge to prevent any exploitation from bots.
I recommend using Cloudflare for this purpose. You can configure a firewall rule in Cloudflare to present a challenge whenever users hit the /wp-admin endpoint.
Let me know if you have questions,
Joe
Eli says
Hi, thanks for the walkthrough!
Am having an issue around your Step 5. `lsb_release -a` says that we are on: “Description: Debian GNU/Linux 10 (buster)”.
Also I am pretty sure this vm is using NGINX vs apache as the login message includes:
“Welcome to the Bitnami WordPress with NGINX and SSL 5.4.2-3”.
We are following the certbot instructions here: https://certbot.eff.org/lets-encrypt/debianbuster-nginx.
So on your Step 5 we are using:
`sudo certbot –nginx` (vs your `sudo certbot –apache`)
But receiving the error:
$ sudo certbot –nginx
Saving debug log to /var/log/letsencrypt/letsencrypt.log
The nginx plugin is not working; there may be problems with your existing configuration.
The error was: NoInstallationError(“Could not find a usable ‘nginx’ binary. Ensure nginx exists, the binary is executable, and your PATH is set correctly.”)
I think the problem is that certbot is not finding the right path to nginx but am unsure how to fix or point it to the right location:
$ which nginx
/opt/bitnami/nginx/sbin/nginx
Any thoughts or advice on how to proceed? Thanks again!
Leron Amin says
Hi Eli,
It looks like you’ve deployed the WordPress with NGINX and SSL Certified by Bitnami and Automattic solution. The instructions in this tutorial are meant for the Click-to-deploy WordPress solution, which uses Apache server.
For instructions on configuring SSL for the NGINX WordPress solution that you’ve deployed, you’ll need to follow these instructions.
Let me know if you have other questions,
Joe
Jhonathan says
Hi,
Thanks for this guide I have followed the steps and it has worked
I have a query, my website is already up and running and the renewal I understand that I must do it manually but I would like it to be automatically I read your other article and it is great but I have also achieved this https://cloud.google.com/load-balancing/docs/ssl-certificates/google-managed-certs?hl=es#console
Can I use the google certificate for my site? And if this is how I can change the one that I have already installed in the console for the one from google?
Leron Amin says
Hi Jhonathan,
I do not recommend using the Google certificates for your site. I would instead recommend issuing new Let’s Encrypt certificates and configuring them according to the instructions in the tutorial. Keep in mind, the certificates are configured to renew automatically when issued according to the instructions in the tutorial.
Let me know if you have other questions,
Joe
Daniel Soloway says
Hi! Thanks for this tutorial. I have a valid certificate, for the nxt 89 days, but the SSL on the site is still not working!
Found the following certs:
Certificate Name: seniortravelbuddies.com
Serial Number: 3c71ae9841c101c5d0a5b80a733efe142f4
Domains: seniortravelbuddies.com http://www.seniortravelbuddies.com
Expiry Date: 2021-01-23 06:58:53+00:00 (VALID: 89 days)
Certificate Path: /etc/letsencrypt/live/seniortravelbuddies.com/fullchain.pem
Private Key Path: /etc/letsencrypt/live/seniortravelbuddies.com/privkey.pem
Any ideas why?
Leron Amin says
Hi Daniel,
Most SSL issues tend to be mixed content errors.
I go through the process of identifying and solving mixed content errors in this tutorial.
Let me know if you have questions,
Joe
KAMODH SINGH says
Hi,
I have installed ssl but facing problems during opening site.
Error : ERR_SSL_VERSION_OR_CIPHER_MISMATCH
Please help me to solve this problem.
Thanks…
Leron Amin says
Hi Kamodh,
There are multiple causes of this issue. I recommend referring tothis article for additional information.
Let me know if you have other questions,
Joe
Ben B says
Hello, I followed your previous tutorial, but if you type http into the url it won’t automatically change to https (except the root domains AND admin areas, which work fine for some reason). I am at a bit of a loss on how to proceed, I’ve tried every solution under the sun from StackOverflow with no luck.
Should I just do your new tutorial instead and hopefully resolve the issue? If so, do I need to do anything to reverse the changes I made with your previous tutorial, or just start the new tutorial from the beginning and it will overwrite the previous tutorial’s changes?
Leron Amin says
Hi Ben,
You will need to configure a non-https to https redirect in your Apache configuration.
Check out step 5 of this tutorial. You will need to add the lines starting with ServerName and ending with Redirect permanent to your wordpress.conf file.
Let me know if you have other questions,
Joe
Ben says
Hi, thanks for the helpful articles.
I followed your previous article for my WordPress multi site click to deploy and everything works except that the sub pages http display an Apache 404 error instead of redirecting to the https version (root url works for all sites but not sub pages)
I tried many tricks with the htaccess file and nothing works.
I’m wondering if I should try to fix that implementation, or use this new method instead?
If I’m going to use this new method, do I need to do something to revert to the old settings that I created with your old tutorial or can I just start with this new one and it will override the other settings without issue?
Thanks very much!
remmel says
Hello,
Will you please tell how to auto renew on amazon lightsail ?
Google recently increased price for hosting, charging for static ip, so i switched to lightsail.
All went well except the auto renew part.
Thanks,
Raghu says
I tried the exact same steps from the tutorials, also i checked all the above comments regarding the issue..
This page isn’t working redirected you too many times.
Try clearing your cookies.
ERR_TOO_MANY_REDIRECTS
And i waited for 2 days as well but still i’m getting same issue, Could you please help me regarding the same or please let me know the way that i can remove this SSL.
Leron Amin says
Hi Raghu,
The ERR_TOO_MANY_REDIRECTS message indicates that you have multiple redirects in your application, which is causing a re-direct loop. If you already had a redirect configured for your domain, and then you added the additional re-direct when you configured Certbot – then that would cause the redirect issue. I’d recommend finding (and removing) the old redirect, since it’s likely been replaced by the new one.
Let me know if you have any other questions,
Joe
Greg says
Great tutorial! My SSL Certificate is working.
Will you be making an updated tutorial for auto renewing the certificate?
Your other tutorial for auto renewing doesn’t appear to work for the latest Bitnami deployments.
Leron Amin says
Hi Greg,
The latest Bitnami tutorial includes auto-renewal configured by default. In step 3 of the tutorial, you’ll be prompted as to whether you’d like to have auto-renewal enabled for your certificates.
Bitnami’s latest WordPress stack includes the bncert tool, which makes the process even easier. To activate the bncert tool, make sure your website is running properly with a domain and HTTP, then run the following command to configure SSL:
Keep in mind, the bncert tool script also has the option for enabling auto-renewal.
Let me know if you have any questions,
Joe
Sushen Biswas says
I got the error when I try to install my SSL:
Note: My issue is my SSL expire. What I have to do to renue it.
(Y)es/(N)o: n
No names were found in your configuration files. Please enter in your domain
name(s) (comma and/or space separated) (Enter ‘c’ to cancel): sushenbiswas.com http://www.sushenbiswas.com
Obtaining a new certificate
Performing the following challenges:
http-01 challenge for sushenbiswas.com
http-01 challenge for http://www.sushenbiswas.com
Enabled Apache rewrite module
Error while running apache2ctl graceful.
httpd not running, trying to start
Action ‘graceful’ failed.
The Apache error log may have more information.
AH00558: apache2: Could not reliably determine the server’s fully qualified domain name, using 127.0.0.1. Set the ‘
ServerName’ directive globally to suppress this message
(98)Address already in use: AH00072: make_sock: could not bind to address [::]:80
(98)Address already in use: AH00072: make_sock: could not bind to address 0.0.0.0:80
no listening sockets available, shutting down
AH00015: Unable to open logs
Unable to restart apache using [‘apache2ctl’, ‘graceful’]
Cleaning up challenges
Error while running apache2ctl graceful.
httpd not running, trying to start
Action ‘graceful’ failed.
The Apache error log may have more information.
AH00558: apache2: Could not reliably determine the server’s fully qualified domain name, using 127.0.0.1. Set the ‘
ServerName’ directive globally to suppress this message
(98)Address already in use: AH00072: make_sock: could not bind to address [::]:80
(98)Address already in use: AH00072: make_sock: could not bind to address 0.0.0.0:80
no listening sockets available, shutting down
AH00015: Unable to open logs
Leron Amin says
Hi Sushen,
It looks like there’s a process already running on port 80. You can first try stopping then restarting all services, and it that doesn’t work, try stopping and re-starting your instance.
If that still doesn’t work, kill all process(es) on port 80, then go through the configuration process again.
Let me know if you have questions,
Joe
Rahul Dhande says
After an aliped SSL certificate this type of error showing.
<?php /** * Front to the WordPress application. This file doesn't do anything, but loads * wp-blog-header.php which does and tells WordPress to load the theme. * * @package WordPress */ /** * Tells WordPress to load the WordPress theme and output it. * * @var bool */ define( 'WP_USE_THEMES', true ); /** Loads the WordPress Environment and Template */ require __DIR__ . '/wp-blog-header.php';
Leron Amin says
Hi Rahul,
This looks like an error in your application code, and likely isn’t directly related to SSL.
Try doing a Google search for the error. If you can’t find a solution, I’d recommend restoring your site from a snapshot.
Let me know if you have other questions,
Joe
Yudikrisno says
Hi
I previously install ssl certificate from go Daddy. It has been expired. Now I want to try free ssl from let”s encrypt. Can you tell me how to do it? Where do I have to start?
Note: i’m using WordPress click to deploy. My engine is Debian 8 (jessie). Thank you
Leron Amin says
Hello Yudikrisno,
Follow the instructions here for configuring the SSL certificates on Debian 8.
Let me know if you have questions,
Joe
Francis says
Great Tutorial
Please @Leron Will this tutorial work for me
I hosted on Google Cloud and installed wordpress through sentora Zpanel, I have also pointed my domain to the cloud engine and my site is ready now to kickoff
If i use this method can i still get the ssl on my domain or if there is any better method for me please direct me.
Thank You!
Leron Amin says
Hi Francis,
I am not familiar with Sentora ZPanel. I checked their documentation and there’s instructions for installing SSL, but they seem very dated (Ubuntu 12.04), and I can’t attest to whether or not those instructions will work with the more current Linux distributions. For your reference, you can find those instructions here.
Let me know if you have any questions,
Joe
Byron Rodrigues says
Thanks for your tutorials, they are 5 stars and helped me with the migration!
I managed to activate ssl-certificates, it turns out that the root byronsd.com appears as insecure, but all other pages for example https://byronsd.com/?page_id=8 are safe. Can you help with this matter?
Leron Amin says
Looks like you were able to get it fixed – what was the issue?
Tamour says
hi how are you and thanks for helping everyone out. U r doing nice work.
im getting following error while installing ssl certificates
sudo certbot –apache
Saving debug log to /var/log/letsencrypt/letsencrypt.log
Error while running apache2ctl configtest.
Action ‘configtest’ failed.
The Apache error log may have more information.
apache2: Syntax error on line 225 of /etc/apache2/apache2.conf: Syntax error on line 35 of /etc/apache2/sites-enabl
ed/wordpress.conf: without matching section
The apache plugin is not working; there may be problems with your existing configuration.
The error was: MisconfigurationError(“Error while running apache2ctl configtest.\nAction ‘configtest’ failed.\nThe
Apache error log may have more information.\n\napache2: Syntax error on line 225 of /etc/apache2/apache2.conf: Synt
ax error on line 35 of /etc/apache2/sites-enabled/wordpress.conf: without matching sec
tion\n”,)
Leron Amin says
Hi Tamour,
If you look at the error, it mentions that there’s a syntax error on line 225 of your /etc/apache2/apache2.conf file, and another syntax error on line 35 of /etc/apache2/sites-enabled/wordpress.conf file. Fix the syntax errors of these files at their respective line numbers, and then restart your server.
Let me know if you have questions,
Joe
silas says
Thanks for your super useful website !!!
This is great information, for free, with youtube videos, you really rock man !
Such great content is rare on the Internet. Very happy that I found you.
Keep up the good work!
have you thought of monetizing your blog with ads or donate button?
Leron Amin says
Thanks for the feedback, Silas – I’m happy to hear you enjoyed the tutorials!
Sagar says
HI,
I get an error on my website after setup the SSL certification of this tutorial.
Home page is working fine but other page is not opening, those page shows 404 error.
Leron Amin says
Hi Sagar,
Were you able to get the issue resolved?
Try going to your Settings > Permalinks page and save your permalink structure again.
Let me know if you have questions,
Joe
Sebastian says
Hi it seems to have work I followed all the steps.
the only issue is that on the browser I still get a message:
View site information Info or Not secure
NOT SECURED
Your connection to this site is not fully secured.
Leron Amin says
Hi Sebastian,
This is typically due to ‘mixed content’ errors, which I cover in this tutorial.
Let me know if you have questions,
Joe
Jan says
HI there, I had an issue with the ssl installating as per your previos post how to instal ssl certificate. ( I have left comment on the other articul) Nontheless, searching for the solution I have found one, reinstaling the apache, so I did it, and went OK. Than as per instruction in this post, I set up the ssl certificatas all good, set and running. When I go to step to connect to my wordpress and finish the instalation, I put my address to chrome browser and good a php code insted of the usual WP login interface. Any help on this one? Really apreciate your site, I have started with google coloud last week, it really helpful. But as usual with coding, not always goes everything as planned. Attached is what appears in browser once I trie to go to my website http://www.salavalacerveza.es
Thanks Jan
<?php
/**
* Dashboard Administration Screen
*
* @package WordPress
* @subpackage Administration
*/
/** Load WordPress Bootstrap */
require_once( dirname( __FILE__ ) . '/admin.php' );
/** Load WordPress dashboard API */
require_once( ABSPATH . 'wp-admin/includes/dashboard.php' );
wp_dashboard_setup();
wp_enqueue_script( 'dashboard' );
if ( current_user_can( 'install_plugins' ) ) {
wp_enqueue_script( 'plugin-install' );
wp_enqueue_script( 'updates' );
}
if ( current_user_can( 'upload_files' ) ) {
wp_enqueue_script( 'media-upload' );
}
add_thickbox();
if ( wp_is_mobile() ) {
wp_enqueue_script( 'jquery-touch-punch' );
}
$title = __( 'Dashboard' );
$parent_file = 'index.php';
$help = '’ . __( ‘Welcome to your WordPress Dashboard! This is the screen you will see when you log in to your site, and gives you access to all the site management features of WordPress. You can get help for any screen by clicking the Help tab above the screen title.’ ) . ”;
$screen = get_current_screen();
$screen->add_help_tab(
array(
‘id’ => ‘overview’,
‘title’ => __( ‘Overview’ ),
‘content’ => $help,
)
David says
This is an amazing site. I’m a beginner (no programming knowledge whatsoever) and was able to setup a WordPress site using google cloud with free ssl following your tutorials. Keep them coming!
You should set a tip jar up to show you some appreciation.
Leron Amin says
Well done David – I’m glad to hear that the tutorials were helpful!
Monty says
Hi mate great post and frankly a bunch of your content on how to get stuff done on GCP is super helpful, even if you’re a complete beginner, thank you for that!
I was trying to get this done on the WordPress on LEMP 7 Max Performance setup which I believe is on nginx so I’ve selected Nginx and Debia 9 (stretched) but this happens after I try to install Certbot via SSH.
Any ideas how to solve this problem? 🙏🙏🙏
—
Job for nginx.service failed because the control process exited with error code.
See “systemctl status nginx.service” and “journalctl -xe” for details.
invoke-rc.d: initscript nginx, action “start” failed.
● nginx.service – A high performance web server and a reverse proxy server
Loaded: loaded (/lib/systemd/system/nginx.service; enabled; vendor preset: enabled)
Active: failed (Result: exit-code) since Sat 2020-04-11 11:50:32 UTC; 10ms ago
Docs: man:nginx(8)
Process: 25535 ExecStart=/usr/sbin/nginx -g daemon on; master_process on; (code=exited, status=1/FAILURE)
Process: 25533 ExecStartPre=/usr/sbin/nginx -t -q -g daemon on; master_process on; (code=exited, status=0/SUCCESS)
Apr 11 11:50:30 homey-wordpress4-lemp7-1-vm nginx[25535]: nginx: [emerg] bind() to 0.0.0.0:80 failed (98: Add… use)
Apr 11 11:50:30 homey-wordpress4-lemp7-1-vm nginx[25535]: nginx: [emerg] bind() to 0.0.0.0:80 failed (98: Add… use)
Apr 11 11:50:31 homey-wordpress4-lemp7-1-vm nginx[25535]: nginx: [emerg] bind() to 0.0.0.0:80 failed (98: Add… use)
Apr 11 11:50:31 homey-wordpress4-lemp7-1-vm nginx[25535]: nginx: [emerg] bind() to 0.0.0.0:80 failed (98: Add… use)
Apr 11 11:50:32 homey-wordpress4-lemp7-1-vm nginx[25535]: nginx: [emerg] bind() to 0.0.0.0:80 failed (98: Add… use)
Apr 11 11:50:32 homey-wordpress4-lemp7-1-vm nginx[25535]: nginx: [emerg] still could not bind()
Apr 11 11:50:32 homey-wordpress4-lemp7-1-vm systemd[1]: nginx.service: Control process exited, code=exited status=1
Apr 11 11:50:32 homey-wordpress4-lemp7-1-vm systemd[1]: Failed to start A high performance web server and a r…rver.
Apr 11 11:50:32 homey-wordpress4-lemp7-1-vm systemd[1]: nginx.service: Unit entered failed state.
Apr 11 11:50:32 homey-wordpress4-lemp7-1-vm systemd[1]: nginx.service: Failed with result ‘exit-code’.
Hint: Some lines were ellipsized, use -l to show in full.
dpkg: error processing package nginx-full (–configure):
subprocess installed post-installation script returned error exit status 1
dpkg: dependency problems prevent configuration of nginx:
nginx depends on nginx-full (<< 1.10.3-1+deb9u3.1~) | nginx-light (<< 1.10.3-1+deb9u3.1~) | nginx-extras (<= 1.10.3-1+deb9u3) | nginx-light (>= 1.10.3-1+deb9u3) | nginx-extras (>= 1.10.3-1+deb9u3); however:
Package nginx-full is not configured yet.
Package nginx-light is not installed.
Package nginx-extras is not installed.
dpkg: error processing package nginx (–configure):
dependency problems – leaving unconfigured
dpkg: dependency problems prevent configuration of python3-certbot-nginx:
python3-certbot-nginx depends on nginx; however:
Package nginx is not configured yet.
Package nginx-full which provides nginx is not configured yet.
dpkg: error processing package python3-certbot-nginx (–configure):
dependency problems – leaving unconfigured
dpkg: dependency problems prevent configuration of python-certbot-nginx:
python-certbot-nginx depends on python3-certbot-nginx; however:
Package python3-certbot-nginx is not configured yet.
dpkg: error processing package python-certbot-nginx (–configure):
dependency problems – leaving unconfigured
Processing triggers for libc-bin (2.24-11+deb9u3) …
Processing triggers for sgml-base (1.29) …
Errors were encountered while processing:
nginx-full
nginx
python3-certbot-nginx
python-certbot-nginx
E: Sub-process /usr/bin/dpkg returned an error code (1)
Leron Amin says
Thanks for the feedback Monty!
I haven’t tested the certbot scripts on NGINX servers. I did, however, take a look at the WordPress LEMP Max Performance stack offered by Jetware, and wasn’t impressed with their documentation. The stack comes pre-installed with the LetsEncypt SSL package, but I couldn’t find any useful instructions in the documentation on how to implement it.
In the future, I’d recommend sticking with solutions from providers who provide comprehensive documentation, such as Bitnami or OpenLiteSpeed.
If you’re able to get it working, please share the solution, as I’m sure others will find it helpful!
Talk to you soon,
Joe
Aazim says
Hi Leron,
First of all i would like to say that your tutorials are very helpful for cloud hosting.
And Could you please help me out in aws route53 problem?
I have successfully routed my instance’s IP to my xyz.com with cloudflare, but my website and its admin panel are available on both IP address and domain. And when i modified my WP_SITEURL & WP_HOME with domain then at least admin panel is become unavailable from IP but still website public urls availible on both.
Any help would be greatly appreciated.
Leron Amin says
Hi Aazim,
Thanks for the feedback!
In regards to your questions, your website will always be served accessible it’s public IP address – I wouldn’t worry to much about it.
If you want to redirect traffic from your IP to your domain name, you can follow these instructions.
Let me know if you have questions,
Joe
Sdtechie says
This latest guide to install ssl certificates on gcp is better than your previous one. In the latest one there is no need to worry about auto-renew. Really helpful.
Leron Amin says
Thanks for the feedback Sdtechie – I will keep your feedback in mind as I create future tutorials.
Emmy says
After going through the guide (https://onepagezen.com/free-ssl-certificates-wordpress-google-cloud-bitnami/) you gave to install SSL and make it auto-renewal – after 3months I still get error that my SSL has expired
Leron Amin says
Hi Emmy,
To configure auto-renewal with the earlier versions of the tutorial, follow the instructions in this tutorial.
Let me know if you have questions,
Joe
Stan Lucci says
Your videos are awesome and educative.
Would you please make a video on how to download a pentest tool, like Gophish, on Azure? It would be very valuable to my work.
Thanks.
I appreciate your videos anyways.
Leron Amin says
Thanks for the suggestion Stan – I will look into it!
Diego Toro says
Hi. Thanks for your blog… its really useful. My SSL works fine. But when i try to activate the autorenewal says “mv: cannot stat ‘certbot-auto’: No such file or directory” . What can i do?
Leron Amin says
Hi Diego,
In this version of the tutorial, the auto-renewal cronjob is configured automatically – so you don’t need to do anything else to configure auto-renewal.
You can test if auto-renewal is working properly by running the following command:
Let me know if you have questions,
Joe
Nic says
I followed your instructions exactly, and now when I try to go on wordpress admin, I get this error:
NET::ERR_CERT_COMMON_NAME_INVALID
Do you know what I could do to resolve this?
I’ve tried flushing DNS from my computer, so I think it’s a problem caused by the SSL.
Leron Amin says
Hi Nic,
That error typically means that the certificate was issued for the incorrect domain. For example, you issued a certificate for ‘example.com’ and your domain is ‘mywebsite.com’.
This typically happens when a user runs the certificate issuing command without changing the domain name in the command.
You can verify if the certificate is issued for the correct domain by checking the certificate here.
Let me know if you have questions,
Joe
ye says
hey bro i followed the tutorial but i got an issue after this command : sudo certbot –apache
During handling of the above exception, another exception occurred:
Traceback (most recent call last):
File “/usr/lib/python3/dist-packages/urllib3/connectionpool.py”, line 594, in urlopen
chunked=chunked)
File “/usr/lib/python3/dist-packages/urllib3/connectionpool.py”, line 350, in _make_request
self._validate_conn(conn)
File “/usr/lib/python3/dist-packages/urllib3/connectionpool.py”, line 837, in _validate_conn
conn.connect()
File “/usr/lib/python3/dist-packages/urllib3/connection.py”, line 281, in connect
conn = self._new_conn()
File “/usr/lib/python3/dist-packages/urllib3/connection.py”, line 147, in _new_conn
self, “Failed to establish a new connection: %s” % e)
requests.packages.urllib3.exceptions.NewConnectionError: : Failed to establish a new connection:
[Errno 101] Network is unreachable
During handling of the above exception, another exception occurred:
Traceback (most recent call last):
File “/usr/lib/python3/dist-packages/requests/adapters.py”, line 423, in send
timeout=timeout
File “/usr/lib/python3/dist-packages/urllib3/connectionpool.py”, line 643, in urlopen
_stacktrace=sys.exc_info()[2])
File “/usr/lib/python3/dist-packages/urllib3/util/retry.py”, line 363, in increment
raise MaxRetryError(_pool, url, error or ResponseError(cause))
requests.packages.urllib3.exceptions.MaxRetryError: HTTPSConnectionPool(host=’acme-v02.api.letsencrypt.org’, port=443): Max retries exceeded with url: /directory (Caused by NewConnecti
onError(‘: Failed to establish a new connection: [Errno 101] Network is unreachable’,))
During handling of the above exception, another exception occurred:
Traceback (most recent call last):
File “/usr/lib/python3/dist-packages/acme/client.py”, line 1103, in _send_request
response = self.session.request(method, url, *args, **kwargs)
File “/usr/lib/python3/dist-packages/requests/sessions.py”, line 488, in request
resp = self.send(prep, **send_kwargs)
File “/usr/lib/python3/dist-packages/requests/sessions.py”, line 609, in send
r = adapter.send(request, **kwargs)
File “/usr/lib/python3/dist-packages/requests/adapters.py”, line 487, in send
raise ConnectionError(e, request=request)
requests.exceptions.ConnectionError: HTTPSConnectionPool(host=’acme-v02.api.letsencrypt.org’, port=443): Max retries exceeded with url: /directory (Caused by NewConnectionError(‘: Failed to establish a new connection: [Errno 101] Network is unreachable’,))
During handling of the above exception, another exception occurred:
ValueError: Requesting acme-v02.api.letsencrypt.org/directory: Network is unreachable
Please see the logfiles in /var/log/letsencrypt for more details.
can you tell me how to solve this issue knowing im using :
Description: Debian GNU/Linux 9.11 (stretch)
Release: 9.11
Codename: stretch
Leron Amin says
Hi Ye,
Are you attempting to renew an existing/expired certificate or are you trying to issue an entirely new certificate?
Keep in mind that before being able to issue the certificate, your website must be online and accessible via either HTTP or HTTPS. This is required in order for Certbot to validate your domain and ultimately issue the certificate.
Please provide the requested information if you need additional support.
Thanks,
Joe
Nickie Oakwood says
Duplicator Pro moved my site but when I click on any link I get a requested url not found. Try to upload a plugin and told directory does not exist or is not writable. Would be a great video for you to do next as so many people who move will want to migrate their site. I carry on trying to find a solution to see what occurs.
Leron Amin says
Hi Nickie,
The issue is likely related to permissions/file ownership issues. Have you tried changing the permissions of the file/directory with chmod?
Talk to you soon,
Joe
Nickie Oakwood says
Stirling as usual. Man, this licks Bitnami 1. In under 30 minutes had it all working SSL the lot. Even including DNS propagation. Cheers buddy!
Leron Amin says
Awesome – glad to hear it Nickie!
isaac says
Hi Joe,
My system is running on Debian GNU/Linux 9.11 (stretch), but Certbot provides only till 9.10. How do I overcome this issue?
Thank you in advance,
Isaac 🙂
isaac says
Sorry, there was a little mind trip going on. Got it fixed myself. 9.11 (Stretch) is under Debian 9. What was I thinking?
Much apologies
Leron Amin says
Glad to hear you were able to get it figured out!
Emmy Nwabuzor says
Joe thanks for the guide.
I have taken time to go through the comments but none of the issues relates to mine.
This is mine;
I was migrating a site from bluehost to Goggle cloud, I have installed wordpress, set static IP address, then activate the “All-in-One Wp Migration” plugin so that I can can import.
Migration was completed.
But am so frustrated that I trying using the step to generate SSL certificate to the site i have just migrated and imported, and its not working. I have deleted my deployment more than 10times to do a fresh one still did not work.
these are part of the error mesage;
During handling of the above exception, another exception occurred:
Traceback (most recent call last):
File “/usr/lib/python3/dist-packages/certbot/error_handler.py”, line 108, in _call_registered
self.funcs[-1]()
File “/usr/lib/python3/dist-packages/certbot/auth_handler.py”, line 316, in _cleanup_challenges
self.auth.cleanup(achalls)
File “/usr/lib/python3/dist-packages/certbot_apache/configurator.py”, line 2311, in cleanup
self.restart()
File “/usr/lib/python3/dist-packages/certbot_apache/configurator.py”, line 2174, in restart
self._reload()
File “/usr/lib/python3/dist-packages/certbot_apache/configurator.py”, line 2202, in _reload
raise errors.MisconfigurationError(error)
certbot.errors.MisconfigurationError: Error while running apache2ctl graceful.
httpd not running, trying to start
Action ‘graceful’ failed.
The Apache error log may have more information.
AH00558: apache2: Could not reliably determine the server’s fully qualified domain name, using 127.0.0.1. Set the ‘
ServerName’ directive globally to suppress this message
(98)Address already in use: AH00072: make_sock: could not bind to address [::]:80
(98)Address already in use: AH00072: make_sock: could not bind to address 0.0.0.0:80
no listening sockets available, shutting down
AH00015: Unable to open logs
Error while running apache2ctl graceful.
httpd not running, trying to start
Action ‘graceful’ failed.
The Apache error log may have more information.
AH00558: apache2: Could not reliably determine the server’s fully qualified domain name, using 127.0.0.1. Set the ‘
ServerName’ directive globally to suppress this message
(98)Address already in use: AH00072: make_sock: could not bind to address [::]:80
(98)Address already in use: AH00072: make_sock: could not bind to address 0.0.0.0:80
no listening sockets available, shutting down
AH00015: Unable to open logs
please what can i do?
i have tried using the step without any importation and it worked, but once i import and try the step it fails.
Leron Amin says
Hi Emmy,
It looks like there are multiple problems.
First of all, it looks like there’s already a process running on port 80. On top of that, your Apache isn’t configured with a ServerName – so the system doesn’t know which domain name is attached to your VM instance. Was your website working correctly without HTTPs before you tried issuing the certificates? This is essential, as the script will only work assuming the website is up-and-running on port 80.
If have experience with troubleshooting Linux systems, I’d recommend searching for the errors through a search engine – start with the port issue, then move to the errors with the Certbot script.
Let me know how else I can help,
Joe
Emmy says
ok, thanks so smuch for your repond. All fixed now
Leron Amin says
Glad to hear it – thanks for the feedback!
Scott says
OMG thanks for this, saved my life. However you might want to update this page to reflect the new setup, the old page sent me down the wrong path for quite a while.
https://onepagezen.com/free-ssl-certificate-wordpress-google-cloud-click-to-deploy/
Leron Amin says
Thank you for the feedback Scott!
The WordPress install, domain, and SSL setup have recently been consolidated into a single tutorial, which you can view here.
Let me know if you have any questions,
Joe
Shail says
Hi there,
We have install the ssl certificates as you mentioned above steps but we need to enable ssl for all subdomains(*) on google cloud. Please let know the command line to enable it.
Thanks,
Shail says
Currently, we have only one subdomain like http://dev.example.com
Please suggest, how can we add subdomains to the existing certificate
Leron Amin says
Hi Shail,
Check out the Bitnami documentation for WordPress Multisite – it has everything you need and more.
Let me know if you have questions,
Joe
Shail says
Hi Leron,
We have configured letsencrypt to work on my website. It’s working fine but the problem is that I am setting up nodejs on it and to setup a socket connection and need to use different ports than 80.
Example: https://www.example.com:1337
How do I configure letsencrypt to allow for different ports?
Thanks,
Leron Amin says
Hi Shail,
You can use the letsncrypt certificate files just as you’d use certificate files from any another certificate authority.
To add SSL to additional ports, follow the configuration instructions here.
Let me know if you have questions,
Joe
Leron Amin says
Hi Shail,
You will need to ‘enable’ the certificates within your Apache VirtualHost / Nginx configuration.
This external tutorial goes over the steps.
Let me know if you have questions,
Joe
Dung Nguyen Ngoc says
An unexpected error occurred:
There were too many requests of a given type :: Error creating new order :: too many certificates already issued fo
r exact set of domains: tranchautravel.vn,www.tranchautravel.vn: see https://letsencrypt.org/docs/rate-limits/
Please see the logfiles in /var/log/letsencrypt for more details.
…. Help me, thanks !
Leron Amin says
Hi Dung,
This error will occur if you’ve made to many certificate requests for a specific domain within a short period of time.
Try again in 24 hours, and the issue should be resolved.
Let me know if you have questions,
Joe
Dung Nguyen Ngoc says
Thanks You, I done published. Greats.
Al says
Hey
Thanks for the great tutorial. Is it going to be renewed automatically after 90 days? shouldn’t i do anything about renew?
Best Regards
Leron Amin says
Hey Al,
The certificate is renewed automatically after 90 days.
If you’re concerned about whether or not the certificates will renew, you can follow the instructions at the end of this tutorial to learn about testing the auto-renewal process.
Hope this helps and let me know if you have any questions,
Joe
Mohit says
hey,
I have followed all the steps above mentioned in this tutorial. the SSL was successfully installed on my website but the website is showing cache files. why this is going to happen please check my website URL and reply to me.
theindianpaper.com
Leron Amin says
Hi Mohit,
What do you mean by ‘the website is showing cache files?’ Please provide further details and I will see how I can help!
Joe
yx says
hi there, I go this error on apache 2 server. any clue how I can reinstall my apache2 server? I think I messed it up while adding the SSL certificates.
oot@adventurematching-vm:~# systemctl status apache2.service
● apache2.service – The Apache HTTP Server
Loaded: loaded (/lib/systemd/system/apache2.service; enabled; vendor preset: enabled)
Active: failed (Result: exit-code) since Sun 2019-10-13 16:14:41 UTC; 7s ago
Process: 1945 ExecStart=/usr/sbin/apachectl start (code=exited, status=1/FAILURE)
Oct 13 16:14:41 adventurematching-vm systemd[1]: Starting The Apache HTTP Server…
Oct 13 16:14:41 adventurematching-vm apachectl[1945]: apache2: Could not open configuration file /etc/apache2/apach
Oct 13 16:14:41 adventurematching-vm apachectl[1945]: Action ‘start’ failed.
Oct 13 16:14:41 adventurematching-vm apachectl[1945]: The Apache error log may have more information.
Oct 13 16:14:41 adventurematching-vm systemd[1]: apache2.service: Control process exited, code=exited status=1
Oct 13 16:14:41 adventurematching-vm systemd[1]: Failed to start The Apache HTTP Server.
Oct 13 16:14:41 adventurematching-vm systemd[1]: apache2.service: Unit entered failed state.
Oct 13 16:14:41 adventurematching-vm systemd[1]: apache2.service: Failed with result ‘exit-code’.
Leron Amin says
Hey yx,
Were you able to get the issue resolved? Do you remember what caused the issue?
Typically you won’t have to reinstall Apache when there’s an error, as this would involve re-configuring your entire VM instance.
The first thing I’d recommend doing is checking your Apache log files for any additional information regarding what caused the error (typically located in /var/log/apache2 or /var/log/httpd).
Let me know if you have any additional questions!
Joe
amit says
Invalid email address: .
Enter email address (used for urgent renewal and security notices)
Leron Amin says
Hi Amit,
You have to enter an email address – or you might be able to just bypass the field by pressing enter.
That being said, it looks like you may have entered a ‘.’ character, which is probably what’s causing the error.
Let me know if you have additional questions,
Joe
Amit Sanghvi says
HI Joe
I get error for when i enter email add … it showing wrong email
Leron Amin says
Hi Amit,
You mean when you try to log in, it’s showing incorrect email?
Let me know,
Joe
Diana says
Excellent video tutorial.
I have a basic question: can I use the static IP address rather than assigned domain name to generate the certificates?
I’m using GCP compute engine with wordpress click and deploy and I hve the static IP address. I’m running student project and would rather not purchase a domain name.
Leron Amin says
Hi Diana,
Thanks for the feedback!
Unfortunately you cannot issue a certificate for an IP address.
Let me know if you have any questions,
Joe
Arpit says
Hi,
How to enable ssl for subdomains(*) on google cloud
Leron Amin says
Hi Arpit,
You can list all of your subdomains in the certificate, or use a Wildcard certificate – it just depends on which would work better for your situation. For instance, if you know exactly which subdomains you’ll be using, I’d recommend simply adding the additional subdomains to the existing certificate. If you plan on regularly introducing new subdomains, I’d recommend using a Wildcard certificate.
Hope this helps and let me know if you have questions,
Joe
Arpit says
Thanks Joe.
I tried on my website and it works.
Tim Rogers says
Thank you for taking the time to do this. Great tutorial – clear and informative.
Best wishes,
Tim
Leron Amin says
Thanks for the feedback Tim!
Marcelo Estay says
Hello,
I write to you from Chile. Apply the latest Virtual Machine WordPress tutorial on Google Cloud. SSL Certificate works perfect on the Web but I want to know what are the commands for automatic certificate renewal for Debian 9.9 Stretch.
The only problem that was presented to me is that I lost the permanent links. I have not been able to restore them under the input format by name, they only work in a simple way. I look forward to your help or suggestion.
regards
Leron Amin says
Hi Marcelo,
The Certbot website has easy-to-follow instructions for configuring Let’s Encrypt SSL certificates on Debian 9 Stretch.
Let me know if you have any questions,
Joe
Bruce says
This was so helpful. Though I still got Lil worried I don’t know if it’s something to worry about or it’s gonna be OK later on. When I log in to my dashboard,my website will get the green lock but at the front end, it says not secured.. Any help?
Leron Amin says
Hi Bruce,
Sounds like insecure/mixed content errors. I’d recommend you open Chrome devtools and check which errors are logging to the console.
I go through this process step-by-step in this tutorial.
Let me know if you have questions,
Joe
Arushi Soni says
Hey there.
After I performed your given steps on how to fix SSL errors on wordpress, my wordpress dashboard and also the website is giving me an error: ERR_TOO_MANY_REDIRECTS. At first I thought it would take a little time to update but its been 2 days and its still not opening up.
Leron Amin says
Hi Arushi,
Make sure you only have a single redirect rule in your Apache configuration files. For instance, if you went through the steps of this tutorial, but already have an existing SSL configuration on your server, then chances are that’s what’s causing the issue. You will need to locate the Apache configuration file with the original redirect and remove it, as the certbot-auto tool used in this tutorial automatically configures the HTTPS redirect.
Let me know if you have questions,
Joe
Arushi Soni says
Please tell me how to remove the existing SSL configuration so that I can replace them with the new ones. Now that I have tried to install the new ones too, there are two certbot-auto packages i.e, certbot-auto and certbot-auto.1
Arushi Soni says
I don’t know how to locate the Apache configuration file with the original redirect and remove it. Please guide me through it. Please help.
Almujgool says
Is there a way i can remove the old certificates that were installed using your old tutorial?
https://onepagezen.com/free-ssl-certificate-wordpress-google-cloud-click-to-deploy/
i used to get emails regarding expiry, and while i’m sure u setup the auto renewal, it never happened.
Currently when i setup the certificate using this tutorial i get the “Too many redirects” error.
Thanks
Leron Amin says
Hi Almujgool,
I just responded to another comment with the same issue.
In step 5 of the earlier tutorial, you were instructed to configure an HTTPs redirect in your wordpress.conf file. Look for the following three lines of code, and then add a # symbol to the left of them, as shown below:
After making the changes, make sure to restart Apache:
You may also need to comment out the certificate paths further down the file, but I'm not sure if that will be necessary.
Please get back to me if the steps don't work, and which additional errors you see, and I will try my best to help.
Joe
Ross says
Hello Joe – I’m having the same infinite 301 redirect loop for the same situation (used previous tutorial and now used the new one).
I tried commenting out the three lines you have suggested but it isn’t making any difference to the redirect loop.
Any help appreciated!
Konqueror says
Previously had certifications using this method: https://onepagezen.com/free-ssl-certificate-wordpress-google-cloud-click-to-deploy/
Then cert. expired, and I installed using the one on this page. However, now I’m receiving a “too many redirects error” although ssl cert. checks show that it is installed properly. What steps can I take to resolve this?
Leron Amin says
Hi Konqueror,
Check out my earlier comment here, and see if this resolves the issue.
Let me know!
Joe
Konqueror says
Made the following changes, but i’m still getting the too many redirect error.
# ServerName http://www.1pagezen.com
# ServerAlias 1pagezen.com
# Redirect permanent / https://www.1pagezen.com/
Leron Amin says
Hi Ross, Arushi, Konqueror,
I took some time to look into the issue. To fix the problem, first undo the changes to your wordpress.conf file – you’re going to leave that redirect as it stands. Next, open your wordpress-le-ssl.conf for editing by running the following command:
Once inside of this file, comment out the following three lines of code, just as you did before except now in the wordpress-le-ssl.conf file instead of the wordpress.conf file:
Remember to restart Apache after making the change:
Let me know if you have questions,
Joe
Arushi Soni says
Thanks a ton. It worked for me.
Konqueror says
Perfect! this worked. I truly appreciate you taking the time to assist us with this issue.
Leron Amin says
No problem – glad to hear it worked!
Darren says
I followed your older “Setup Free SSL for WordPress on Google Cloud (Click-to-Deploy)”. As there were some error messages, I was not sure if everything went well.
I chanced upon this tutorial, and tried to run the SSL installation again. Ended up with the same “too many redirects error” that Ross, Arushi, and Konqueror mentioned. It’s a bit shocking when I tried to fix an issue and made things worse…
Your solution worked.
I’ll suggest that you put a huge red warning at the top for people who ran one of your older “free SSL” tutorial.
Leron Amin says
Thanks for the suggestion Darren – I’m glad to hear you were able to get the issue resolved.
I will add a notification at the top of the older tutorials in order to point users to the latest version.
Let me know if you have any other questions,
Joe
Mario says
Thanks for the tutorial. I am wondering if this works as well with a site hosted on Google Domains, how will that work.
What would be the best approach to generate the SSL certificates for a domain, this domain was verified already on App Engine, do you know if that can be done without the VM?
Leron Amin says
Hi Mario,
This tutorial won’t be applicable for managed hosting providers, which is what Google Domains offers.
Most managed hosting providers offer a 1-click SSL solution, so most of the time manually configuring SSL for your site (as demonstrated in this tutorial) is not necessary.
Hope this helps and let me know if you have questions,
Joe
Abdelaziz says
Hi LERON AMIN
The best tutorial well done! It worked for me like a charm. I just have a quick question I have just bought a new domain and would like to register it for the same site and make sure it is secure as well. What will be the best approach?
Leron Amin says
Hi Abdelaziz – are you trying to redirect traffic from the new domain to the same site?
Let me know and I will see how I can help!
Abdelaziz Alzaabi says
Yes to my 2nd new domain. I have done it correctly read through the documents and did it well. Thanks a lot Bro. Please keep it up we need people like you everyday.
Leron Amin says
Glad you got it working! Also thanks for the great feedback!
Naveena C K says
Hi,
I did everything as listed here. But I am getting this error while trying to access the site. I tried multiple times 🙁
ERR_CONNECTION_TIMED_OUT
Leron Amin says
Hi Naveena,
It looks like a database connection issue; a problem for which there could be a variety of causes.
Do a Google search for ‘WordPress error establishing a database connection’ and you will find many resources. The first thing I’d check, however, is that the database credentials in your wp-config.php file are correct.
Let me know if you have questions,
Joe
Singham says
Error while running apache2ctl graceful.
httpd not running, trying to start
Action ‘graceful’ failed.
The Apache error log may have more information.
AH00558: apache2: Could not reliably determine the server’s fully qualified domain name, using 127.0.0.1. Set the ‘ServerName’ directive globally to suppress this message
(98)Address already in use: AH00072: make_sock: could not bind to address [::]:80
(98)Address already in use: AH00072: make_sock: could not bind to address 0.0.0.0:80
no listening sockets available, shutting down
AH00015: Unable to open logs
IMPORTANT NOTES:
– Your account credentials have been saved in your Certbot
configuration directory at /etc/letsencrypt. You should make a
secure backup of this folder now. This configuration directory will
also contain certificates and private keys obtained by Certbot so
making regular backups of this folder is ideal.
Leron Amin says
Hi Singham,
Try adding a ServerName directive to your Apache configuration file, and see if that fixes the issue.
See this resource for additional information, and let me know if you’d like additional clarification.
Thanks,
Joe
Corey says
Hey Leron, thank you for all of these tutorials and all of this help! You’ve enable me to be my own admin (both good and bad). I followed your older instructions to get the auto-cert setup:https://onepagezen.com/free-ssl-certificate-wordpress-google-cloud-click-to-deploy/
After I did that, I moved my DNS from GoDaddy to Google. Everything was fine for a few months. I started getting an email that my cert was set to expire. I attempted to renew it, but was getting access errors. I thought I might be able to renew them by following the steps outlined in this tutorial, but I think I’ve done more harm than good. I followed this guide exactly and I was able to update the cert, but something is wrong, my cert is still showing the old one that is expiring in a few days on this checker:
https://www.sslshopper.com/ssl-checker.html#hostname=latitudelabs.io
but correct on this one:
https://www.ssllabs.com/ssltest/analyze.html?d=latitudelabs.io
And I am getting an odd redirect error. I can no longer access my site at all, nor the admin page. When I attempt to get to the admin page the “/” is missing and I get “.iowp-admin”. I also get a crazy number of https redirects, 19!
Since I can’t access the admin, I tried editing the wp-config.php file to force the site address, but that didnt help
define(‘WP_SITEURL’, ‘https://latitudelabs.io/’);
define(‘WP_HOME’, ‘https://latitudelabs.io/’);
I checked my .htaccess file and it is this:
# BEGIN WordPress
RewriteEngine On
RewriteBase /
RewriteRule ^index\.php$ – [L]
RewriteCond %{REQUEST_FILENAME} !-f
RewriteCond %{REQUEST_FILENAME} !-d
RewriteRule . /index.php [L]
# END WordPress
Any help would be greatly appreciated.
Leron Amin says
Hi Corey,
Were you able to get the issue resolved? If so, what was the problem?
In the future, use the following command to renew your certificates:
Thanks,
Joe
majda says
Joe, how to renew almost expired certificate? please let us know
Leron Amin says
Hi Majda,
If you have certbot configured properly, you should be able to renew by executing the following command from the directory that contains the certbot script:
For older implementations using certbot-auto, the script would be:
Let me know if you have other questions,
Joe
Dali says
Fantastic as usual! Your tutorials are in a class of their own. Really, it’s a pleasure learning from them. This is how it should be done. Clear and concise, step-by-step, with video walk-through, illustrated graphic elements and everything. Impressive!
We used your previous (now old) tutorial on this exact same theme: Free self-updating SSL for WordPress on Google Cloud (Click-to-Deploy). Depending solely on your clear descriptions we configured WordPress Multisite Network with many websites on it and it all works flawlessly, all websites and sub-sites SSL are self-updating with no issues, for almost a year now.
We are also continuously adding new websites and sub-sites on the network and will now switch to using this new way, because it seems even simpler.
Thank you very much for all your brilliant tips & always highest-quality tutorials!
They make seemingly complicated procedures easy as peanuts!
Leron Amin says
Hi Dali,
Thank you for the great feedback! I’m happy to hear the tutorials have been helpful to you, and I appreciate you taking the time to share your experience!
Best regards,
Joe
Kiran More says
Error occurred please help me
Unable to locate package cerbot
Unable to locate python-cerbot-apche
Leron Amin says
Hi Kiran – when are you seeing this error?
Imran says
Hello,
I tried installation of SSL through SSH console. The process is easy. However, the whole website gets distorted. The home page gets ruined. This thing I faced at Digital Ocean as well as Google Cloud. Why is it so?
Leron Amin says
Hi Imran,
That could be caused by ‘mixed content’ errors, which will cause some of your content not to display if it’s being served with an HTTP prefix (instead of HTTPS).
You can learn more about ‘mixed content’ errors, and how to fix them, by checking out step 1 of this tutorial.
Let me know if you have questions,
Joe
Antonet Behr says
Hi
Step 5 just tells me
command not found?
what now?
Leron Amin says
Hi Antonet,
Did you verify that the operating system is Debian 9 (Stretch)?
Talk to you soon,
Joe
San says
What are the steps for Debian8 Google Cloud? I get errors when following the steps outlined in https://certbot.eff.org/lets-encrypt/debianjessie-apache
Im not sure about what I need to copy/paste on my SSH session. Can you make a tutorial for Debian 8 as well? Or provide a walk-through? Thanks!
Leron Amin says
Hi San,
The steps are very straightforward, as displayed here.
Check out the link and let me know if you have questions,
Joe
Leron Amin says
What did you think of this tutorial? Please share your questions and comments!
Michael says
Shows command not found when inputting “$ sudo apt-get install certbot python-certbot-apache -t stretch-backports”
so I am not able to proceed with the tutorial
Leron Amin says
Hi Michael,
Do not add the $ symbol in front of the command.
Let me know if you have questions,
Joe