One of the final steps before deploying your WordPress website on Google Cloud Platform is setting up a domain name.
With most hosting providers (such as SiteGround or BlueHost), setting up a domain name is relatively easy. However, setting up a domain name on the Google Cloud Platform is slightly more complicated.
Registering a Domain Name
Before starting this tutorial, you should’ve already purchased a domain name. Most .com domains usually sell for around ten U.S. dollars. However, less commonly used domain names, such as those ending in .club or .site, sell for much cheaper. To register a domain:
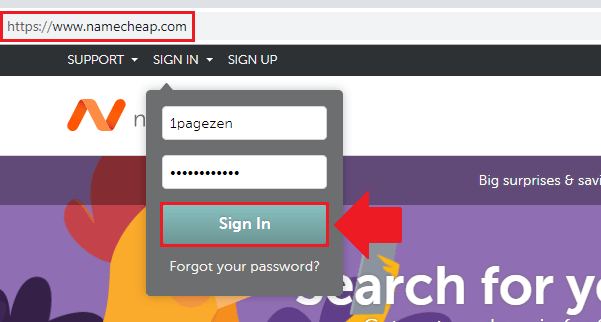
Visit a domain name provider (we recommend NameCheap).
Search for the domain you want to purchase.
Add it to your cart.
Checkout.
Once you’ve registered a domain name and have setup WordPress on Google Cloud (Click-to-Deploy or Bitnami), you’re ready to start this tutorial.
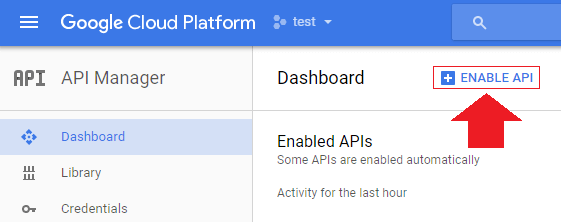
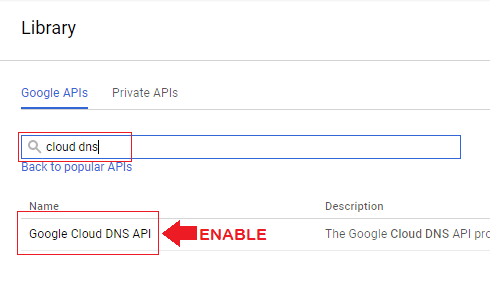
1. Enable the Cloud DNS API
Login to your Google Cloud Platform account. Click the hamburger menu in the upper left-hand corner of the screen and go to API Manager > Dashboard.Once you’ve reached your API Dashboard, click on ENABLE API at the top of the screen.In the search field, search for cloud dns, and click on Google Cloud DNS API. After you’ve clicked on Google Cloud DNS API, click to enable the API.
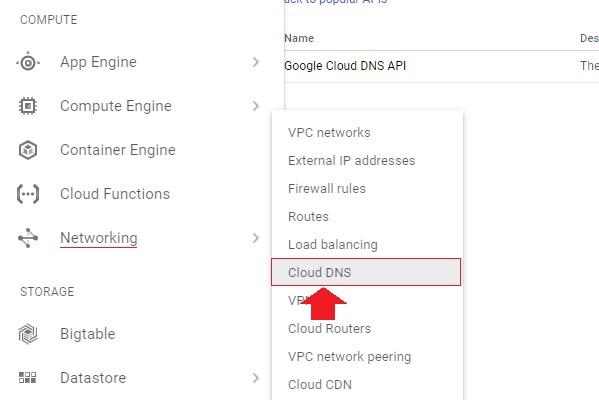
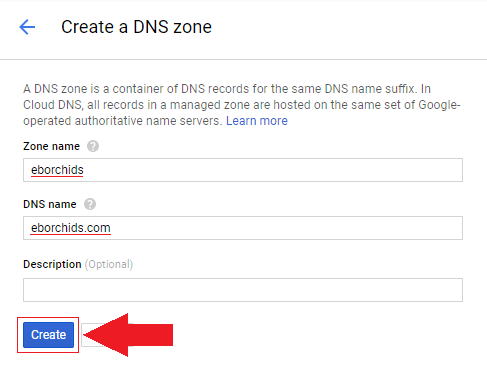
2. Create a Cloud DNS Zone
After enabling the Cloud DNS API, click on the hamburger menu in the upper left hand corner of the screen and navigate to Networking > Cloud DNS.Once you’ve navigated to Cloud DNS, click on CREATE ZONE at the top of the page.Enter the name of your website in the Zone Name field, and your website’s root domain name in the DNS Name field. Click the Create button.
3. Add DNS Records
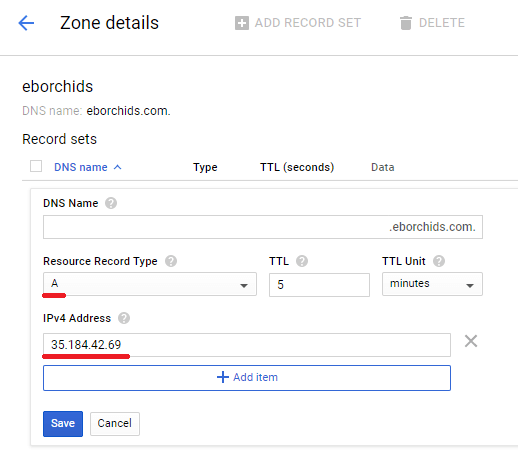
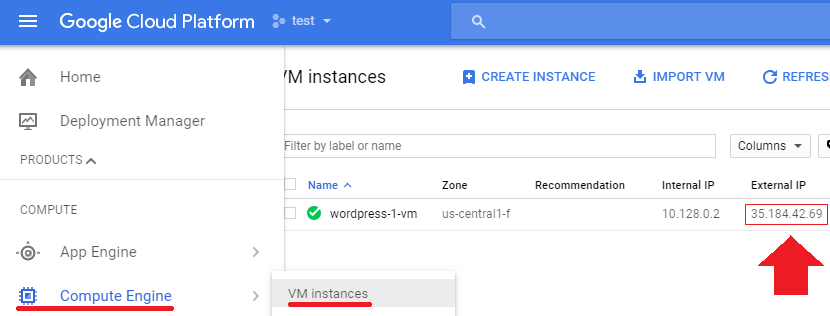
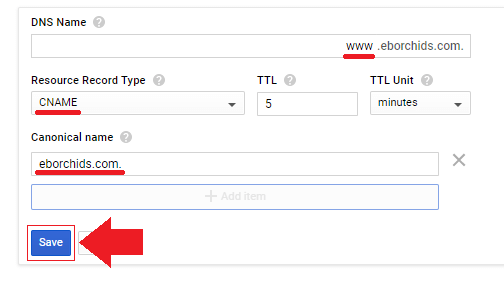
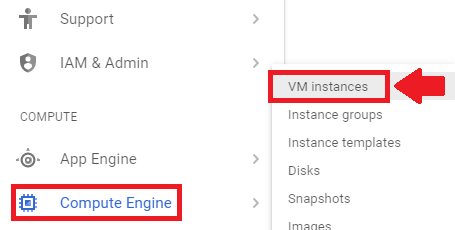
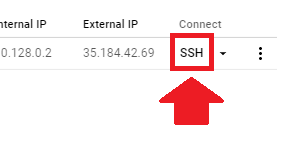
After you’ve created your zone, click on the ADD RECORD SET link that appears on the next page.The first record you’ll create is an A record. In the Resource Record Type field, select A. In the IPv4 Address field, enter your IPv4 address (instructions for finding your IPv4 address in next image).You can locate your IPv4 address by clicking on the hamburger menu in the upper left-hand corner of the screen, and navigating to Compute Engine/ > VM Instances > External IP.Next, you’re going to create a CNAME record. In the DNS Name field enter www. In the Resource Record Type field enter CNAME. In the Canonical name field, enter your domain name.
4. Configure NS Records
In this section of the tutorial, you will be pointing your domain name to your website on Google Cloud. In this example, NameCheap is used as the domain name provider, however, the process will be the similar for all domain name providers.
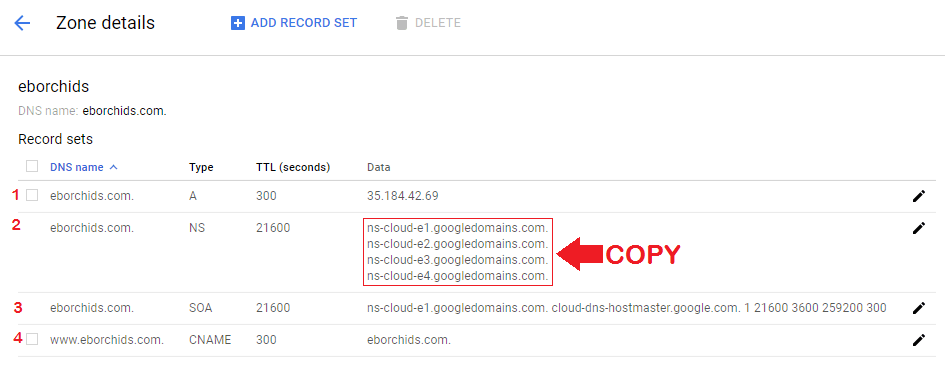
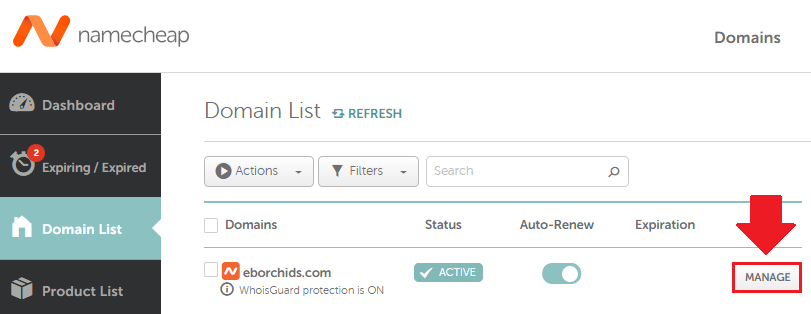
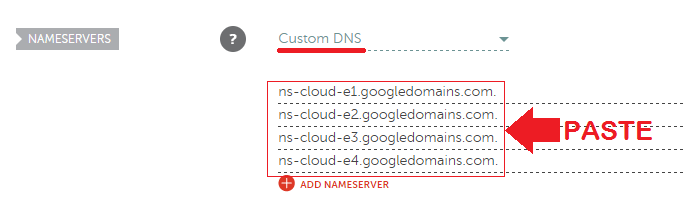
After you’ve configured your A and CNAME records, you should have a total of 4 record sets. The two record sets in the middle (NS and SOA) are generated automatically. Copy the four NS records.Sign-in to the domain name provider where you registered your domain name.Click on the MANAGE button next to your domain name.In the NAMESERVERS section of the domain management page, choose Custom DNS, then paste the four Google NS records.
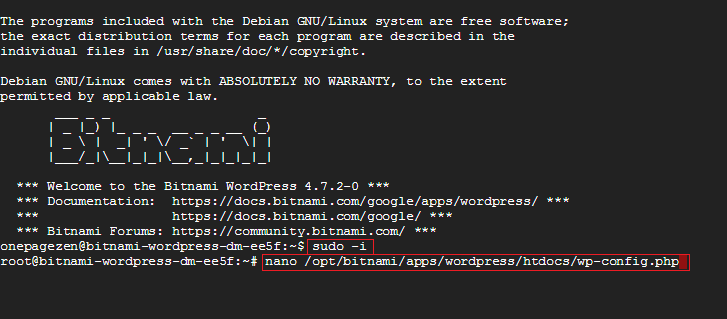
From your Google Cloud Platform dashboard navigate to Compute Engine > VM Instances.Once inside of your Compute Engine, click on the SSH button to connect to your WordPress installation.Once connected via SSH, connect as a root user and open your wp-config.php file in the nano editor.
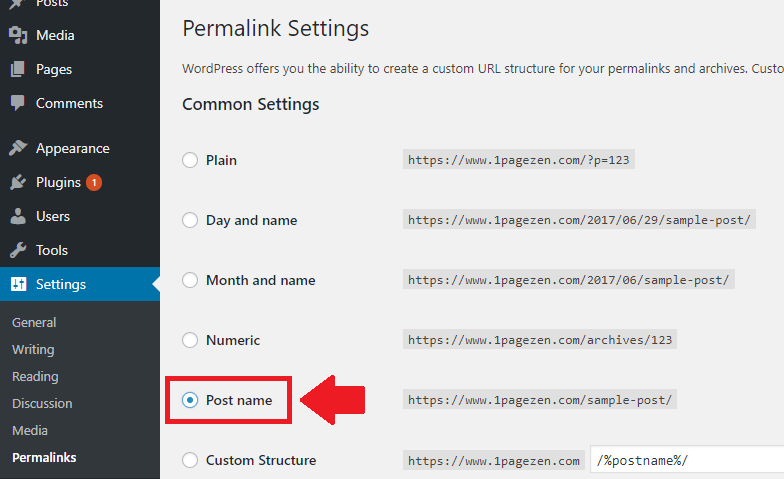
Next, make sure to verify your website’s permalink structure. This setting often gets corrupted after changing your domain name settings. You can access your permalink settings by going to Settings > Permalinks.
Make sure to verify your permalink structure after changing your domain name settings.
5.2. WordPress Click-to-deploy Instructions
Use the following instructions to configure your WordPress URLs for the Click-to-deploy version of WordPress on Google Cloud.
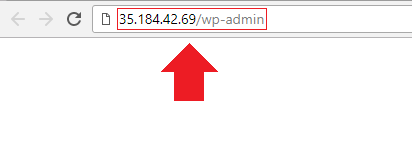
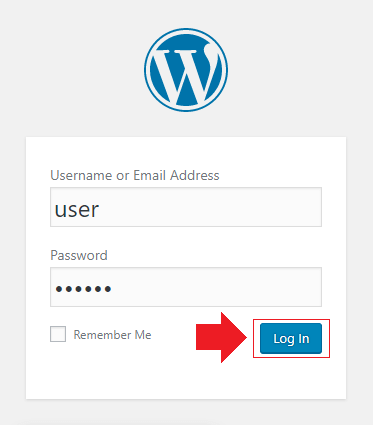
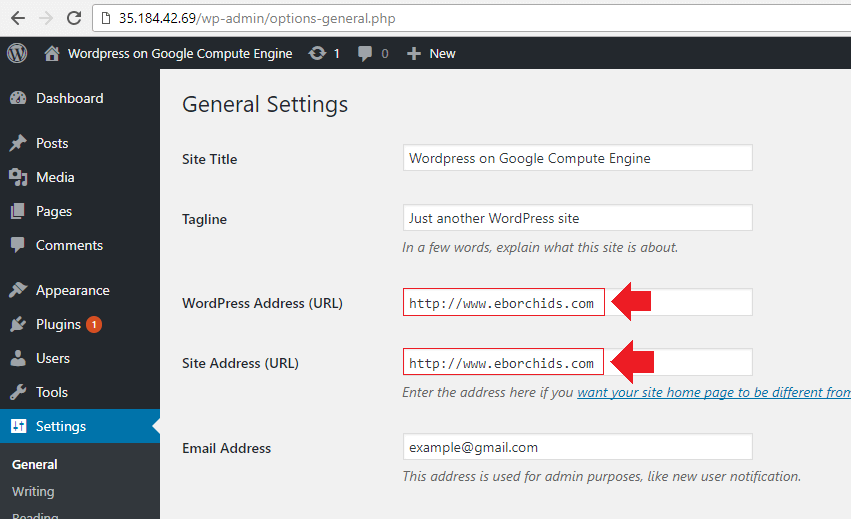
Go back to your Compute Engine > VM instances page and copy the IP address connected to your website. Also – make sure that you’ve reserved the IP address as static. Paste the IP address into your browser, followed by /wp-admin.Next, fill in your login credentials to access your WordPress dashboard.From your WordPress dashboard, navigate to Settings > General. From here, change the URL fields from your IP address to the domain name that you just transferred.
That’s it!
Your domain name is now pointing to your Google Cloud website!
Remember – domain name changes can take up to 48 hours to take effect, but in my experience, they usually take less than 30 minutes.
If you have questions, follow along with the video for clarification.
Otherwise, leave your questions and comments below, and I will respond to them promptly.
i owned godaddy domain and created wordpress website via google cloud platform (as a 1st yr free hosting) and i have linked the nameservers and DNS propagation is also fine and after 3 dyas also my website is not opening …..
someone help me with this problem.
hi,
i have followed your tutorial its awesome,but i have a doubt if i change the nameservers in godaady will it effect my email i mean sending or receiving emails.
That is correct. If you plan to use Google Cloud DNS, then you will have to import the GoDaddy MX records into Google Cloud DNS.
Hope this helps and let me know if you have questions,
Joe
Muhammad Suleimansays
in step 3, you should have put the instruction for getting the IPv4 first before the instruction for adding record set. it has cost me an issue now. sha thanks for the gesture.
I’m using Google Domains for holding my domain, and trying to configure it to point to my Google Cloud hosted WordPress. I changed the nameservers to point to the google cloud “ns-cloud-b1” instead of the original name servers.
After following all the steps which went well, I went into the wordpress admin and changed the url to match the domain.
Now I still don’t the domain resolved, it just says not “cant find server”.
Am hosting a WP website on Google cloud https://www.ab2c.com/
I changed the name servers and followed every step. I installed simple SSL plugin and got the msg:
Config.php is not writable issues with word press URL and Site URL
So, I tried the command
nano /opt/bitnami/apps/wordpress/htdocs/wp-config.php
and changed these two lines:
define(‘WP_SITEURL’, ‘https://www.ab2c.com/’);
define(‘WP_HOME’, ‘https://www.ab2c.com/’);
Then saved the changes and exited. I also deleted the simple ssl plugin.
Even now the wordpress address url and Site address url are greyd out in my dashboard. I have been at it for last two days and gone through almost every thing related to this problem on the internet and youtube and even Bitnami forum , and tried various permutations and combinations but nothing. I read it somewhere that if I delete these two lines
from config.php , that might “un-grey” my dashboard.
I even tried that but nothing.
I am sure I missed out something. Please help and thanks in advance.
The WordPress Home and Site URLs in Bitnami WordPress cannot be changed from the dashboard. To change your site URLs, you need to change them in your wp-config.php file. This is default behavior and there’s no reason to change it (see step 7 of this tutorial for instructions on changing your site’s URLs).
If you need to allow a plugin to write to your wp-config.php file, then you need to change the permissions of the file. The following command would make wp-config.php writable by the plugin:
You still have to enter the www-version of your domain as a CNAME record – however, you can configure your preferred domain at the server level (in your Apache config and in your WordPress admin settings).
Hello Sir
I would like to say thank you so much for this great tutorial. I did all of the steps which u taught in the training for running a wordpress bitnami website on googe cloud platform.
But i did all of the steps for wordpress bitnami multisite and i got a problem in one step which is adding a ssl certificates for my seconday domains websites like “blog.hafizawais.com”. My primary wordpress multisite which is “hafizawais.com”got a successful ssl security but the other secondary websites didnt get this ssl certificate.
I would like you to visit my secondary subdomain website “blog.hafizawais.com” and I would be thankful to you if u make a tutorial to how to fix it etc…
Once again thank you so much for the step by step tutorial
I am using click-to-deploy and I had the same problem as many other people had after following this guide, I couldn’t log into the admin page after I bounded the VM to a static IP. Going to share my solution here in case anyone else have this problem in future.
Problem: /wp-admin suddenly doesn’t load anymore
Cause: Database in VM still keeps track of old ip, requesting /wp-admin will use the old ip in database. This needs to be updated manually.
Solution: Log in phpmyadmin from Deployment Manager, check list on left side and find wordpress -> wp_options. Edit “site_url”s value from your old ip to your new website name, and edit “home”s value from your old ip to your new website name as well. This is doing same work as last image of 5.2 without logging on /wp-admin.
Hi
Nice tutorial. Here is my issue. After installing the free SSL and getting a static IP , why the site showing the IP address on all other pages apart from the Home page with typical SSL warning ? I have even installed the Simple SSL plugin to change mix content as well.
You would still need to add the CNAME record for www because you’ll want users to be redirected to the non-www version of the website whenever they visit the www-version.
Hope this helps, and let me know if you have any other questions!
Joe
Hi, I followed instructions for Bitnami WP deployment. Successfully done DNS and NS steps. However when I changed WP URLs as you described I no longer reach WP admin panel. It says …com is down or moved permanently. I have been trying more then one day to get it back but no success. Thanks in advance for your help
What steps have you taken so far? Did you verify the URLs in your wp-config.php file?
Let me know how I can help,
Joe
juanitasays
why you should deploy the instance before setup your domain?
i am have a server in Linode wich is installed with lemp + redis, and NameCheap domain register, using Linode dns, so what should i do next? the reason i am using google dns is to take advantage from network latency. i think they have respond time/latency is quite good.
You can set up the domain before deploying the instance – it’s up to you.
And yes – Google DNS is quite performant – I would recommend using it whenever possible.
Talk to you soon,
Joe
Juanitasays
so, i just go to dns in gcp, should i enable DNS API or NOT ? or DNS API was Enable By Default ? and then after that i can add record with my ip on it and www on it? other thing that should i known in case setup the dns properly ?
My website still appears on my IP address as well as my domain name. I’m using Cloudflare for DNS but the redirect needs to be installed on the server somehow and I don’t know where to do this? I’m using Google Click to Deploy. I have tried editing the .htaccess file but just end up with “too many redirects” error. Any help would be appreciated.
You can configure a redirect in your wordpress.conf (Click-to-deploy) or bitnami.conf (Bitnami) file. You probably have an existing redirect in either of those files, or within your Cloudflare dashboard, which is what’s causing the error.
I did follow all the steps correctly but when I try to enter the admin panel, it doesn’t respond. It says the site may be temporarily down or moved to a new address. Kindly Help!
Hey Gyanu – please share more details regarding your website configuration, including what may have caused the error.
Nourrysays
Hi,
Thanks a lot for this tutorial.
I’ve followed it step by step and it worked just fine !
The only issue I am having is when configurating my Gsuite mail account.
To do so, both GSuite and Namecheap assistance ask to configure the MX records by going to Domain / Manage / Advanced DNS and under Email settings, to select Gmail.
The issue is that this option is not available when I am under a Custom DNS (which I did as explained in the above tutorial).
First thank you for taking time to answer me. However, since I followed your WordPress on Google Cloud tutorial, I decided to do the following:
Created Cloud DNS zone for a new domain.
Pointed my domain to the same nameservers as the primary domain.
I created virtual host in the existing vm/lamp for WordPress by adding necesary folders and configuring domain2.conf in apache. After that I executed a2ensite to enable my configs and restarted apache.
Enabled htaccess files and added redirection rules to a new domain.
I now want to add another domain to it but instead of being redirected it will be full fledged site. Can I add SSL certificate to the new site if I used virtual host?
Is there any downside to adding more sites to one VM instance or it would be better to create separate VM instance for every site?
Thanks for sharing the steps – I’m glad to hear you were able to get everything up and running.
In your case, you can add multiple domains/subdomains to a single certificate, then have each of your Virtual Host’s use the same certificate. By doing it this way, you can simplify the renewal process.
That being said, the downside to having multiple websites running on the same machine is that, if the machine were to fail, you’d potentially have multiple sites going down. There is ways to insure against this, but this requires additional work on your end.
Generally, I’d recommend keeping a single domain and it’s subdomains (even if they’re separate sites) on a single VM. I wouldn’t recommend running multiple unrelated websites from a single VM, unless they’re relatively simple and/or static websites.
Hope this helps and let me know if you have questions,
Joe
We created website, setup dns and updated url from IP address to https://www.prodahsolutions.com. After that wp-admin disappeared. what could be the problem?
in that command prompt kind of window, I don’t know how to save the changes that I have made,
when I directly close the window It doesn’t get save, and also that Ctrl S is not working here.
Please help
I have hosted a website over Google Cloud Platform.Root domain is globexploration.com and we have added a CNAME of http://www.globexploration.com(Same as Bucket Name ).We are able to access http://www.globexploration.com, but in case of root domain the site is unreachable.we change DNS servers over our domain registrar(i.e. BigRock) to google NS records but still we are unable to access root domain . we want our root domain to show files from the bucket only.its king of an emergency.
By the root domain do you mean your domain without www. in front?
You can add directives to your wordpress.conf (Click-to-deploy) or bitnami.conf (Bitnami) to influence the behavior when a user visits
your root domain. See this resource for more information.
gracias me funciono correctamente, no encontraba informacion tan bien explicada hasta que di con tu canal de youtube, no me funciono a la primera pero al segundo intento quedo y sin detalles
gracias
When I followed the steps, the homepage is fine, but all other pages are opening in the IP Address.
If I click on any link on Homepage, the link with IP address will open.
Make sure that all of your site’s links are configured to link to your Website’s domain name – not it’s external IP address. This is a common issue after migrations, but is an easy issue to fix, as it simply requires updating your WordPress’s HTML.
I had a couple differences when following your tutorials for google click to deploy.
My deployment manager doesn’t show login and password for phpMyadmin,
So I’m left unable to log in to phpMyadmin.
I’m also having trouble getting my domain configuration working. http://www.bosworths.ca direct to a page that says “Future Home of Something Quite Cool” but my ip address shows my sample webpage “http://35.232.121.218/”
http://www.bosworths.ca used to point to a simple page in a storge bucket but that has been deleted. Is there something hanging around from that instance that I need to cleanup?
Your deployment manager page should have a table with MySQL root user and MySQL root password (Temporary) – those are your phpMyAdmin credentials.
Your domain appears to be resolving just fine, including with HTTPS, so I’m going to assume that you were able to get the issue with the IP sorted out.
Regarding the storage bucket – there’s nothing else to clean up aside from deleting the files.
Hope this helps and feel free to reach out if you have any questions,
Joe
Ravi Rajsays
Hi, Thank you for this tutorial.
I am using Google Domains for my domains.
I am done everything what you said on the article step-by-step.
but my website can’t open and the error msg is (Hmm. We’re having trouble finding that site.
We can’t connect to the server at http://www.yoursite.com)
Thank you for the tutorials — they’ve been very helpful. I appreciate your hard work.
I have an unusual situation. After following your instructions in this tutorial, when I visit the url without ‘www’, it does not redirect to the full url with ‘www’ in front.
I have the A name record pointing to the server’s IP and CName record with ‘www’ added to DNS name field and the canonical url is pointing to the main domain without ‘www’.
Hi, Thank you for this tutorial.
I am using namesilo for my domains.
I struggle to add google Nameserver on namesilo.
I really don’t see what i am doing wrong.
I always have a message telling me i haven’t created the nameservers even if i have done it.
I’ve never used NameSilo, but I found this resource with instructions on how to change your nameservers on NameSilo.
If you’re unable to change the nameservers (due to technical reasons), I would recommend contacting NameSilo support.
Hope this helps and let me know if you have questions,
Joe
Jamessays
Hey Joe,
Thanks for the instructions/guide. They’ve been very helpful and I’ve successfully migrated three WordPress sites previously hosted on a third-party to Google Cloud!
On my latest migration, it seems successful. The main home site page loads fine. However, if I click on any link that takes me to a post, it displays this message:
Not Found
The requested URL /probiotics/ was not found on this server.
Or another link:
Not Found
The requested URL /fiber-products/feed-your-good-bacteria-with-benefiber/ was not found on this server.
It appears fine on my old host but for some reason, it’s an issue after the migration to Google Cloud. I have checked permalink settings as well as in general settings, the WordPress URL is updated as well.
I wonder if it’s because for this particular WordPress installation, from the start I had http://mydomainname.com instead of my others, which started as http://www.mydomainname.com as a default since they were on another host.
For WordPress Click-to-deploy, follow the instructions in this comment here regarding how to modify the AllowOverride directive.
Let me know how it goes and if you have any questions,
Joe
samsays
Hi,
I tried to get SSL certificate but couldn’t get it done correctly,.. i will list down what i have done so far.. Up to step 6 i followed your tutorial..Thanks a lot .. that worked 🙂
1. Bought domain name from Namecheap
2. Enabled cloud DNS API in GCP.
3. Created a DNS Zone (Networking-> Cloud DNS)
4. Then added ‘A’ record with IP address of the VM instance (where i host my website)
5. Added ‘CNAME’ record.
6. Then i copy ‘NS’ Records and pasted in Namecheap side DNS records.
7. Bought SSL from Namecheap
8. Generate CSR from Google shell at GCP
9. Got the certificate zip file via email.
10. Then Added custom domain in GCP, then verify it via webmaster google.
11. Then copy the webmaster code and added as TXT record in DNS zone (above mentioned) at GCP
12 . Then certificate installed (as i think)
But i didn’t see that “https://” in my website url
After you issue the CSR, you will need to upload it to your certificate provider in order for them to issue the certificates. After you’ve sent the CSR to the certificate provider, they will typically send you the certificate files within a couple of days.
Check out this link (and the video) from GoDaddy to get a general idea of the process; it’s pretty much the same regardless of where you buy your certificate.
Adding the domain to Webmaster Tools (steps 10 and 11) are essential for your website’s SEO, but that’s unrelated to the process of configuring SSL.
This most likely means that in your Apache configuration, you have the www. version of your domain pointing to a different file directory.
Please provide additional details including the domain name of the website in question, as well as which WordPress stack you’re using (Bitnami or Click-to-deploy).
Talk to you soon,
Joe
evan affandysays
hello,
i have done doing all of your step by step to transfer domain on google cloud.
and it has been 8 hour, but my domain still not linked with the ip address.
i from indonesia, and i buy a domain with local provider( not namecheap)
now, when i type my domain in browser, it redirect to another site.
I have read through all of this and the other troubleshooting I can find, as well as requested to join the FB group. I might just be impatient.
I bought my domain via Google Domains, and I don’t know if that’s hanging this up, but it might be. I’m using the one-click (not Bitnami) and I’ve double checked all of my settings based on the tutorial.
I followed the tutorial exactly (except for where the settings were located in slightly different places).
After I changed my WP urls in the final steps and saved changes, I can’t connect to my website. Previously I had been able to access via IPv4 in google cloud, but it did not have a domain name. If I go to my IPv4 xx.xxx.xx.xxx/wp-admin or my domain name it gives me “This site can’t be reached http://www.snakesandcatters.com’s server IP address could not be found. … ERR_NAME_NOT_RESOLVED”.
I ran a config on both my IP and URL, both of which came back as 0 loss. I cleared cache on my browser and restarted both my computer and router, “just in case”. I’m at a loss.
It’s been about two hours, and I have no way to change my redirects in my wordpress back to what they were, because I can’t get into the front end console editor. Everything i’ve found for command line is using Bitnami, and I’m using the one-click from Google.
Your website is loading fine on my end – did you try loading it through a proxy? This is is a quick way of bypassing Chrome’s cache to check if your website is running correctly.
Hi,
I have done the all the procedure from creating zone to regitarar setup of domain name.
My website open in IP address only not in domain name even I changed in WordPress> setting >general> of site address (domain.com) instead IP address.
If i changed from IP address to domain name the message shows “the page not found”
How can I use domain name, it is almost 24 hrs passed. Please help.
Sounds like you followed all of the steps properly, however, it sounds like there is an error somewhere in your configuration.
If you’d like, post a message to the WordPress Cloud Hosting Support Group and myself or one of the other members will walk you through the troubleshooting process.
You want to use two separate domains for serving the same content? I wouldn’t recommend this as it will cause numerous SEO related issues with your website.
If you’re switching domain names when you export the website, the All-in-one WP Migration plugin has a Find & Replace option that allows your to replace your old domain name with the new one.
Hope this helps and let me know if you have any questions,
Joe
http://www.example.com is the main domain currently hosted in Google Cloud (WordPress Bitnami version with SSL on) and its DNS settings are also managed by Google Cloud DNS service. Domain registry of http://www.example.co.uk is with another company.
What I would like to achieve is forwarding http://www.example.co.uk to the main site with masking so whoever visits http://www.example.co.uk continue browsing the site without seeing any changes in the address field.
The domain provider of http://www.example.co.uk does not support redirecting with masking, in fact the company only provide defining name servers for the domain name but nothing else.
I wonder what’s the best way to handle forwarding with masking procedure. To be more specific:
1) Should I define a separate Cloud DNS zone for http://www.example.co.uk or alternatively can I add records for http://www.example.co.uk inside the DNS zone that is already created for http://www.example.com?
2) What further steps should I take after DNS settings?
3) Do I need to touch anything on WordPress configuration?
Do a Google search for “[yourdomainnameprovider] url masking”. The changes that you have to make in your server and DNS configuration are minimal, as most of the changes will be implemented from within the domain name provider itself.
It may also be worth it to reach out to the WordPress Cloud Hosting Support group to see if anyone there has experience with implementing URL masking.
I have updated my Name Servers (NS) to godaddy. My NS are showing updated when i checked in whois. but the IP is showing the old one where the website was hosted previously.
Can you please tell me how can i make myself sure that my domain has been transferred successfully.
My website is still up and running properly.
I would recommend viewing the website in another browser or through a proxy, as it’s possible your browser is showing the cached version of the website.
hi Sir!
great tutorial, I successfully made my website on click to deploy on GCP and now my domain name is pointing towards my WordPress site too. i am not clear on how to make this external ip address my static address without changing it
Please help !
From your Google Cloud dashboard, navigate to VPC Network > External IP Addresses. From here you should be able to change your IP address to static from under the Type column.
Hi, there I have created the CNAME Record but for creating A name record IP Address that required is availale in the VM Instance .. what to do in this..
Thanks for your tutorial. I installed successfully in google host. But right now I facing two issue. One is my external IP not redirecting automatically. both external IP and the domain name also working together. And another issue is permalink default option only working. Can you help me.
The code should go in the same place as the https redirect, as shown in step 7 of this tutorial.
I’m not sure what the issue is with your permalinks not working. Do a Google search for ‘wordpress only default permalink works’ and check out the StackOverflow threads; it appears to be a common problem.
Hope this helps,
Joe
Arushisays
Hey, I’m a newbie to making websites. Your tutorials are a big help to me!
I have this problem which I’m not able to solve. I changed the DNS nameservers in my GoDaddy domain but when I’m opening it, the following error is coming up: “domain refused to connect”.
So even after I linked it to my wordpress url it shows the same error.
Please help!
Do the nameservers that you assigned to your domain in GoDaddy match the nameservers in the DNS Zone that you created on Google Cloud?
Did you change your domain name in the WordPress application itself? If not, you should do this.
Let me know if you have any questions,
Joe
Arushi Sonisays
I deployed the wordpress again and then changed the url for wordpress address and site address. Now even the wordpress dashboard is “refusing to connect”.
It sounds like an error with your DNS – something probably doesn’t match up somewhere. You should go through the tutorial again and make sure all of the settings are configured as shown. Also, follow the link from my last comment to verify that your WordPress URLs are properly configured.
Talk to you soon,
Joe
Arushi Sonisays
Should I make the IP address of server instance static or the one of WordPress? Because the limit in my region is only 1. Also, I set up the DNNSEC for my DNS, should I remove it? I think that is what is causing the problem here.
Thank you Joe for the tutorial. I followed all your instructions, I am able to access my website through the IP but cannot log in to my WordPress Admin Page, any attempt to login redirects me to mydomainname where I get a server cannot be found error. I have reviewed instructions over and over again and checked custom name servers with my Domain Name Provider. Everything seems fine.
Make sure that your Cloud DNS is properly configured, and that IP address of your A record matches the IP address of your virtual machine.
If that all checks out, I would make sure that you added the correct Google nameservers as your custom nameservers. Also, try removing the ‘.’ at the end of each of the nameservers and see if that helps.
Finally, try viewing your website through a proxy service such as hide.me or run a test on GTmetrix.com to bypass your browser’s cache and see if it’s loading properly.
Hope this helps and let me know if you have any questions,
Joe
1and1 is like any other domain name provider – just change your nameservers as instructed in the tutorial.
Hope this helps and let me know if you have any questions,
Joe
Pedrosays
When I do `dig @8.8.8.8 http://www.myDomain.com` it returns the appropriate external ip of my VM. However, when I point any browser to http://www.myDomain.com it won’t resolve the address. If I point the browser to my VM external IP it responds properly. The problem appears to be on the translation of the canonial domain to the VM IP. I don´t know what to do.
Re-trace your steps and make sure everything was done properly.
Then clear your browser cache and try viewing the website from a different browser. Also try viewing it through a proxy service such as hide.me and see if that works.
Also, are you using CloudDNS as shown in the tutorial?
Hope this information helps, and let me know if you have any questions.
Joe
Hi!
I followed your tutorials to transfer a wordpress website to GCP and it works! ☺️. However, I am afraid of changing my domain provider’s DNS, because my client has e-mails with his own domain ([email protected]) using Gmail. Would be a problem if I make that change? (Like emails stop working)
P.S my domain provider only lets me to put DNS names (there no more options available like MX)
If you want to use CloudDNS as demonstrated in the tutorial, you will have to transfer all of your current DNS records to CloudDNS after making the change.
That being said, you can avoid using CloudDNS altogether and simply point your A record to the IP of the VM that’s running your website (remember to also create a CNAME record for the www-version of the domain). This is easier to configure, and will meet the needs of most projects. Also, your domain name provider should have a section that allows for configuring DNS records – I would check their docs/support.
There are many tutorials out there on DNS configuration, so I would recommend doing a search on the subject if you run into issues.
Hope this helps and let me know if you have any questions,
Joe
While updating the nameservers following error occurs
“Records for airenergycars.com could not be updated. The nameserver you chose may not be a valid nameserver. Please verify with the provider and try again”
I purchased domain from domain.com
just tried changing “ns-cloud-b1.googledomains.com.” this to “ns-cloud-b1.googledomains.com”
ie removing the dot in the last?? Will it setup correctly?
That is correct – you do not need the dot at the end of the nameserver.
Let me know if you have any questions,
Joe
Sarkhansays
Hi,
I added my google cloud dns to my google domain custom dns and it gives caution like below.
“It looks like you’ve changed your name servers. All settings for your domain (including website, email, synthetic records and resource records) are currently disabled. To enable these settings, you will need to restore the Google Domains name servers. Learn more”
and says Restore the Google Domains Nameserves. When I restore my website doesn’t work. When I leave it untouched, by browser gives me “your connection is not secure” caution and I am not able to add SSL sertificate.
I am living in Azerbaijan and when I configure my google domain setting, it says “You appear to be in a country where Google Domains is not yet available.” I bought my domain from domain.google.
Can you please write your thoughts on this subject?
How can I solve this huge amount of problem?
I can also give you my domain, cloud hosting information if you want to see my real problems.
Hi Sarkhan,
There is not much of a problem here.
What you need to do is to follow the instructions in the tutorial and transfer all of the DNS records from Google Domains to Google Cloud.
If that’s not working for you, an easier solution would be to simply create an A record on Google domains that points to the IP address of the VM that is running your website, and a CNAME record that points to the domain name. Look at the section of this article titled ‘CNAME and A records’ to get an idea of what I’m talking a about.
Also, try using a chrome extension such as Strong Proxy to avoid being blocked from websites/services that aren’t available in your country of residence.
I hope this information helps,
Joe
Sarkhansays
Thanks Joe!
I created A and CNAME records once, there are A and CNAME records in my Domain and Cloud hosting. Should I edit them or can I add new A and CNAME records?
The DNS changes should take less than an hour, so if the changes haven’t taken effect in 48 hours, then there is an error in your configuration.
I would recommend going through the tutorial again and make sure that you didn’t miss any steps.
Talk to you soon,
Joe
Juansays
Just wanted to thank you for this tutorial! After talking to DD24 and google support, I was giving up on setting the website. Not a lot of information available online either. But you sir, saved my day.
Hi Leron! Great guide, saved me many times. Quick question:
My company website was built by someones else in the past and the email was configured through G Suite. Now with my new WordPress website on the GCP, am I right in adding the MX records from this guide (https://support.google.com/a/answer/6150791?hl=en) to my DNS settings, and then I can just send through the NameServers to my domain host?
I am concerned about email issues when my new website is live
If you’re using CloudDNS, you will need to add the MX records to your DNS records as shown in this guide. You will also need to add records for DKIM and SPF in order to prevent your outbound emails from being flagged as spam.
Hi Jonathan,
I’m under the impression that you only have to verify your domain with Google one time.
Take a look at this resource here, and let me know if you have any questions.
Joe
Thanks Joe. I have sent my domain host the GCP NameServers (which have the gmail MX records added). I will let you know of the outcome 🙂
Benjaminsays
Hello there,
Thanks for your tutorials, I have used them to deploy through google cloud vm. I have a domain registered through google domains as well. I have a static IP reserved for my vm in my google cloud project. When I add an A record to my domains.google.com for the domain and save it. The website doesn’t load or point to the vm instance even though I have entered the static IP address.
I am curious is this cause I have not included a cloud dns zone in the project in cloud.google.com. Second if this is the case, I am curious why I can just use the zone file from google domains and why I have to point the name severs to a could dns zone? This just seems a little redundant and extra costs.
Hi Benjamin,
If you don’t want to use Cloud DNS, you can simply point your domain A record to the IP of your instance on Google Cloud.
However, I wouldn’t recommend doing this as it’s a best practice to use the DNS service of whichever cloud hosting provider you’re using.
Please check out this link and this link for additional information regarding the benefits of using Cloud DNS.
That being said, if all you’re planning to do is run a simple WordPress website on Google Cloud, no email or other VM integrations, then it won’t make much of a difference if you don’t use Cloud DNS.
Please feel free to reach out to me if you have any questions.
Talk to you soon,
Joe
Thank you so much 🙂
I just created a WordPress website in just less than 2$ with your help.
I am planning something big with the target of the minimum investment.
And you helped a lot.
Thank you so much 😀
That’s awesome Mahipalsingh!
Glad to hear you were able to get your WordPress website running at such a great value.
Let me know if you have any questions,
Joe
Hi Mahipalsingh,
There are many problems/issues that users can potentially encounter when configuring SSL, so I will need more details regarding the problem.
Talk to you soon,
Joe
okay, I am going to try it again.
now I have another question,
I thought google cloud hosting for WordPress is free for one year but I found somewhere on your blog that it costs around 5$ per month.
is it right?
or it is really free for one year?
Hi Mahipalsingh,
The cost will likely be free for the first year for most services utilized in the tutorials.
However, after the 1-year trial expires, the cost for services such as DNS and bandwidth will not be included.
And without these services included, the costs totaled around $6 dollars per month (based on my experience running WP on an f1-micro machine).
Hope this helps and let me know if you have any other questions,
Joe
Nithinsays
Hi,
You really are a life-saver. Being new to the entire web development thing, I was really stumbling everywhere; and then I found exactly what I needed in your articles. Keep up the fantastic job man.
Nithin
Your Google Cloud nameservers are located in your “Cloud DNS”.
To view them, first create a new “DNS Zone”.
Let me know if you have questions,
Joe
Enessays
Great tuts, really helped me thanks. Just 1 issue that i personally faced is when i go to namecheap to edit nameservers you must to delete point at end (.) First time i shut down project bcs i didnt delete point at end and nameservers didn’t changed properly…
Keep going wish you good luck you really helped me :)))
You’re correct that it’s best to add the nameservers without the . at the end. Wish I had known that when I created the video. 😛
Regards,
Joe
Clairesays
To add to my comment,
I am in Australia – So Google domains are not available – which is why they use 3rd party – Godaddy.
Also upon checking again – my MX records are now misisng from Gsuite and Godaddy DNS doesnt have them, they are in some sort of black hole.
I am having some trouble and so far have not been able to find any resolution from my domain provider GoDaddy or the GSuite team.
I have followed alot of your great tutorials and used the google click to deploy for wordpress in December on my google console.
But I realised since December my gsuite email/inbox is not working, after I contacted Gsuite team a few days ago they told me to switch to default nameservers. Which brought my email back online – but knocked my website off.
So I have 2 scenarios: 1) if I select ‘Default’ Nameserver = email works but site does not.
2) add ‘Custom’ Nameservers = site works but email does not.
I checked the MX records for the gsuite gmail account and it seems to be correct, as confirmed from gsuite team.
A few days ago, followed your tutorial to set up Cloud DNS custom nameservers so i could change the URL from the IP to appear as the domain name. Which meant I switched the name server to custom and copied in the Cloud DNS nameserver in the GoDaddy manager. But then – my email stopped working again…
I am not sure why the the 2 google products dont seem to work together…
Hoping you can shed some light on where I have gone wrong, or point me in the right direction.
Let me know if you need any further information/clarification. I really appreciate your help!
I looked into it and you can use custom nameservers with Gsuite – here is the link with instructions.
This is just like how I configure Zoho email in the tutorial on onepagezen.com. You will need to configure DKIM, SPF, and MX records in your Cloud DNS.
Let me know if you have any questions about the process.
Clairesays
Thank you, I’ll give it a try. Quick question, do I have to use cloudns.net? as I already have the Cloud DNS API in Google Console.
I have no idea, will do whatever you recommend.
No you wouldn’t use cloudns.net – that’s simply an example – you would use whichever domain name provider hosts your domain name.
Say for instance you purchased your domain from NameCheap – you would select “Use Custom Nameservers”, and then add the 4 nameservers from your Cloud DNS, just like I do in the tutorial.
Then, in your cloud DNS you would have to add SPF, DKIM, and MX records as instructed in the links I sent you in the last message.
Clairesays
Joe? right?
THANK YOU SO MUCH!!
I have spent so much time trying to get g**gle to help and they were not able to – i was even politely told to look for a new host…
I really appreciate all these video tutorials you put together and the time you take to help a total novice like me resolve problems, it requires alot of kindness and patience! Thank you much for helping me again!
I know how much of a nightmare it can be to deal with poor customer support.
That being said, I’m glad you were finally able to get the issue resolved! 😀
Best regards,
Joe
STEPHANIEsays
Thank you for all the tutorials you did. It was really useful to a beginner like me. Appreciate it!
I did not realise I had to reserve a static ip address, and I resize the VM Instance according to Google’s recommendation. Now I cannot access my site and WP Admin panel. I got my domain from Google Suite. I had done this step at Google/Enom – “Go to the website where you purchased your domain name, and locate your nameservers. Choose “Custom DNS”, then paste the four Google NS records.” But I am stuck at Step 5 of this tutorial as I cannot access my WordPress dashboard.
Also it seems we cannot receive emails, I am not sure where I did wrong.
p/s: I had done this tutorial too — “Free SSL Certificate Setup for WordPress on Google Cloud (Click-to-Deploy)”. But I was not able to update the URLs in WordPress.
Make sure the IP address assigned to your VM instance matches the IP address assigned to your domain’s A record in your cloud DNS.
Also, the most commonly used mail ports are closed in Google Cloud, so you will have to configure SMTP in order to send emails from your instance.
Stephaniesays
Hi Leron,
Thank you. Turns out that the WordPress configuration is still recognizing the old IP address, I had since updated it and able to access the website. However, then I realize that when I chose “Custom DNS”, we cannot receive our email (sending out is not a problem).
I am also facing the same problem as Claire (post above). We can receive emails once we select “Default DNS”. We obtain our domain via G Suite (third party, Enom). Still not resolved ….
Sometimes IP address changes take a while to take effect, but most of the time it’s the browser – not the website – that is serving the cached version of the website with the old IP address. To avoid this problem in the future, try browsing through a proxy (there’s a free Chrome plugin called Strong Proxy which works well).
Regarding G Suite – check out the links I sent to Claire regarding configuring DKIM, SPF, and MX records in your Cloud DNS. These are all required for your G suite to work correctly when you’re using custom nameservers.
Also note that if you are trying to send email from your VM instance itself, it will not work. Most of the common mail ports are closed on Google Cloud so you have to configure SMTP.
After this process my domain and ip is not working
please help
all process with work clearly but afterthat i replace the domain then the domian is not working
and my ip is also not working when i revert it to domain to ip pls help
35.224.212.236/
domain-searchmeguru.com
Hi Deepak,
What I recommend doing is going back through the tutorial and making sure that the IP address assigned to your instance matches the A record IP address in your Cloud DNS.
If you’re using the Bitnami or Click-to-Deploy versions of WordPress on Google Cloud, you will need to configure your domain name within WordPress according to step 2 of this tutorial.
Talk to you soon,
Joe
I am using Google Click to deploy and i followed your steps and config DNS and login to wordpress and changed the URL and now i am not able to access website with my ip 35.200.223.71 as well as my domain name http://stylecart.co
Hi Syed,
There is likely an issue with your DNS configuration.
I would look over your Cloud DNS and make sure that the IP address for your instance matches the IP address of your A record in your cloud DNS.
Also, look over the tutorial to make sure you didn’t miss any important steps.
Let me know if you have any questions, 🙂
Joe
Thank you for your reply it was my mistake i didn’t notice the name servers changed when i created a new instance i just assume it will be same. My bad. However thank for your detailed tutorial and my website is a success just cause of you i almost lost hope when i first started with GCP, after watching your videos i am successfully running an ecommerce website.
I have a suggestion for an additional video for the issues i faced.
1. Creating Load balancing for Http and Https domains
2. Reducing and checking load of server.
Hi Syed,
Thank you for the feedback! I am glad to hear you were able to get an ecommerce website running on GCP.
I know how intimidating GCP can be when first starting out, but I congratulate you for persevering!
Also, those are great tutorial suggestions, and I will look into creating those.
Talk to you soon, 🙂
Joe
Leathrasays
Thanks for the tutorial. I am getting a weird error from my domain registrar. When I put my google nameservers in it tells me they are invalid, but I can see them in my zone details. Is there a wait time for having my nameservers added to googles data base?
Hi Leathra,
Were you able to get the problem resolved?
After adding the nameservers, there is not waiting period.
It is possible that there is a syntax error with the nameservers that you entered.
Talk to you soon,
Joe
Mehdisays
Hello Leron
Thank you for all the tutorials you did i really appreciate that work !
I did everything as you said but in the 5th step instead of writing http://www… i wrote https://www.. and now i can’t access my admin panel.
Hi Medhi,
Your first option is to change your WordPress URL’s in your wp-config.php file.
The other option is to install SSL to your domain using either the Bitnami or Click-to-Deploy SSL tutorials.
Let me know if you have any questions about either of these processes.
Talk to you soon!
Joe
First off, thanks for this video and for all the others on your channel. You routinely show up in my searches for accomplishing tasks on Google Cloud – so well done with that!
My question is this… I setup a WordPress site through Compute Engine, Setup the DNS, pointed Namecheap domain to the name servers – all went well. Except – when I type in my domain name WITHOUT “www”, it is now resolving back to the “www” version. I want the opposite – a “non” www site. Example: “mydomain.com” instead of “www.mydomain.com”.
My DNS setup is exactly what you have in the video. I set an A type record for “mydomain.com” pointing to my static IP. I set a CNAME type record for “www.mydomain.com” pointing to “mydomain.com”.
Is there a config file in WordPress that’s still pointing it back to a “www” version or something? Thanks for your help in advance!
Hey Jeremy,
I am glad the videos have been useful to you. 🙂
Anyways, this is a common issue that you are referring to.
If you are using the Click-to-Deploy version of WordPress on Google Cloud, changing your domain URL is as simple as changing your WordPress URLs in Settings > General.
If you are using the Bitnami version, you will have to edit your wp-config.php file, as shown in this tutorial (Step 2). You should also complete Step 1 (reserving a static IP address) if you plan to stick with this website for a long time.
Let me know if this answers your question, and/or if you have any others!
Talk to you soon,
Joe
It is a nice blog you have here. I did everything you wrote here carefully to make sure i did not miss anything. After 48hours, when i visit the domain it did not point to my wordpress blog i setup on google cloud. I then tried again some minutes later and to my surprise it showed the the blog. i then tried a third time and it went back to showing sedo parking. and has refused to load the my wordpress blog for over 72hours now. What do you think is the problem? i have not done your tutorial – configuring Domain name for WPon Gpc but i hope that is not the problem.Looking forward to your response
Hi Ernest,
Make sure that you follow the instructions exactly as shown in the tutorial.
It is very unlikely that it should take 48 hours for changes to take effect – although 48 hours is typically the maximum of time it could potentially take.
If you haven’t figured it out yet, let me know and I will take a look at your DNS configuration and check for any errors.
Thanks,
Joe
Hi and thanks Leron for your tutorials! I have learned a lot from them. 🙂
However I have a problem and maybe you or somebody from your community can help me.
I did everything according to this tutorial, but the problem I have is that when I go to my domain: ozolins.me everything is fine, however if I click something or go to admin panel it automatically switches to 104.155.86.2. And that of course is a no go. :(. 72 hours of course have passed and I am confused. Any ideas? Here is how my setup looks like: https://ibin.co/3S6GoYobviSe.png
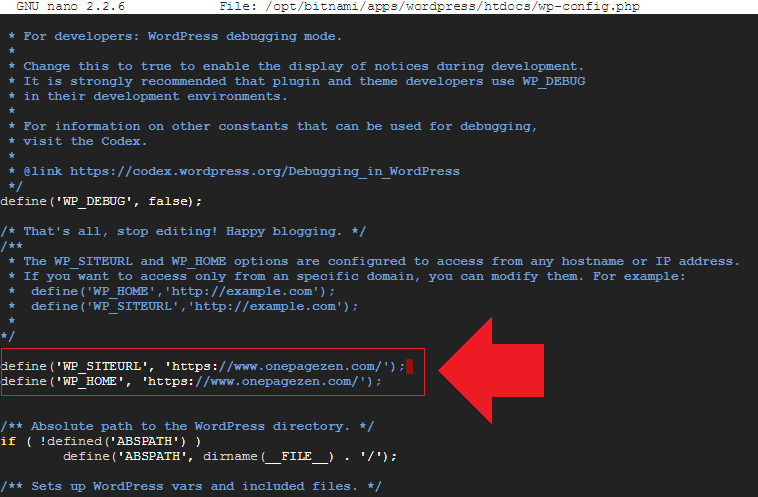
If you’re using Click-to-Deploy, make sure you changed your WordPress URL’s under the settings > General tab. If you’re using Bitnami, to change your domain name, “specify your domain name in the /opt/bitnami/apps/wordpress/htdocs/wp-config.php file. Edit and replace the following lines as shown, remembering to replace the DOMAIN placeholder with the actual domain name you wish to use:
These will need to be changed again if you configure SSL security for your site. That should fix the problem. Make sure there aren’t any additional errors by opening Chrome developer tools (ctrl+shift+i) from your dashboard.
After making the changes you will need to restart apache.
For Click-to-Deploy, run the following: sudo service apache2 restart
For Bitnami, run the following: sudo /opt/bitnami/ctlscript.sh restart apache
I can see a big problem…. I followed everything but i see a huge problem
i saw a message on my jetpack plugin “jetpack has been placed into Safe mode because we noticed this is an exact copy of my wordpress external ip adress here example http://36.188.133.132”
and i see that my wordpress is loading from my ip adress here example http://36.188.133.132 as well as my domain also…
this is creating dublication my blog won’t rank.
please fix this
i just want my bitnami wordpress to load from domain only
Please please please fix this coz it’s happing with your website also
just check your website eborchids.com is opening by it’s ip https://35.184.42.69.
Hi Nilesh,
This is not a problem with the DNS configuration. Whether or not you want your site to be accessible via your external IP can be configured via your bitnami.conf file at nano /opt/bitnami/apache2/conf/bitnami/bitnami.conf. Set up a rewrite condition within the VirtualHost_default_:80 section of the file. The condition should read:
Remember to replace the IP address with your own external IP, and to replace http://www.yourdomain.com with your website’s domain name.
Also, make sure your instance is using a static IP address, which can be configured from Google Cloud platform under Networking > External IP addresses.
If you’re using the Click-to-Deploy version of WordPress on Google Cloud, repeat the steps as shown above, however, the file you will be configuring is located at /etc/apache2/sites-available/wordpress.conf.
If you’re using the Bitnami version of WordPress on Google Cloud, you can’t change your domain name via the settings page. To change your domain name, “specify your domain name in the /opt/bitnami/apps/wordpress/htdocs/wp-config.php file. Edit and replace the following lines as shown, remembering to replace the DOMAIN placeholder with the actual domain name you wish to use:
After making the changes you will need to restart apache.
For Click-to-Deploy, run the following: sudo service apache2 restart
For Bitnami, run the following: sudo /opt/bitnami/ctlscript.sh restart apache
This may solve the issue with JetPack, although I’m not sure as I haven’t used the plugin before.
Let me know if you have any additional questions and I will see how I can help!
Apologies for delay on my reply … Yes, both comments please?
Here’s my ‘REVISED & COMPACT’ comment 😉
MX Records IF you’re using G Suite new name for [Google Apps for Work] (£3.30/per user)
MX RECORDS is your domain’s ‘Mail Exchanger’ to send and receive emails using your domain name extension i.e. [email protected]/ [email protected], etc. [professional] and for… [protection] from phishing, email bounces, and being labeled as ‘spam’ email.
1. Resource Record Type: MX (Mail Exchanger)
2. TTL: 1 (or whatever TTL value set from domain registrar)
3. TTL Unit: hour (or whatever TTL value set from domain registrar)
4. Preference and mail server: (add number first and space – use all 5 rows)
Wait a couple of hours then test (send email and reply to from a external/secondary email) to see if all is running smoothly across the domain+email DNS exchange.
Great instructions as always, Isabel.
Thanks for sharing this!
What has been your experience with GSuite? Good, bad, so-so?
I’ve never actually used it and am curious to know how it compares with it’s no-cost competitors.
I am especially interested in knowing how it stack up to Zoho.
Talk to you soon,
Joe
First off, I’ve opted for gmail configurations rather than MS Outlook in the past.
I use it daily, and setup GSuite up for my clients too. It’s ‘A Mahoosive Nifty Tool’ …Like it a lot
And so you know, you can linkup/synchronise Outlook, Zoho, and a lot more to it, [basically GSuite is your entire office dashboard ‘online’]. You only need to know your login details, and internet connection to run your business from anywhere =mobile/pc/etc…
I run a few ‘organizations’ =domains with email users (with a few aliases/departments).
Each have their permission levels setup, and work to do… there is a ton of office communication/editing back and forth in real-time. Nifty tool he he
The tools are limitless, whether you have from outside or not, Google synchronises it AND you don’t loose any data, if you choose to leave, the data goes with you. I’m connected to a few this way.
They give you a free 14 day trial BUT… you can only set this account up IF you have a domain, OR want to purchase one from inside ($12/year I believe).
Hey Leron. I have mapped my domain to my new Google Cloud WP site, but for some reason it does not display the domain name in the address field. Instead it displays the external IP address. How can I fix this issue?
I’ve found your comments helpful! Are you sure you want me to delete them?
If so, which ones? Let me know the time-stamps of the ones you want me to delete.
Also, I just published a tutorial about configuring domain email with Zoho, I use it instead of Gsuite simply because it’s free. How has your experience been with using Gsuite for email?
/var/www/html/index.html
/var/log/apache2/error.log
why my domain shows Apache2 Debian Default Page
remove Apache2 Debian Default Page not wordpress domain
Type: MX (Mail Exchanger) Record
Lol Joe,
I use Google G Suite for my business, and add my clients to good ‘ol Google too. It’s like…
‘If you can’t beat them?! Then join them! he he he
… so let’s all 1… 2… 3… ‘Google it’ 😉
Google G Suite > Google Domains > Google Cloud Platforms > Google Google Google ugh!
Inside G Suite adding ‘other’ domain(s)
1. needs to be ‘ownership verified’ using any of these G platforms
i.e. html upload file/ G search /Webmaster/ G Analytics… etc
2. ‘encourages’ to confirm email MX records to point to either Google (Google Apps For Work) or remain external webmail… Why? So your email is protected from phishing sabotage, avoid email bounces, protecting your business domain email from being labeled as ‘spam’ email… yada yada 😉
(FYI: Have you tested your email send and receive? As I have not been ‘notified’ that you replied to my comment here?)
The problem I have is that I can not connect my domain with Google Cloud, I already had it right but I had to delete the project and do it again and now I can not connect it to the domain.
I followed all the instructions of your video and I worked but now it has not worked for me, you know how I can fix it?
Not sure if this helps Joe, but with reference to issues with MX Record set up.
Tbh, Name Cheap was no problem setting the whole process up, however, have had GoDaddy and Enom issues so… I’m informed to add my MX Record on Google Cloud and it seems to do the job?! so thought I’d share it here for your readers to get the job done!
So here goes 😉
DNS Name: (leave blank or you can add symbol ‘ @ ‘ without quotes)
Resource Record Type: MX (Mail Exchanger)
TTL: 1 (or whatever TTL value set from domain registrar)
TTL Unit: week (or whatever TTL value set from domain registrar)
Preference and mail server:
10 aspmx.l.google.com.
20 alt1.aspmx.l.google.com.
30 alt2.aspmx.l.google.com.
40 aspmx2.aspmx2.l.google.com.
50 aspmx3.l.google.com.


David says
i owned godaddy domain and created wordpress website via google cloud platform (as a 1st yr free hosting) and i have linked the nameservers and DNS propagation is also fine and after 3 dyas also my website is not opening …..
someone help me with this problem.
pavan kumar says
hi,
i have followed your tutorial its awesome,but i have a doubt if i change the nameservers in godaady will it effect my email i mean sending or receiving emails.
Leron Amin says
Hi Pavan,
That is correct. If you plan to use Google Cloud DNS, then you will have to import the GoDaddy MX records into Google Cloud DNS.
Hope this helps and let me know if you have questions,
Joe
Muhammad Suleiman says
in step 3, you should have put the instruction for getting the IPv4 first before the instruction for adding record set. it has cost me an issue now. sha thanks for the gesture.
Leron Amin says
Thank you for the feedback Muhammad!
Mark john says
Really I get great content for transfer domain. Thank you so much
Leron Amin says
Glad to hear it Mark – thanks for the feedback!
AL says
Hi,
I’m using Google Domains for holding my domain, and trying to configure it to point to my Google Cloud hosted WordPress. I changed the nameservers to point to the google cloud “ns-cloud-b1” instead of the original name servers.
After following all the steps which went well, I went into the wordpress admin and changed the url to match the domain.
Now I still don’t the domain resolved, it just says not “cant find server”.
Is this something that takes a while to resolve?
Leron Amin says
Hi Al,
It shouldn’t take long, and it may be an issue with your browser’s cache.
After waiting a few minutes, try loading the domain from a device that you haven’t used to access it before.
Let me know if you have questions,
Joe
Anil Lal says
Thanks Joe, figured it out. Great work here really helped me set up my WordPress blog from blogger to WordPress on GC
Leron Amin says
Awesome – glad to hear it!
vaani says
Hello Sir,
Am hosting a WP website on Google cloud
https://www.ab2c.com/
I changed the name servers and followed every step. I installed simple SSL plugin and got the msg:
Config.php is not writable issues with word press URL and Site URL
So, I tried the command
nano /opt/bitnami/apps/wordpress/htdocs/wp-config.php
and changed these two lines:
define(‘WP_SITEURL’, ‘https://www.ab2c.com/’);
define(‘WP_HOME’, ‘https://www.ab2c.com/’);
Then saved the changes and exited. I also deleted the simple ssl plugin.
Even now the wordpress address url and Site address url are greyd out in my dashboard. I have been at it for last two days and gone through almost every thing related to this problem on the internet and youtube and even Bitnami forum , and tried various permutations and combinations but nothing. I read it somewhere that if I delete these two lines
define(‘WP_SITEURL’, ‘https://www.abc.com/’);
define(‘WP_HOME’, ‘https://www.abc.com/’);
from config.php , that might “un-grey” my dashboard.
I even tried that but nothing.
I am sure I missed out something. Please help and thanks in advance.
Leron Amin says
Hi Vaani,
The WordPress Home and Site URLs in Bitnami WordPress cannot be changed from the dashboard. To change your site URLs, you need to change them in your wp-config.php file. This is default behavior and there’s no reason to change it (see step 7 of this tutorial for instructions on changing your site’s URLs).
If you need to allow a plugin to write to your wp-config.php file, then you need to change the permissions of the file. The following command would make wp-config.php writable by the plugin:
Please reach out if you have any other questions,
Joe
Aryan says
These is a really great article,
I have a Doubt please fix this.
I am not using www in my website so Should I enter www in DNS Name field or not?
Leron Amin says
Hi Aryan,
You still have to enter the www-version of your domain as a CNAME record – however, you can configure your preferred domain at the server level (in your Apache config and in your WordPress admin settings).
Let me know if you have questions,
Joe
Awais Ahmad says
Hello Sir
I would like to say thank you so much for this great tutorial. I did all of the steps which u taught in the training for running a wordpress bitnami website on googe cloud platform.
But i did all of the steps for wordpress bitnami multisite and i got a problem in one step which is adding a ssl certificates for my seconday domains websites like “blog.hafizawais.com”. My primary wordpress multisite which is “hafizawais.com”got a successful ssl security but the other secondary websites didnt get this ssl certificate.
I would like you to visit my secondary subdomain website “blog.hafizawais.com” and I would be thankful to you if u make a tutorial to how to fix it etc…
Once again thank you so much for the step by step tutorial
Leron Amin says
Hi Awais,
I hope you’ve been well!
Did you add the subdomain to the same certificate as the root domain? Bitnami has a sample VirtualHost configuration in their WordPress Multisite docs, which shows how to configure SSL on multiple subdomains.
Let me know if you have questions,
Joe
Sam says
I am using click-to-deploy and I had the same problem as many other people had after following this guide, I couldn’t log into the admin page after I bounded the VM to a static IP. Going to share my solution here in case anyone else have this problem in future.
Problem: /wp-admin suddenly doesn’t load anymore
Cause: Database in VM still keeps track of old ip, requesting /wp-admin will use the old ip in database. This needs to be updated manually.
Solution: Log in phpmyadmin from Deployment Manager, check list on left side and find wordpress -> wp_options. Edit “site_url”s value from your old ip to your new website name, and edit “home”s value from your old ip to your new website name as well. This is doing same work as last image of 5.2 without logging on /wp-admin.
pradeep says
Hi
Nice tutorial. Here is my issue. After installing the free SSL and getting a static IP , why the site showing the IP address on all other pages apart from the Home page with typical SSL warning ? I have even installed the Simple SSL plugin to change mix content as well.
pradeep says
It says the certificate is issued for http://www.domainname.com and domainname.com and NOT for 123.123.123.123 ( example )
Error Code : SSL_ERROR_ BAD-CERT_Domain
Leron Amin says
Hi Pradeep,
Did you define the WP_HOME and WP_SITEURL in your wp-config.php file? Also, try viewing from a different browser in order to bypass your cache.
Let me know if you have questions,
Joe
Arun Garg says
sir, Kindly help me .. It is not working in my case ..
I have define the WP_HOME and WP_SITEURL in SSH . But , then my site is not reachable. I have run this on proxy server also …
I am really frustrated sir .. Please help me …
Leron Amin says
Hi Arun,
What steps have you taken so far? Did you remember to save the file and restart your server after making the changes?
Talk to you soon,
Joe
daniel zulu says
Youre very helpful !
i was almost giving up!
Thank You!
Leron Amin says
Thanks for feedback Daniel – I’m glad to hear the tutorial was helpful to you!
Bhupendra says
Thank you for your helpful artilce.
I have a Doubt please fix this.
I am not using www in my website so Should I enter www in DNS Name field or not?
Leron Amin says
Hi Bhupendra,
You would still need to add the CNAME record for www because you’ll want users to be redirected to the non-www version of the website whenever they visit the www-version.
Hope this helps, and let me know if you have any other questions!
Joe
Bhupendra says
Thank you for the help.
Using your blog post I have successfully done migration of two website on Google Cloud.
Leron Amin says
Thanks for the feedback Bhuppendra – glad to hear the tutorial worked for you!
Ahi says
Hi, I followed instructions for Bitnami WP deployment. Successfully done DNS and NS steps. However when I changed WP URLs as you described I no longer reach WP admin panel. It says …com is down or moved permanently. I have been trying more then one day to get it back but no success. Thanks in advance for your help
Leron Amin says
Hi Ahi,
What steps have you taken so far? Did you verify the URLs in your wp-config.php file?
Let me know how I can help,
Joe
juanita says
why you should deploy the instance before setup your domain?
i am have a server in Linode wich is installed with lemp + redis, and NameCheap domain register, using Linode dns, so what should i do next? the reason i am using google dns is to take advantage from network latency. i think they have respond time/latency is quite good.
Leron Amin says
Hi Juanita,
You can set up the domain before deploying the instance – it’s up to you.
And yes – Google DNS is quite performant – I would recommend using it whenever possible.
Talk to you soon,
Joe
Juanita says
so, i just go to dns in gcp, should i enable DNS API or NOT ? or DNS API was Enable By Default ? and then after that i can add record with my ip on it and www on it? other thing that should i known in case setup the dns properly ?
Thank you.
Leron Amin says
Hi Juanita,
Follow the instructions in the tutorial – I go over all of the steps to configure domains using Cloud DNS.
And yes – the Google Cloud DNS API needs to be enabled.
Let me know if you have any questions,
Joe
Matt says
Hi there
My website still appears on my IP address as well as my domain name. I’m using Cloudflare for DNS but the redirect needs to be installed on the server somehow and I don’t know where to do this? I’m using Google Click to Deploy. I have tried editing the .htaccess file but just end up with “too many redirects” error. Any help would be appreciated.
Matt
Leron Amin says
Hi Matt,
You can configure a redirect in your wordpress.conf (Click-to-deploy) or bitnami.conf (Bitnami) file. You probably have an existing redirect in either of those files, or within your Cloudflare dashboard, which is what’s causing the error.
Let me know if you have questions,
Joe
kanu bheda says
DNSSEC / On ya off plz reply me
Leron Amin says
Keep it off or you may run into problems.
chamans says
Hi
How to save After change name website in ssh?
https://onepagezen.com/wp-content/uploads/2017/07/domain-name-configuration-2.png
thank you.
Leron Amin says
Enter the following commands: CTRL + X, then CTRL + Y, then Enter.
osha says
after I follow all the steps I cannot log to the admin anymore
Leron Amin says
What happens when you try to login?
Rishi Khetan says
I did follow all the steps correctly but when I try to enter the admin panel, it doesn’t respond. It says the site may be temporarily down or moved to a new address. Kindly Help!
Leron Amin says
Hello Rishi,
Were you able to resolve the issue? If not what steps have you taken so far, and what exactly caused the error?
Talk to you soon,
Joe
Gyanu says
Please help me to deal with this https://imgur.com/24r7sB6
Leron Amin says
Hey Gyanu – please share more details regarding your website configuration, including what may have caused the error.
Nourry says
Hi,
Thanks a lot for this tutorial.
I’ve followed it step by step and it worked just fine !
The only issue I am having is when configurating my Gsuite mail account.
To do so, both GSuite and Namecheap assistance ask to configure the MX records by going to Domain / Manage / Advanced DNS and under Email settings, to select Gmail.
The issue is that this option is not available when I am under a Custom DNS (which I did as explained in the above tutorial).
I hope you can help.
Many thanks,
pablo says
Same problem here, could you solve it?
Oliver says
Hello. Thanks for the guide. I succesfully used it to install WP and point domain to it.
Wondering now what would be the steps to point another domain to it?
We have sitedomain.com working, but we want now to point oldsitedomain.com to sitedomain.com, basically to do 301 redirection for a new domain.
How can I add one more domain to my vm machine and redirect it to default one?
Leron Amin says
Hi Oliver,
You can configure domain forwarding with your domain name provider in order to automatically redirect traffic from that domain name.
Good luck and let me know if you have questions,
Joe
Oliver says
First thank you for taking time to answer me. However, since I followed your WordPress on Google Cloud tutorial, I decided to do the following:
Created Cloud DNS zone for a new domain.
Pointed my domain to the same nameservers as the primary domain.
I created virtual host in the existing vm/lamp for WordPress by adding necesary folders and configuring domain2.conf in apache. After that I executed a2ensite to enable my configs and restarted apache.
Enabled htaccess files and added redirection rules to a new domain.
I now want to add another domain to it but instead of being redirected it will be full fledged site. Can I add SSL certificate to the new site if I used virtual host?
Is there any downside to adding more sites to one VM instance or it would be better to create separate VM instance for every site?
Leron Amin says
Hi Oliver,
Thanks for sharing the steps – I’m glad to hear you were able to get everything up and running.
In your case, you can add multiple domains/subdomains to a single certificate, then have each of your Virtual Host’s use the same certificate. By doing it this way, you can simplify the renewal process.
That being said, the downside to having multiple websites running on the same machine is that, if the machine were to fail, you’d potentially have multiple sites going down. There is ways to insure against this, but this requires additional work on your end.
Generally, I’d recommend keeping a single domain and it’s subdomains (even if they’re separate sites) on a single VM. I wouldn’t recommend running multiple unrelated websites from a single VM, unless they’re relatively simple and/or static websites.
Hope this helps and let me know if you have questions,
Joe
sudhakar says
Hi,
Thanks for the nice explanations.
We created website, setup dns and updated url from IP address to https://www.prodahsolutions.com. After that wp-admin disappeared. what could be the problem?
Leron Amin says
Hi Sudhakar – what happens when you try to access wp-admin?
Sheshan Pradhan says
Hello sir,
After changing this
define(‘WP_SITEURL’, ‘https://www.yourdomain.com/’);
define(‘WP_HOME’, ‘https://www.yourdomain.com/’);
in that command prompt kind of window, I don’t know how to save the changes that I have made,
when I directly close the window It doesn’t get save, and also that Ctrl S is not working here.
Please help
Leron Amin says
Hi Sheshan,
To save the file, enter CTRL + O, then press enter. After doing this, you can safely exit (CTRL X) the file.
Let me know if you have questions,
Joe
Nitish Tiwari says
Hello,
I have hosted a website over Google Cloud Platform.Root domain is globexploration.com and we have added a CNAME of http://www.globexploration.com(Same as Bucket Name ).We are able to access http://www.globexploration.com, but in case of root domain the site is unreachable.we change DNS servers over our domain registrar(i.e. BigRock) to google NS records but still we are unable to access root domain . we want our root domain to show files from the bucket only.its king of an emergency.
so please give us your valuable suggestions.
Regards.
Nitish Tiwari
Web developer
Leron Amin says
Hi Nitish,
By the root domain do you mean your domain without www. in front?
You can add directives to your wordpress.conf (Click-to-deploy) or bitnami.conf (Bitnami) to influence the behavior when a user visits
your root domain. See this resource for more information.
Let me know if you have questions,
Joe
Arturo Vargas Gutierrez says
gracias me funciono correctamente, no encontraba informacion tan bien explicada hasta que di con tu canal de youtube, no me funciono a la primera pero al segundo intento quedo y sin detalles
gracias
Sanjay Tolani says
Hey Sir!
Thanks for posting the stuff
When I followed the steps, the homepage is fine, but all other pages are opening in the IP Address.
If I click on any link on Homepage, the link with IP address will open.
Please help
Leron Amin says
Hi Sanjay,
Make sure that all of your site’s links are configured to link to your Website’s domain name – not it’s external IP address. This is a common issue after migrations, but is an easy issue to fix, as it simply requires updating your WordPress’s HTML.
Let me know if you have questions,
Joe
Pete says
Hi Joe,
I had a couple differences when following your tutorials for google click to deploy.
My deployment manager doesn’t show login and password for phpMyadmin,
So I’m left unable to log in to phpMyadmin.
I’m also having trouble getting my domain configuration working.
http://www.bosworths.ca direct to a page that says “Future Home of Something Quite Cool” but my ip address shows my sample webpage “http://35.232.121.218/”
http://www.bosworths.ca used to point to a simple page in a storge bucket but that has been deleted. Is there something hanging around from that instance that I need to cleanup?
Thanks
Leron Amin says
Hi Pete,
Your deployment manager page should have a table with MySQL root user and MySQL root password (Temporary) – those are your phpMyAdmin credentials.
Your domain appears to be resolving just fine, including with HTTPS, so I’m going to assume that you were able to get the issue with the IP sorted out.
Regarding the storage bucket – there’s nothing else to clean up aside from deleting the files.
Hope this helps and feel free to reach out if you have any questions,
Joe
Ravi Raj says
Hi, Thank you for this tutorial.
I am using Google Domains for my domains.
I am done everything what you said on the article step-by-step.
but my website can’t open and the error msg is (Hmm. We’re having trouble finding that site.
We can’t connect to the server at http://www.yoursite.com)
I really don’t see what i am doing wrong.
Leron Amin says
Hi Ravi – were you able to get the issue resolved?
Cricket says
Thank you for the tutorials — they’ve been very helpful. I appreciate your hard work.
I have an unusual situation. After following your instructions in this tutorial, when I visit the url without ‘www’, it does not redirect to the full url with ‘www’ in front.
I have the A name record pointing to the server’s IP and CName record with ‘www’ added to DNS name field and the canonical url is pointing to the main domain without ‘www’.
I would be grateful to you for your help.
Myriam says
Hi, Thank you for this tutorial.
I am using namesilo for my domains.
I struggle to add google Nameserver on namesilo.
I really don’t see what i am doing wrong.
I always have a message telling me i haven’t created the nameservers even if i have done it.
Help.
Leron Amin says
Hi Myriam,
I’ve never used NameSilo, but I found this resource with instructions on how to change your nameservers on NameSilo.
If you’re unable to change the nameservers (due to technical reasons), I would recommend contacting NameSilo support.
Hope this helps and let me know if you have questions,
Joe
James says
Hey Joe,
Thanks for the instructions/guide. They’ve been very helpful and I’ve successfully migrated three WordPress sites previously hosted on a third-party to Google Cloud!
On my latest migration, it seems successful. The main home site page loads fine. However, if I click on any link that takes me to a post, it displays this message:
Not Found
The requested URL /probiotics/ was not found on this server.
Or another link:
Not Found
The requested URL /fiber-products/feed-your-good-bacteria-with-benefiber/ was not found on this server.
It appears fine on my old host but for some reason, it’s an issue after the migration to Google Cloud. I have checked permalink settings as well as in general settings, the WordPress URL is updated as well.
I wonder if it’s because for this particular WordPress installation, from the start I had http://mydomainname.com instead of my others, which started as http://www.mydomainname.com as a default since they were on another host.
Any ideas to fix this would be awesome!
Leron Amin says
Hi James,
For WordPress Click-to-deploy, follow the instructions in this comment here regarding how to modify the AllowOverride directive.
Let me know how it goes and if you have any questions,
Joe
sam says
Hi,
I tried to get SSL certificate but couldn’t get it done correctly,.. i will list down what i have done so far.. Up to step 6 i followed your tutorial..Thanks a lot .. that worked 🙂
1. Bought domain name from Namecheap
2. Enabled cloud DNS API in GCP.
3. Created a DNS Zone (Networking-> Cloud DNS)
4. Then added ‘A’ record with IP address of the VM instance (where i host my website)
5. Added ‘CNAME’ record.
6. Then i copy ‘NS’ Records and pasted in Namecheap side DNS records.
7. Bought SSL from Namecheap
8. Generate CSR from Google shell at GCP
9. Got the certificate zip file via email.
10. Then Added custom domain in GCP, then verify it via webmaster google.
11. Then copy the webmaster code and added as TXT record in DNS zone (above mentioned) at GCP
12 . Then certificate installed (as i think)
But i didn’t see that “https://” in my website url
Please help me to resolve this problem
Leron Amin says
Hi Sam,
After you issue the CSR, you will need to upload it to your certificate provider in order for them to issue the certificates. After you’ve sent the CSR to the certificate provider, they will typically send you the certificate files within a couple of days.
Check out this link (and the video) from GoDaddy to get a general idea of the process; it’s pretty much the same regardless of where you buy your certificate.
Adding the domain to Webmaster Tools (steps 10 and 11) are essential for your website’s SEO, but that’s unrelated to the process of configuring SSL.
Let me know if you have any questions,
Joe
Dapetin says
Hi
I have a new problem.
After I have installed the domain & SSL, why does the domain with www show different website?
http://www.domain.com > show different website / content
http://domain.com > redirect to https://www.domain.com > same website/content
https://www.domain.com> same website/content
What should I do?
Thanks
Leron Amin says
Hi Dapetin,
This most likely means that in your Apache configuration, you have the www. version of your domain pointing to a different file directory.
Please provide additional details including the domain name of the website in question, as well as which WordPress stack you’re using (Bitnami or Click-to-deploy).
Talk to you soon,
Joe
evan affandy says
hello,
i have done doing all of your step by step to transfer domain on google cloud.
and it has been 8 hour, but my domain still not linked with the ip address.
i from indonesia, and i buy a domain with local provider( not namecheap)
now, when i type my domain in browser, it redirect to another site.
please help me..
thanks
Leron Amin says
What is your domain name?
Did you verify that your domain is using Google Cloud’s nameservers?
evan affandy says
it has been solved, the problem is in my browser. i clear all cache and hostory.
thanks for your tutorial
Leron Amin says
Great! I’m glad to hear you were able to get it working!
MissMurmaider says
I have read through all of this and the other troubleshooting I can find, as well as requested to join the FB group. I might just be impatient.
I bought my domain via Google Domains, and I don’t know if that’s hanging this up, but it might be. I’m using the one-click (not Bitnami) and I’ve double checked all of my settings based on the tutorial.
I followed the tutorial exactly (except for where the settings were located in slightly different places).
After I changed my WP urls in the final steps and saved changes, I can’t connect to my website. Previously I had been able to access via IPv4 in google cloud, but it did not have a domain name. If I go to my IPv4 xx.xxx.xx.xxx/wp-admin or my domain name it gives me “This site can’t be reached http://www.snakesandcatters.com’s server IP address could not be found. … ERR_NAME_NOT_RESOLVED”.
I ran a config on both my IP and URL, both of which came back as 0 loss. I cleared cache on my browser and restarted both my computer and router, “just in case”. I’m at a loss.
It’s been about two hours, and I have no way to change my redirects in my wordpress back to what they were, because I can’t get into the front end console editor. Everything i’ve found for command line is using Bitnami, and I’m using the one-click from Google.
Leron Amin says
Hi MissMurmaider,
Your website is loading fine on my end – did you try loading it through a proxy? This is is a quick way of bypassing Chrome’s cache to check if your website is running correctly.
Let me know if you have any questions!
sikkandhar says
Hi,
I have done the all the procedure from creating zone to regitarar setup of domain name.
My website open in IP address only not in domain name even I changed in WordPress> setting >general> of site address (domain.com) instead IP address.
If i changed from IP address to domain name the message shows “the page not found”
How can I use domain name, it is almost 24 hrs passed. Please help.
Thank you,
Sikkandhar…
Leron Amin says
Hi Sikkandhar,
Sounds like you followed all of the steps properly, however, it sounds like there is an error somewhere in your configuration.
If you’d like, post a message to the WordPress Cloud Hosting Support Group and myself or one of the other members will walk you through the troubleshooting process.
Talk to you soon,
Joe
Vivek Kumar says
How can I change my wordpress address and site address url – http to https?
Because after loading SSL they are blocking my content.
Leron Amin says
Hi Vivek,
If you’re using Bitnami, follow the instructions here.
Hope this helps,
Joe
nizam says
please make sure that your domain name was
entered correctly and the DNS A/AAAA record(s) for that domain
contain(s) the right IP address
im facing this while installing ssl
Leron Amin says
Hi Nizam,
Check that the A record in your Cloud DNS matches the IP of your instance. IF not, change it.
Let me know if you have any questions,
Joe
nizam says
can i use both domain on same content and database. after all in one migration tools
that is old domain and new domain with same content and database.
does it will create a problem.
Leron Amin says
Hi Nizam,
You want to use two separate domains for serving the same content? I wouldn’t recommend this as it will cause numerous SEO related issues with your website.
If you’re switching domain names when you export the website, the All-in-one WP Migration plugin has a Find & Replace option that allows your to replace your old domain name with the new one.
Hope this helps and let me know if you have any questions,
Joe
Atilla says
Hi Leron,
Thanks for great instructions as always.
I have two domain names: http://www.example.com and http://www.example.co.uk.
http://www.example.com is the main domain currently hosted in Google Cloud (WordPress Bitnami version with SSL on) and its DNS settings are also managed by Google Cloud DNS service. Domain registry of http://www.example.co.uk is with another company.
What I would like to achieve is forwarding http://www.example.co.uk to the main site with masking so whoever visits http://www.example.co.uk continue browsing the site without seeing any changes in the address field.
The domain provider of http://www.example.co.uk does not support redirecting with masking, in fact the company only provide defining name servers for the domain name but nothing else.
I wonder what’s the best way to handle forwarding with masking procedure. To be more specific:
1) Should I define a separate Cloud DNS zone for http://www.example.co.uk or alternatively can I add records for http://www.example.co.uk inside the DNS zone that is already created for http://www.example.com?
2) What further steps should I take after DNS settings?
3) Do I need to touch anything on WordPress configuration?
Thanks,
Leron Amin says
Hi Atilla,
Do a Google search for “[yourdomainnameprovider] url masking”. The changes that you have to make in your server and DNS configuration are minimal, as most of the changes will be implemented from within the domain name provider itself.
It may also be worth it to reach out to the WordPress Cloud Hosting Support group to see if anyone there has experience with implementing URL masking.
Talk to you soon,
Joe
Avinash says
Hey,
I have updated my Name Servers (NS) to godaddy. My NS are showing updated when i checked in whois. but the IP is showing the old one where the website was hosted previously.
Can you please tell me how can i make myself sure that my domain has been transferred successfully.
My website is still up and running properly.
Leron Amin says
Hi Avinash,
I would recommend viewing the website in another browser or through a proxy, as it’s possible your browser is showing the cached version of the website.
Give this a try and let me know what you find.
Talk to you soon,
Joe
arihant jain says
hi Sir!
great tutorial, I successfully made my website on click to deploy on GCP and now my domain name is pointing towards my WordPress site too. i am not clear on how to make this external ip address my static address without changing it
Please help !
Leron Amin says
Hi Arihant,
From your Google Cloud dashboard, navigate to VPC Network > External IP Addresses. From here you should be able to change your IP address to static from under the Type column.
Let me know if you have any questions,
Joe
Manjeet Gulati says
Hi, there I have created the CNAME Record but for creating A name record IP Address that required is availale in the VM Instance .. what to do in this..
Leron Amin says
Hi Manjeet,
The IP address is connected to your VM instance – this is shown in one of the images in step3.
Let me know if you have any questions,
Joe
Sugam Arora says
Hi,
Great tutorials!
I have migrated my website from shared hosting to GCP. I was using the url without www. How do I configure with DNS records to remove www?
Leron Amin says
Thanks for the feedback Sugam! Are you using Bitnami or Click-to-deploy?
Noordeen says
Hi,
Thanks for your tutorial. I installed successfully in google host. But right now I facing two issue. One is my external IP not redirecting automatically. both external IP and the domain name also working together. And another issue is permalink default option only working. Can you help me.
Leron Amin says
Hi Noordeen,
Configure a rewrite in your wordpress.conf file – follow the template as shown in the first answer in the comments here:
The code should go in the same place as the https redirect, as shown in step 7 of this tutorial.
I’m not sure what the issue is with your permalinks not working. Do a Google search for ‘wordpress only default permalink works’ and check out the StackOverflow threads; it appears to be a common problem.
Hope this helps,
Joe
Arushi says
Hey, I’m a newbie to making websites. Your tutorials are a big help to me!
I have this problem which I’m not able to solve. I changed the DNS nameservers in my GoDaddy domain but when I’m opening it, the following error is coming up: “domain refused to connect”.
So even after I linked it to my wordpress url it shows the same error.
Please help!
Leron Amin says
Hey Arushi,
I’m glad the tutorials have helped you!
I would check the following things:
Do the nameservers that you assigned to your domain in GoDaddy match the nameservers in the DNS Zone that you created on Google Cloud?
Did you change your domain name in the WordPress application itself? If not, you should do this.
Let me know if you have any questions,
Joe
Arushi Soni says
I deployed the wordpress again and then changed the url for wordpress address and site address. Now even the wordpress dashboard is “refusing to connect”.
Leron Amin says
Hi Arushi,
It sounds like an error with your DNS – something probably doesn’t match up somewhere. You should go through the tutorial again and make sure all of the settings are configured as shown. Also, follow the link from my last comment to verify that your WordPress URLs are properly configured.
Talk to you soon,
Joe
Arushi Soni says
Should I make the IP address of server instance static or the one of WordPress? Because the limit in my region is only 1. Also, I set up the DNNSEC for my DNS, should I remove it? I think that is what is causing the problem here.
Leron Amin says
Hi Arushi,
You should assign a static IP address to the IP address that is connected to the VM instance that it running your WordPress website.
Also, don’t set up DNSSEC – it will cause problems in the future.
Hope this helps,
Joe
Paa says
Thank you Joe for the tutorial. I followed all your instructions, I am able to access my website through the IP but cannot log in to my WordPress Admin Page, any attempt to login redirects me to mydomainname where I get a server cannot be found error. I have reviewed instructions over and over again and checked custom name servers with my Domain Name Provider. Everything seems fine.
What could be the issue here?
Leron Amin says
Hi Paa,
Make sure that your Cloud DNS is properly configured, and that IP address of your A record matches the IP address of your virtual machine.
If that all checks out, I would make sure that you added the correct Google nameservers as your custom nameservers. Also, try removing the ‘.’ at the end of each of the nameservers and see if that helps.
Finally, try viewing your website through a proxy service such as hide.me or run a test on GTmetrix.com to bypass your browser’s cache and see if it’s loading properly.
Hope this helps and let me know if you have any questions,
Joe
Jeremias Medrano says
hello from BSAS , do you know the instructions to connect my domain from 1and1 to google.cloud
Leron Amin says
Hey Jeremias,
1and1 is like any other domain name provider – just change your nameservers as instructed in the tutorial.
Hope this helps and let me know if you have any questions,
Joe
Pedro says
When I do `dig @8.8.8.8 http://www.myDomain.com` it returns the appropriate external ip of my VM. However, when I point any browser to http://www.myDomain.com it won’t resolve the address. If I point the browser to my VM external IP it responds properly. The problem appears to be on the translation of the canonial domain to the VM IP. I don´t know what to do.
Leron Amin says
Hi Pedro,
Re-trace your steps and make sure everything was done properly.
Then clear your browser cache and try viewing the website from a different browser. Also try viewing it through a proxy service such as hide.me and see if that works.
Also, are you using CloudDNS as shown in the tutorial?
Hope this information helps, and let me know if you have any questions.
Joe
Paa says
Hi Pedro, I am experiencing the same issue. A DNS lookup showed the domain name was pointing to a different IP. Have you been able to resolve it?
Pamela RS says
Hi!
I followed your tutorials to transfer a wordpress website to GCP and it works! ☺️. However, I am afraid of changing my domain provider’s DNS, because my client has e-mails with his own domain ([email protected]) using Gmail. Would be a problem if I make that change? (Like emails stop working)
P.S my domain provider only lets me to put DNS names (there no more options available like MX)
Great tutorials 😀
Leron Amin says
Hi Pamela,
I’m glad to hear the tutorial worked for you!
If you want to use CloudDNS as demonstrated in the tutorial, you will have to transfer all of your current DNS records to CloudDNS after making the change.
That being said, you can avoid using CloudDNS altogether and simply point your A record to the IP of the VM that’s running your website (remember to also create a CNAME record for the www-version of the domain). This is easier to configure, and will meet the needs of most projects. Also, your domain name provider should have a section that allows for configuring DNS records – I would check their docs/support.
There are many tutorials out there on DNS configuration, so I would recommend doing a search on the subject if you run into issues.
Hope this helps and let me know if you have any questions,
Joe
PamelaRS says
Hi!
I used these DNS:
ns-cloud-e1.googledomains.com
ns-cloud-e2.googledomains.com
ns-cloud-e3.googledomains.com
ns-cloud-e4.googledomains.com
I set up them in my domain provider
I hope that Gsuite continues working (I have to wait to refresh DNS change)
Do you think that doing that was enough?
Thanks!
Pamela
Leron Amin says
Hi Pamela,
As I mentioned in my previous comment, you will have to import the records to CloudDNS in order for your email to continue working.
You will need to import all of the MX records as well as an SPF and DKIM record to prevent your outgoing emails from being flagged as SPAM.
Please take a look at this video were I go over how to configure mail records using Zoho as the email client.
Hope this helps!
Joe
Pamela says
Hi
I created MX (Google’s) in the CloudDNS, and everything is working fine :D. Website and emails are working.
Thanks! I will continue follow your amazing tutorials 😀
Pam
Leron Amin says
Hey Pamela,
Way to go – I’m glad to hear you got it working!
Thanks for the update and I will talk to you soon,
Joe
Gerardo says
I had this same problem were after changing the DNS name server in google domains I was unable to receive emails in the G suite email account. Here is the link from google on how to fix it. https://support.google.com/a/answer/9222085?hl=en&ref_topic=4445319
Leron Amin says
Thanks for the useful link Gerardo!
Himanshu Choudhari says
While updating the nameservers following error occurs
“Records for airenergycars.com could not be updated. The nameserver you chose may not be a valid nameserver. Please verify with the provider and try again”
I purchased domain from domain.com
Himanshu Choudhari says
just tried changing “ns-cloud-b1.googledomains.com.” this to “ns-cloud-b1.googledomains.com”
ie removing the dot in the last?? Will it setup correctly?
Leron Amin says
Hi Himanshu,
That is correct – you do not need the dot at the end of the nameserver.
Let me know if you have any questions,
Joe
Sarkhan says
Hi,
I added my google cloud dns to my google domain custom dns and it gives caution like below.
“It looks like you’ve changed your name servers. All settings for your domain (including website, email, synthetic records and resource records) are currently disabled. To enable these settings, you will need to restore the Google Domains name servers. Learn more”
and says Restore the Google Domains Nameserves. When I restore my website doesn’t work. When I leave it untouched, by browser gives me “your connection is not secure” caution and I am not able to add SSL sertificate.
I am living in Azerbaijan and when I configure my google domain setting, it says “You appear to be in a country where Google Domains is not yet available.” I bought my domain from domain.google.
Can you please write your thoughts on this subject?
How can I solve this huge amount of problem?
I can also give you my domain, cloud hosting information if you want to see my real problems.
I am looking for your answer.
Best regards,
Sarkhan
Leron Amin says
Hi Sarkhan,
There is not much of a problem here.
What you need to do is to follow the instructions in the tutorial and transfer all of the DNS records from Google Domains to Google Cloud.
If that’s not working for you, an easier solution would be to simply create an A record on Google domains that points to the IP address of the VM that is running your website, and a CNAME record that points to the domain name. Look at the section of this article titled ‘CNAME and A records’ to get an idea of what I’m talking a about.
Also, try using a chrome extension such as Strong Proxy to avoid being blocked from websites/services that aren’t available in your country of residence.
I hope this information helps,
Joe
Sarkhan says
Thanks Joe!
I created A and CNAME records once, there are A and CNAME records in my Domain and Cloud hosting. Should I edit them or can I add new A and CNAME records?
Leron Amin says
Hi Sarkhan,
Edit the existing ones.
Thanks,
Joe
Siddesh says
I follow the above steps as it is.
But still not after 48 hrs my domain are not hosted.
My domain registration is on Godaddy.
Plz help me.
Leron Amin says
Hi Siddesh,
The DNS changes should take less than an hour, so if the changes haven’t taken effect in 48 hours, then there is an error in your configuration.
I would recommend going through the tutorial again and make sure that you didn’t miss any steps.
Talk to you soon,
Joe
Juan says
Just wanted to thank you for this tutorial! After talking to DD24 and google support, I was giving up on setting the website. Not a lot of information available online either. But you sir, saved my day.
Thanks!
Leron Amin says
Hey Juan,
Thanks for the feedback. I am glad to hear you were able to get your website set up!
Talk to you soon,
Joe
Jonathan Swart says
Hi Leron! Great guide, saved me many times. Quick question:
My company website was built by someones else in the past and the email was configured through G Suite. Now with my new WordPress website on the GCP, am I right in adding the MX records from this guide (https://support.google.com/a/answer/6150791?hl=en) to my DNS settings, and then I can just send through the NameServers to my domain host?
I am concerned about email issues when my new website is live
Leron Amin says
Hey Jonathan,
If you’re using CloudDNS, you will need to add the MX records to your DNS records as shown in this guide. You will also need to add records for DKIM and SPF in order to prevent your outbound emails from being flagged as spam.
Let me know if you have any questions,
Joe
Jonathan Swart says
Thanks Joe! As my host has changed to GCP, would I need to verify my domain again?
Leron Amin says
Hi Jonathan,
I’m under the impression that you only have to verify your domain with Google one time.
Take a look at this resource here, and let me know if you have any questions.
Joe
Jonathan Swart says
Thanks Joe. I have sent my domain host the GCP NameServers (which have the gmail MX records added). I will let you know of the outcome 🙂
Benjamin says
Hello there,
Thanks for your tutorials, I have used them to deploy through google cloud vm. I have a domain registered through google domains as well. I have a static IP reserved for my vm in my google cloud project. When I add an A record to my domains.google.com for the domain and save it. The website doesn’t load or point to the vm instance even though I have entered the static IP address.
I am curious is this cause I have not included a cloud dns zone in the project in cloud.google.com. Second if this is the case, I am curious why I can just use the zone file from google domains and why I have to point the name severs to a could dns zone? This just seems a little redundant and extra costs.
Leron Amin says
Hi Benjamin,
If you don’t want to use Cloud DNS, you can simply point your domain A record to the IP of your instance on Google Cloud.
However, I wouldn’t recommend doing this as it’s a best practice to use the DNS service of whichever cloud hosting provider you’re using.
Please check out this link and this link for additional information regarding the benefits of using Cloud DNS.
That being said, if all you’re planning to do is run a simple WordPress website on Google Cloud, no email or other VM integrations, then it won’t make much of a difference if you don’t use Cloud DNS.
Please feel free to reach out to me if you have any questions.
Talk to you soon,
Joe
Mahipalsingh says
Thank you so much 🙂
I just created a WordPress website in just less than 2$ with your help.
I am planning something big with the target of the minimum investment.
And you helped a lot.
Thank you so much 😀
Leron Amin says
That’s awesome Mahipalsingh!
Glad to hear you were able to get your WordPress website running at such a great value.
Let me know if you have any questions,
Joe
Mahipalsingh says
Ya Loren!
I tried your method for SSL certificate but couldn’t succeed.
It is Showing some errors.
Leron Amin says
Hi Mahipalsingh,
There are many problems/issues that users can potentially encounter when configuring SSL, so I will need more details regarding the problem.
Talk to you soon,
Joe
Mahipalsingh says
okay, I am going to try it again.
now I have another question,
I thought google cloud hosting for WordPress is free for one year but I found somewhere on your blog that it costs around 5$ per month.
is it right?
or it is really free for one year?
Leron Amin says
Hi Mahipalsingh,
The cost will likely be free for the first year for most services utilized in the tutorials.
However, after the 1-year trial expires, the cost for services such as DNS and bandwidth will not be included.
And without these services included, the costs totaled around $6 dollars per month (based on my experience running WP on an f1-micro machine).
Hope this helps and let me know if you have any other questions,
Joe
Nithin says
Hi,
You really are a life-saver. Being new to the entire web development thing, I was really stumbling everywhere; and then I found exactly what I needed in your articles. Keep up the fantastic job man.
Nithin
Leron Amin says
Awesome Nithin – I’m glad to hear that you were able to get your website working.
Let me know if you have any questions,
Joe
Daniel Lopes says
Hey Leron,
My domain provider asks for the name servers and the ip of each one.
How can i get this information?
Leron Amin says
Hi Daniel,
Your Google Cloud nameservers are located in your “Cloud DNS”.
To view them, first create a new “DNS Zone”.
Let me know if you have questions,
Joe
Enes says
Great tuts, really helped me thanks. Just 1 issue that i personally faced is when i go to namecheap to edit nameservers you must to delete point at end (.) First time i shut down project bcs i didnt delete point at end and nameservers didn’t changed properly…
Keep going wish you good luck you really helped me :)))
Leron Amin says
Thanks for the update Enes,
You’re correct that it’s best to add the nameservers without the . at the end. Wish I had known that when I created the video. 😛
Regards,
Joe
Claire says
To add to my comment,
I am in Australia – So Google domains are not available – which is why they use 3rd party – Godaddy.
Also upon checking again – my MX records are now misisng from Gsuite and Godaddy DNS doesnt have them, they are in some sort of black hole.
Claire says
Hi Leron,
I am having some trouble and so far have not been able to find any resolution from my domain provider GoDaddy or the GSuite team.
I have followed alot of your great tutorials and used the google click to deploy for wordpress in December on my google console.
But I realised since December my gsuite email/inbox is not working, after I contacted Gsuite team a few days ago they told me to switch to default nameservers. Which brought my email back online – but knocked my website off.
So I have 2 scenarios: 1) if I select ‘Default’ Nameserver = email works but site does not.
2) add ‘Custom’ Nameservers = site works but email does not.
I checked the MX records for the gsuite gmail account and it seems to be correct, as confirmed from gsuite team.
A few days ago, followed your tutorial to set up Cloud DNS custom nameservers so i could change the URL from the IP to appear as the domain name. Which meant I switched the name server to custom and copied in the Cloud DNS nameserver in the GoDaddy manager. But then – my email stopped working again…
I am not sure why the the 2 google products dont seem to work together…
Hoping you can shed some light on where I have gone wrong, or point me in the right direction.
Let me know if you need any further information/clarification. I really appreciate your help!
Thanks,
Claire
Leron Amin says
Hi Claire,
I looked into it and you can use custom nameservers with Gsuite – here is the link with instructions.
This is just like how I configure Zoho email in the tutorial on onepagezen.com. You will need to configure DKIM, SPF, and MX records in your Cloud DNS.
Let me know if you have any questions about the process.
Claire says
Thank you, I’ll give it a try. Quick question, do I have to use cloudns.net? as I already have the Cloud DNS API in Google Console.
I have no idea, will do whatever you recommend.
Thank you !
Leron Amin says
No you wouldn’t use cloudns.net – that’s simply an example – you would use whichever domain name provider hosts your domain name.
Say for instance you purchased your domain from NameCheap – you would select “Use Custom Nameservers”, and then add the 4 nameservers from your Cloud DNS, just like I do in the tutorial.
Then, in your cloud DNS you would have to add SPF, DKIM, and MX records as instructed in the links I sent you in the last message.
Claire says
Joe? right?
THANK YOU SO MUCH!!
I have spent so much time trying to get g**gle to help and they were not able to – i was even politely told to look for a new host…
I really appreciate all these video tutorials you put together and the time you take to help a total novice like me resolve problems, it requires alot of kindness and patience! Thank you much for helping me again!
Leron Amin says
Hey Claire,
I know how much of a nightmare it can be to deal with poor customer support.
That being said, I’m glad you were finally able to get the issue resolved! 😀
Best regards,
Joe
STEPHANIE says
Thank you for all the tutorials you did. It was really useful to a beginner like me. Appreciate it!
I did not realise I had to reserve a static ip address, and I resize the VM Instance according to Google’s recommendation. Now I cannot access my site and WP Admin panel. I got my domain from Google Suite. I had done this step at Google/Enom – “Go to the website where you purchased your domain name, and locate your nameservers. Choose “Custom DNS”, then paste the four Google NS records.” But I am stuck at Step 5 of this tutorial as I cannot access my WordPress dashboard.
Also it seems we cannot receive emails, I am not sure where I did wrong.
p/s: I had done this tutorial too — “Free SSL Certificate Setup for WordPress on Google Cloud (Click-to-Deploy)”. But I was not able to update the URLs in WordPress.
Leron Amin says
Hi Stephanie,
Make sure the IP address assigned to your VM instance matches the IP address assigned to your domain’s A record in your cloud DNS.
Also, the most commonly used mail ports are closed in Google Cloud, so you will have to configure SMTP in order to send emails from your instance.
Stephanie says
Hi Leron,
Thank you. Turns out that the WordPress configuration is still recognizing the old IP address, I had since updated it and able to access the website. However, then I realize that when I chose “Custom DNS”, we cannot receive our email (sending out is not a problem).
I am also facing the same problem as Claire (post above). We can receive emails once we select “Default DNS”. We obtain our domain via G Suite (third party, Enom). Still not resolved ….
Thank you.
Leron Amin says
Hi Stephanie,
Sometimes IP address changes take a while to take effect, but most of the time it’s the browser – not the website – that is serving the cached version of the website with the old IP address. To avoid this problem in the future, try browsing through a proxy (there’s a free Chrome plugin called Strong Proxy which works well).
Regarding G Suite – check out the links I sent to Claire regarding configuring DKIM, SPF, and MX records in your Cloud DNS. These are all required for your G suite to work correctly when you’re using custom nameservers.
Also note that if you are trying to send email from your VM instance itself, it will not work. Most of the common mail ports are closed on Google Cloud so you have to configure SMTP.
Deepak Sodhi says
After this process my domain and ip is not working
please help
all process with work clearly but afterthat i replace the domain then the domian is not working
and my ip is also not working when i revert it to domain to ip pls help
35.224.212.236/
domain-searchmeguru.com
Leron Amin says
Hi Deepak,
What I recommend doing is going back through the tutorial and making sure that the IP address assigned to your instance matches the A record IP address in your Cloud DNS.
If you’re using the Bitnami or Click-to-Deploy versions of WordPress on Google Cloud, you will need to configure your domain name within WordPress according to step 2 of this tutorial.
Talk to you soon,
Joe
Syed says
I am using Google Click to deploy and i followed your steps and config DNS and login to wordpress and changed the URL and now i am not able to access website with my ip 35.200.223.71 as well as my domain name http://stylecart.co
Leron Amin says
Hi Syed,
There is likely an issue with your DNS configuration.
I would look over your Cloud DNS and make sure that the IP address for your instance matches the IP address of your A record in your cloud DNS.
Also, look over the tutorial to make sure you didn’t miss any important steps.
Let me know if you have any questions, 🙂
Joe
Syed says
Thank you for your reply it was my mistake i didn’t notice the name servers changed when i created a new instance i just assume it will be same. My bad. However thank for your detailed tutorial and my website is a success just cause of you i almost lost hope when i first started with GCP, after watching your videos i am successfully running an ecommerce website.
I have a suggestion for an additional video for the issues i faced.
1. Creating Load balancing for Http and Https domains
2. Reducing and checking load of server.
Leron Amin says
Hi Syed,
Thank you for the feedback! I am glad to hear you were able to get an ecommerce website running on GCP.
I know how intimidating GCP can be when first starting out, but I congratulate you for persevering!
Also, those are great tutorial suggestions, and I will look into creating those.
Talk to you soon, 🙂
Joe
Leathra says
Thanks for the tutorial. I am getting a weird error from my domain registrar. When I put my google nameservers in it tells me they are invalid, but I can see them in my zone details. Is there a wait time for having my nameservers added to googles data base?
Leron Amin says
Hi Leathra,
Were you able to get the problem resolved?
After adding the nameservers, there is not waiting period.
It is possible that there is a syntax error with the nameservers that you entered.
Talk to you soon,
Joe
Mehdi says
Hello Leron
Thank you for all the tutorials you did i really appreciate that work !
I did everything as you said but in the 5th step instead of writing http://www… i wrote https://www.. and now i can’t access my admin panel.
Please is there any solution for this problem ?
Thank you in advance.
Leron Amin says
Hi Medhi,
Your first option is to change your WordPress URL’s in your wp-config.php file.
The other option is to install SSL to your domain using either the Bitnami or Click-to-Deploy SSL tutorials.
Let me know if you have any questions about either of these processes.
Talk to you soon!
Joe
Samson says
Url Address change option is greyed out and set to my cloud IP?
Samson says
10/10 Tutorials https://onepagezen.com/domain-name-configuration-wordpress-google-cloud/
Jeremy says
Joe,
First off, thanks for this video and for all the others on your channel. You routinely show up in my searches for accomplishing tasks on Google Cloud – so well done with that!
My question is this… I setup a WordPress site through Compute Engine, Setup the DNS, pointed Namecheap domain to the name servers – all went well. Except – when I type in my domain name WITHOUT “www”, it is now resolving back to the “www” version. I want the opposite – a “non” www site. Example: “mydomain.com” instead of “www.mydomain.com”.
My DNS setup is exactly what you have in the video. I set an A type record for “mydomain.com” pointing to my static IP. I set a CNAME type record for “www.mydomain.com” pointing to “mydomain.com”.
Is there a config file in WordPress that’s still pointing it back to a “www” version or something? Thanks for your help in advance!
Leron Amin says
Hey Jeremy,
I am glad the videos have been useful to you. 🙂
Anyways, this is a common issue that you are referring to.
If you are using the Click-to-Deploy version of WordPress on Google Cloud, changing your domain URL is as simple as changing your WordPress URLs in Settings > General.
If you are using the Bitnami version, you will have to edit your wp-config.php file, as shown in this tutorial (Step 2). You should also complete Step 1 (reserving a static IP address) if you plan to stick with this website for a long time.
Let me know if this answers your question, and/or if you have any others!
Talk to you soon,
Joe
jose sanchez says
Buen dia amigo es necesario que el nombre de la zona sea el mismo del dominio ejemplo
zone name: dunamssss
dns name: dunamisgirardot.com
this correct o no?
Leron Amin says
Yes – that is correct. 🙂
Ernest says
Hello Joe
It is a nice blog you have here. I did everything you wrote here carefully to make sure i did not miss anything. After 48hours, when i visit the domain it did not point to my wordpress blog i setup on google cloud. I then tried again some minutes later and to my surprise it showed the the blog. i then tried a third time and it went back to showing sedo parking. and has refused to load the my wordpress blog for over 72hours now. What do you think is the problem? i have not done your tutorial – configuring Domain name for WPon Gpc but i hope that is not the problem.Looking forward to your response
Leron Amin says
Hi Ernest,
Make sure that you follow the instructions exactly as shown in the tutorial.
It is very unlikely that it should take 48 hours for changes to take effect – although 48 hours is typically the maximum of time it could potentially take.
If you haven’t figured it out yet, let me know and I will take a look at your DNS configuration and check for any errors.
Thanks,
Joe
Anil Kumar Raju A says
Steps are very clear and exactly done as you said. It is working perfectly. Now, need to set up SSL. Thank You Very Much.
Leron Amin says
Hi Anil,
Thanks for commenting!
I am glad you found the tutorial helpful!
Thanks,
Joe
Janis says
Hi and thanks Leron for your tutorials! I have learned a lot from them. 🙂
However I have a problem and maybe you or somebody from your community can help me.
I did everything according to this tutorial, but the problem I have is that when I go to my domain: ozolins.me everything is fine, however if I click something or go to admin panel it automatically switches to 104.155.86.2. And that of course is a no go. :(. 72 hours of course have passed and I am confused. Any ideas? Here is how my setup looks like: https://ibin.co/3S6GoYobviSe.png
Thank you in advance.
Janis
Leron Amin says
Hi Janis,
If you’re using Click-to-Deploy, make sure you changed your WordPress URL’s under the settings > General tab. If you’re using Bitnami, to change your domain name, “specify your domain name in the /opt/bitnami/apps/wordpress/htdocs/wp-config.php file. Edit and replace the following lines as shown, remembering to replace the DOMAIN placeholder with the actual domain name you wish to use:
define(‘WP_SITEURL’, ‘http://’ . $_SERVER[‘HTTP_HOST’] . ‘/’);
define(‘WP_HOME’, ‘http://’ . $_SERVER[‘HTTP_HOST’] . ‘/’);
with
define(‘WP_SITEURL’, ‘http://DOMAIN/’);
define(‘WP_HOME’, ‘http://DOMAIN/’);
These will need to be changed again if you configure SSL security for your site. That should fix the problem. Make sure there aren’t any additional errors by opening Chrome developer tools (ctrl+shift+i) from your dashboard.
After making the changes you will need to restart apache.
For Click-to-Deploy, run the following: sudo service apache2 restart
For Bitnami, run the following: sudo /opt/bitnami/ctlscript.sh restart apache
Thanks,
Joe
Janis says
Thank you very much! It worked.
Nilesh says
I can see a big problem…. I followed everything but i see a huge problem
i saw a message on my jetpack plugin “jetpack has been placed into Safe mode because we noticed this is an exact copy of my wordpress external ip adress here example http://36.188.133.132”
and i see that my wordpress is loading from my ip adress here example http://36.188.133.132 as well as my domain also…
this is creating dublication my blog won’t rank.
please fix this
i just want my bitnami wordpress to load from domain only
Please please please fix this coz it’s happing with your website also
just check your website eborchids.com is opening by it’s ip https://35.184.42.69.
Leron Amin says
Hi Nilesh,
This is not a problem with the DNS configuration. Whether or not you want your site to be accessible via your external IP can be configured via your bitnami.conf file at nano /opt/bitnami/apache2/conf/bitnami/bitnami.conf. Set up a rewrite condition within the VirtualHost_default_:80 section of the file. The condition should read:
RewriteEngine On
RewriteBase /
RewriteCond %{HTTP_HOST} ^92\.18\.29\.239$
RewriteRule ^(.*)$ http://www.yourdomain.com/$1 [L,R=301]
Remember to replace the IP address with your own external IP, and to replace http://www.yourdomain.com with your website’s domain name.
Also, make sure your instance is using a static IP address, which can be configured from Google Cloud platform under Networking > External IP addresses.
If you’re using the Click-to-Deploy version of WordPress on Google Cloud, repeat the steps as shown above, however, the file you will be configuring is located at /etc/apache2/sites-available/wordpress.conf.
If you’re using the Bitnami version of WordPress on Google Cloud, you can’t change your domain name via the settings page. To change your domain name, “specify your domain name in the /opt/bitnami/apps/wordpress/htdocs/wp-config.php file. Edit and replace the following lines as shown, remembering to replace the DOMAIN placeholder with the actual domain name you wish to use:
define(‘WP_SITEURL’, ‘http://’ . $_SERVER[‘HTTP_HOST’] . ‘/’);
define(‘WP_HOME’, ‘http://’ . $_SERVER[‘HTTP_HOST’] . ‘/’);
with
define(‘WP_SITEURL’, ‘http://DOMAIN/’);
define(‘WP_HOME’, ‘http://DOMAIN/’);
After making the changes you will need to restart apache.
For Click-to-Deploy, run the following: sudo service apache2 restart
For Bitnami, run the following: sudo /opt/bitnami/ctlscript.sh restart apache
This may solve the issue with JetPack, although I’m not sure as I haven’t used the plugin before.
Let me know if you have any additional questions and I will see how I can help!
Thanks,
Joe
Isabel Da Guerra says
Hi Joe,
Apologies for delay on my reply … Yes, both comments please?
Here’s my ‘REVISED & COMPACT’ comment 😉
MX Records IF you’re using G Suite new name for [Google Apps for Work] (£3.30/per user)
MX RECORDS is your domain’s ‘Mail Exchanger’ to send and receive emails using your domain name extension i.e. [email protected]/ [email protected], etc. [professional] and for… [protection] from phishing, email bounces, and being labeled as ‘spam’ email.
— go back to your DNS and ADD [DEFAULT COMMAND below] or [your domain’s REGISTRAR’S COMMAND here’s Google’s list https://support.google.com/a/topic/1611273?hl=en&ref_topic=2683820%5D :
1. Resource Record Type: MX (Mail Exchanger)
2. TTL: 1 (or whatever TTL value set from domain registrar)
3. TTL Unit: hour (or whatever TTL value set from domain registrar)
4. Preference and mail server: (add number first and space – use all 5 rows)
1 aspmx.l.google.com.
5 alt1.aspmx.l.google.com.
5 alt2.aspmx.l.google.com.
10 alt3.aspmx.l.google.com.
10 alt4.aspmx.l.google.com.
>> SAVE
Wait a couple of hours then test (send email and reply to from a external/secondary email) to see if all is running smoothly across the domain+email DNS exchange.
Go test it here http://leafdns.com/
Enjoy 😉
Leron Amin says
Great instructions as always, Isabel.
Thanks for sharing this!
What has been your experience with GSuite? Good, bad, so-so?
I’ve never actually used it and am curious to know how it compares with it’s no-cost competitors.
I am especially interested in knowing how it stack up to Zoho.
Talk to you soon,
Joe
Isabel Da Guerra says
Hi Joe,
First off, I’ve opted for gmail configurations rather than MS Outlook in the past.
I use it daily, and setup GSuite up for my clients too. It’s ‘A Mahoosive Nifty Tool’ …Like it a lot
And so you know, you can linkup/synchronise Outlook, Zoho, and a lot more to it, [basically GSuite is your entire office dashboard ‘online’]. You only need to know your login details, and internet connection to run your business from anywhere =mobile/pc/etc…
I run a few ‘organizations’ =domains with email users (with a few aliases/departments).
Each have their permission levels setup, and work to do… there is a ton of office communication/editing back and forth in real-time. Nifty tool he he
The tools are limitless, whether you have from outside or not, Google synchronises it AND you don’t loose any data, if you choose to leave, the data goes with you. I’m connected to a few this way.
They give you a free 14 day trial BUT… you can only set this account up IF you have a domain, OR want to purchase one from inside ($12/year I believe).
Tutorials inside for different levels.
I believe this one would be the -Full access administrator/Owner/Developer/etc..
http://admin-training.googleapps.com/#/
This is a nice way to find out on whether or not it’s what you are looking for.
Overall, I’m quite happy with it.
Enjoy buddy 😉
Alton Criswell says
Hey Leron. I have mapped my domain to my new Google Cloud WP site, but for some reason it does not display the domain name in the address field. Instead it displays the external IP address. How can I fix this issue?
Thanks in advance!
http://www.debtshop.us
~Alton C.
Alton Criswell says
Nevermind. I fixed it through the WP site itself.
Probably a not-too-smart question in the first place. 🙂
Isabel says
okay… so I ‘stuffed’ up the previous comment here (with all the google-dee-doo). Sorry.
Could you please be so kind as to delete ‘all’ my comments on this page regarding the MX records.
I’ll send you a ‘revised version’ next.
Sorry again for wasting your time Joe
Leron Amin says
Hi Isabel,
I’ve found your comments helpful! Are you sure you want me to delete them?
If so, which ones? Let me know the time-stamps of the ones you want me to delete.
Also, I just published a tutorial about configuring domain email with Zoho, I use it instead of Gsuite simply because it’s free. How has your experience been with using Gsuite for email?
Thanks for your input!
-Joe
Isabel says
topwacdeals.com
wizadclick.com
larnebma.com
primesportscars.com
/var/www/html/index.html
/var/log/apache2/error.log
why my domain shows Apache2 Debian Default Page
remove Apache2 Debian Default Page not wordpress domain
Type: MX (Mail Exchanger) Record
Lol Joe,
I use Google G Suite for my business, and add my clients to good ‘ol Google too. It’s like…
‘If you can’t beat them?! Then join them! he he he
… so let’s all 1… 2… 3… ‘Google it’ 😉
Google G Suite > Google Domains > Google Cloud Platforms > Google Google Google ugh!
Inside G Suite adding ‘other’ domain(s)
1. needs to be ‘ownership verified’ using any of these G platforms
i.e. html upload file/ G search /Webmaster/ G Analytics… etc
2. ‘encourages’ to confirm email MX records to point to either Google (Google Apps For Work) or remain external webmail… Why? So your email is protected from phishing sabotage, avoid email bounces, protecting your business domain email from being labeled as ‘spam’ email… yada yada 😉
(FYI: Have you tested your email send and receive? As I have not been ‘notified’ that you replied to my comment here?)
The MX (Mail Exchanger) Records I added on the previous comment, vary in value (so you need to check them out here https://support.google.com/a/topic/1611273?hl=en&ref_topic=2683820) but have a similar structure that I showed above…
Enjoy
P.S. This is my way of saying ‘thank you’ for giving us this easy to follow content 😉
Leron Amin says
Hi Isabel,
Thanks for sharing this information!
Were you trying to setup email for your domain, or would the DNS configuration simply not work without adding the MX records?
I find that surprising, but it shows how little I know!
Thanks again for sharing this information. I’m always happy to see your comments when they appear on the site. 🙂
-Joe
Yohnathan says
Hi Leron!
The problem I have is that I can not connect my domain with Google Cloud, I already had it right but I had to delete the project and do it again and now I can not connect it to the domain.
I followed all the instructions of your video and I worked but now it has not worked for me, you know how I can fix it?
Please, help me!!!
Leron Amin says
Hi Yohnathan,
What exactly is the error message you are receiving?
Thanks,
Joe
Isabel Da Guerra says
Not sure if this helps Joe, but with reference to issues with MX Record set up.
Tbh, Name Cheap was no problem setting the whole process up, however, have had GoDaddy and Enom issues so… I’m informed to add my MX Record on Google Cloud and it seems to do the job?! so thought I’d share it here for your readers to get the job done!
So here goes 😉
DNS Name: (leave blank or you can add symbol ‘ @ ‘ without quotes)
Resource Record Type: MX (Mail Exchanger)
TTL: 1 (or whatever TTL value set from domain registrar)
TTL Unit: week (or whatever TTL value set from domain registrar)
Preference and mail server:
10 aspmx.l.google.com.
20 alt1.aspmx.l.google.com.
30 alt2.aspmx.l.google.com.
40 aspmx2.aspmx2.l.google.com.
50 aspmx3.l.google.com.
(or whatever value set from domain registrar)
Press ‘Save’
… hope this helps someone 😉
mike says
this helped alot thank you