Adding Expires and Cache-control headers is a great way to improve user experience by reducing your website’s load time.
In this tutorial you will learn how to quickly add Expires and Cache-control headers to your WordPress Bitnami installation.
Configuring Expires and Cache-control headers enables your website to cache static content, leading to better website performance and reduced load times for visitors.
Checking existing headers
Before diving into this tutorial, you should check your website for existing Expires and Cache-control headers. To do this, run a test for your domain at GTMetrix.com.
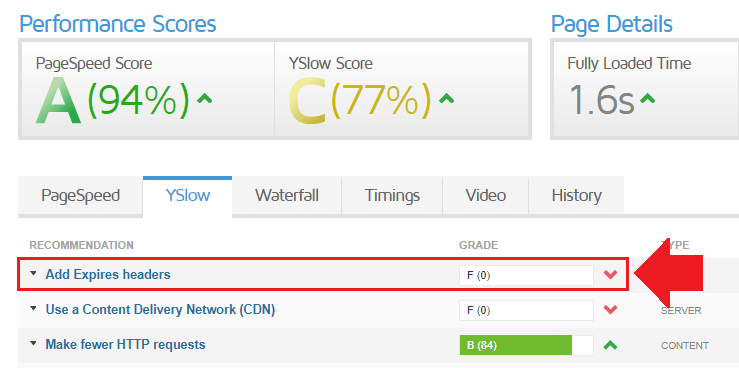
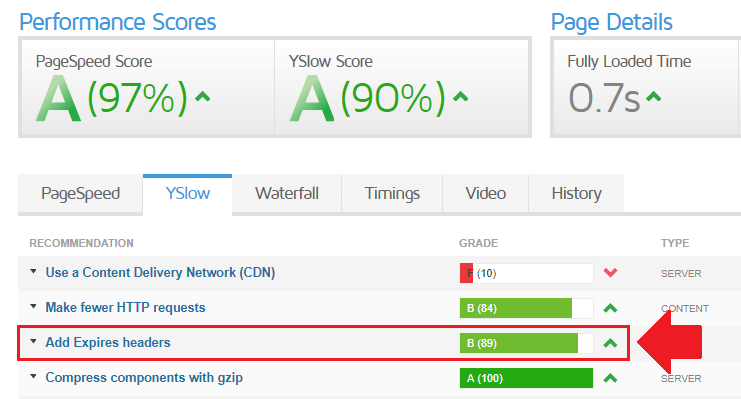
If you received an F grade for the Add Expires Headers recommendation, then read on to learn how to configure Expires and Cache-control headers for your website.
Getting started
Before getting started with this tutorial, you should have already installed the Bitnami WordPress (LAMP) stack on Google Cloud. If you haven’t yet done this, check out the following tutorials for instructions on how to install the Bitnami WordPress stack on Google Cloud.
Please note that this tutorial will also work with the Bitnami WordPress (LAMP) stack on Amazon AWS and Microsoft Azure.
Lastly, if you’ve already configured Expires Headers as shown in step 4 of the CloudFlare CDN for WordPress on Google Cloud tutorial, then you can skip this tutorial.
There are 5 steps in this tutorial:
1. Connect to your instance
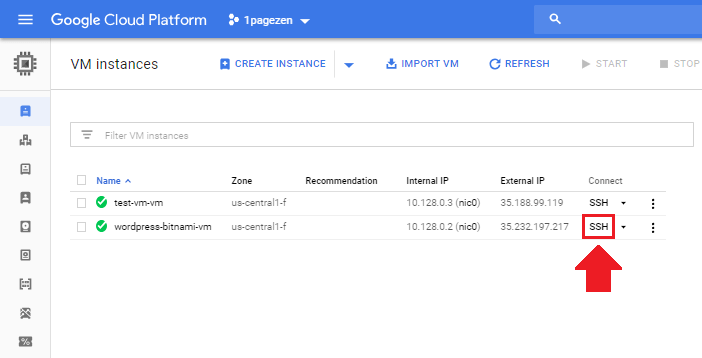
If you are using AWS, click here for instructions on how to SSH into your EC2 instance.
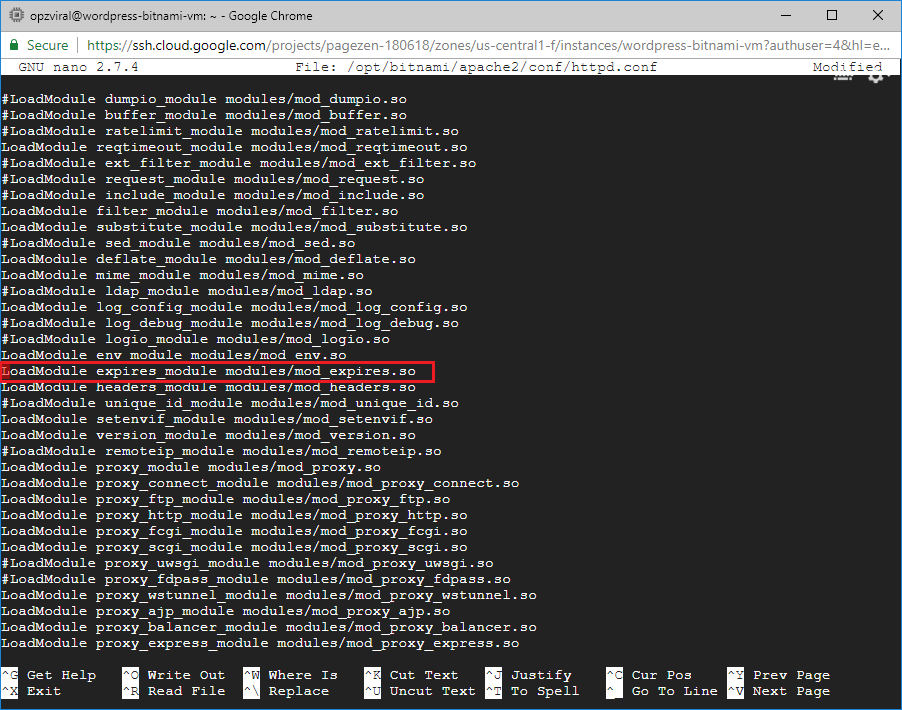
2. Enable expires module
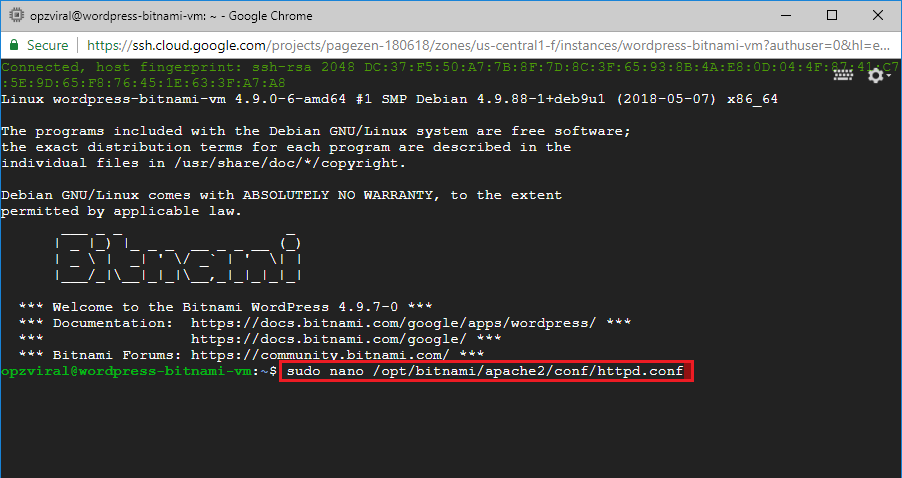
sudo nano /opt/bitnami/apache2/conf/httpd.conf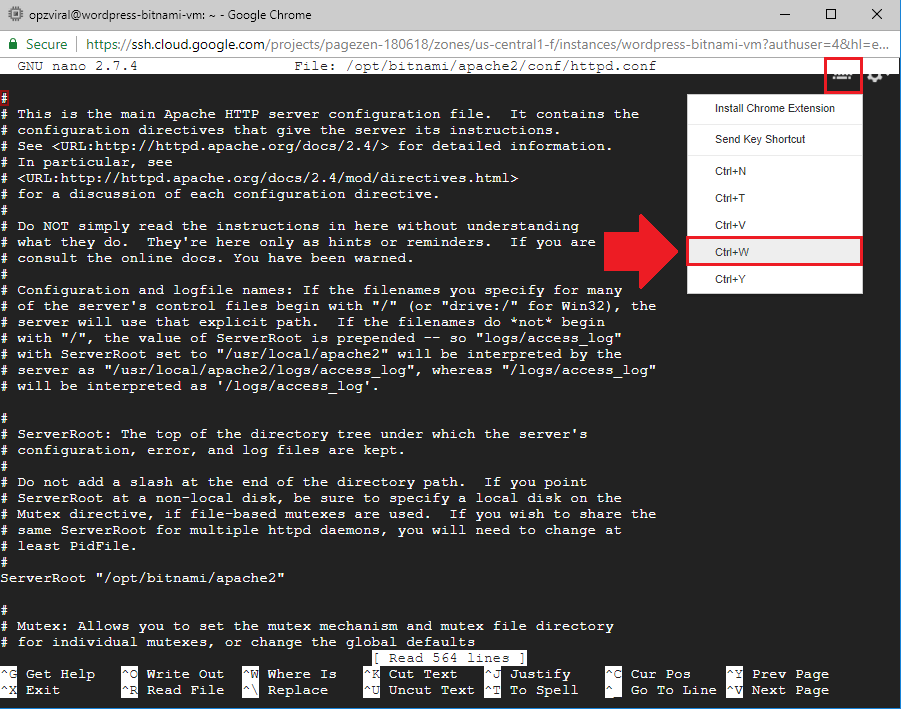
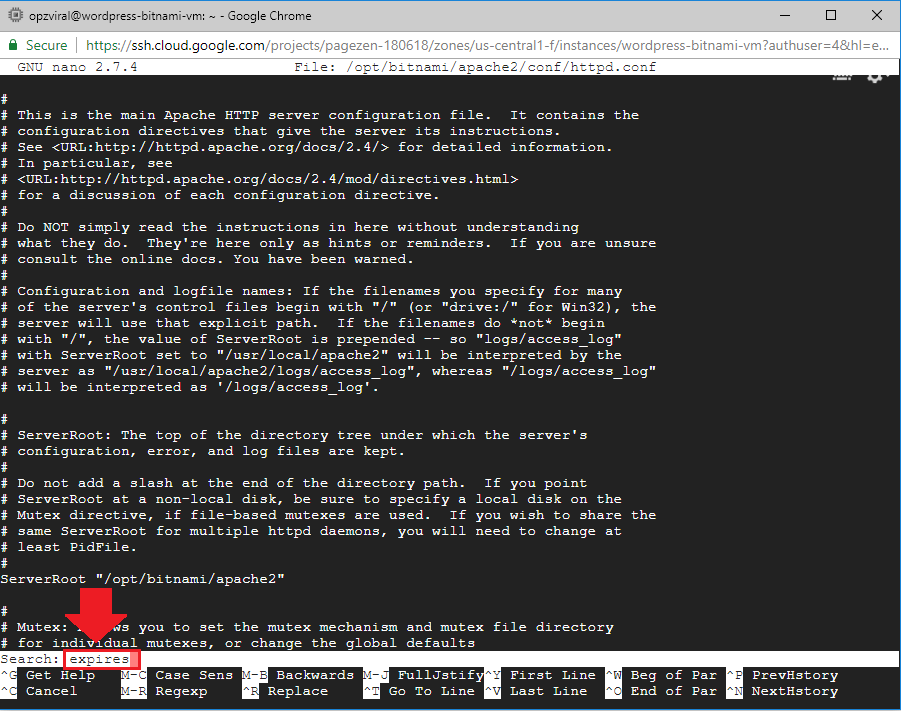
Lastly, enter CRTL + X, then Y, to save and exit the file.
3. Add expires headers
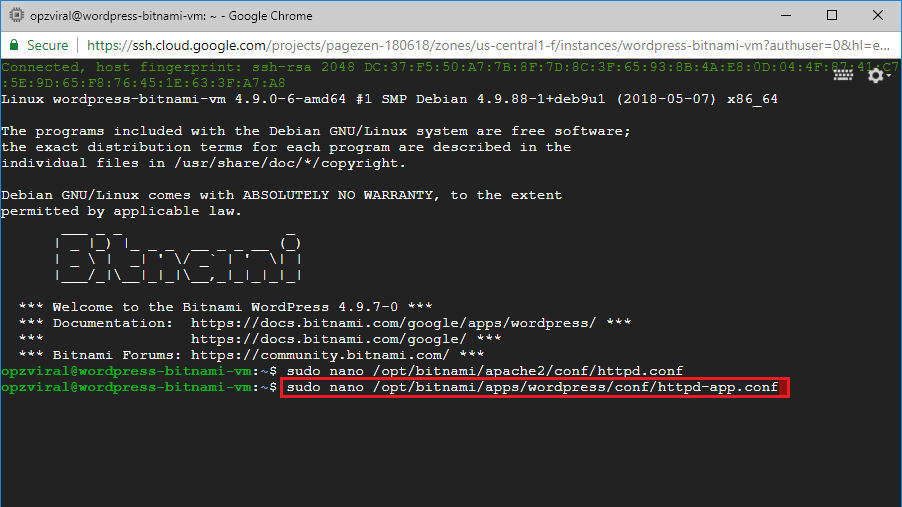
sudo nano /opt/bitnami/apps/wordpress/conf/httpd-app.conf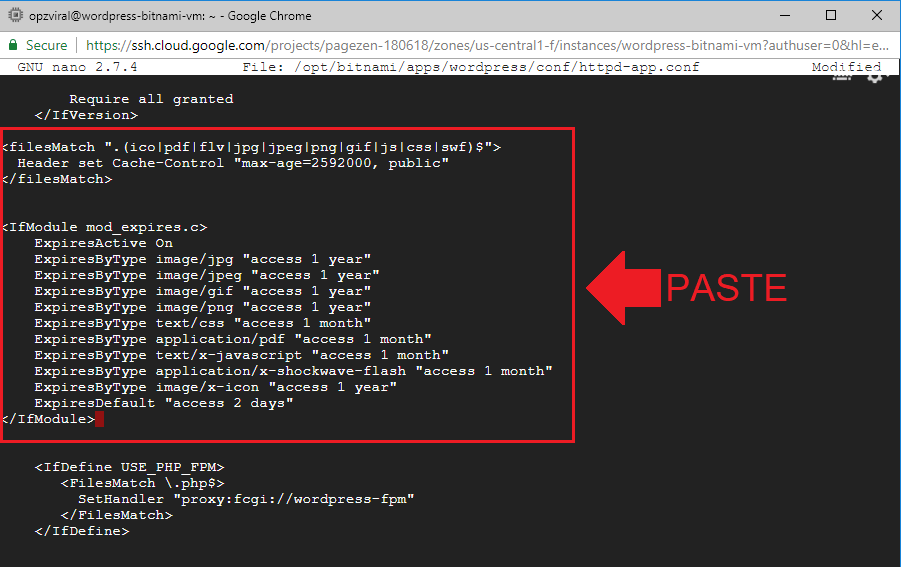
<filesMatch ".(ico|pdf|flv|jpg|jpeg|png|gif|js|css|swf)$">
  Header set Cache-Control "max-age=2592000, public"
</filesMatch>

<IfModule mod_expires.c>
    ExpiresActive On
    ExpiresByType image/jpg "access 1 year"
    ExpiresByType image/jpeg "access 1 year"
    ExpiresByType image/gif "access 1 year"
    ExpiresByType image/png "access 1 year"
    ExpiresByType text/css "access 1 month"
    ExpiresByType application/pdf "access 1 month"
    ExpiresByType text/x-javascript "access 1 month"
    ExpiresByType application/x-shockwave-flash "access 1 month"
    ExpiresByType image/x-icon "access 1 year"
    ExpiresDefault "access 2 days"
</IfModule>
4. Restart Apache server
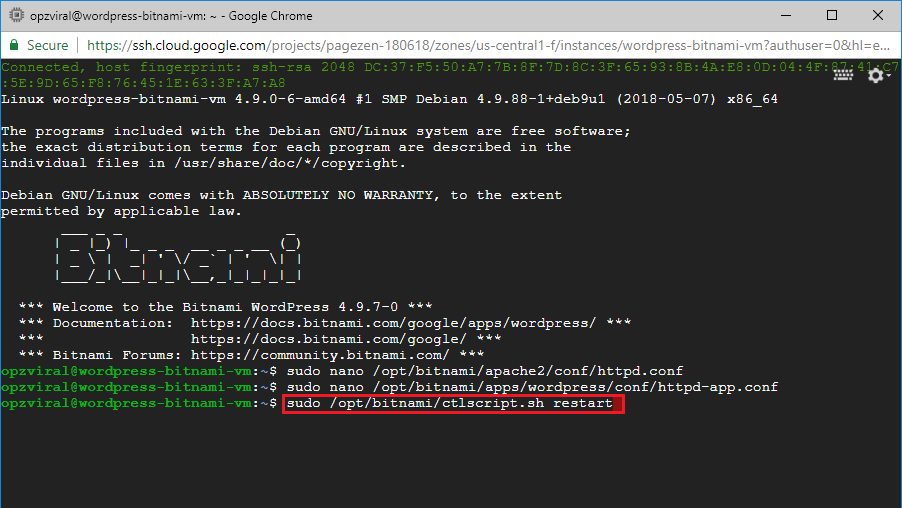
sudo /opt/bitnami/ctlscript.sh restart5. Test performance
Now that you’ve configure Expires and Cache-control headers for your WordPress website, the next step is to test that the changes were effective. Re-test your domain on GTMetrix.com to get an updated performance report, then navigate to the YSlow tab.
Frequently Asked Questions
- Why do you need Expires and Cache-control headers?
- How do you check if both Expires and Cache-control headers are enabled?
According to Kartik Ayyar, Machine Learning engineer at Google, you should “use both, primarily because different browsers and intermediate proxies can implement parsing these headers slightly differently and you want to insulate yourself from bugs in either”.
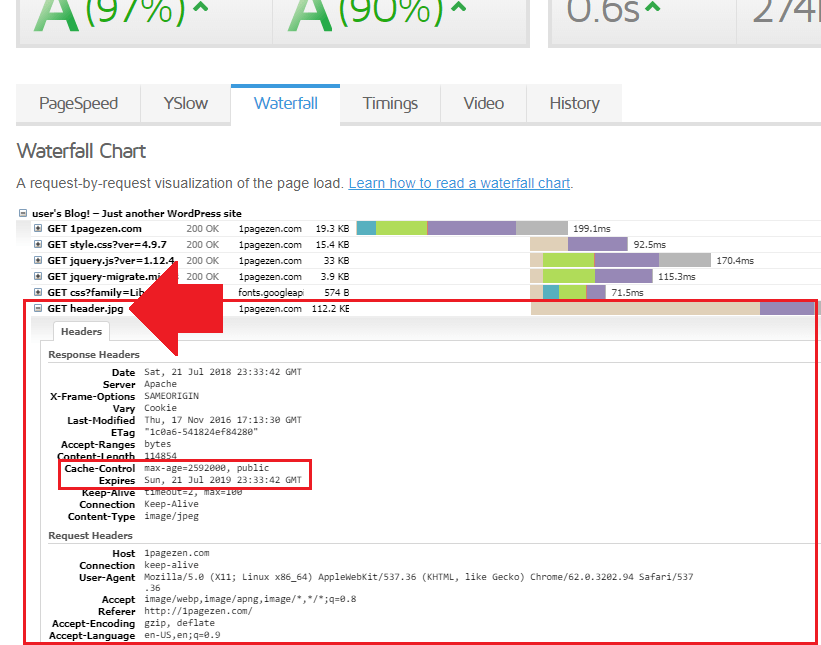
You can view your Expires and Cache control settings by running a performance report for your website on GTMetrix.com, then clicking on one of your website’s images under the Waterfall tab.
Troubleshooting
If you have any questions or comments regarding this tutorial, please leave them in the comment field below.
For troubleshooting support, be sure to check out the WordPress Cloud Hosting Support Group on Facebook.
![]()
Nickie Oakwood says
Tried it but my conf looked different plus in the explanation can not see the dot. Anyway tried it and got 521 error. So reverted conf back and site back.
RewriteEngine On
RewriteRule / / [L,R]
Options +MultiViews +FollowSymLinks
AllowOverride None
<IfVersion
Order allow,deny
Allow from all
= 2.3>
Require all granted
Header set Cache-Control “max-age=2592000, public”
php_value memory_limit 512M
Nickie Oakwood says
Sadly didn’t change on GT Metrix for me.
Jame Petchin says
I got rid of the expire header problem, but now a new problem came up “Avoid landing page redirects” tried so many options but I still get this fault. I believe this forum is the best place I can get the final answer to this problem. Please do help me out on this one.
Leron Amin says
Hi Jame,
You’re bound to see this message depending on the preferred version of your domain. It’s not a problem – it’s simply notifying you that a redirect took place.
If your preferred domain is without the www. prefix, and you run a GTMetrix test for your domain with the www. prefix, there will be a redirect – and vise versa – there’s no way around around this. As a best practice, set your preferred domain to the non-www. version, as most users will access your site without the www. prefix, thereby reducing the number of visitors who will encounter the landing page redirect.
Use GTMetrix as a guide/reference point towards improving the general performance of your application, and don’t focus as much on the letter score.
Let me know if you have any questions,
Joe
Devansh Chaudhary says
Thanks for this awesome tutorial.
https://gtmetrix.com/reports/www.spactual.com/RE4az50h
There are still many google fonts and other google links in expire header. How to fix them.
David Robinson says
Thank you for this awesome post!
I have a question, if I set expires headers to my e-commerce website where I frequently add and remove products and changing images in the store.
Will it affect my client-side in terms of getting these updates?
Leron Amin says
Hi David,
Yes, that’s correct. With e-commerce, you’ll have to be more strategic about your cache-control settings.
Take a look at this article about the SEO implications of expires headers, and this article about invalidating and updating cached responses (which ties into your question about client-side updating).
Please reach out if you have other questions,
Joe
Shahbaaz says
Hi, I followed your tutorial extensively but my GT matrix score is still the same. I am getting 0 on add expires headers. What should I do ?
Here is a Screenshot of the same https://ibb.co/9Hqq2Jc
Leron Amin says
Hi Shahbaaz,
Did you restart your server after making the changes? Did you clear your cache (if using a caching plugin).
Talk to you soon,
Joe
Jitu Tripathi says
I follow your tutorial . I have a bitnami wordpress website on Google cloud platform but i have a question which which cache plugins are good for my web . And which cache plugins you used in one page zen. Pls tell me
Leron Amin says
Hi Jitu,
Bitnami has documentation on how to optimize your WordPress website’s performance, which you can view here.
Let me know if you have any questions,
Joe
Rade says
Hello,
I followed the instructions but did not change the Gt metrix report and also I continued to see Get header.jpg in my waterfall chart.
I am using Cloudflare, and I changed the setting to Respect Existing Headers. Allso, I am using the plugins Autoptimize and ShortPixel Image Optimizer, and I tried without them but no change in the GTmetrix.
Is there anything else I must to do?
I tried this on a site where only wordpress was installed, and there was no problem, Expires Headers was created.
Thanks.
Leron Amin says
Hi Rade,
If you’re using CloudFlare, then you’ll have to configure the caching settings from within the Cloudflare dashboard. For additional information about this process, check out step 4 of the Cloudflare tutorial.
Hope this helps and let me know if you have questions about this process.
Talk to you soon,
Joe
Rade says
Hi Joe,
Thanks for your reply.
I have already done it by following your instructions. But still Express Headers was not created. How can I determine what the problem is?
Thanks.
Leron Amin says
Hi Rade,
You will have to do some research into the issue in order to determine why Cloudflare isn’t respecting your existing headers, or vise versa.
Configuring Cloudflare for your website has many benefits, but it also adds a layer of complexity.
I’d recommend you try configuring the headers through Cloudflare – does that work?
Talk to you soon,
Joe
Mohsin says
Hi
i am not using bitnami how can i do that with (Linux wordpress-1-vm)
pls share the commands
Leron Amin says
Hi Mohsin,
If you’re using Apache, you can add the directives to either an htaccess file or your default server configuration file.
Hope this helps and let me know if you have questions,
Joe
Steve Goglewski says
I am with all the rest please show this for one click install. I also wanted to try the the google load balancer & Cdn combo. Everyone else makes it super complicated or assumes we are already familar with the interface and configuration. LOVE these videos.
Leron Amin says
Thanks for the feedback Steve – I will publish this tutorial, as many people have been requesting it recently.
Gintautas Bruzas says
Hello,
Thanks to you guys, omg you saved me so much time already!
Bu i have big bad issue with SVG and WOFF files, even I add a lines for them it seems it doesnt work 🙁
So sad… but maybe you guys know were is the problme?
Thanks!
Preeti says
will you please share the process of add expire headers in wordpress google deploy. not for wordpress bitnami.
Leron Amin says
Yes, I will create this tutorial – thank you for the suggestion!
Hussain Vohra says
Your tutorials are very good.
Please create a tutorials for adding Expire Headers for One-Click WordPress Install in GCP. Thanks You.
Leron Amin says
Will do – thanks for the suggestion Hussain!
Vikash Goyal says
Did he make the tutorial for One Click WordPress GCP- I also need it. Great work man…!!
yavar khan says
I did the above steps but it does not apply to the below
https://www.googletagmanager.com/gtag/js?id=UA-87254826-1

https://connect.facebook.net/en_US/fbevents.js

https://fonts.googleapis.com/css?family=Sintony:normal%7CMonda:700&subset=latin,latin

https://connect.facebook.net/signals/config/1978088205577631?v=2.8.51&r=stable

https://www.google-analytics.com/analytics.js

https://connect.facebook.net/signals/plugins/inferredEvents.js?v=2.8.51
Leron Amin says
Hi Yavar,
Those are external scripts, so you don’t have any control over their expiration. That being said, you can download the font if you’d like to serve it from your own domain instead of from googleapis – this would allow to you to define the expires headers.
Let me know if you have questions,
Joe
yavar khan says
Awesome thx
Kartik says
Your tutorials are really great.
But Could you please please make a tutorial on How to configure WordPress (Click to Deploy) for all Cache Plugins and other plugins.
Because its always gives some type of error.
Thanks in advance.
Leron Amin says
Thank you for the recommendation Kartik – this is something I will look into!
Benjamin Waller says
Hello Joe,
As always you do a fantastic job with helping people understand cloud computing. Such a great resource.
I have a question, after adding expires headers to my WP site I still get a F (failing) score. It looks like most of them are Goodle fonts but there is one background image which is a .jpg which is listed so maybe adding the expires headers hasn’t worked correcly?
See the GT Metrixs report.
https://gtmetrix.com/reports/www.jonaviray.com/GL6E73mF
Cheers,
Ben
Leron Amin says
Thanks for the feedback Ben!
You would need to download and serve the external resources from your own domain if you wanted to configure cache-control headers for that content. I’m not sure about the issue with the jpeg image not caching properly. Did you restart your Apache server after making the changes?
You can also check the existing cache control-headers by following the instructions from this guide, which has instructions for Chrome devtools.
You can also copy the link to whichever image you want to check the headers on, then use the curl command according to the following model:
Also – if you’re using Cloudflare – make sure the ‘Respect Existing Headers’ setting is selected under your ‘Browser Cache Expiration’ settings. I go over this in step 4 of the Cloudflare tutorial.
Let me know if you’re able to get the issue resolved,
Joe
Let me know if you’re able to resolve the issue!
Talk to you soon,
Joe
Muhammad Waleed says
Hello Bro this was a really helpful tutorial but the problem is that I have deployed the Click to Deploy version of wordpress on my GCP VM instance so can you plzz make a tutorial for the Click to Deploy version, it would be a great help.
Leron Amin says
Hi Muhammad – this is on my list of tutorials to do! Thanks for the feedback and suggestion!
Gary Watson says
Love your blog, so helpful with issues that keep arising for me as a freelancer and i keep reverting back here for the solution. Hands down class lad
Leron Amin says
Thanks for sharing your feedback – I’m glad to hear the tutorials have been helpful to you!
Sejarah Negara says
I was very happy with your tutorial from the first time I tried to build the site, so I could make it. I am very happy.
When I applied this tutorial, I suspected that something was not right. In Gtmetrix it says:
Cache-Control: max-age = 0, no-cache, s-maxage = 10
Where is my mistake?
Regards
Leron Amin says
Hi Sejarah,
I’m not sure what your mistake is. Make sure that you saved the file in Nano after editing it. Also, I’d recommend going through the tutorial again to ensure that you didn’t miss any steps.
Let me know if you have any questions,
Joe
Garrett Dewbre says
Does this tutorial work for the standard Bitnami Google Cloud deployment? Or, is this only applicable for Bitnami LAMP Stack?
Also, when I decide to begin using a CDN, will the changes made in this tutorial effect the use of a future CDN?
Thanks,
Garrett
Leron Amin says
Hi Garrett,
This only works for the Bitnami LAMP stack.
Regarding the CDN question: you can either configure your CDN to respect the existing headers, or create new ones – it just depends on your CDN configuration.
Talk to you soon,
Joe
Sergio says
Hello Leron,
Once again thank you for the great tutorial, I built my first website using your tutorials from the beginning. Have two questions please:
1* On the “Expires Headers” code, did you forget to insert this line or it was intentional?
LINE: ExpiresByType text/html “access 1 month”
2*. On GTmetrix and precisely on the “Add Expires headers” section I still get a message regarding some components without a far-future expiration date (Analytics):
https://www.googletagmanager.com/gtag/js?id=UA-XXXXXX
https://www.google-analytics.com/analytics.js
Is there any tweak to apply the Expires on the analytics code?
Thanks again and keep the good work.
Sergio, SEO Expert.
Leron Amin says
Hi Sergio,
I’m glad you’ve enjoyed the tutorials!
Yes – I would recommend adding the text/html header. And don’t add an expires header for Google Analytics – Philip Watson gives a good explanation of the reasons not to here. I wouldn’t worry too much about Tag Manager either; the idea behind adding expires/cache-control headers is to minimize HTTP requests. Most websites make anywhere from 50-200 requests, and anything above 100 seems to really impact performance, so I wouldn’t worry about an additional one or two. Your time is better spent optimizing your website’s media either through compression or through optimizing content delivery.
Hope this helps and let me know if you have questions,
Joe
Sergio says
Thank you Joe, here are my stats on GTmetrix:
https://snag.gy/R8Vp4z.jpg
I’ll pass on the minimizing requests process for now, because I think my website is already optimized in this area.
Just an other question: how do you recommend optimizing content delivery?
Leron Amin says
Hi Sergio,
There are many options when it comes to implementing a content delivery network, but the easiest would be to setup Cloudflare CDN: free CDN, great security features, and some other fairly advanced features. You can also look at more conventional CDN’s; I know that most of the big CDN providers have plugins for easy WordPress integration.
Another solution is to serve static assets (videos, images) from a multi-regional storage bucket. This can be done fairly easily thanks to the WP-Stateless plugin. This is a cost-effective solution that would be optimal for a media-rich WordPress websites (photography, graphic design, etc.).
Another possibility is deploying multiple identical instances in areas where your visitors are centered, then using a cross-region load balancer (here’s a tutorial) to forward traffic to the instances in the various regions. This is optimal for website with a global audience, for instance a 50/50 distribution of traffic from the United States and India would call for deploying instances in both of those countries in order make your website’s content more readily available to users. Keep in mind that this solution is resource intensive, due to both it’s complexity and high cost.
Hope this answers your question!
Joe
Sergio says
Thank you Joe, this answers all of my questions and more, looking forward for the next video/article.
Keep up the good work.
Leron Amin says
Thanks for the feedback Sergio! 🙂
louisa says
Is there a way to measure the contents of a blog to see how much memory the blog is using? Google Cloud offers different types of VMS, with the smallest one being f1-micro 0.6GB. You said this is sufficient for small to medium blogs. I was wondering if it’s possible to track the size of my blog so I know when to upgrade to a bigger VM if needed.
Leron Amin says
Hi Louisa,
You can navigate to Compute Engine > VM Instances, then click on the instance that’s running your website. From there, click on the ‘Monitoring’ tab at the top of the page. The resulting graphs will provide you with a 30-day insight into how your VM is performing, and whether it’s being over or under utilized.
To check available disk space, SSH into your instance and type the following command: df. This will give you insight into whether or not you need to add more storage. If your VM is short on storage, you will notice a significant decrease in performance.
Hope this helps, and let me know if you have questions,
Joe
louisa says
In Monitoring, the graph for 30 days for %CPU shows under 5%. Does this mean only less than 5% of the VM is being used? I have a few more questions.
1) At what percentage %CPU usage should I consider scaling up to a bigger VM?
2) I followed your tutorials on how to set up a blog in Google Cloud and managed to do it even though I know next to nothing about cloud computing (thanks so much!!!). Originally I chose the smallest VM with 0.6GB RAM, which costs about $5/month. I thought the site would run faster if I scale up so I changed to a bigger VM, n1-standard-1 with 3.75GB. Is it possible for me to go down back to 0.6GB since I don’t need a big VM like the one I have now? Can I just stop the VM, choose the 0.6BG option and restart the VM again?
Leron Amin says
Hi Louisa,
Thanks for the great feedback – I’m glad the tutorials have been helpful to you!
And yes – your machine type is overkill considering the size of your application. There’s nothing wrong with this, it just means that you’re paying for resources that your project isn’t using.
Additionally, the added CPU power won’t have a huge impact on your website’s performance because your visitor’s connection speed is already the limiting factor. Instead, consider upgrading the memory from 0.6 to 1.7GB. Keep in mind that WordPress is not a very resource-intensive application to begin with.
1) I’d recommend you scale to a bigger VM if your %CPU is consistently above 30% – but this is just a recommendation. It is true that lower is generally better.
2) To scale down your VM, follow this guide from Google Cloud. Make sure to start your instance again after you’ve made the changes, and run the following command to restart services on the VM once it’s started:
Let me know if you have any questions,
Joe
louisa says
I used the df command, but the result is confusin. I will summarize what I assume is the important info.
File system Use%
udev 0%
tmpfs 11%
/dev/sda1 31%
tmpfs 0%
tmpfs 0%
tmpfs 0%
I don’t know what “udev” “tmpfs” “/dev/sda1” mean. Which row should I look at to determine the size of my site? And if the size gets to a certain %, should I upgrade to a larger VM? Thank you for your help!!!
Leron Amin says
Hi Louisa,
The only disk partition you should be concerned with is /dev/sda1 – which is currently at 31%. I’d recommend resizing when the /dev/sda1 partition starts to approach 70-80% capacity.
To upgrade, you would not upgrade your machine type – you would simply resize the persistent disk attached to your VM.
Let me know if you have questions,
Joe
louisa says
I am afraid my knowledge of Google Cloud is really lacking. Do you know any books or tutorials online you can recommend that can teach me about Google Cloud. Since I don’t know anything, I think the simpler the info, the better, maybe beginner’s stuff first. I researched online, but I am overwhelmed by the options I don’t know what to choose. Thank you.
Leron Amin says
Hi Louisa,
Unfortunately there aren’t many beginner tutorials available on the subject. I’d recommend getting familiar with installing applications on Google Cloud using a variety of Google Cloud services – this will give you good exposure to everything GCP offers and will give you a better understanding of the platform. Also – check out Google’s Codelab tutorials!
Good luck!
Joe
Benoy says
Hello Leron,
This is Benoy again. I did the activation of the expires headers module and started the server. I am getting the following notice as I restart it. Is this normal? You know I am not a techie
Syntax OK
/opt/bitnami/apache2/scripts/ctl.sh : httpd stopped
/opt/bitnami/php/scripts/ctl.sh : php-fpm stopped
/opt/bitnami/mysql/scripts/ctl.sh : mysql stopped
/opt/bitnami/mysql/scripts/ctl.sh : mysql started at port 3306
/opt/bitnami/php/scripts/ctl.sh : php-fpm started
Syntax OK
/opt/bitnami/apache2/scripts/ctl.sh : httpd started at port 80
Leron Amin says
Hi Benoy – that looks correct!
Benoy says
Thanks a ton!
Leron Amin says
No problem! 🙂
Benoy says
Thanks a ton. Just a suggestion if you have time:
updating php version from 7.0.31 to 7.2+
would be great help. And there was an email from gcp regarding updating to new regional cpu – I was successful in editing the same. Thanks for all the tutorials which gave me an idea. Can I also opt for a larger disk size by editing the same? Just wanted to query the expert before plunging in. Thanks!
Leron Amin says
Hi Benoy,
I will do a tutorial at some point for upgrading PHP versions on Click-to-deploy. Unfortunately, there’s no easy way to upgrade with Bitnami (that I know of) – you’d have to migrate the application to a new stack with all updated components.
And yes – you can increase your disk size at any time by going to Compute Engine > Disks, then clicking the “Edit” button at the top of the page. The only downside to this is that you can’t scale the disk size down – so make sure to increase your disk size only by the necessary amount, especially if you’re using SSD (they’re expensive compared to HDDs).
Hope this helps and let me know if you have questions,
Joe
Benoy says
Thanks for your help. Disk query is solved 🙂 Yes, I was trying to increase it as the snapshots took some space.
Regarding the bitnami php updates, a video on the migration stuff you mentioned would be a great help not only to me but to a lot of people trying to do it. Of course your time is precious and I guess there are a lot of requests apart from mine. No hurry, do update it only if you have some free time to spare. At the moment 7 version is doing just fine.
So long, do keep up the good work.
Antony Warmbold says
Hi Joe,
Your tutorials are amazing, thank you so very much for all this work, it’s amazing.
Did you have any time to look into showing us how to upgrade PHP on a Click-to-deploy instance?
I am starting to panic as I am seeing that WooCommerce will soon require PHP version 7.2 or newer..
Leron Amin says
Hi Antony,
Thanks for the feedback.
I would recommend migrating your WordPress install to a later stack with all updated components.
Let me know if you have other questions,
Joe
Faheem says
Hi Leron,
I’m still waiting for Non-batnami version.
Johnson says
Sir, My Name is Johnson From Tamil Nadu, India… Your Service is Very Good… First Thank You….
I Want Add Expires Headers for WordPress on Google Cloud. Please Upload This Video…
Leron Amin says
Hi Johnson – were you looking for a version of this tutorial for WordPress Click-to-deploy?
Benjamin Waller says
Hey Joe,
Hope your well.
I was wondering whether it is worth doing this to my Moodle LMS https://www.hocvietngu.com/ since when checking the GTmetrix report I get a score of B (89) without doing anything! And for the Waterfall, the following:
Expires:Thu, 19 Nov 1981 08:52:00 GMT
Cache-Control : no-store, no-cache, must-revalidate
My other question, not specifically related to this article but an Apache question. I have an issue with my Moodle is not receiving the Authentication header it requires from your Apache/PHP setup. To fix the issue I have been instructed to set the ‘CGIPassAuth on’ in your Apache config or .htaccess file. What I don’t know is where I can find that file to turn it on?
Would it be in this file?“`/opt/bitnami/apps/wordpress/conf/httpd-app.conf“`
You can refer to the Apache page reference on this. https://httpd.apache.org/docs/2.4/en/mod/core.html#cgipassauth
Best regards,
Ben
Leron Amin says
Hey Ben,
I was researching your question but it appears you were able to get an answer here. Did that end up working correctly? If not, let me know and I will look into it.
Also, I wouldn’t use this tutorial with Moodle, as it has only been tested with WordPress. Also, it appears Moodle has their own system/instructions for caching which can be viewed here.
Let me know if you have any questions,
Joe
Benjamin Waller says
Thanks Joe,
Yes, I had posted on Bitnami’s forums but unfortunately adding that change to the config file hasn’t worked yet. But I will try turning on a couple of the modules that are used by the CGIPassAuth such as (mod_cgi, mod_cgid, mod_proxy_fcgi, mod_proxy_scgi,) to see if it can pass the quiz results from this function : get_headers see Moodle docs https://github.com/moodle/moodle/blob/v3.5.2/mod/lti/OAuth.php#L744
And thanks for that link, I will read up on how Moodle handles caching.
Faheem says
Hi Leron,
Dear, I want to know how to fix the header on the Non-Bitnami version of WordPress on google cloud.
Thanks in advance
Faheem
Leron Amin says
Hi Faheem – I will try to make a tutorial on the subject soon, hopefully next week.
Faheem says
Thanks a lot, Leron,
I’m waiting I m a regular reader of your blog.
try to make earlier.
Thanks Faheem
Leron Amin says
Thanks Faheem – I will try!
Ale Duran says
Hi Lero,
Thank you for amazing tutorial, i have a quick question I would like to apply this in a normal installation of wordpress not using click-to-deploy version. Can be this one safe for that ?
Thank you.
Leron Amin says
Hi Ale,
So are you just using your own LAMP stack? I’m not 100% sure what you mean by a ‘normal installation of WordPress’.
Let me know and I will see how I cant help!
Ale Duran says
I was meaning Non-Bitnami version of WordPress on google cloud. But i saw that you are working on that tutorial…. Just another quick question. Could you please explain what is the different between Non-Bitnami and with Bitnami. On your experience which one is better.
Leron Amin says
Hi Ale,
I’ve had a lot of requests for this tutorial, so yes, I am working on it right now.
Regarding Bitnami v. Click-to-deploy: The Bitnami stack come with a few more components than Click-to-deploy, and it’s a bit more complicated to setup. For instance, with Bitnami, PhpMyAdmin is accessibly only via SSH tunnel. Additionally, changing the WordPress site URL’s via the WordPress settings dashboard is disabled – this must be done from the backend in your wp-config.php file. Although these seem like minor inconveniences, they can make the setup process profoundly more difficult for developers who are new to Google Cloud/linux administration.
In conclusion, if you need a more feature-rich stack with greater security and pre-configured performance upgrades (e.g. mod_pagespeed), then go with Bitnami. If you need to get up-and-running quickly, and prefer a more bare bones stack, go with Click-to-deploy.
Talk to you soon,
Joe
Rudhra says
Followed the instructions but no change in the Gt metrix report. I am using Cloudflare. Is there anything else I must do and also I don’t see Get header.jpg in my waterfall chart
Leron Amin says
Hi Rudhra,
If you’re using Cloudflare, you will need to follow these steps to fix the problem:
From your Cloudflare dashboard, click on the Caching icon at the top of the page – this will take you to your Cloudflare caching settings.
From the Cloudflare caching settings page, scroll down to the Browser Cache Expiration section, and change the setting to Respect Existing Headers. See step 4 of the Cloudflare tutorial for images of the process.
Let me know if you have any questions,
Joe
Pranav says
Visual editor is not working in bitnami certified wordpress installation on google cloud platform. How to enable it?
Leron Amin says
Go to Users > Click on your user > then uncheck the “Disable the visual editor when writing” box.
Pranav says
It is already unchecked but still visual editor is not showing.
Leron Amin says
I’m not sure then – this is the first I’ve heard of this issue. Try researching StackOverflow and Google to see if any other individuals have experienced a similar issue. Please update me if you’re able to find the solution.
Pranav says
I searched but couldn’t found any solution. Even I reinstall the WordPress by going to updates but still facing the same issue. Can you tell me what is the best other WordPress installation option available other than bitnami in Google cloud?
Leron Amin says
There is a full series of tutorials on the WordPress Click-to-deploy stack – that’s the best alternative to using Bitnami.
Arman Ali says
Hey leron,
How to make sub domain in google cloud also install ssll in sub domain also?
Please make a video on this topic please make fast.
Thanks
Leron Amin says
Thanks for the suggestion Arman – I will look into creating this tutorial!
Lee says
Hey Leron, Can you guide me on resetting my wordpress user password. I tried to follow the bitnami wordpress stack and I can’t seem to change my password. I’m using the temporary password.
Leron Amin says
Hey Lee – what issue are you having with the reset process?
Lee says
How do you change the temporary admin password?
For example. http://www.example.com/admin
How do I change this password to login to wordpress from any computer? Do I access myadminphp?
Can’t get this to work for some reason.
thanks!
Leron Amin says
Hi Lee,
From your Google Cloud dashboard navigate to Marketplace > My Solutions. There you will find your WordPress credentials.
If you’re using Click-to-deploy, you can access phpmyadmin via http://www.example.com/phpmyadmin. With Bitnami, phpmyadmin is only accessible via SSH tunnel.
Let me know if you have any questions,
Joe
Karun Manohar says
Hi, I tried editing the .htaccess for my WordPress to improve speed by leveraging browser caching.
it is hosted on google cloud (Click to deploy) but Gtmetrix still reports the error to leverage browser caching and add expires header.
Could you help me, Thanks in advance.
Ay says
Hello Leron
there is a question not related to the post
when migrate my site from old host to google cloud host
found that the pagespeed module change the image URL to another type of image
I want to disable this type of filters in page speed
the new url of the image found like that
https://www.nnnn.com/wp-content/uploads/2018/09/xabdomen-belly-exercise-220×150.png.pagespeed.ic.wm-d4uDlqM.webp
Leron Amin says
Hi Ay,
You can disable mod_pagespeed by following the instructions here. Also, here is more information about the image filters. Lastly, your mod_pagespeed configuration can be accessed by running the following command:
Remember, the rewrite is not permanent, and serves to optimize your image for better performance – see here.
Let me know if you have any questions,
Joe
Sean says
Hi Leon,
How would we adapt your walk thru above for an nginx version?
I am on Bitnami WordPress With NGINX And SSL For Google Cloud Platform
Thanks
Leron Amin says
Hi Sean,
The process is similar. Check out this section of the Bitnami documentation for instructions on how to configure mod_rewrite caching.
Hope this helps,
Joe
Sean says
Thanks Joe, however, the file /opt/bitnami/apps/wordpress/conf/htaccess.conf does not exist on the nginx version at that location so while the instructions are on the correct page for bitnami, the instructions are incorrect. I have notified bitnami but not sure what to do from here.
Leron Amin says
Hey Sean,
Sounds good – let me know what you find out.
Joe
Subhojit Mazumder says
sir “onepagezen.com” this website is configuration The 0.6GB shared 1vCPU machine is a great value for small WordPress sites
Mohd Syahrizan Senan says
Hi Leron, your website very valuable for me. After I’m finish my installation WordPress Bitnami, I can’t find Htaccess file as usual like sharedhosting. When I try install certain plugin that have to use httacess, it’s will create new htaccess file but nothing happen to my website.
Is WordPress Bitnami hide htaccess file?
Leron Amin says
Hi Mohd,
There is an htaccess file which exists at the following location:
Hope this helps,
Joe
Mohd Syahrizan Senan says
Thank you Leron!
Akash says
Please tell me how to do this for the Click to deploy wp Version
Leron Amin says
Hi Akash,
I will be publishing a tutorial for Click-to-deploy soon!
Talk to you soon,
Joe
Bruno A. Jimenez Reyes says
Hi, any news about the click-to-deploy version?
Leron Amin says
Hi Bruno – not yet – but thanks for the reminder! Hopefully soon!
Anurag Tripathi says
Great i am about to ask for it .
how about click to deploy version ?
Leron Amin says
Hi Anurag,
I will be publishing the Click-to-deploy version soon!
Talk to you soon,
Joe
Leron Amin says
What did you think of this tutorial?
Please share your questions and comments below!