In this quick-start tutorial you will learn how to configure free, auto-renewing SSL certificates for WordPress websites hosted on Google Cloud Platform compute engine using the Bitnami version of WordPress on Google Cloud Platform.
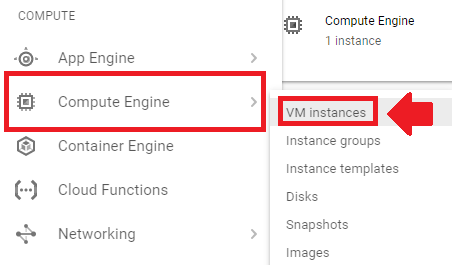
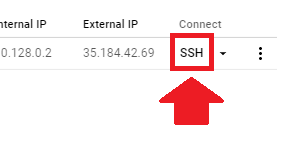
Go to your Google Compute homepage and click the hamburger menu in the upper left-hand corner.Navigate to Compute Engine, then to VM instances to access your WordPress installation.Once inside your Compute Engine, click on the SSH button to connect to your VM Instance.
2. Generate SSL Certificates
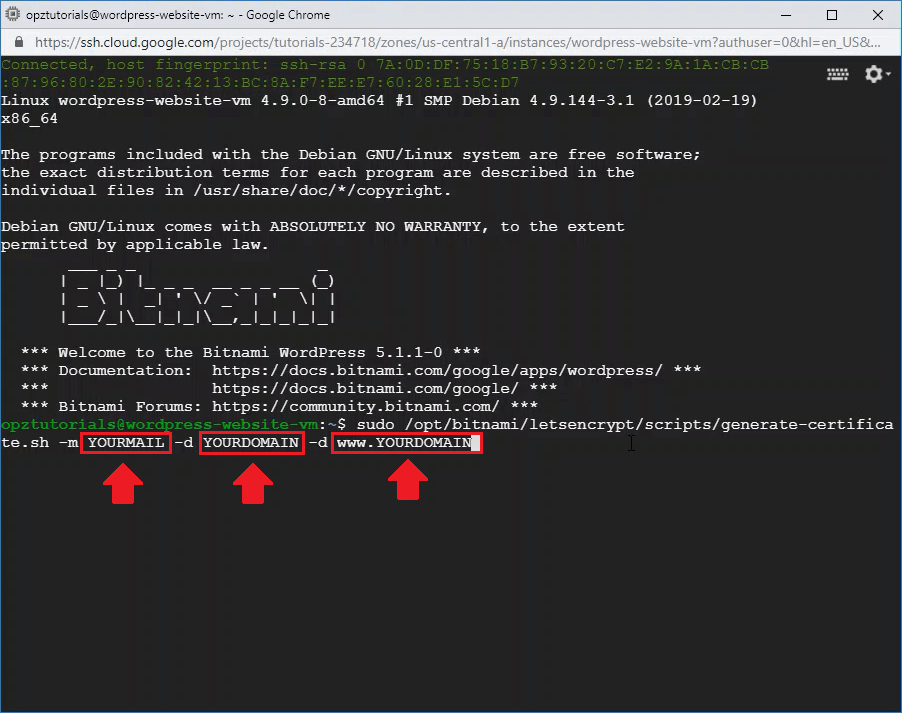
Now that you’ve connected to your VM instance, the next step is to copy and paste the certificate issuing command into your terminal. Remember to replace YOURMAIL, YOURDOMAIN, and www.YOURDOMAIN with the correct values.
For example, if your email address is [email protected] and your domains are 1pagezen.com and www.1pagezen.com, then your certificate issuing command would look like this:
3. Configure SSL Certificates
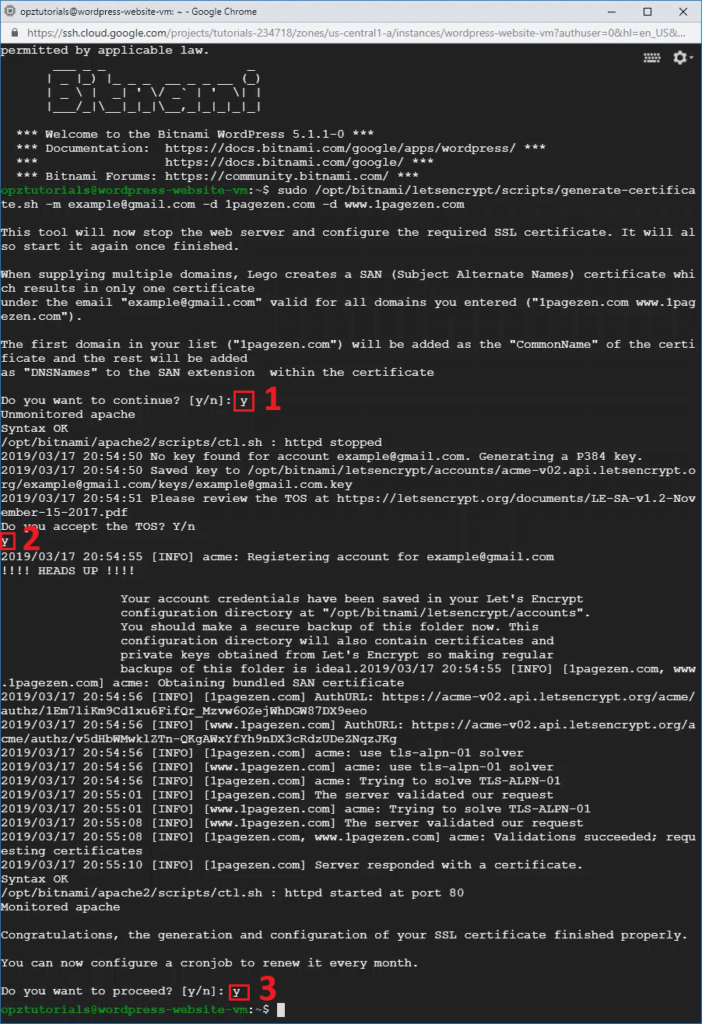
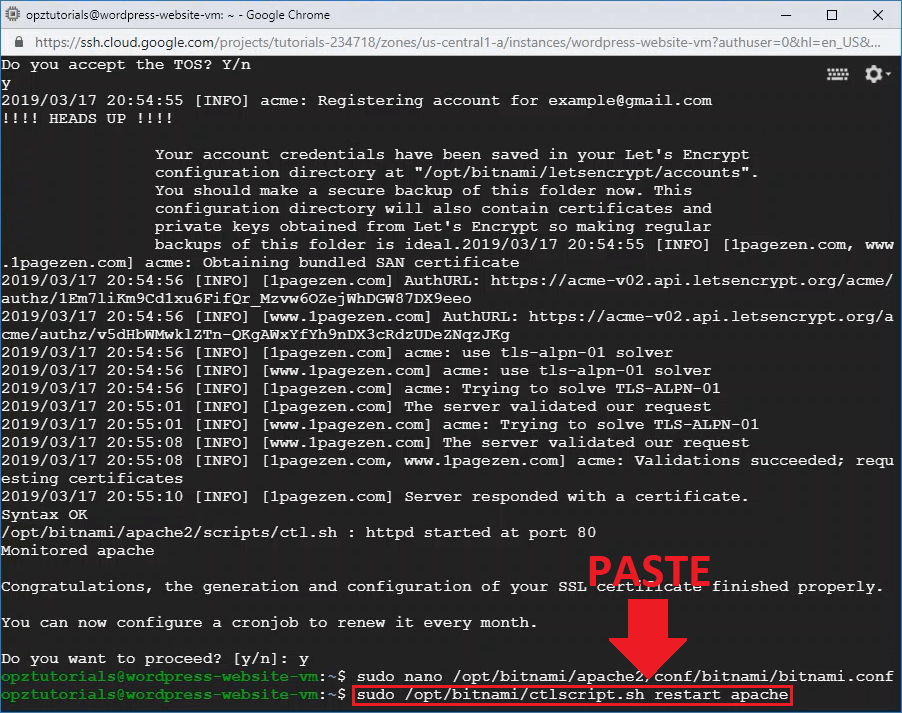
Now that you’ve entered the certificate issuing command, you will be prompted with a series of questions. For each of the three questions, press y and then press Enter.
4. Configure HTTPS Redirect
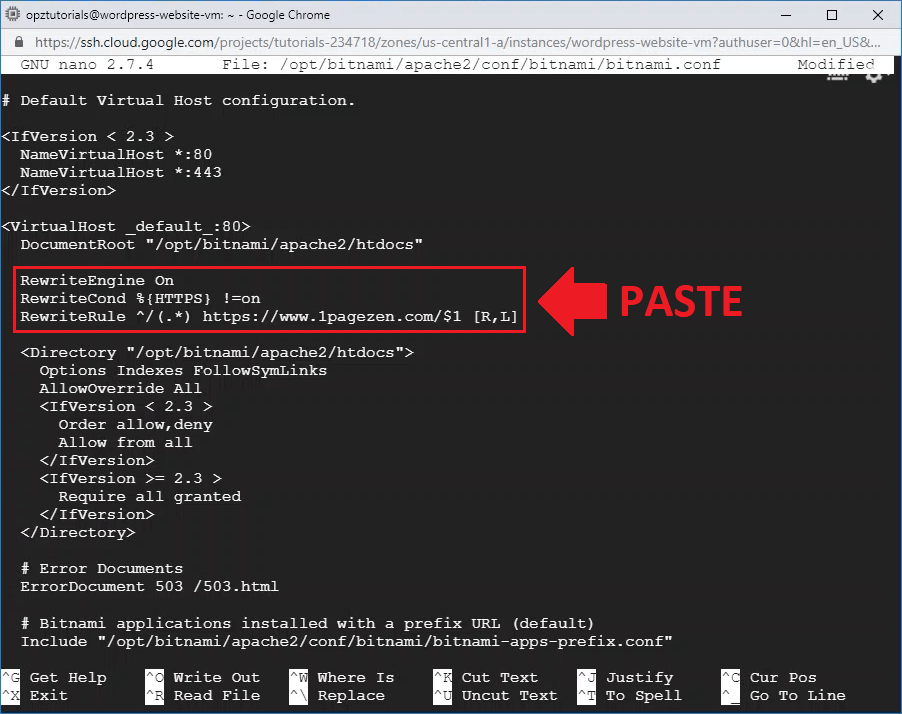
Now that that the certificates have been configured, the next step is to configure a redirect in your bitnami.conf file in order to redirect all traffic to the HTTPS (secure) version of your website. To do this, copy and paste the command below in order to open the bitnami.conf file for editing.
Now that you’ve opened the bitnami.conf file for editing, copy and paste the the three lines of code below, in the same location as shown in the picture (remember to replace 1pagezen.com with your own domain name). After editing the file, press CTRL+X then Y to save and exit the file.
RewriteEngine On

RewriteCond %{HTTPS} !=on

RewriteRule ^/(.*) https://www.1pagezen.com/$1 [R,L]
5. Restart Apache Server
In order for the recent file changes to take effect, you must restart your Apache server. To do this, copy and paste the command below into your terminal.
sudo /opt/bitnami/ctlscript.sh restart apache
That’s it!
Now that you’ve configured free, auto-renewing SSL certificates for your website, you may also be interested in boosting your website’s performance by configuring Cloudflare CDN.
If you run into any issues with your certificates and want to verify that they’re configured properly, check out the SSL Checker tool. Also check out this tutorial on how to fix SSL errors.
If you have any questions or comments, please post them below!
thank for this article, i have been a big help for me. i had an issue after configuring the certificate, where images from external urls didn’t load on pages(home,…). i solved the issue by Updating Domain URLs(as mentioned in the previous article). thanks
Hey, I followed this and it worked like a charm. Thanks. But, I’ve a major issue in which I want your help. I have mapped multiple domains to one IP via a plugin. Now, I thought that doing this method again and again I can get unlimited SSL certificates but on the 2nd turn only, it messed up. Both the sites gave notification before opening. Then I deleted the changes in bitnami.config and now it has removed SSL from both but when I try again, it shows there exists a certificate. Please help and tell me how can I add SSL certs to multiple domains mapped on a single IP (single WP Installation).
P.S.: When doing it for the 2nd time, I put in the same e-mail ID. Just so you know!
The easiest way is to issue a Let’s Encrypt certificate and include all of your domains in the single certificate. There’s no need to manage multiple certificates if all of your domains are mapping to the same IP.
Hope this helps and let me know if you have other questions,
Joe
Adolfssays
Thank you for a comprehensive tutorial.
I have already had my free one-year SSL certificaten from my domain registrar. It seems a waste of resources if I don’t use it, at least until it expires. My question is how do I integrate it with my bitnami WordPress. I have already generated the SSL certificate before.
I’d recommend forgetting about the one-year free certificate. SSL certificates can be easily obtained for free with Certbot, and you will spend many hours on configuration for something that is worth less than $10.
Done the SSL. Set the cronjob to renew. Seemed like all was good. Now the ssl has expired and when trying to do it again I am faced with the following problem:
It seems there is a valid certificate in the web server configuration folder. Please renew that certificate or generate new ones manually
Please check our documentation or open a ticket in our community forum, our team will be more than happy to help you!
What to do? How does one delete the old certificate to create new? Tried new tool to see:
Error: There has been an error.
This installer requires root privileges. Please become superuser before
executing the installer
Press [Enter] to continue:
Became superuser, used new tool and got an error on cronjob:
Performing changes to your installation
The Bitnami HTTPS Configuration Tool will perform any necessary actions to your
Bitnami installation. This may take some time, please be patient.
–
Error: Error running crontab -u bitnami /tmp/cron20200915092455: new crontab
file is missing newline before EOF, can’t install.
Press [Enter] to continue:
—————————————————————————-
Some errors occurred
The configuration was applied, but some of the changes could not be applied.
Find the details below.
It looks like there is a solution to this issue as described here.
Let me know if you have other questions,
Joe
Dinosays
Hi Joe
Thank you very much for putting all of these tutorial, you are awesome! I have successfully follow this instruction and now I have a padlock on my website.
I already download cert-bot auto package as per above instruction (wget https://dl.eff.org/certbot-auto && chmod a+x certbot-auto) but I can’t move the package.
With this latest tutorial, auto-renewal is configured automatically if you enter “Y” in step 3 of the tutorial (look towards the bottom of the screenshot in step 3, where the terminal prompts the user, “…You can now configure a cronjob to renew it every month. Do you want to proceed…”).
Let me know if you have other questions,
Joe
Dinosays
Hi Joe
Thank you for your answer.
I have successfully configure ssl on my site using your tutorial.
Once again thank you for putting all of these tutorials.
You are awesome!
Hello, thanks for this video. While I am good with tech, this is not a strength of mine. I was watching your video and stuck after Step 2 when this is the error that pops. Can you please help me? Also, I had followed your video last time but I must have made some error because the automatic renewal did not work and my certificate expired on 31 July.
“It seems there is a valid certificate in the web server configuration folder. Please renew that certificate or generate new ones manually
. Please check our documentation or open a ticket in our community forum, our team will be more than happy to help you!”
The message is saying that you should renew your existing certificate instead of trying to issue a new one. Depending on your original configuration, try the following command:
sudo certbot-auto renew
If that doesn't work, follow the auto-renewal instructions in this section of the bitnami WordPress documentation.
Hello Sir,
I am not expert of this programming, I just follow you and do all what you teach. You are my best teacher. But some time I got the error and I stuck. Then I have not solutions at prompt. Please help me. Now my site was unsecure, I try to use your method, and after that, all things gone. now I can not see my site live 🙁 Please help me sir.
This tutorial is quiet confusing, The first one states that this is the latest tutoril, so if i go by this tutorial it does not include the part of auto renewing the SSL cert through cron. i also noticed tyou had signed in the other tutorial which points to this one in june 2020 , and this one was edited in 2019.
Question is which tutorial should we follow: https://onepagezen.com/free-ssl-certificates-wordpress-google-cloud-bitnami/
Always follow the latest tutorials when configuring a new VM with the latest version of WordPress from the Google Cloud Marketplace. For old configurations, use the SSL tutorial that you used when you first configured SSL – don’t mix and match earlier and later versions of the tutorials.
Regarding your auto-renewal question: In this version of the tutorial, you run a script which automatically configures a cronjob to handle the auto-renewal process. Look at the screenshot of the terminal in step 3 of the tutorial – the last prompt reads, “You can now configure a cronjob to renew it every month. Do you want to proceed? [y/n]”.
https redirection code that you have provided is working well, but it is a 302 redirection. For SEO perspective, don’t you think we should use 301 redirection rather than 302?
I set it up 3 months ago. But I must have made a mistake. Because today is the SSL renewal and it doesn’t seem to work because the website is not accessible.
On my IP address I get the “Apache2 Debian Default Page”
“The configuration layout for an Apache2 web server installation on Debian systems is as follows:
When I installed the bitnami on Google Cloud and then later uploaded the backup again, I encountered a problem in which writing a htacces file is the only solution
If you need to manually update the file, then you can run the edit command with ‘sudo’ in front. For example:
sudo nano /path/to/.htaccess
If you need the file to be writable by another process on your VM, then you need to change the permissions of the file. I go over how to change file permissions in step 4 of this tutorial.
I really enjoy all your videos and all were really helpful. This video in particular is great. For some reason my SSL Certificate has expired and I don’t know how to renew it. Is there a way you could guide me to renew my letsencrypt certificate? The certificates were working fine before they expired.
I’d recommend following this guide for instructions on how to manually/automatically configure certificate renewal.
Let me know if you have other questions,
Joe
Shahbaazsays
The ssl certificate on my bitnami wordpress doesn’t renew automatically. After a few months, my website goes offline because I am using strict SSL settings on cloudflare. what should I do?
Follow these instructions for configuring the auto-renewal. For additional information, check out this Bitnami thread with instructions on how to renew the certificate after it’s already expired.
Let me know if you have questions,
Joe
Marcsays
Hi, Could you show me how to add free SSL for main domain and subdomain for wordpress multisite by bitnami cause it’s work for main domain only after I follow your instruction.
Thanks in advance.
I didn”t understand how to get the certificate for subdomains it’s only working on www. I want to make a spesific payment and login link, please provide me a code or a link with the codes that I could use,
thank you.
Follow the instructions in the link that I provided. Configuring multiple subdomains for a WordPress Multisite instance requires a working knowledge of Apache server configuration. Try researching StackOverflow for possible answers if you’re unable to get it working.
Good luck, and let me know if you have any general questions!
Joe
Juan Pablo Laclausays
I would add to this guide the following to prevent mixed errors:
Make sure to replace DOMAIN with your actual domain name (either the www. or non-www version, whichever you prefer for your site. Also, if you’ve configured SSL for your site, make sure to change http to https.
Is there a way to change the WordPress Address (URL) & Site Address (URL) to HTTPS as it not showing there fools lots of plugins that the site is not secure. Stripe for instance. AMP Plugin, the list goes on It seems bonkers that it doesn’t change it with everything we do to get there, then this issue. Those 2 fields contain a value therefore theyu must be editable somewhere, surely?
Alright dude. So set this up and site is showing https. Only issue in the WP Admin I can’t change http to https in the site url like you can with Google Click to Deploy. When I upload an image it causes mixed content issue in media and padlock gone. Put said image on page and page padlock gone.
The only wayu I can find around this is setting up WP Stateless and GCS Bucket (http or https Load Balancer if ofloading media to GCDN). I don’t want to have to do this as GCS costs and the end game is Cloudflare so seems pointless offloading media to GCDN if offloading site to Cloudflare. Just out of interest, if I offloaded media to GCS and the site to Cloudflare would images still be from GCDN amnd the rest of the site on Cloudflare or would it all be on Cloudflare, thus making GCDN a moot point? Like facing two mirrors to each other, where does it actually end.
With Google Click to Deploy it was easier to set up as can change WP URL but have discovered that index.php is forced in to my urls i.e: rentmydrive.co/index.php/about I have googled the Hell out of it and checked that the rewrite is on .htaccess but I can not fix it. Changing permalinks to be rentmydrive.co/%postname returns a requested URL not found.
I just feel like no matter where I turn ‘ANOTHER’ issue arises.
You shouldn’t have to configure a rewrite rule. There may be some cached settings that are causing the permalink issue (see my previous response).
Cloudflare already acts as a CDN (plus some), so I don’t see a substantial benefit in also serving the images from Cloud Storage, given the added complexity (except for redundancy/failover – which would be a valid use case).
Did you start this site from scratch or did you migrate it from another host? I have encountered issues in the past where the permalink structure breaks after completing the migration. Also, to confirm, are you using Bitnami or Click-to-deploy? If you’re using Click-to-deploy, can you verify that your directory structure is correct (default is var/www/html) – that’s another thing I can think of that could cause Permalink issues.
Dear OnePageZen is me Caleb its been a while. So i deployed WordPress for Bitnami today and i got this warning message on Deployment Manager Page
The template is incompatible with Python3. Please fix the following errors: Exception in software_status.py Traceback (most recent call last): return constructor[m](evaluation_context) File “software_status.py”, line 188, in GenerateConfig File “software_status.py”, line 161, in _Waiter File “software_status.py”, line 131, in _WaiterDependsOn AttributeError: module ‘types’ has no attribute ‘StringTypes’ Resource: software_status.py Resource: config https://cloud.google.com/deployment-manager/docs/migrate-to-python3
CAN I CONTINUE TO WORK ON THE DEPLOYMENT OR IS THERE SOMETHING NEW THAT I AM SUPPOSE TO DO YOUR QUICK REPLY WILL BE MUCH APPRECIATED AND HAPPY HOLIDAYS CHEERS.
If not, make sure you’re connected to your VM instance and not Google Cloud shell.
Let me know if you have questions,
Joe
Vesnasays
Check if your web server is nginx or apache. Bitnami says: “TIP: To find out if your Bitnami stack uses Apache or NGINX, check the output of the command sudo /opt/bitnami/ctlscript.sh status.”
Hi Joe, I’ve been watching your tutorials for a few days now and I’ve done all the steps well, but I couldn’t complete the SSL Certificate configuration, now I can’t access the website at all. 🙂 But I will persist until I do everything right, I am determined to learn everything about cloud services.
I GET THIS ERROR:
mapa_lazarevac@test-1-vm:~$ sudo /opt/bitnami/letsencrypt/scripts/generate-certificate.sh -m [email protected]
om -d esamurai.net -d http://www.esamurai.net
There is a new tool available for configuring HTTPS certificates, which is easier to use and includes new features
such as redirections. Find it in the following path:
/opt/bitnami/bncert-tool
You can read more about it here: https://docs.bitnami.com/general/how-to/understand-bncert/
Do you want to continue anyways? [y/N]: Y
This tool will now stop the web server and configure the required SSL certificate. It will also start it again once
finished.
When supplying multiple domains, Lego creates a SAN (Subject Alternate Names) certificate which results in only one
certificate
under the email “[email protected]” valid for all domains you entered (“esamurai.net http://www.esamurai.net“).
The first domain in your list (“esamurai.net”) will be added as the “CommonName” of the certificate and the rest wi
ll be added
as “DNSNames” to the SAN extension within the certificate
Do you want to continue? [y/n]: Y
Unmonitored apache
Syntax OK
/opt/bitnami/apache2/scripts/ctl.sh : apache not running
2019/12/07 22:22:06 [INFO] [esamurai.net, http://www.esamurai.net] acme: Obtaining bundled SAN certificate
2019/12/07 22:22:06 [INFO] [esamurai.net] AuthURL: https://acme-v02.api.letsencrypt.org/acme/authz-v3/1605951936
2019/12/07 22:22:06 [INFO] [www.esamurai.net] AuthURL: https://acme-v02.api.letsencrypt.org/acme/authz-v3/160595193
7
2019/12/07 22:22:06 [INFO] [esamurai.net] acme: use tls-alpn-01 solver
2019/12/07 22:22:06 [INFO] [www.esamurai.net] acme: use tls-alpn-01 solver
2019/12/07 22:22:06 [INFO] [esamurai.net] acme: Trying to solve TLS-ALPN-01
2019/12/07 22:22:21 [INFO] [www.esamurai.net] acme: Trying to solve TLS-ALPN-01
2019/12/07 22:22:36 [INFO] Deactivating auth: https://acme-v02.api.letsencrypt.org/acme/authz-v3/1605951936
2019/12/07 22:22:37 [INFO] Unable to deactivate the authorization: https://acme-v02.api.letsencrypt.org/acme/authz-
v3/1605951936
2019/12/07 22:22:37 [INFO] Deactivating auth: https://acme-v02.api.letsencrypt.org/acme/authz-v3/1605951937
2019/12/07 22:22:37 [INFO] Unable to deactivate the authorization: https://acme-v02.api.letsencrypt.org/acme/authz-v3/1605951937
2019/12/07 22:22:37 Could not obtain certificates:
acme: Error -> One or more domains had a problem:
[esamurai.net] acme: error: 400 :: urn:ietf:params:acme:error:connection :: Timeout during connect (likely firewall problem), url:
[www.esamurai.net] acme: error: 400 :: urn:ietf:params:acme:error:connection :: Timeout during connect (likely firewall problem), url:
Error: Something went wrong when running the following command:
$ “$LEGO_BIN” –path “/opt/bitnami/letsencrypt” –tls –email=”${email}” ${domain_args} run
Please check our documentation or open a ticket in our community forum, our team will be more than happy to help you!
We are going to try to recover the web server configuration now…
Unmonitored apache
Syntax OK
/opt/bitnami/apache2/scripts/ctl.sh : apache not running
Syntax OK
(98)Address already in use: AH00073: make_sock: unable to listen for connections on address [::]:80
(98)Address already in use: AH00073: make_sock: unable to listen for connections on address 0.0.0.0:80
no listening sockets available, shutting down
AH00015: Unable to open logs
/opt/bitnami/apache2/scripts/ctl.sh : httpd could not be started
Monitored apache
mapa_lazarevac@test-1-vm:~$
AND THIS HAPPENS WHEN I TRY CONFIGURATION WITH THE BNCERT TOOL:
mapa_lazarevac@test-1-vm:/opt/bitnami$ sudo ./bncert-tool
Warning: Custom redirections were detected in your web server configuration
files. This tool will not be able to enable/disable redirections.
Press [Enter] to continue:
—————————————————————————-
Welcome to the Bitnami HTTPS Configuration tool.
—————————————————————————-
Domains
Please provide a valid space-separated list of domains for which you wish to
configure your web server.
Domain list []: esamurai.net http://www.esamurai.net
Warning: The domain ‘esamurai.net’ resolves to a different IP address than the
one detected for this machine, which is ‘35.246.207.251’. Please fix its DNS
entries or remove it. For more info see: https://docs.bitnami.com/general/faq/configuration/configure-custom-domain/
Was the website accessible via HTTP before starting with the certificate generating tool?
Talk to you soon,
Joe
Larssays
I have a multisite Bitnami WordPress on GCP that I’m setting up to host several domains.
The topic is – how to enable HTTPS for all of them.
Curretly I’m setting up test sites two sited which we can call gcptst.domain.com and gcptst.otherdomain.net
After running the folowing HTTPS worked fine on gcptxt.domain.com
> sudo letsencrypt/scripts/generate-certificate.sh -m [email protected] -d gcptst.domain.com
It worked fine.
I then proceeded with
> sudo letsencrypt/scripts/generate-certificate.sh -m [email protected] -d gcptst.otherdomain.net
… which also worked fine but broke the setting for https://gcptxt.domain.com https://gcptxt.domain.com now shows the invalid certificate warning in the frowser with reference to that it’s a certificate for gcptst.otherdomain.net
Happy go lucky I tried
> sudo letsencrypt/scripts/generate-certificate.sh -m [email protected] -d gcptst.domain.com -d gcptst.otherdomain.net
… and got:
“It seems there is a valid certificate in the web server configuration folder. Please renew that certificate or generate new ones manually”
Which is the solution to
1) roll back from the situation I created
2) to solve the need to have HTTPS on multiple domains on a multisite bitnami wordpress GCP installation
PS: wouldn’t the following be a better rewrite rule?
RewriteEngine On
RewriteCond %{HTTPS} off
RewriteRule .* https://%{HTTP_HOST}%{REQUEST_URI} [R=301,QSA,L]
Bitnami has a very useful guide on SSL setup for multisite configurations, which you can view here.
Let me know if you have questions,
Joe
Alexsays
Hi,
The auto-renewing from my website was not good configured, so the certificate expired.
I tried to renew it but it was not possible.
Then I decide to delete the certificates and generate a new certificate, but now the /opt/bitnami/letsencrypt/scripts/generate-certificate.sh do not exist.
I tried to install the Lego Client from: https://docs.bitnami.com/general/how-to/generate-install-lets-encrypt-ssl/
but I get the message: Cannot write to ‘lego_v3.2.0_linux_amd64.tar.gz’ (No space left on device)
Please help, how can I fix the script to generate the certificate?
Sounds like your persistent disk is out of space. You should resize immediately or you’ll end up unable to write to your WordPress database.
Here is the link for instructions o resizing persistent disks in Google Cloud. You can also connect to your VM instance and run the ‘df’ command to view the remaining disk space in the partition that’s running your WordPress instance.
Hope this helps and let me know if you run into any issues.
Thanks,
Joe
Learsays
Hi, thanks for the tutorial.
I followed all steps but my website got “certificate common name mismatch ” warning when accessing. Any solution?
A certificate mismatch error means that the domain-name listed in the certificate (i.e. the domain name the certificate was issued for), does not match the domain name for your website. This error typically occurs when users forget to change the domain name in the certificate issuing command.
Hope this is helpful, and please reach out if you have any questions!
Joe
Joeysays
Hi!
On GCS Bitnami WordPress pack.
I have followed this tutorial to the point. Now I have had an email saying that the cert will be invalid in 19 days from Let Encrypt. I have also double check on a SSLchecker and it shows the same info.
From what I understand this new scripts includes a “hidden” auto-renewal script in the end, but why do I get this message? When will the cert be renewed with the auto-renewal set up in the end of this tutorial?
If the certificate is showing an expiry date of 19 days, then it’s likely that auto-renewal isn’t working properly. You may want to check out the steps in this tutorial for additional information regarding testing certificate auto-renewal.
Also – I looked at your domain, and it appears that the certificate is valid for ~90 days. Did you encounter an error with auto-renewal?
hi, sir my site is running in aws cloud, my Ip is not redirecting to my domain… please provide me solution…. i have followed all the steps mention i this post but still its not working
If you followed the instructions outlined in the tutorial, then auto-renewal will be configured automatically.
For more in-depth functionality, such as testing auto-renewal, check out this tutorial.
Let me know if you have questions,
Joe
Mohitsays
Thanks, your article was so helpful
Philip Zaunersays
Hi Joe,
I received also warning letter from lets encryp telling me that my certificate is going to expire because it is reaching the 90 Days time limit.
I am using WP with Bitnami and I followed the instructions outlined in this tutorial.
Is the script renewing the certificate after 90 Days ?
If not could you please point me into the right direction what went wrong with my configuration?
The certificate expire every 90 days, and are set to auto-renew within 30 days before they are set to expire.
If you check your domain through the SSL Checker website and it shows that the certificates are set to expire in less than 20 days, then that’s a strong indicator that auto-renewal isn’t working properly. Per the auto-renewal script, the certificates are set to auto-renew sometime within the month before they are set to expire.
If you’d like to test whether or not auto-renewal is working correctly, I’d recommend going through the steps outlined in this tutorial.
As always, feel free to reach out if you have any questions!
Joe
Are you using the Bitnami version of WordPress on Google Cloud? If so, try navigating to the bitnami.conf file one directory-level at a time and make sure that file and directory actually exists.
If so, navigate to the bitnami directory, and run sudo nano bitnami.conf from within the directory.
Are you sure you deployed the correct Bitnami solution? There is both a Bitnami WordPress Multisite as well as a standalone Bitnami WordPress solution, and it’s easy to get them confused.
Take a look at your directory tree and whether or not you deployed the correct solution.
Talk to you soon,
Joe
Vesnasays
This happened to me Bitnami also has a non-apache version which wont have that directory
Bitnami says: “TIP: To find out if your Bitnami stack uses Apache or NGINX, check the output of the command sudo /opt/bitnami/ctlscript.sh status.”
2. WordPress Address (URL) and Site Address (URL) in settings –> general is greyed out. I cant edit it. But with other hosting, there is the option to edit that field.
You can configure your site URLs within your wp-config.php file, which I cover in this tutorial. Remember to use https:// and not http:// when you configure the site URLs.
Let me know if you have questions,
Joe
Jinsonsays
Hi it worked. Thanks.
I have been trying changing most of the bitnami config files for the last couple of days. none of them worked. Even bitnami community forum told some other answers which doesn’t work for me. Finally See your reply here and try it.
Thanks again.
Thanks for the guide. I have successfully installed WordPress on Google Cloud and activated SSL based on your tips. Can you make a video on this error “A definition of a siteurl or homeurl was detected in your wp-config.php, but the file is not writable.” When trying to install some plugins, I am getting this error. Thanks. 🙂
You may have to change the permissions of the wp-config.php file – let me know if you need instructions on how to do this.
Talk to you soon,
Joe
Caleb Adekunlesays
I got this error please can you help me out on this
[vevio.cz] acme: error: 400 :: urn:ietf:params:acme:error:dns :: DNS problem: SERVFAIL looking up A for vevio.cz, u
rl:
[www.vevio.cz] acme: error: 400 :: urn:ietf:params:acme:error:dns :: DNS problem: SERVFAIL looking up A for http://www.vev
io.cz, url:
Error: Something went wrong when running the following command:
$ “$LEGO_BIN” –path “/opt/bitnami/letsencrypt” –tls –email=”${email}” ${domain_args} run
Please check our documentation or open a ticket in our community forum, our team will be more than happy to help yo
u!
Documentation: https://docs.bitnami.com/
Support: https://community.bitnami.com/
We are going to try to recover the web server configuration now…
There’s an issue with either your DNS configuration or the LEGO script itself.
Open a support ticket at community.bitnami.com and see what their engineers have to say. Also, check out this thread started by a user with what appears to be a similar issue.
I created my site in January I followed every tutorial of yours and thanks for great tutorials.
My website SSL just expired I don’t how but I’ve done all renewal things but still, it’s showing my site SSL expired on SSL checker sites.
So, Then I followed previse tutorial again, and terminal showing everything is fine, Then I re-generated SSL certificate but It’s still not showing any SSL on my site tenreason.com.
And when I followed this tutorial It’s saying this:
( It seems there is a valid certificate in the web server configuration folder. Please renew that certificate or generate new ones manually
Please check our documentation or open a ticket in our community forum, our team will be more than happy to help you! )
When I try to generate new one it says congratulations SSL generated successfully
BUT WHY NOT SHOWING ON MY SITE I have followed SSL error tutorial too
Which steps have you taken so far? Did you configure the redirect?
Also, make sure to change your WordPress URLs to the desired version of your domain under Settings > General.
Hope this helps and let me know if you have questions,
Joe
Ernest Akpossays
Hello Leron Amin
You are doing a great job with this site and i have a learned a lot. Thanks a million. I have a request, I just saw that google cloud introduced bitnami wordpress with NGINX and SSL. I wanted to install SSL with this tutorial, but it does not follow exactly.How do i do this? Could you do a tutorial on it? I will like to use this NGINX. Thanks
Thanks for the feedback Ernest – I’ve added this to my list of tutorials-to-do!
Joshsays
How can I get the SSL Certificate to work for a “SubDomain”? I created an “A Record” pointing to IP Address for subdomain which is complete. now I would like to install an SSL on the subdomain.
It looks like it getting simpler to set up the SSL Certificate using letsencrypt. I would like to add that I still needed to complete Step 6; to define site and home URLs as per the pervious video tutorial on SSL because I got mixed content by an image I uploaded but this step fixed that.
Hey Joe,
Just getting stuck on the last step 5. Restart Apache Server, after adding 3 lines to Configure for HTTPS Redirect. Here is the following error:
AH00526: Syntax error on line 11 of /opt/bitnami/apache2/conf/bitnami/bitnami.conf:
RewriteEngine must be On or Off
Here is my three lines I added:
RewriteEngine On
RewriteCond %{HTTPS} !=on
RewriteRule ^/(.*) https://www.jonaviray.com/$1 [R,L]
It all looks good to me. I have the RewriteEngine on so am a little confused. Also I just did the same configuration to my Moodle site and it worked.
Any help would be great.
Cheers,
Ben
Awesome – I’m glad it was a quick fix! Also, thanks for sharing the solution. I’m curious where those underscore characters were coming from?
Talk to you soon,
Joe
Mohamadsays
Thank you very much.
There are many occasions when I needed help right, from the very beginning of my journey on how to set up a wordpress site on google cloud platform and the various problem encounter along the way and to this the latest one.. had to delete my old vm and reinstall wordpress, ssl site error.
You sir, have been my number one source of help. I cannot thank you enough.
You have save me countless headaches, heartaches and time.
Cheers and God Bless You.
Mohamad
P.S. I cannot stress this enough to everyone out there, I’ve learned it the hard way…..backup, backup, backup on every opportunity u can. Your tutorial on All In One WP Migration is another gold nugget. Thank you
I know how difficult the journey can be. Becoming proficient in cloud computing technologies is not for the faint of heart. As you very well know, it takes a lot of patience and tons of perseverance. With that being said, congratulations on all that you’ve achieved!
And yes – backup, backup, backup – that simply cannot be stressed enough!
Thank you for your videos 🙂
I need please. I was following the steps on the video and I cannot access my domain now for some reason 🙁
I wonder what the issue could be.
First of all I would like to thank you for all your superb walk through tutorials. They are really useful for non-techies like myself.
I would like to ask for your help with the following issue I came across.
I wanted to upgrade the PHP, MSQL, etc. version of my deployment on GCP. I figured a clean way to go about it would be to redo the website on a new deployment. I chose the “WordPress with NGINX and SSL Certified by Bitnami” version for this. When I got to the part of pointing my domain name to the new deployment everything was fine. But when I followed the steps to setup the SSL certificate something went wrong. I’ve managed to get the certification, but failed to the following steps (Configure HTTPS Redirect). There was an error message when trying to locate the Bitnami config file. “The file doesn’t exist”. And since then I am getting a “502 – Bad Gateway” on the new deployment.
Would you be able to assist me to fix this? Was this tutorial not meant to work with the above mentioned version of Bitnami deployment?
This tutorial is meant for Bitnami’s LAMP stack solution (Linux, Apache, MySQL, PHP), and will not work with their LEMP stack solution (Linux, Nginx, MySQL, PHP).
That being said, the SSL instructions for issuing the certificates are similar for the LEMP stack solution – which you can view here. Once you’ve issued the certificates, configure an HTTPS redirect with Nginx as shown here, and you should be good to go!
Let me know if you have any questions,
Joe
Sohil Patelsays
This worked for me, just took a couple of minutes.
Thanks for this and other tutorials, really helpful and straightforward.
Hey Alexander – the certificates are configured to renew automatically.
Johnsays
Dear Leron,
Great tutorial. I use the Bitnami WP. I followed all your steps, but after 3 months the certificate wasn’t renew automatically. I had to renew it manually. Can you tell us how to let them renew automatically?
Are you using WordPress Bitnami? Are you using a new version of the WordPress Bitnami stack? The reason I ask is because the older versions of this stack don’t come pre-installed with this script.
First, check if that script exists in your scripts directory by executing:
cd /opt/bitnami/scripts
Like I said – it may not be there by default in the older versions of this stack.


david says
thank for this article, i have been a big help for me. i had an issue after configuring the certificate, where images from external urls didn’t load on pages(home,…). i solved the issue by Updating Domain URLs(as mentioned in the previous article). thanks
Leron Amin says
Thanks for the feedback David – I’m glad to hear that updating your domain URLs fixed the issue!
Shubham Jain says
Hey, I followed this and it worked like a charm. Thanks. But, I’ve a major issue in which I want your help. I have mapped multiple domains to one IP via a plugin. Now, I thought that doing this method again and again I can get unlimited SSL certificates but on the 2nd turn only, it messed up. Both the sites gave notification before opening. Then I deleted the changes in bitnami.config and now it has removed SSL from both but when I try again, it shows there exists a certificate. Please help and tell me how can I add SSL certs to multiple domains mapped on a single IP (single WP Installation).
P.S.: When doing it for the 2nd time, I put in the same e-mail ID. Just so you know!
Leron Amin says
Hi Shubham,
The easiest way is to issue a Let’s Encrypt certificate and include all of your domains in the single certificate. There’s no need to manage multiple certificates if all of your domains are mapping to the same IP.
Hope this helps and let me know if you have other questions,
Joe
Adolfs says
Thank you for a comprehensive tutorial.
I have already had my free one-year SSL certificaten from my domain registrar. It seems a waste of resources if I don’t use it, at least until it expires. My question is how do I integrate it with my bitnami WordPress. I have already generated the SSL certificate before.
Leron Amin says
Hi Adolf,
I’d recommend forgetting about the one-year free certificate. SSL certificates can be easily obtained for free with Certbot, and you will spend many hours on configuration for something that is worth less than $10.
Let me know if you have other questions,
Joe
Mark Askew says
Done the SSL. Set the cronjob to renew. Seemed like all was good. Now the ssl has expired and when trying to do it again I am faced with the following problem:
It seems there is a valid certificate in the web server configuration folder. Please renew that certificate or generate new ones manually
Please check our documentation or open a ticket in our community forum, our team will be more than happy to help you!
What to do? How does one delete the old certificate to create new? Tried new tool to see:
Error: There has been an error.
This installer requires root privileges. Please become superuser before
executing the installer
Press [Enter] to continue:
Became superuser, used new tool and got an error on cronjob:
Performing changes to your installation
The Bitnami HTTPS Configuration Tool will perform any necessary actions to your
Bitnami installation. This may take some time, please be patient.
–
Error: Error running crontab -u bitnami /tmp/cron20200915092455: new crontab
file is missing newline before EOF, can’t install.
Press [Enter] to continue:
—————————————————————————-
Some errors occurred
The configuration was applied, but some of the changes could not be applied.
Find the details below.
The configuration report is shown below.
Failed steps:
* Removing cron entry
Backup files:
* /opt/bitnami/apache2/conf/httpd.conf.back.202009150923
* /opt/bitnami/apache2/conf/bitnami/bitnami-apps-prefix.conf.back.202009150923
* /opt/bitnami/apache2/conf/bitnami/bitnami.conf.back.202009150923
Find more details in the log file:
/tmp/bncert-202009150923.log
restarted Apache and EPIC FAIL. PLEASE HELP! HOW TO DELETE AND RECREATE?
Many thanks
Leron Amin says
Hi Mark,
It looks like there is a solution to this issue as described here.
Let me know if you have other questions,
Joe
Dino says
Hi Joe
Thank you very much for putting all of these tutorial, you are awesome! I have successfully follow this instruction and now I have a padlock on my website.
However do I need to follow your instruction regarding auto renew? https://onepagezen.com/letsencrypt-auto-renew-certbot-apache/
I already download cert-bot auto package as per above instruction (wget https://dl.eff.org/certbot-auto && chmod a+x certbot-auto) but I can’t move the package.
Leron Amin says
Hi Dino,
With this latest tutorial, auto-renewal is configured automatically if you enter “Y” in step 3 of the tutorial (look towards the bottom of the screenshot in step 3, where the terminal prompts the user, “…You can now configure a cronjob to renew it every month. Do you want to proceed…”).
Let me know if you have other questions,
Joe
Dino says
Hi Joe
Thank you for your answer.
I have successfully configure ssl on my site using your tutorial.
Once again thank you for putting all of these tutorials.
You are awesome!
Cheers
Leron Amin says
Thanks for the great feedback Dino!
Kris V says
Hello, thanks for this video. While I am good with tech, this is not a strength of mine. I was watching your video and stuck after Step 2 when this is the error that pops. Can you please help me? Also, I had followed your video last time but I must have made some error because the automatic renewal did not work and my certificate expired on 31 July.
“It seems there is a valid certificate in the web server configuration folder. Please renew that certificate or generate new ones manually
. Please check our documentation or open a ticket in our community forum, our team will be more than happy to help you!”
Leron Amin says
Hi Kris,
The message is saying that you should renew your existing certificate instead of trying to issue a new one. Depending on your original configuration, try the following command:
If that doesn't work, follow the auto-renewal instructions in this section of the bitnami WordPress documentation.
Let me know if you have other questions,
Joe
ALee says
Hello Sir,
I am not expert of this programming, I just follow you and do all what you teach. You are my best teacher. But some time I got the error and I stuck. Then I have not solutions at prompt. Please help me. Now my site was unsecure, I try to use your method, and after that, all things gone. now I can not see my site live 🙁 Please help me sir.
Leron Amin says
Hi ALee,
Thanks for the feedback – I’m glad the tutorials have been helpful to you.
Were you able to get your site working again?
Talk to you soon,
Joe
Jonathan Kweku says
This tutorial is quiet confusing, The first one states that this is the latest tutoril, so if i go by this tutorial it does not include the part of auto renewing the SSL cert through cron. i also noticed tyou had signed in the other tutorial which points to this one in june 2020 , and this one was edited in 2019.
Question is which tutorial should we follow:
https://onepagezen.com/free-ssl-certificates-wordpress-google-cloud-bitnami/
or this:
https://onepagezen.com/free-ssl-certificate-wordpress-google-cloud-bitnami/
the s is missing from the certificates to lead to different urls
Leron Amin says
Hi Jonathan,
Always follow the latest tutorials when configuring a new VM with the latest version of WordPress from the Google Cloud Marketplace. For old configurations, use the SSL tutorial that you used when you first configured SSL – don’t mix and match earlier and later versions of the tutorials.
Regarding your auto-renewal question: In this version of the tutorial, you run a script which automatically configures a cronjob to handle the auto-renewal process. Look at the screenshot of the terminal in step 3 of the tutorial – the last prompt reads, “You can now configure a cronjob to renew it every month. Do you want to proceed? [y/n]”.
Let me know if you have other questions,
Joe
Caleb Adekunle says
So guys this method have been updated for bitnami i tried it out today
after going to your compute engine
and opening ssh
just use this : sudo /opt/bitnami/bncert-tool
then enter your domain names like say onepagezen www. onepagezen
There is last part
Where it says http to https you answer is (Yes)
.onepagezen to http://www.onepagezen the answer is (yes)
http://www.onepagezen to .onepage zen the answer is (No)
After this enter your email
press enter and your ssl will be created
just wanted to help out because onepagezen hav really touched my live in a very good way thanks guys try it out
Leron Amin says
Awesome – thanks for the update Caleb!
SEM Officer says
Hi Leron,
Thank you for the great tutorial.
https redirection code that you have provided is working well, but it is a 302 redirection. For SEO perspective, don’t you think we should use 301 redirection rather than 302?
[R=301,L] rather than [R,L]
Thanks
Leron Amin says
Yes – good catch! Thanks for sharing this.
Cameron says
Hi Leron,
Great tutorial, thanks!
I set it up 3 months ago. But I must have made a mistake. Because today is the SSL renewal and it doesn’t seem to work because the website is not accessible.
On my IP address I get the “Apache2 Debian Default Page”
“The configuration layout for an Apache2 web server installation on Debian systems is as follows:
/etc/apache2/
|– apache2.conf
| `– ports.conf
|– mods-enabled
| |– *.load
| `– *.conf
|– conf-enabled
| `– *.conf
|– sites-enabled
| `– *.conf
“”
Let me know if there is a fix for this?
Thanks in advance!
Leron Amin says
Hi Cameron,
The Apache default page displays when the sever isn’t running. Run the following command to start all services:
Let me know if you have questions,
Joe
Muzamil says
When I installed the bitnami on Google Cloud and then later uploaded the backup again, I encountered a problem in which writing a htacces file is the only solution
How To Make Htaccess File Writable
Leron Amin says
Hi Muzamil,
If you need to manually update the file, then you can run the edit command with ‘sudo’ in front. For example:
If you need the file to be writable by another process on your VM, then you need to change the permissions of the file. I go over how to change file permissions in step 4 of this tutorial.
Let me know if you have any questions,
Joe
duke lee says
Hi,
I try to open bitnami Conf.
It Shows
Directory ‘/opt/bitnami/apache2/conf/bitnami’ does not exist
What should I want to do
Leron Amin says
Hi Duke,
What command did you run?
Try navigating to /opt/bitnami/apache/conf/bitnami one level at a time, and see if that directory actually exists.
Let me know you if you have questions,
Joe
Pakshal Lodha says
Hey Joe,
I really enjoy all your videos and all were really helpful. This video in particular is great. For some reason my SSL Certificate has expired and I don’t know how to renew it. Is there a way you could guide me to renew my letsencrypt certificate? The certificates were working fine before they expired.
Would appreciate help on this.
Thanks
Leron Amin says
Hi Pakshal,
I’d recommend following this guide for instructions on how to manually/automatically configure certificate renewal.
Let me know if you have other questions,
Joe
Shahbaaz says
The ssl certificate on my bitnami wordpress doesn’t renew automatically. After a few months, my website goes offline because I am using strict SSL settings on cloudflare. what should I do?
Leron Amin says
Hi Shabaaz,
Follow these instructions for configuring the auto-renewal. For additional information, check out this Bitnami thread with instructions on how to renew the certificate after it’s already expired.
Let me know if you have questions,
Joe
Marc says
Hi, Could you show me how to add free SSL for main domain and subdomain for wordpress multisite by bitnami cause it’s work for main domain only after I follow your instruction.
Thanks in advance.
Leron Amin says
Hi Marc,
Check out the instructions here to learn how to configure SSL for multiple domains on a single IP address.
Let me know if you have questions,
Joe
Ryan Ben Hassine says
I didn”t understand how to get the certificate for subdomains it’s only working on www. I want to make a spesific payment and login link, please provide me a code or a link with the codes that I could use,
thank you.
Leron Amin says
Hi Ryan,
Follow the instructions in the link that I provided. Configuring multiple subdomains for a WordPress Multisite instance requires a working knowledge of Apache server configuration. Try researching StackOverflow for possible answers if you’re unable to get it working.
Good luck, and let me know if you have any general questions!
Joe
Juan Pablo Laclau says
I would add to this guide the following to prevent mixed errors:
sudo nano /opt/bitnami/apps/wordpress/htdocs/wp-config.php
REPLACE THIS:
define(‘WP_SITEURL’, ‘http://’ . $_SERVER[‘HTTP_HOST’] . ‘/’);
define(‘WP_HOME’, ‘http://’ . $_SERVER[‘HTTP_HOST’] . ‘/’);
WITH THIS:
define(‘WP_HOME’,’https://www.1pagezen.com’);
define(‘WP_SITEURL’,’https://www.1pagezen.com’);
sudo /opt/bitnami/ctlscript.sh restart apache
Leron Amin says
Excellent recommendation – thank you for sharing this Juan Pablo!
Din Cheung says
How can i set the “WordPress General Setting” with https:// for WordPress Address (URL) & Site Address (URL)
Leron Amin says
Hi Din,
SSH into your instance, then open your wp-config.php file for editing by running the following command:
Now that you’ve opened your wp-config.php file for editing, replace these two lines of code:
with
Make sure to replace DOMAIN with your actual domain name (either the www. or non-www version, whichever you prefer for your site. Also, if you’ve configured SSL for your site, make sure to change http to https.
Check out these instructions from Bitnami for additional information.
Let me know if you have questions,
Joe
Nickie Oakwood says
Hi
Is there a way to change the WordPress Address (URL) & Site Address (URL) to HTTPS as it not showing there fools lots of plugins that the site is not secure. Stripe for instance. AMP Plugin, the list goes on It seems bonkers that it doesn’t change it with everything we do to get there, then this issue. Those 2 fields contain a value therefore theyu must be editable somewhere, surely?
Many thanks
Leron Amin says
Hi Nickie,
You can assign values to WP_HOME and WP_SITEURL in your wp-config.php file.
For Bitnami’s WordPress solution, the wp-config.php file is located here:
Let me know if you have questions,
Joe
Nickie Oakwood says
Alright dude. So set this up and site is showing https. Only issue in the WP Admin I can’t change http to https in the site url like you can with Google Click to Deploy. When I upload an image it causes mixed content issue in media and padlock gone. Put said image on page and page padlock gone.
The only wayu I can find around this is setting up WP Stateless and GCS Bucket (http or https Load Balancer if ofloading media to GCDN). I don’t want to have to do this as GCS costs and the end game is Cloudflare so seems pointless offloading media to GCDN if offloading site to Cloudflare. Just out of interest, if I offloaded media to GCS and the site to Cloudflare would images still be from GCDN amnd the rest of the site on Cloudflare or would it all be on Cloudflare, thus making GCDN a moot point? Like facing two mirrors to each other, where does it actually end.
With Google Click to Deploy it was easier to set up as can change WP URL but have discovered that index.php is forced in to my urls i.e: rentmydrive.co/index.php/about I have googled the Hell out of it and checked that the rewrite is on .htaccess but I can not fix it. Changing permalinks to be rentmydrive.co/%postname returns a requested URL not found.
I just feel like no matter where I turn ‘ANOTHER’ issue arises.
Any advice on the above truly appreciated.
Many thanks
Leron Amin says
Hi Nickie,
You shouldn’t have to configure a rewrite rule. There may be some cached settings that are causing the permalink issue (see my previous response).
Cloudflare already acts as a CDN (plus some), so I don’t see a substantial benefit in also serving the images from Cloud Storage, given the added complexity (except for redundancy/failover – which would be a valid use case).
Did you start this site from scratch or did you migrate it from another host? I have encountered issues in the past where the permalink structure breaks after completing the migration. Also, to confirm, are you using Bitnami or Click-to-deploy? If you’re using Click-to-deploy, can you verify that your directory structure is correct (default is var/www/html) – that’s another thing I can think of that could cause Permalink issues.
Talk to you soon,
Joe
Jitendra Raju Asole says
I already have a SSL certificate issued from Positive SSL. How do I upload and enable it?
Leron Amin says
Hi Jitendra,
You can upload the certificate directly to your instance using the Cloud Shell GUI – just follow the instructions here.
To enable the certificates, you’d have to add them to your Apache configuration file – as is done in the Bitnami and Click-to-deploy SSL tutorials.
Let me know if you have questions,
Joe
CALEB ADEKUNLE says
Dear OnePageZen is me Caleb its been a while. So i deployed WordPress for Bitnami today and i got this warning message on Deployment Manager Page
The template is incompatible with Python3. Please fix the following errors: Exception in software_status.py Traceback (most recent call last): return constructor[m](evaluation_context) File “software_status.py”, line 188, in GenerateConfig File “software_status.py”, line 161, in _Waiter File “software_status.py”, line 131, in _WaiterDependsOn AttributeError: module ‘types’ has no attribute ‘StringTypes’ Resource: software_status.py Resource: config https://cloud.google.com/deployment-manager/docs/migrate-to-python3
CAN I CONTINUE TO WORK ON THE DEPLOYMENT OR IS THERE SOMETHING NEW THAT I AM SUPPOSE TO DO YOUR QUICK REPLY WILL BE MUCH APPRECIATED AND HAPPY HOLIDAYS CHEERS.
Leron Amin says
Hi Caleb,
Great to here from you – and sorry for the late reply!
I’ve come across that error before, and supposedly it’s just a warning. However, when I re-deployed the solution the error was gone.
Take care and talk to you soon,
Joe
Caleb adekunle says
Thank you so much for your reply when I redeployed it was truly gone thank you
Leron Amin says
Awesome – glad to hear it!
GOURAV says
Foloowing error was shown
Unable to deactivate the authorization: https://acme-v02.a
pi.letsencrypt.org/acme/authz-v3/1828409041
Screenshot
https://drive.google.com/file/d/1rsZpWJ6oOB94ZTEv-WmT8k4PTASg2lKd/view?usp=sharing
Leron Amin says
Hi Gourav,
Were you able to get the issue resolved?
If not, check out this resource for additional information pertaining to the error.
Talk to you soon,
Joe
Sasan says
Hi Joe,
Thanks for the helpful resources that you are sharing.
I cannot move forward from step 4. Configure HTTPS Redirect.
When I enter the below command is showing the file is not exist.
sudo nano /opt/bitnami/apache2/conf/bitnami/bitnami.conf
Would you please help me to fix this.
Thanks,
Sasan
Leron Amin says
Hi Sasan,
Were you able to get the issue resolved?
If not, make sure you’re connected to your VM instance and not Google Cloud shell.
Let me know if you have questions,
Joe
Vesna says
Check if your web server is nginx or apache. Bitnami says: “TIP: To find out if your Bitnami stack uses Apache or NGINX, check the output of the command sudo /opt/bitnami/ctlscript.sh status.”
https://docs.bitnami.com/google/how-to/generate-install-lets-encrypt-ssl/#alternative-approach
Petar Glisovic says
Hi Joe, I’ve been watching your tutorials for a few days now and I’ve done all the steps well, but I couldn’t complete the SSL Certificate configuration, now I can’t access the website at all. 🙂 But I will persist until I do everything right, I am determined to learn everything about cloud services.
I GET THIS ERROR:
mapa_lazarevac@test-1-vm:~$ sudo /opt/bitnami/letsencrypt/scripts/generate-certificate.sh -m [email protected]
om -d esamurai.net -d http://www.esamurai.net
There is a new tool available for configuring HTTPS certificates, which is easier to use and includes new features
such as redirections. Find it in the following path:
/opt/bitnami/bncert-tool
You can read more about it here:
https://docs.bitnami.com/general/how-to/understand-bncert/
Do you want to continue anyways? [y/N]: Y
This tool will now stop the web server and configure the required SSL certificate. It will also start it again once
finished.
When supplying multiple domains, Lego creates a SAN (Subject Alternate Names) certificate which results in only one
certificate
under the email “[email protected]” valid for all domains you entered (“esamurai.net http://www.esamurai.net“).
The first domain in your list (“esamurai.net”) will be added as the “CommonName” of the certificate and the rest wi
ll be added
as “DNSNames” to the SAN extension within the certificate
Do you want to continue? [y/n]: Y
Unmonitored apache
Syntax OK
/opt/bitnami/apache2/scripts/ctl.sh : apache not running
2019/12/07 22:22:06 [INFO] [esamurai.net, http://www.esamurai.net] acme: Obtaining bundled SAN certificate
2019/12/07 22:22:06 [INFO] [esamurai.net] AuthURL: https://acme-v02.api.letsencrypt.org/acme/authz-v3/1605951936
2019/12/07 22:22:06 [INFO] [www.esamurai.net] AuthURL: https://acme-v02.api.letsencrypt.org/acme/authz-v3/160595193
7
2019/12/07 22:22:06 [INFO] [esamurai.net] acme: use tls-alpn-01 solver
2019/12/07 22:22:06 [INFO] [www.esamurai.net] acme: use tls-alpn-01 solver
2019/12/07 22:22:06 [INFO] [esamurai.net] acme: Trying to solve TLS-ALPN-01
2019/12/07 22:22:21 [INFO] [www.esamurai.net] acme: Trying to solve TLS-ALPN-01
2019/12/07 22:22:36 [INFO] Deactivating auth: https://acme-v02.api.letsencrypt.org/acme/authz-v3/1605951936
2019/12/07 22:22:37 [INFO] Unable to deactivate the authorization: https://acme-v02.api.letsencrypt.org/acme/authz-
v3/1605951936
2019/12/07 22:22:37 [INFO] Deactivating auth: https://acme-v02.api.letsencrypt.org/acme/authz-v3/1605951937
2019/12/07 22:22:37 [INFO] Unable to deactivate the authorization: https://acme-v02.api.letsencrypt.org/acme/authz-v3/1605951937
2019/12/07 22:22:37 Could not obtain certificates:
acme: Error -> One or more domains had a problem:
[esamurai.net] acme: error: 400 :: urn:ietf:params:acme:error:connection :: Timeout during connect (likely firewall problem), url:
[www.esamurai.net] acme: error: 400 :: urn:ietf:params:acme:error:connection :: Timeout during connect (likely firewall problem), url:
Error: Something went wrong when running the following command:
$ “$LEGO_BIN” –path “/opt/bitnami/letsencrypt” –tls –email=”${email}” ${domain_args} run
Please check our documentation or open a ticket in our community forum, our team will be more than happy to help you!
Documentation: https://docs.bitnami.com/
Support: https://community.bitnami.com/
We are going to try to recover the web server configuration now…
Unmonitored apache
Syntax OK
/opt/bitnami/apache2/scripts/ctl.sh : apache not running
Syntax OK
(98)Address already in use: AH00073: make_sock: unable to listen for connections on address [::]:80
(98)Address already in use: AH00073: make_sock: unable to listen for connections on address 0.0.0.0:80
no listening sockets available, shutting down
AH00015: Unable to open logs
/opt/bitnami/apache2/scripts/ctl.sh : httpd could not be started
Monitored apache
mapa_lazarevac@test-1-vm:~$
AND THIS HAPPENS WHEN I TRY CONFIGURATION WITH THE BNCERT TOOL:
mapa_lazarevac@test-1-vm:/opt/bitnami$ sudo ./bncert-tool
Warning: Custom redirections were detected in your web server configuration
files. This tool will not be able to enable/disable redirections.
Press [Enter] to continue:
—————————————————————————-
Welcome to the Bitnami HTTPS Configuration tool.
—————————————————————————-
Domains
Please provide a valid space-separated list of domains for which you wish to
configure your web server.
Domain list []: esamurai.net http://www.esamurai.net
Warning: The domain ‘esamurai.net’ resolves to a different IP address than the
one detected for this machine, which is ‘35.246.207.251’. Please fix its DNS
entries or remove it. For more info see:
https://docs.bitnami.com/general/faq/configuration/configure-custom-domain/
If you can help, thanks in advance. Best regards.
Leron Amin says
Hi Petar,
Were you able to get the issue resolved?
Was the website accessible via HTTP before starting with the certificate generating tool?
Talk to you soon,
Joe
Lars says
I have a multisite Bitnami WordPress on GCP that I’m setting up to host several domains.
The topic is – how to enable HTTPS for all of them.
Curretly I’m setting up test sites two sited which we can call gcptst.domain.com and gcptst.otherdomain.net
After running the folowing HTTPS worked fine on gcptxt.domain.com
> sudo letsencrypt/scripts/generate-certificate.sh -m [email protected] -d gcptst.domain.com
It worked fine.
I then proceeded with
> sudo letsencrypt/scripts/generate-certificate.sh -m [email protected] -d gcptst.otherdomain.net
… which also worked fine but broke the setting for https://gcptxt.domain.com
https://gcptxt.domain.com now shows the invalid certificate warning in the frowser with reference to that it’s a certificate for gcptst.otherdomain.net
Happy go lucky I tried
> sudo letsencrypt/scripts/generate-certificate.sh -m [email protected] -d gcptst.domain.com -d gcptst.otherdomain.net
… and got:
“It seems there is a valid certificate in the web server configuration folder. Please renew that certificate or generate new ones manually”
Which is the solution to
1) roll back from the situation I created
2) to solve the need to have HTTPS on multiple domains on a multisite bitnami wordpress GCP installation
PS: wouldn’t the following be a better rewrite rule?
RewriteEngine On
RewriteCond %{HTTPS} off
RewriteRule .* https://%{HTTP_HOST}%{REQUEST_URI} [R=301,QSA,L]
Leron Amin says
Hi Lars,
You should generate a single certificate for both of the domains in your Multisite configuration. For instance:
Bitnami has a very useful guide on SSL setup for multisite configurations, which you can view here.
Let me know if you have questions,
Joe
Alex says
Hi,
The auto-renewing from my website was not good configured, so the certificate expired.
I tried to renew it but it was not possible.
Then I decide to delete the certificates and generate a new certificate, but now the /opt/bitnami/letsencrypt/scripts/generate-certificate.sh do not exist.
I tried to install the Lego Client from: https://docs.bitnami.com/general/how-to/generate-install-lets-encrypt-ssl/
but I get the message: Cannot write to ‘lego_v3.2.0_linux_amd64.tar.gz’ (No space left on device)
Please help, how can I fix the script to generate the certificate?
Leron Amin says
Hi Alex,
Sounds like your persistent disk is out of space. You should resize immediately or you’ll end up unable to write to your WordPress database.
Here is the link for instructions o resizing persistent disks in Google Cloud. You can also connect to your VM instance and run the ‘df’ command to view the remaining disk space in the partition that’s running your WordPress instance.
Hope this helps and let me know if you run into any issues.
Thanks,
Joe
Lear says
Hi, thanks for the tutorial.
I followed all steps but my website got “certificate common name mismatch ” warning when accessing. Any solution?
Leron Amin says
Hi Lear,
A certificate mismatch error means that the domain-name listed in the certificate (i.e. the domain name the certificate was issued for), does not match the domain name for your website. This error typically occurs when users forget to change the domain name in the certificate issuing command.
Hope this is helpful, and please reach out if you have any questions!
Joe
Joey says
Hi!
On GCS Bitnami WordPress pack.
I have followed this tutorial to the point. Now I have had an email saying that the cert will be invalid in 19 days from Let Encrypt. I have also double check on a SSLchecker and it shows the same info.
From what I understand this new scripts includes a “hidden” auto-renewal script in the end, but why do I get this message? When will the cert be renewed with the auto-renewal set up in the end of this tutorial?
Thanks for a great site!
Leron Amin says
Hey Joey,
If the certificate is showing an expiry date of 19 days, then it’s likely that auto-renewal isn’t working properly. You may want to check out the steps in this tutorial for additional information regarding testing certificate auto-renewal.
Also – I looked at your domain, and it appears that the certificate is valid for ~90 days. Did you encounter an error with auto-renewal?
Talk to you soon,
Joe
Belkacem TALEB says
Hi Joe
i had the same issue with this new script, i checked the auto renew, but looks like it did not work and now the certificate is expired
Leron Amin says
Hi Belkacem,
Did you try running the auto renew script?
How do you know the certificate is expired – are you seeing a security warning in Chrome?
Talk to you soon,
Joe
SUBHENDU BARAL says
hi, sir my site is running in aws cloud, my Ip is not redirecting to my domain… please provide me solution…. i have followed all the steps mention i this post but still its not working
Leron Amin says
Hi Subhendu,
Make sure that your networking settings are configured properly.
Additionally, it can sometimes take a few hours (and sometimes days), for the IP to direct to your domain once it’s been configured.
Hope this helps and let me know if you have questions,
Joe
Mohit says
how to execute auto-renew of SSL certificate. i have done this process but it is valid only for 90 days. please share the process
Leron Amin says
Hi Mohit,
If you followed the instructions outlined in the tutorial, then auto-renewal will be configured automatically.
For more in-depth functionality, such as testing auto-renewal, check out this tutorial.
Let me know if you have questions,
Joe
Mohit says
Thanks, your article was so helpful
Philip Zauner says
Hi Joe,
I received also warning letter from lets encryp telling me that my certificate is going to expire because it is reaching the 90 Days time limit.
I am using WP with Bitnami and I followed the instructions outlined in this tutorial.
Is the script renewing the certificate after 90 Days ?
If not could you please point me into the right direction what went wrong with my configuration?
Best regards,
Leron Amin says
Hi Philip,
The certificate expire every 90 days, and are set to auto-renew within 30 days before they are set to expire.
If you check your domain through the SSL Checker website and it shows that the certificates are set to expire in less than 20 days, then that’s a strong indicator that auto-renewal isn’t working properly. Per the auto-renewal script, the certificates are set to auto-renew sometime within the month before they are set to expire.
If you’d like to test whether or not auto-renewal is working correctly, I’d recommend going through the steps outlined in this tutorial.
As always, feel free to reach out if you have any questions!
Joe
Nickie Oakwood says
Now encountering this in the SSH Error:
There has been an error.
This installer requires root privileges. Please become superuser before
executing the installer
Leron Amin says
Hi Nickie,
Execute the command with sudo in-front to enable root/superuser permissions.
Hope this helps and let me know if you have any questions,
Joe
Nickie Oakwood says
How to delete the SSL to start over as my site is now serving 503?
Leron Amin says
Hi Nickie,
Just re-issue new certificates and the old ones will be overwritten.
Let me know if you have questions,
Joe
Kasati says
Thanks very much Joe.This is just what I need.
I have an issue .After I enter command
[sudo nano /opt/bitnami/apache2/conf/bitnami/bitnami.conf]
it shows [ Directory ‘/opt/bitnami/apache2/conf/bitnami’ does not exist ] so I cant finish Configure HTTPS Redirect.
what should I do next ? please help me.
Leron Amin says
Hi Kasati,
Are you using the Bitnami version of WordPress on Google Cloud? If so, try navigating to the bitnami.conf file one directory-level at a time and make sure that file and directory actually exists.
If so, navigate to the bitnami directory, and run sudo nano bitnami.conf from within the directory.
Let me know if you have questions,
Joe
sandeep says
my directry doesnt exist what i do?
Leron Amin says
Hi Sandeep,
What does your directory tree look like?
Are you sure you deployed the correct Bitnami solution? There is both a Bitnami WordPress Multisite as well as a standalone Bitnami WordPress solution, and it’s easy to get them confused.
Take a look at your directory tree and whether or not you deployed the correct solution.
Talk to you soon,
Joe
Vesna says
This happened to me Bitnami also has a non-apache version which wont have that directory
Bitnami says: “TIP: To find out if your Bitnami stack uses Apache or NGINX, check the output of the command sudo /opt/bitnami/ctlscript.sh status.”
Nginx instructions here:
https://docs.bitnami.com/google/how-to/generate-install-lets-encrypt-ssl/#alternative-approach
jinhui zhang says
same question!and how to “navigate to the bitnami directory”? Thanks!
Leron Amin says
Hi Jinhui,
You would use the cd command to navigate to the bitnami directory, which is located at the following location:
Let me know if you have any questions!
Joe
Jinson K V says
Hi I have an issue.
1. I have steup Google Cloud wordpress on unknownguides.com. The problem is that, sometimes, it load as https://unknownguides.com and sometimes, it load as https://www.unknownguides.com/. I don’t want the www version.
2. WordPress Address (URL) and Site Address (URL) in settings –> general is greyed out. I cant edit it. But with other hosting, there is the option to edit that field.
Leron Amin says
Hi Jinson,
You can configure your site URLs within your wp-config.php file, which I cover in this tutorial. Remember to use https:// and not http:// when you configure the site URLs.
Let me know if you have questions,
Joe
Jinson says
Hi it worked. Thanks.
I have been trying changing most of the bitnami config files for the last couple of days. none of them worked. Even bitnami community forum told some other answers which doesn’t work for me. Finally See your reply here and try it.
Thanks again.
Leron Amin says
Thanks for the feedback Jinson – I’m glad to hear you were able to get it working!
Jinson K V says
Thanks for the guide. I have successfully installed WordPress on Google Cloud and activated SSL based on your tips. Can you make a video on this error “A definition of a siteurl or homeurl was detected in your wp-config.php, but the file is not writable.” When trying to install some plugins, I am getting this error. Thanks. 🙂
Leron Amin says
Hi Jinson,
You may have to change the permissions of the wp-config.php file – let me know if you need instructions on how to do this.
Talk to you soon,
Joe
Caleb Adekunle says
I got this error please can you help me out on this
[vevio.cz] acme: error: 400 :: urn:ietf:params:acme:error:dns :: DNS problem: SERVFAIL looking up A for vevio.cz, u
rl:
[www.vevio.cz] acme: error: 400 :: urn:ietf:params:acme:error:dns :: DNS problem: SERVFAIL looking up A for http://www.vev
io.cz, url:
Error: Something went wrong when running the following command:
$ “$LEGO_BIN” –path “/opt/bitnami/letsencrypt” –tls –email=”${email}” ${domain_args} run
Please check our documentation or open a ticket in our community forum, our team will be more than happy to help yo
u!
Documentation: https://docs.bitnami.com/
Support: https://community.bitnami.com/
We are going to try to recover the web server configuration now…
Leron Amin says
Hi Caleb – hope you’re well!
There’s an issue with either your DNS configuration or the LEGO script itself.
Open a support ticket at community.bitnami.com and see what their engineers have to say. Also, check out this thread started by a user with what appears to be a similar issue.
Let me know if you’re able to get it fixed.
Thanks,
Joe
Gyanu says
Hi’ leron
I created my site in January I followed every tutorial of yours and thanks for great tutorials.
My website SSL just expired I don’t how but I’ve done all renewal things but still, it’s showing my site SSL expired on SSL checker sites.
So, Then I followed previse tutorial again, and terminal showing everything is fine, Then I re-generated SSL certificate but It’s still not showing any SSL on my site tenreason.com.
And when I followed this tutorial It’s saying this:
( It seems there is a valid certificate in the web server configuration folder. Please renew that certificate or generate new ones manually
Please check our documentation or open a ticket in our community forum, our team will be more than happy to help you! )
When I try to generate new one it says congratulations SSL generated successfully
BUT WHY NOT SHOWING ON MY SITE I have followed SSL error tutorial too
I’m using Bitnami
Leron Amin says
Hi Gyanu,
I checked your website at it appears to be loading with HTTPS.
How did you resolve the issue?
Talk to you soon,
Joe
Siopao says
Hi,
The keys didn’t auto-renew. Is there a way to force renew this?
Thanks.
Siopao says
Sigh.
It turned out I don’t have bncert tool and I have to install this for your stuff to work.
https://docs.bitnami.com/google/how-to/understand-bncert/
Thanks again.
jay patel says
Non www version is only working on homepage.
It’s not working on pages.
www and non www both are working on pages, i only want non www to be work on whole site.
Leron Amin says
Hi Jay,
Which steps have you taken so far? Did you configure the redirect?
Also, make sure to change your WordPress URLs to the desired version of your domain under Settings > General.
Hope this helps and let me know if you have questions,
Joe
Ernest Akpos says
Hello Leron Amin
You are doing a great job with this site and i have a learned a lot. Thanks a million. I have a request, I just saw that google cloud introduced bitnami wordpress with NGINX and SSL. I wanted to install SSL with this tutorial, but it does not follow exactly.How do i do this? Could you do a tutorial on it? I will like to use this NGINX. Thanks
Leron Amin says
Thanks for the feedback Ernest – I’ve added this to my list of tutorials-to-do!
Josh says
How can I get the SSL Certificate to work for a “SubDomain”? I created an “A Record” pointing to IP Address for subdomain which is complete. now I would like to install an SSL on the subdomain.
Benjamin Waller says
Thanks very much Joe for this updated tutorial.
It looks like it getting simpler to set up the SSL Certificate using letsencrypt. I would like to add that I still needed to complete Step 6; to define site and home URLs as per the pervious video tutorial on SSL because I got mixed content by an image I uploaded but this step fixed that.
https://onepagezen.com/free-ssl-certificate-wordpress-google-cloud-bitnami/
and mentioned in this tutorial.
https://onepagezen.com/fix-ssl-certificate-errors-google-cloud/
Also, I see that configuring the certificates has completely changed in this new version.
Best regards,
Ben
Leron Amin says
Hey Ben,
Thanks for bringing this to my attention – this is an essential step and I will add it to the tutorial later today.
Thanks again and talk to you soon,
Joe
Benjamin Waller says
Hey Joe,
Just getting stuck on the last step 5. Restart Apache Server, after adding 3 lines to Configure for HTTPS Redirect. Here is the following error:
AH00526: Syntax error on line 11 of /opt/bitnami/apache2/conf/bitnami/bitnami.conf:
RewriteEngine must be On or Off
Here is my three lines I added:
RewriteEngine On
RewriteCond %{HTTPS} !=on
RewriteRule ^/(.*) https://www.jonaviray.com/$1 [R,L]
It all looks good to me. I have the RewriteEngine on so am a little confused. Also I just did the same configuration to my Moodle site and it worked.
Any help would be great.
Cheers,
Ben
Leron Amin says
Hey Ben,
It’s great to hear from you!
You can enable RewriteEngine by running the following command:
Remember to restart Apache after making the change:
Let me know if this works for you!
Joe
Benjamin Waller says
Hi Joe,
Thanks for the reply.
I got the following when using the first command here (sudo a2enmod rewite)
sudo: a2enmod: command not found
So something is wrong somewhere!
Ben
Benjamin Waller says
Hey Joe,
Removing a couple of weird underscores on 2 lines was the cause of the issue.
So all is good, thanks.
See resolved issuse on Bitnami Community forum.
https://community.bitnami.com/t/ah00526-syntax-error-on-line-11-of-opt-bitnami-apache2-conf-bitnami-bitnami-conf/68354
Leron Amin says
Awesome – I’m glad it was a quick fix! Also, thanks for sharing the solution. I’m curious where those underscore characters were coming from?
Talk to you soon,
Joe
Mohamad says
Thank you very much.
There are many occasions when I needed help right, from the very beginning of my journey on how to set up a wordpress site on google cloud platform and the various problem encounter along the way and to this the latest one.. had to delete my old vm and reinstall wordpress, ssl site error.
You sir, have been my number one source of help. I cannot thank you enough.
You have save me countless headaches, heartaches and time.
Cheers and God Bless You.
Mohamad
P.S. I cannot stress this enough to everyone out there, I’ve learned it the hard way…..backup, backup, backup on every opportunity u can. Your tutorial on All In One WP Migration is another gold nugget. Thank you
Leron Amin says
Thank you for the awesome feedback Mohamad!
I know how difficult the journey can be. Becoming proficient in cloud computing technologies is not for the faint of heart. As you very well know, it takes a lot of patience and tons of perseverance. With that being said, congratulations on all that you’ve achieved!
And yes – backup, backup, backup – that simply cannot be stressed enough!
Cheers to you,
Joe
Wasim says
Thank you for your videos 🙂
I need please. I was following the steps on the video and I cannot access my domain now for some reason 🙁
I wonder what the issue could be.
Thank you in advance!
Leron Amin says
Hi Wasim,
There could be many issues causing your website not to respond.
What happens when you try to access your website in the browser? Do any status codes appear or does the page simply timeout?
Talk to you soon,
Joe
Prasoon G Das says
Hi, great work here.
I got past all the steps until step 4: configuring https.
I get an error that my bitnami.conf file is not found.
[ Directory ‘/opt/bitnami/apache2/conf/bitnami’ does not exist ]
Please help.
Leron Amin says
Hi Prasoon,
Please share which command is causing the error.
Talk to you soon,
Joe
Antal says
Hi Joe,
First of all I would like to thank you for all your superb walk through tutorials. They are really useful for non-techies like myself.
I would like to ask for your help with the following issue I came across.
I wanted to upgrade the PHP, MSQL, etc. version of my deployment on GCP. I figured a clean way to go about it would be to redo the website on a new deployment. I chose the “WordPress with NGINX and SSL Certified by Bitnami” version for this. When I got to the part of pointing my domain name to the new deployment everything was fine. But when I followed the steps to setup the SSL certificate something went wrong. I’ve managed to get the certification, but failed to the following steps (Configure HTTPS Redirect). There was an error message when trying to locate the Bitnami config file. “The file doesn’t exist”. And since then I am getting a “502 – Bad Gateway” on the new deployment.
Would you be able to assist me to fix this? Was this tutorial not meant to work with the above mentioned version of Bitnami deployment?
I look forward to your answer.
Antal
Leron Amin says
Hi Antal,
This tutorial is meant for Bitnami’s LAMP stack solution (Linux, Apache, MySQL, PHP), and will not work with their LEMP stack solution (Linux, Nginx, MySQL, PHP).
That being said, the SSL instructions for issuing the certificates are similar for the LEMP stack solution – which you can view here. Once you’ve issued the certificates, configure an HTTPS redirect with Nginx as shown here, and you should be good to go!
Let me know if you have any questions,
Joe
Sohil Patel says
This worked for me, just took a couple of minutes.
Thanks for this and other tutorials, really helpful and straightforward.
Leron Amin says
Thanks for the feedback Sohil – I’m glad to hear the tutorial worked for you!
Alexander Morac says
Hello Leron, thanks for the tutorial, Are these certificates renewed automatically? or do you touch manually?
Leron Amin says
Hey Alexander – the certificates are configured to renew automatically.
John says
Dear Leron,
Great tutorial. I use the Bitnami WP. I followed all your steps, but after 3 months the certificate wasn’t renew automatically. I had to renew it manually. Can you tell us how to let them renew automatically?
Leron Amin says
Thanks for the feedback John!
Check out this tutorial for instructions on configuring auto-renewal.
Let me know if you have other questions,
Joe
Alejandro Chaves says
Hello,
I can not get past the first step I get: /opt/bitnami/letsencrypt/scripts/generate-certificate.sh: command not found
Leron Amin says
Hi Alejandro,
Are you using WordPress Bitnami? Are you using a new version of the WordPress Bitnami stack? The reason I ask is because the older versions of this stack don’t come pre-installed with this script.
First, check if that script exists in your scripts directory by executing:
Like I said – it may not be there by default in the older versions of this stack.
Let me know if you have questions,
Joe
Leron Amin says
What did you think of this tutorial? Please share your questions and comments!