In this tutorial you will learn how to install WordPress on Google Cloud using the Click-to-deploy version of WordPress on Google Cloud.
Running WordPress on Google’s massive cloud network allows you to take your WordPress website to the next level.
Although hosting WordPress on Google Cloud offers amazing performance, it can be challenging. If you’re a new to the development world, you may be interested in managed hosting; there are even managed cloud hosting providers (view tutorial).
To get started, create a free Google Cloud account and follow along with the video above. If you get stuck, check below to see the steps listed individually with their commands.
There are 5 steps in this tutorial:
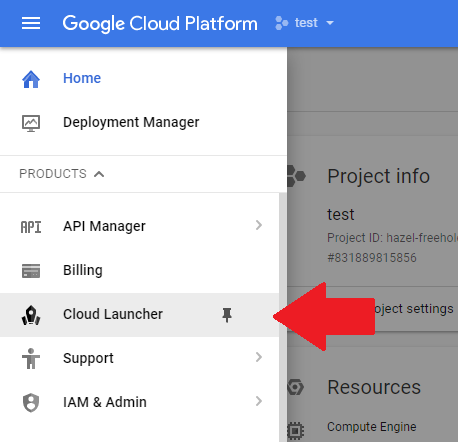
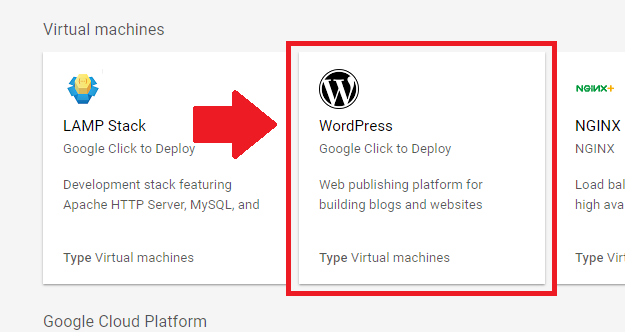
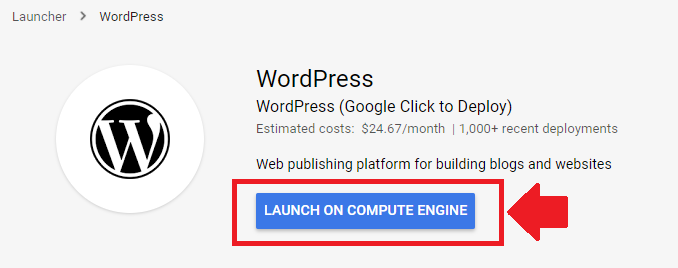
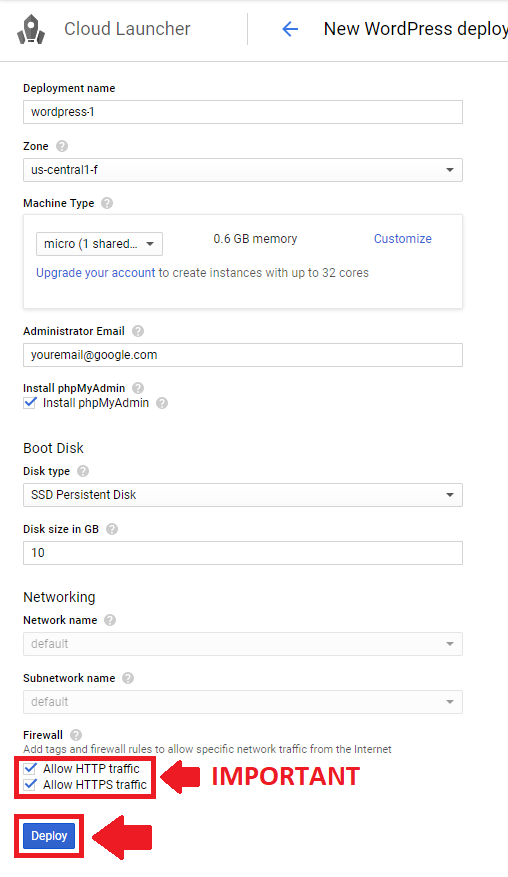
1. Deploy WordPress

2. Configure WordPress Installation
3. Setup phpMyAdmin
4. Login to WordPress
That’s it!
Your new WordPress website is configured and ready to go!
If you have any questions about this tutorial, or general questions about WordPress on Google Cloud Platform, please post them as comments below.
Up Next…
Jhonathan says
Hello, I want to thank you for these spectacular tutorials and posts, they are very clear and to the point,
My question is how can I increase the size of the disk where is my site in wordpress? I’m not a very advanced user so any specs you can give me would be very helpful.
Jhonathan
Leron Amin says
Hey Jhonathan,
Resizing your persistent disks is a relatively straightforward process. Simply follow these instructions as outlined in the Google Cloud Documentation.
Let me know if you have any questions or require additional assistance,
Joe
Emilian says
Hello,
I’m looking for the tutorial to upgrade my PHP to the latest version. I followed your tutorials in 2018 and my website works great but my SEO rating is poor because my PHP is really old.
Please help !
Thank you again for your wonderful work so far !
Leron Amin says
Hi Emilian,
I’m hoping to publish a tutorial on this topic soon.
In the meantime, follow the suggestion that I published in this comment.
Please reach out if you have questions,
Joe
Emilian says
Thank you. I do not understand the procedure you’re referring to in that comment.
I will wait for your tutorial since I don’t understand if my SSL will still be working, what will happen with my IP, how do I pass it to the new VM instance, etc. Too many details not covered in that comment…
Please excuse my ignorance, I’m a doctor MD and I know little about computers. I just followed your step by step tutorials and it worked !!! My VM instance hasn’t been shutdown for 2 years now 🙂
Thank you very much again !
Leron Amin says
Sounds good Emilian,
I’m happy to hear your VM instance has been running for 2 years without shutting down – that’s awesome!
Take care,
Joe
sanjay says
Hello Sir, Thanks for this detailed illustration,, I am newbie,.. I could install wordpress, use cloudfare, however struck at end…. my website page is showing however wp panel did’t became accessible since being an hour.. in the video its explained it would take 5-10 minutes, first post, website is visible however wp panel is not working. Kindly help..
Leron Amin says
Hi Sanjay,
Can you please provide additional details?
Which specific error are you seeing when you try to access your admin dashboard?
Talk to you soon,
Joe
saket says
I have followed ALL THE STEPS AS MENTIONED FOR CLICK TO DEPLOY METHOD. However after changing the site address on my wordpress the admin page doesn’t work at all. What to do?
Leron Amin says
Hi Saket,
Can you provide additional details, including the type of error message that you’re seeing?
Talk to you soon,
Joe
Kelly Quintero says
Hi, did you found a solution to this?
Nickie Oakwood says
Absolutely driving me bloody mad. Think everything has gone according to plan. Deployed – check. DNS – Check. SSL – Check.
My URL looks something like this:
https://rentmydrive.co/index.php/vendors-terms-and-conditions/ when I try to set the links through permalinks to get rid of the index.php (which is in every url except the homepage) my pages return the requested URL was not found on this server.
Any ideas buddy
Leron Amin says
Hi Nickie,
It’s working correctly from my end.
Typically when facing issues with Permalink structure, you can simply change the default structure under ‘Permalink settings’, click ‘Save’, then switch is back and ‘Save’ again.
Anyways – it looks like you were able to fix the issue.
Talk to you soon,
Joe
Nickie Oakwood says
Got the deployment and ssl ok but when trying to change phpmyadmin get the below message:
hello@rmd-store-vm:~$ mysqladmin -u -p password
mysqladmin: connect to server at ‘localhost’ failed
error: ‘Access denied for user ‘-p’@’localhost’ (using password: NO)’
hello@rmd-store-vm:~$
Leron Amin says
Hi Nickie,
You have to specify a username:
Replace ‘root’ and ‘password’ from the command above with your respective user name and password.
Talk to you soon,
Joe
sai says
Thanks for your great articles.
I have a question concening the price, when I choosed:
n1-standard-1 (default instance):
– CPU: 1
– RAM: 3.75GB
the estimated cost = USD 24.27 per 1 month, this means I will pay $24 even if there are no traffics?
sai says
What I can do to make sure monthly charges do not exceed $25/month?
Leron Amin says
Hi Sai,
You can set up budget alerts by following the instructions here.
Also, don’t use more resources than needed – for instance, most small WordPress websites run fine on the f1-micro machines, which are covered under the free tier.
Hope this helps and let me know if you have questions,
Joe
Sai says
Thanks for your reply. Actually, I’m not using the free tier, it’s a customer account. the site is small, but I wanted to know what are the installation set up that can gurantees that the monthly charge won’t exceed $25.
Is it cheaper to deploy it on appengine?
Leron Amin says
Hi Sai,
Compute Engine, as of now, is probably the cheapest because you get one f1-micro instance free per month with 30GB HDD for free under the ‘Always-Free’ tier. So if you use this machine setup, and don’t use Cloud DNS, you could essentially run your instance for less than $1 per month. That being said, you won’t get optimal performance with this hardware setup (I’d recommend using an SSD with Cloud DNS) – but it will still perform significantly better than any mainstream managed ‘shared hosting’ service.
Good luck and don’t hesitate to reach out if you have questions,
Joe
Leron Amin says
Hi Sai,
Yes – that’s correct – your instance will still use resources whether or not there is any traffic. This is why I’d recommend using a smaller machine size (as I suggested in my last reply) unless you have substantial amounts of traffic that would justify using the n1-standard-1 machine.
Hope this helps and let me know if you have questions,
Joe
Shashank says
Hay thanks a lot for such a detailed tutorial !
with click to deploy I get PHP 7.0 can you please help me update and enable the latest version of for my wp website? I tried certain things from stack overflow but when I make phpinfo() it shows php 7.0 and when i see in terminal php -v it shows 7.3
I think I have not enabled the latest version
Please help
Leron Amin says
Hi Shashank,
Upgrading PHP can be a pain – I’d recommend migrating your website to the latest stack with all the latest components.
I will do a tutorial on this in the future, as it seems to be a process that many users are unfamiliar with.
Let me know if you have questions,
Joe
Shashank Shekhar says
Hi I am very new to Cloud computing can you please make a video how to deploy auto scaling wordpress website step by step I tried many ways nothing is working can you please help
In my case usually there are very less or no visitors on my website but at times there is a very sudden increase
Thank you so much for all the tutorials you have put its very very useful please send me any article link if it already exist regarding this
Leron Amin says
Hi Shashank,
If you’re new to Google Cloud and are looking for a relatively simply auto-scaling solution, I’d recommend using App Engine for your WordPress deployment.
Google has a free tutorial on deploying WordPress to App Engine which you can view here.
Let me know if you have questions,
Joe
Bernard says
Hello Joe, all your tuts are superb and easy to follow. In the two tuts on WordPress setup in either bitnami or by click to install, there was no place u mention myphpadmin except in click to install method, so I assume myphpadmin is automatically install using the bitnami method and if so how do I access it.
Leron Amin says
Hi Bernard,
It is correct that it is installed on the Bitnami version, and it can be accessed via SSH tunnel (see this tutorial).
Let me know if you have questions,
Joe
Kay says
This tutorial was absolutely awesome! After a resource issue sent my account over my allocated resource limit with my initial hosting provider, I started searching for new hosting. I came across your post while investigating Google Cloud and decided to try it! Wow! Worked perfectly. I was able to get my site up and running, get my files moved from my old host to the new host and get my phpmail email going quickly and easily in a few hours. These instructions were the springboard for that success. Many thanks to you for taking the time to put this all together! You are AWESOME!
Leron Amin says
Thanks for the great feedback Kay – I’m glad to hear you were able to get your site up and running!
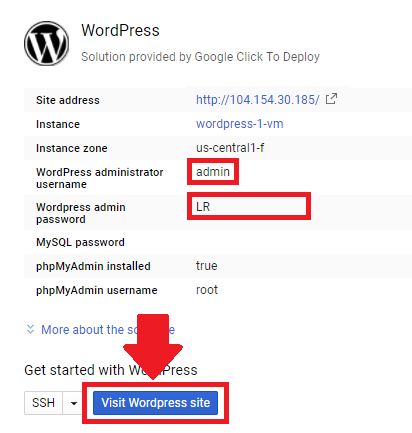
Arushi Soni says
Hi there!
I need to know that is there a way that I can change my wordpress admin user name on click to deploy? As of right now it shows my email ID, I want to change it to something else to log in.
Leron Amin says
Hi Arushi,
You can change your WordPress admin username, but you will have to configure SMTP beforehand in order to send emails from your VM instance. This is necessary because WordPress will send a confirmation email to whichever email you decide to use.
Let me know if you have any questions,
Joe
Jo Osler-lane says
Hi Leron. I have used click to deploy and love your tuts but on comming back to the website to work on it I have tried using the IP address of the site and wp-admin but get this error
This site can’t be reached
http://www.marketrendfinder.com’s server IP address could not be found.
Search Google for marketrend finder phpmyadmin
ERR_NAME_NOT_RESOLVED
I have also tried using the domain – http://www.marketrendfinder.com/wp-admin – but get the same message. I must be doing something wrong but cannot work out what. Do I need to activate something else? I know when working in wordpress offline I needed to activate the webserver to be able to edit the website.
I used click-to-deploy and then changed the passwords and the settings in wordpress and the phpMyAdmin without using the ssh shell. I need to access WordPress to edit my website, obviously!!!!
Jo
Leron Amin says
Hi Jo,
I revised the tutorial with updated instructions – please give it a look and let me know if you’re able to work out the issues.
Talk to you soon,
Joe
Joan Osler-lane says
Hi Joe
I have already followed the updated vid. My problem seems to be with G-suite. It’s not recognising the changes I make. In the DNS Management page it says
‘We can’t display your DNS information because your named servers are not managed by us’ .
Does this mean I have to change the name servers at go daddy.
I have got an authorisation code from G-suite but have no idea where to use it.
Help on this would be appreciated as it has already held me up for quite some time now
Jo Osler-Lane
Leron Amin says
Hi Jo,
When I visit your domain in my browser I get the message, “The requested URL /wordpress/wp-login.php was not found on this server.” This indicates that the issue has to do with your server or WordPress file/directory structure.
If you have a backup, I’d recommend restoring the website from the backup. If not, run
sudo apachectl configtestand see if you get any error messages. If not, check your logs for errors.Hope this helps,
Joe
Joan Osler-lane says
Hi again Joe
Fortunately I have not done anything with the website yet. Do you think it would be worth it to start again, ie delete the instance and start from the beginning.
My problems only started when I tried to get the IP address to change to the website name, changing the named servers etc.
Jo Osler-Lane
Leron Amin says
Hi Jo,
Yes – I would recommend starting over again. Sometimes it takes a few times to get familiar with the networking/DNS component of Google Cloud, but once you do it a few times, it will become like clockwork.
Good luck!
Joe
Waryanto says
Hi,
In cPanel, I can addon domain using addon domain menu. On Google Cloud, how to addon another domain, example: domain B? (in case, I already setup wordpress click to deploy with domain A).
thank you
Leron Amin says
Hi Waryanto,
Your networking settings for adding/configuring domains are located under Network services > Cloud DNS.
Let me know if you have any questions,
Joe
Todd says
I don’t have the option for “micro” machine, only small.
I’m currently within the free ($300/year) period, is this why?
Another reason? I’ve tried several regions within the US and none of them offer it.
Leron Amin says
Hi Todd,
Create your instance using the g1-small machine. After the instance has been created, stop the instance, then click the “Edit” button at the top of the page. At this point, you will be able to select the “f1-micro” machine from the machine type field. Make sure to save your instance after making the change; you may have to restart it as well.
Let me know if you have any questions,
Joe
Corey Snyder says
Hi Leron
How do I find my other dB variables. Like host? How do I access configs? Thanks in advance
Leron Amin says
Hi Corey,
Check your wp-config.php file. You can open it for editing by executing the following command:
Let me know if you have any questions,
Joe
Corey Snyder says
Thanks, this was the location.
Brady Barrows says
I watched the video and when you get to the step of main navigation > Cloud Launcher > WordPress
There is no such CLOUD LAUNCHER under billing in my console. Why don’t I have it?
Leron Amin says
Hi Brady – they changed “Cloud Launcher” to “Marketplace”.
Brady says
Thanks. They are always moving stuff.
Amar Mishra says
Please update it in your video also. I kept searching for it for several hours.
Leron Amin says
Fixed it! Thanks for the heads-up Amar.
Justin Allen says
Do you ever run into permission issues within WP. I’ve installed WP on a number of google instances, but I usually seem to have issues with updating plugins and all. Also do you do any php.ini changes? If so, do you have recommendations? The updating of plugins/themes always seems to be a permission issue. Is wordpress added to www-data by default or does that have to be setup in ssh?
Leron Amin says
Hey Justin,
Yes – I run into permissions errors occasionally.
Plugins won’t be able to write to wp-config.php with the default permission level, as is necessary with some of the cache plugins. This is the permissions-related issue that I most frequently get questions about.
I occasionally change settings in php.ini, for instance upload_max_filesize. There are other settings that I’ve changed in the past, but I can’t remember what they were.
Hope this information is helpful!
Joe
ridz says
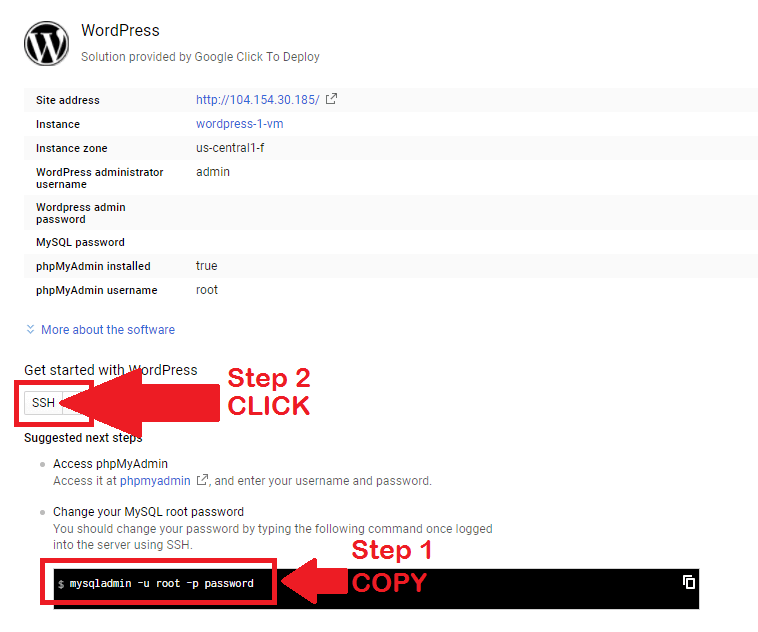
Cannot access the phpMyAdmin page ..How to reset the mysql root password to login
Leron Amin says
Hey Ridz,
Your MySQL root password will be shown on your deployment settings page. You can access this page by going to Deployment Manager > My solutions, and then clicking on the WordPress instance that you just deployed.
You can try running the following command to reset the root password:
Let me know if you have any questions,
Joe
Jason says
Hi
Really helful tutorial. Thanks
I also can’t log into phpmyadmin.
None of the options I’ve had have taken me to a console.
I can get into WordPress ok but neither of the temp passwords shown work with phpmyadmin.
None of the options I’ve had have taken me to a console. I tried going into the console but I couldn’t find mysql there either or get in with mysqladmin.
Any ideas?
Thanks
Jason
Thanks
Leron Amin says
Did you try both ‘user’ and ‘root’ for the phpMyAdmin username?
Jason says
Hi.
I replied to this earlier as couldn’t get into the correct place in console. I copied the command correctly this time and it all worked.
Thanks again for this tutorial
Jason
Leron Amin says
Great – I’m glad to hear you were able to get it working!
Ela Sant says
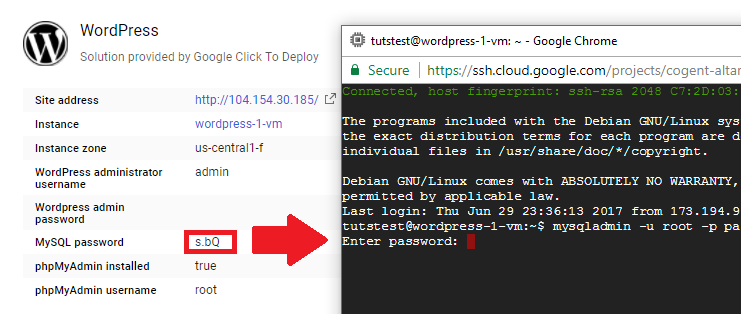
when I did my first deployment I was able to follow this tutorial just fine. But now when I try to enter (paste) the Mysql password i just cant :(. any solutions for it ?>
Leron Amin says
Hi Ela,
I’m not sure I fully understand your question.
Check out this response to Ridz that I just drafted a few minutes ago. It talks about how to view your MySQL password, and the command that you can run in your SSH terminal if you need to reset it.
If this doesn’t answer your question, please provide additional details and I will get back to you shortly!
Thanks,
Joe
Ela says
Hey Joe,
After I enter the command mysqladmin -u root -p password , and try to enter the password the I cant. Can not paste or type it into the ssh.
Leron Amin says
What error message do you see when you run the command? Can you paste the output that you’re seeing in your SSH terminal?
Hitesh L. says
I have the EXACT same problem.. I cannot type anything when it asks for a password.
Leron Amin says
Hi Hitesh,
The password will not show up in the terminal, even though it is registering everything that you type. Just type your password, then press enter. Again, you will not see the password, but it is being registered.
Check out this resource for more information.
Let me know if you have any questions,
Joe
Kenny Torres says
Hello, the state very attentive to your videos and tutorials. He has confronted me with a great challenge and he has come forward. I would like to know a detail, I want a good, safe and reliable service. I have seen many hosting, my idea is to help several people with their web pages in wordpress. And I really liked google cloud, my clients do not have many visits, as well as they do not have presence on the internet. You that I can recommend, I already registered in your group of people, I am in pending status waiting for your check. I am using the 300 dollars free of Google Cloud but I do not understand very well how I can lower the prices. Sometimes it says 0.01 dollar but I see that you have displeased me more than 60 dollars, the problem is that I have 1 page created and another that I have only one page, I am creating it. You think, I continue with the google service or I like to use other options where the monthly payment is 5 euros per month, thank you very much.
Leron Amin says
Hi Kenny,
Use the $300 dollars to play around with Google Cloud and get comfortable with it.
Only when you have a good understanding of Google Cloud should you consider hosting your websites on the platform.
And $5 dollars per month isn’t a lot for managed hosting, and it wouldn’t be worth the hassle to move your client’s websites to Google Cloud unless you know how to design a reliable system and are comfortable troubleshooting it when it breaks.
Hope this information helps,
Joe
Martin says
Hi Leron,
Thank you for all your help first of all! I just feel gratitude for suche a greats tutorials that help me out to set up my site,
i’m just wonder if there’s a chance that i can get into my wordpress control panel straight from the website
like “mywebsite.com/admin” as usually
instead of going the ip address like “http://35.224.221.251”
from google cloud
many thanks in advance
Martin
Leron Amin says
Hi Martin,
After configuring a domain name with your Google Cloud WordPress installation, as shown in this tutorial, you should be able to access your WordPress website from youdomain.com/wp-admin.
Let me know if you have any questions,
Joe
Kenny Torres says
Muchas gracias Joe, eres muy amable
Leron Amin says
Thanks Kenny – glad I could help! 🙂
Bharath says
I need your help as soon as possible please.
I am unable to proceed with step 3. When I click on SSH, after some time of loading I get this error saying “An error occurred while communicating with the SSH server. Check the server and the network configuration.”.
I’m trying it from past 3 days. Same result. I even tried with sdk but getting some different error.
Please help me.
Leron Amin says
Hi Bharath,
That’s not something I am able to help you with – that sounds like an issue with your account itself.
Either open a new account or contact Google Cloud support to get the issue resolved.
Let me know if you have any questions,
Joe
lin says
Yes. I watch this video, but now the URL can not get in. Admin Can you teach me a better way? Thank you
Leron Amin says
Hi Lin,
Please provide more details regarding the error that you encountered and I will see how I can help.
Thanks,
Joe
lin says
hello can you help me? I watched the video set SSL, but I do not know where the settings are wrong, it can not be linked WordPress admin
Leron Amin says
Hello Lin,
Please provide more specific details, such as your domain and specific error messages that you’re seeing (if any), and I will see how I can help.
Talk to you soon,
Joe
lin says
The page does not work
lexzl.com did not send any data.
ERR_EMPTY_RESPONSE
Does not seem to send any data. And I can not log in to their own management accounts
Leron Amin says
Hi Lin,
This tutorial does not cover domain configuration, so your domain will not work with your site until after you complete this tutorial.
At this point, after completing the setup and install tutorial, your website will only be accessible using your virtual machine’s external IP address.
Let me know if you have any questions,
Joe
salem says
hi Leron,
how i change wordpres website name?
i mean like this ” google.com”?
Leron Amin says
Hi Salem,
Use this tutorial for instructions on how to point your domain name to your website on Google Cloud.
Talk to you soon,
Joe
Marie says
I wish my install went smoothly! I followed your steps exactly, but when I pressed enter on the ssh terminal it told me I had a bunch of errors about 3 ssh things. Please help, Joe!
Leron Amin says
Hi Marie,
What exactly were the SSH errors? Can you copy and paste them here?
Talk to you soon,
Joe
Mark says
Hi Leron,
First of all, thank you for this great tutorial.
I followed your video but I encountered a SSH warning similar to what Marie encountered. Below are the details of the warnings.
WARNING: The public SSH key file for gcloud does not exist.
WARNING: The private SSH key file for gcloud does not exist.
WARNING: You do not have an SSH key for gcloud.
WARNING: SSH keygen will be executed to generate a key.
This tool needs to create the directory [/home/mg_hambunan/.ssh]
before being able to generate SSH keys.
Do you want to continue (Y/n)? Y
Generating public/private rsa key pair.
Enter passphrase (empty for no passphrase):
I tried to continue and now it’s asking me for a passphrase which I’m not sure what the value is.
Hope you could help me on this.
NOTE:
I’m new to both WordPress and Google Cloud Platform
Thanks!
Leron Amin says
Hi Mark,
This is normal behavior. The system will generate an SSH key pair the first time you connect to Google Cloud.
Just enter “Y” and then press “enter”. Don’t enter a passphrase, just press enter again to continue without creating a password.
Hope this helps and let me know if you have any questions,
Joe
Mark says
Hi Leron,
Yes I was able to proceed using the procedure you mentioned but I bump into some issue which I will raise in another post.
Thanks again for your detailed tutorials and being responsive to all our questions.
More power to you!
Mike says
Hi Leron,
Great tutorial! I have setup WordPress on Google Cloud using Click To Deploy method. I installed Braintree by PayPal and briefly experimented with the Sandbox environment but I’m ready to switch to the Braintree production environment, go live and start taking payments on my site.
I’m stuck on the following step:
“Update Live Server Configuration.
In your server code, update your configuration to production values.
PHP
Braintree_Configuration::environment(‘production’);
Braintree_Configuration::merchantId(‘YOUR_PRODUCTION_MERCHANT_ID’);
Braintree_Configuration::publicKey(‘YOUR_PRODUCTION_PUBLIC_KEY’);
Braintree_Configuration::privateKey(‘YOUR_PRODUCTION_PRIVATE_KEY’);
”
I’m assuming to use the PHP method since using Google Cloud but not sure where to type this command. Any ideas?
Thanks.
Raj says
Hi, Leron thanks for best tutorial,
Where wordpress files located in google compute (wordpress Google deploy) ?
Leron Amin says
Hey Raj,
The WordPress files can be found in the home directory at /var/www/html/.
Hope this answers your question!
Best regards, 😀
Joe
Leron Amin says
Did this tutorial work for you?
Did you have any issues?
Please let me know.
Thanks,
Joe
Karen says
How do I set up a second (or 3rd) website? How do I deploy other sites on the same VM or they separate instances? I can’t seem to find this anywhere.
I do websites for small orgs. part time.
BTW, your tutorials are very helpful for getting started. Thank you.
Leron Amin says
Hi Karen,
You can use WordPress Multisite to host multiple WordPress websites on a single VM instance. That being said, I’d only recommend using WordPress Multisite for small, static websites that don’t get a lot of traffic, primarily as a means of cutting costs.
Run your high-value, high-traffic websites in their own instances. You can run an unlimited number of instances in your Google Cloud Platform account.
Let me know if you have any other questions,
Joe
Chandresh says
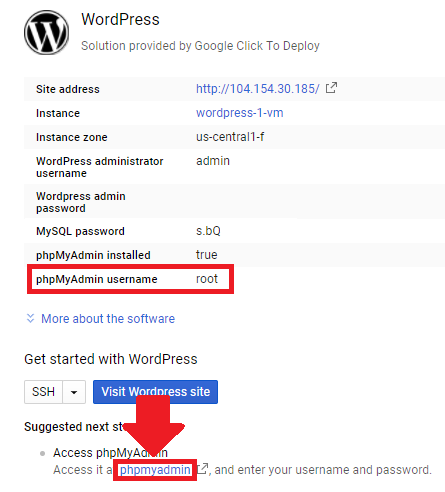
After deploying google cloud wordpress how to access mysql database or how to go inside phpmyadmin
Leron Amin says
Hi Chandresh,
On Click-to-Deploy you can access phpMyAdmin by going to yourdomain.com/phpmyadmin
Let me know if you have any questions,
Joe