Having difficulty uploading files/plugins/themes to your WordPress website on Google Cloud Platform? This problem usually arises from file upload-size limits, which are imposed in your server’s php.ini file.
Although there are many ways to fix this problem, the best solution is to edit your server’s php.ini file directly – which is what you will learn in this tutorial.
There are 4 steps in this tutorial:
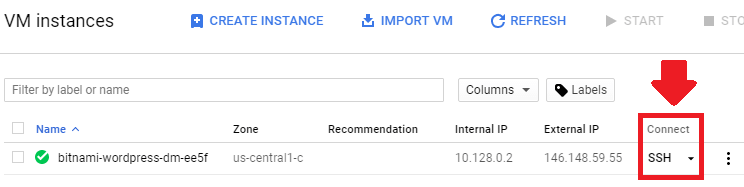
1. Connect to VM Instance
2. Switch to Root User
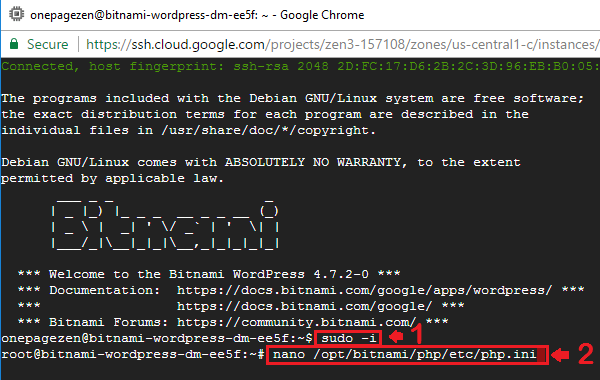
If you’re using Bitnami WordPress, your php.ini can be opened for editing by running the following command:
nano /opt/bitnami/php/etc/php.iniIf you’re using Click-to-Deploy WordPress, your php.ini can be opened for editing by running the following command:
nano /etc/php/7.0/apache2/php.ini
If you're using the old Click-to-deploy stack with PHP5 (not PHP7), the php.ini file is located at the following location: /etc/php5/apache2/php.ini
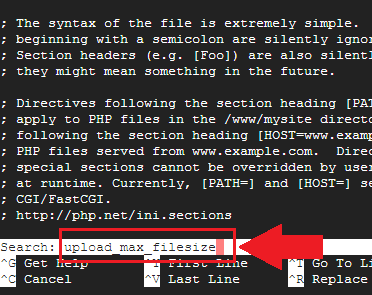
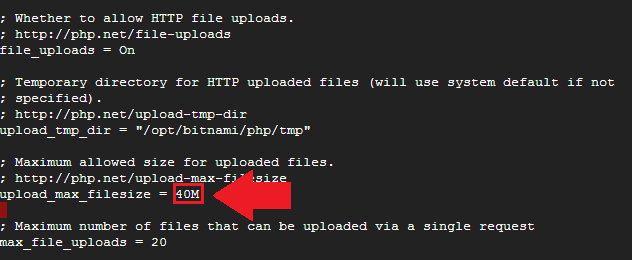
3. Change Upload Size Limit
4. Restart Apache
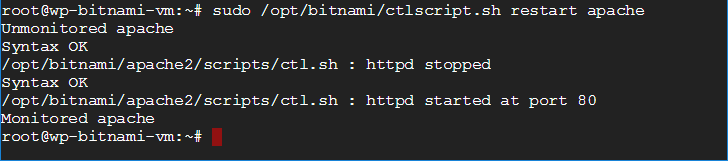
If you're using Bitnami WordPress, restart your server by running:
sudo /opt/bitnami/ctlscript.sh restart apacheIf you're using Click-to-Deploy WordPress, restart your server by running:
sudo service apache2 restartOptional Modifications
Some additional limits that you may want increase are:
    memory_limit = 64M

upload_max_filesize = 64M

post_max_size = 64M

max_execution_time = 300
If you plan on importing large theme files, you may have to increase the upload size limit to over 128M.
Did it work?
After implementing this fix, you shouldn't have any additional issues with being unable to upload files/themes/plugins to your WordPress website.
If you have any questions or comments, please post them below!
Thanks,
![]()
Thallyson Dias says
OnePageZen is the best. I configure all my plataform just with you tutorials.
Thanks a lot.
I want pay you a coffe, how i do?
Leron Amin says
No need to buy me a coffee – but I appreciate the wonderful feedback!
Rin Sanada says
the sudo -i command doesn’t work for me. I looked it up and somewhere it said I had to create it. I don’t know how to do that. there’s a password but i don’t know what it is or where to find it. Please help.
Leron Amin says
Hi Rin,
You may have to install sudo first. Follow this tutorial here.
Let me know if you have questions,
Joe
Jobin says
I changed the upload max filesize as you mentioned but I’m still getting following error in all in one wp migration plugin
Your file exceeds the maximum upload size for this site: 40 MB
Website nicebeautyparlour.in
Could you please help me to sortout this issue. im getting this error while i am trying to upload the backup file of size 215MB
Vik says
Facing issue upload File size permission denied error and installed your shared plugin as well but there is another error “deprecated.php” on line 26.
So I am not able to increase the file size, please help.
Pramod M says
Thanks. This helped me today to modify the file upload size for wordpress on Google cloud platform. Though it didnt work initially, I tried the following steps on the GCP platform and it worked.. I was using Bitnami wordpress.
Modify the following on the php.ini file.
1) upload_max_filesize
2) post_max_size
Do a full restart and not just the Apache restart as one of the user had commented using the below command.
“sudo /opt/bitnami/ctlscript.sh restart”
Leron Amin says
Thank you Pramod for this useful tip!
Carmen says
Thanks¡¡¡
Muhammad Aurangzeb says
i am using wordpress google cloud butnami
i had increased file size and also changed permission given complete permission to following directories through chmod 777
But facing following problem
Unable to open file for reading. File: /opt/bitnami/wordpress/wp-content/plugins/all-in-one-wp-migration/storage/pz7p3qgdtos6/beautyfashionsworld.com-20191216-105918-255.wpress
someone also asked same question but not replied. please resolve this issue
Leron Amin says
Hi Muhammad,
Where are you seeing that error? In the terminal or in your WordPress dashboard?
Talk to you soon,
Joe
MUHAMMAD AURANGZEB says
In WordPress while uploading file
Leron Amin says
Hi Muhammad,
Were you able to get it working? Try running the following command:
Let me know if you have questions!
Joe
George says
Hi
so I have implemented this fix but on the wordpress instance it is still showing the same error
Rick Ertl says
If it helps someone else, I had to also increase “post_max_size” in “/opt/bitnami/php/etc/php.ini” to get the max upload value to change for AIO WP Migration plugin use.
; Maximum size of POST data that PHP will accept.
post_max_size = 16M
Thanks for the great tutorials. I would have not figured this out if not for the existing info. Appreciate it!
Renato says
Thank you. OnePageZen is the best.
Leron Amin says
Thanks for the feedback Renato!
Jack Xue says
Hi Joe,
Thank you for proving excellent tutorials! I’m following your video to increase my upload limit but it won’t work, upload limit remains 40M, could you please kindly help to update?
I’m using WordPress Certified by Bitnami, version5.2.2
Leron Amin says
Hi Jack,
Did you restart your Apache server after making the changes? Did you save the changes to the file?
Talk to you soon,
Joe
Jack Xue says
Hi Joe,
Thank you for coming back to me!
I followed everystep of your video, including save changes and restart the Apache server.
Leron Amin says
Hi Jack,
If it’s still not working correctly for you, try modifying the upload limit in your httpd.conf file – and see if that fixes the issue.
There are instruction from Bitnami’s documentation on increasing the upload limit in httpd.conf, which you can view here.
Let me know if you have questions,
Joe
Jack Xue says
Hi Joe,
Thank you very much for the alternative option, it seems i don’t have a permission to the /opt/bitnami/php/etc/php.ini file, i recieved feed back like this:-bash: /opt/bitnami/php/etc/php.ini: Permission denied.
Could you please kindly instruct me how to get permission to this file? Appreciate it! Thanks!
Have a nice day!
Leron Amin says
Hi Jack,
You can either change the permissions of the file:
You can also switch to root user in order to edit the file:
Keep in mind that there are security concerns within your system surrounding changing the file permissions to 777. Although it’s an easy approach to editing the file, you may want to read more into changing file permissions here and here.
Hope this helps and let me know if you have any other questions,
Joe
Aman says
I did all as you said. Then restarted the apache server.
But upload size is still 40mb.
Please help.
jimmy says
This is the solutionthat work for me: Modify the following options in the
sudo nano /opt/bitnami/php/etc/php.ini
file to increase the allowed size for uploads
then: sudo /opt/bitnami/ctlscript.sh restart
Aditya Singh Tomar says
I followed every step as you directed in video. I’m using Bitnami WordPress.
I have backup of my website “weblatic.com” from my previous hosting of size 335MB. I have extracted the backup from all-in-one wp migration plugin. When I installed wordpress on Google Cloud, I got “upload_max_filesize” as 40M. So I made following changes
“memory_limit = 400M
upload_max_filesize = 400M
post_max_size = 256M
max_execution_time = 300”
and it worked in php.ini
But when I’m going to upload my WP backup through all-in-one wp migration plugin on my Google cloud hosting, it is showing upload size only 40M. Even I installed a plugin “WP Server Stat” to check my php.ini configuration from WP dashboard.
It showed the same as originally installed,
“memory_limit = 40M
upload_max_filesize = 40M
post_max_size = 256M
max_execution_time = 300”
I rechecked on SSH connect, by verifying and reopening
“sudo nano /opt/bitnami/php/etc/php.ini”, it is showing my made changes in “php.ini”
I’m not able to upload my backup my website and make it’s loading time faster. PLEASE HELP.
Leron Amin says
Hi Aditya,
Follow the instructions here to increase your PHP upload limit.
Let me know if you have questions,
Joe
Andrew says
This worked for a long time but my recent installations for Google Click to Deploy and Bitnami the restart was not working to reset the data.
sudo /opt/bitnami/ctlscript.sh restart worked for Bitnami and did a full restart and it finally took effect.
Thanks for a great website!
Leron Amin says
Thanks for the feedback Andrew – I’m glad to hear you were able to get it working!
Hitesh L. says
Not working for me..
I coudn’t find .htaccess file so I created one in the html folder (using FileZilla), and added(using notepad)-
php_value upload_max_filesize 900M
php_value post_max_size 64M
php_value max_execution_time 300
php_value max_input_time 300
but it wasn’t working so I double checked by using the command nano /var/www/html/.htaccess
which showed me the same code I had added along with this –
‘[ Read 4 lines (Converted from DOS format) ]’
I coudn’t find the location of php.ini file so I had to go for .htaccess, but it isn’t working still..
Leron Amin says
Hi Hitesh,
I would not recommend creating a separate .htaccess file for this purpose.
If you’re using the latest WordPress Click-to-deploy stack with PHP7, you can open the php.ini file for editing by running the following command:
I will update the tutorial to reflect this change.
Regards,
Joe
Erik Hals says
Thanks for this! I’ve used it many times, however the last time the directory didn’t exist.
I believe the location of the file for Google Click-to-Deploy has been moved to: /etc/php/7.0/cli/php.ini
Leron Amin says
Hi Erik,
Thanks for bringing this to my attention!
There have been some significant changes in the new Click-to-deploy WordPress solution, so I’m currently working on bringing the tutorials up-to-date.
Talk to you soon,
Joe
Jack says
I could find the php.ini folder in filezilla under the same location as mentioned from Erik, but when opened in SSH it would be a empty file.
I found this solution on some other website, and it worked for me.
sudo sed -i “s/upload_max_filesize =.*/upload_max_filesize = 20M/g” /etc/php/7.0/cli/php.ini
Increase post size
sudo sed -i “s/post_max_size =.*/post_max_size = 20M/g” /etc/php/7.0/cli/php.ini
Restart Server
sudo /etc/init.d/apache2 restart. $ sudo /etc/init.d/apache2 restart
Leron Amin says
Awesome – thanks for sharing the solution!
Nicolas Frichot says
Working 🙂 Excellent
Leron Amin says
Awesome – I’m glad to hear it, and thanks for the feedback!
Kaibron says
Hi Leron,
how long does it take for this to be in place, I mean, once you follow all the tutorials?
Leron Amin says
Hey Kaibron,
The only ‘delay’ you will face when configuring the tutorial is when waiting for your DNS to resolve. This typically takes between 10 to 30 minutes depending on your configuration.
The total time that it would take to complete all of the tutorials from start to finish would be somewhere around 2 to 3 hours.
Let me know if you have any questions,
Joe
Kaibron says
Thank you Leron.
Leron Amin says
No problem! 🙂
karun says
Hi, I changed the max upload size and the same has also been reflected on my page yet I cannot upload large files(Themes) to my WordPress.
Could you help me?
Leron Amin says
Hi Karun – did you save the changes to the file and restart your Apache server afterwards?
Pankaj Sinha says
I am using one click deploy wordpress. and i followed all the steps as u have asked in the tut, but unfortunately after Ctrl O it shows error writing. permission denied
Leron Amin says
Hi Pankaj,
Check out this tutorial for instructions on how to solve insufficient permission errors.
Joe
Dave says
Brilliant, specific, clear and thoughtful tutorial. Thanks for doing both bitnami and the one click! Couldn’t find much for one click roll out.
Thanks again
Leron Amin says
Thanks Dave! I am glad to hear you’ve enjoyed the tutorials 🙂
Sharfraz Ansari says
I your Fan…
Leron Amin says
Hey Sharfraz – thanks for reaching out! I’m glad to hear that you’re a fan of the tutorials! 🙂
Taylor says
Not only did this work, but it was clear as mud and accounted for variations (something most tutorials don’t do).
This was incredibly helpful/useful.
Leron Amin says
Thanks Taylor – I’m glad you found the tutorial helpful.
Aditi says
There are literally too few websites giving quality info on GC, you are one of them – keep it up.
Leron Amin says
Thanks for the feedback Aditi! 🙂
Larry says
Great stuff mate – thanks a lot for your help.
Leron Amin says
No problem – I’m glad the tutorial helped you!
David says
Thank you! This saved me! I was about to quit GCP !! God bless you!
Ela says
I used Click-to-deploy and cant seem to find the fix for this. Can you help me?
Leron Amin says
Hello Ela,
Check out Raghav’s solution for Click-to-Deploy users here. This involves adding the the upload limits code to your htaccess file.
Let me know if you have any questions,
Joe
Ela says
I was able to do it. Just some issues with the CTR + W to find the text, because Chrome closes the window on that command. But I did it. Thanks a lot!
Leron Amin says
Awesome! I’m glad to hear you were able to get it working!
John says
How do you overcome the CTR + W the window disappears cant find the limit
Leron Amin says
Hey John,
In the upper right-hand corner of the black SSH terminal window there is a keyboard icon. Click that icon and it will display a keyboard shortcut for CTRL + W that you can click to use.
Hope this helps,
Joe
Mphati says
Hi
I followed your instructions but when I try save the changes it tells me I don’t have permission. How do I fix that?
Leron Amin says
Hi Mphati,
Check out steps 3-6 of this tutorial.
Let me know if you have any questions,
Joe
Stuart Burchill says
Very useful – I was about to switch from Google cloud when i got your blog 🙂 Thank you.
Leron Amin says
Hi Stuart,
Thanks for the feedback! I am glad to hear the tutorials have helped you. 😀
Naim Hashmi says
Hi,
I have Click 2 Deploy installed. And I need to increase my upload limit size in wordpress installed on Google Cloud Platform.
Thank You Very Much for this post. You’ve helped a lot. If you need any favour contect me.
Leron Amin says
Thanks Naim,
I’m glad the tutorial has been helpful for you! 😀
Karan says
I have a click to deploy installed. But when i am searching for upload_max_filesize it is showing me not found
Leron Amin says
Hi Karan,
Your memory limit may be defined in your wp-config.php file – I would check there as well.
Gagandeep Singh says
Hello Jay,
I just migrated to GCN from Hostgator hosting. And must say it wouldn’t be possible without you. I learned everything from Bitnami WordPress installation to email client management from you. Your way of explaining is the thing what makes you above all other GCP blogs.
But I am facing a problem there. I can’t able to increase file upload limit. By default file upload limit is 40 MB which is quite low. And also I tried to increase php var limit with this method because it is low then recommended limit by my theme. I follow every single step described by you and now file upload limit is set to 512mb and var_limit is 3000 in php.ini file. But still, the limit is not increased in WordPress. and var limit is also same. Hope you find any solution for this. And I also edited the htaccess.conf file as described by Raghav Bhalla.
Warm regards and
Thanx in advance,
Gagandeep Singh
Leron Amin says
Hello,
Thanks for the feedback – I am glad you’ve found the tutorials helpful.
Regarding the memory limits, it is possible that they are defined in your wp-config.php file.
The location of your memory limits is dependent on your theme and your WordPress configuration. Unfortunately it isn’t limited to one location.
I hope this information helps!
David says
Thank you so much, Leron. Do you have a blog or video how to connect to FTP from Mac? I am not too technical and I see your similar video for Windows, but I don’t use a Window system 🙁
Leron Amin says
David,
Check out the comments section of this tutorial here.
Rob and Deepak and Ben go into detail about how to configure FTP for Mac users.
Hope this helps,
Joe
Safna says
I Don’t have wordpress installed. I have a Lamp set up as a VM Instance. Added phpmyadmin, I am having trouble importing sql file larger than 2 MB.
Leron Amin says
Hi Safna,
Look for your php.ini file and change the upload limits accordingly.
To find the file, run this command in the terminal:
find / -type f -name php.ini
Please reach out to me if you have any questions. 🙂
Jim says
Thanks for the help mate. You are probably the only (or one among a few) person who is helping so much on Google Cloud 🙂
Leron Amin says
No problem Jim – glad I could help! 😀
Aswarth says
Made all the changes as mentioned above. Still having trouble to upload theme. Getting error saying – Are you sure want to do this?
Leron Amin says
Hi Aswarth,
If it is not working for you, you may want to try configuring your upload limits in your htaccess file – as described in this comment.
Talk to you soon,
Joe
Marcelo says
Worked!
But I still haven’t found the “max_input_vars” way to change in gcloud.
There it is on the php.ini but you can’t change. It’s fixed to 1000.
How do I do?
Leron Amin says
Hi Marcelo,
What do you mean you can’t edit it?
Are you getting an insufficient permission error?
Talk to you soon,
Joe
Marcelo says
Just a Theme,
They say that’s not a problem, but I get bugged when I can’t change something. There is no error at all. The theme sucks. Google Page Insights bellow 50. Speaking of page speed, any tutorials about that? Without blowing up the theme. lol
Leron Amin says
Hi Marcelo,
I know what you mean about being bugged when you can’t change something.
I’ve been looking into doing a page speed tutorial. There have been a lot of requests for it, so thank you for bringing it to my attention!
And your page is serving a lot of high-resolution images, which is really difficult to optimize. Somehow the big guys at Apple and Google have it figured out, but I imagine they’re using some abstract compression algorithms that are beyond my level of expertise.
Anyways – I will look into making some of those tutorials.
Talk to you soon,
Joe
Marcelo says
“abstract compression algorithms that are beyond my level of expertiseabstract compression algorithms that are beyond my level of expertise” for sure.
The minimum size that I get it’s between 70 and 100kb to photos. And use plugins to try to minimize, and tried to use plugins to cache. But caching gave me a LOT of headaches. Even the simple ones seems to distorce some level of the site functions.
The ThemeGood are lunching daily updates, but sucks the at the same level. Now I’m looking for lighter themes or start using the Adobe Muse. I even start to use Blance VMs on Gcloud to cache and to test if it get better velocity, but nothing happens either. Frontends, backends, healthchecks, SSL… all that I can imagine. I’m learning. That’s true…
They recommended Nginx to compress HTML or php, don’t know for sure, but I tried to implement it and, failed to comprehend the hole process. And got stuck in the middle process.
Keep the work! looking forward to see more tuts…
Marcelo
Leron Amin says
Hi Marcelo,
70-100kb for large photos isn’t bad, especially if they are high resolution like the ones being served on your site.
I am surprised that ThemeGood are doing daily updates – that seems excessive. And did you try out load balancing?
The main drawback I’ve noticed is that the cost of using the load balancing service is relatively expensive.
Also, I enjoyed looking at your portfolio – you do nice work.
Talk to you soon,
Joe
Bashir says
Worked like a charm bro!!
Please.. Please Keep adding tutorials everyday!!
You are need of the hour..
Let me tell you!
More content you add more people like it..
& Eventually more revenue for you..
I just setup 2 sites!! Without much hiccups!
Cheers!!
Leron Amin says
Hi Bashir!
I am glad to hear the tutorials have helped you!
Joe
Miz says
Hi.. how can i change php version from php5 to php7 in google cloud WP.?
Leron Amin says
Hi Miz,
I am not quite sure the best process for updating php5 to php7.
If you’re using a WordPress Bitnami installation, check out this thread for more information. Otherwise, I would recommend checking out this thread if you’re using Click-to-Deploy.
Let me know if you have any questions,
Joe
Luca says
hello, I follow the procedure but the PHP.INI file does not exist or you can not see it, so it does not change how it looks, it only looks at a black and white screen and the bottom menu
Leron Amin says
Hi Luca,
Try running the command with sudo in front:
sudo nano /opt/bitnami/php/etc/php.ini
Let me know if this fixes the issue. 🙂
Joe
Luca says
ok the command is fine and it works but when I connect it I get a blank black screen with bottom menu, instead I should see lots of writing … I do not understand what does not go!
Leron Amin says
Hi Luca,
If it’s showing an empty file, it typically means the file doesn’t exit.
Are you using the Bitnami version of WordPress on Google Cloud?
Luca says
You guessed, I’m using bitnames on G Cloud but I do not know how to do it!
Leron Amin says
What is the output of the following command:
sudo ls /opt/bitnami/php/etc/
RAGHAV BHALLA says
any tutorial to do this for the click to deploy version ? via SSH i mean.
RAGHAV BHALLA says
so only the location is different for the click to deploy version, in order to find the php location i ran this [php -i | grep ‘Configuration File’] after that i followed your tutorial and edited the settings in the exact php file.
now even after restarting the server my upload size and post size are still 2M, when i check the php.ini again using SSH it has them both at 16M (as edited by me via SSH previously). Seems like wordpress is not syncing the new php.ini file. Any tips ? 🙂
RAGHAV BHALLA says
sorry for the multiple comments but i managed to get it working. I used that nano command from your tutorial for the htaacess file. in the non bitnami wordpress it is located here “/var/www/html/.htaccess” so once you have it opened in SSH you just need to add this at the end of the file
php_value upload_max_filesize 64M
php_value post_max_size 64M
php_value max_execution_time 300
php_value max_input_time 300
this did the trick for me. 🙂 Thanks a ton for the wonderful tutorials, 2days ago SUDO and SSH were alien terms me, now ive managed to set up SSL using them and also got filezilla working using your tutorials.
Leron Amin says
Great Raghav!
I am glad you were able to get the problem resolved!
Thanks for posting these instructions as well – I am sure a lot of users will find this very useful!
And congratulations on learning sudo and SSH so quickly – you seem to be well versed in solving problems/troubleshooting, which is a great way of learning something.
Talk to you soon, 🙂
Joe
RAGHAV BHALLA says
Thanks for your kind words. Wouldn’t have been able to do all of this without your brilliant and detailed tutorials. There are 2 more issues I’d like to point out regarding the one click install method. Hope this helps others, don’t know where to post this so will just leave it here, as a ton of people would use your tutorials for google cloud wordpress in future too.
With 1 click install the robots.txt disables everything by default, to fix this you have to edit the robots.txt via the nano command. location of it is here /var/www/html/robots.txt (I tried changing it’s permissions so All In One SEO plugin can manage it but that didn’t work so I manually edited it in the SSH ultimately and that did the trick). Im guessing this is very important as otherwise search engines won’t be able to read the website at all.
Other thing is, the mod_expires is disabled by default. This leads to a low performance by your wordpress cache engine overall (took me hours to figure out this was the main issue). I use WP rocket but wasn’t seeing any performance boost with google cloud which felt weird.
To enable proper caching on your VM simply type in “sudo -i” into SSH and then “a2enmod expires” and then after this “service apache2 restart” . this enables caching properly and you will get normal caching.
Hope this helps out someone as my switch from godaddy cpanel to this has been really adventurous.. Hehe, so far this is the major stuff I’ve figured out that needs to be tweak apart from everything already present on this website.
Leron Amin says
Hi Raghav,
Awesome tips! I know a lot of people will find this advice very helpful, and thank you for taking the time out of your day to publish these great tips.
I am glad you are learning a lot from Google Cloud and it seems like you’re a natural! The switch from CPanel and managed hosting to Google Cloud is a difficult change for most people, but you’ve seem to have handled it with relative ease! 😉
Thanks again for sharing these great tips!
Talk to you soon,
Joe
Ela says
I tried this, but the file is empty 🙁
Leron Amin says
Hi Ela,
Make sure you got the file path right.
Also – try pasting the rules into the empty file, saving it, and seeing if it works.
Let me know how it goes,
Joe
Claire says
I only just realised my robots.txt file was blocked, thanks Rhagav for sharing your tips!
Isabel Da Guerra says
OFF TOPIC:
Hi Joe,
I hope to find you well my friend… 😉
This is so off topic and I hope you’ll excuse me, but could I be cheeky enough to request you add a ‘Search’ button or a ‘Sitemap’ link at the footer-bottom of your website?
I’ve been trying to go back to some of my previous comments and lost my bearings he he he…
Leron Amin says
Hey Isabel,
Thanks so much for posting this comment!
I had to edit the site-footer last week and forgot that I had removed the link to the sitemap.
Hopefully my SEO won’t be too adversely affected, seeing as it was only gone for a week or so… :/
Thanks again for bringing this to my attention! 😀
Best regards,
Joe
Anwesh Shetty says
Hello..im hosting my wordpress website in google cloud not with bitnami..but i couldnt able to upload file size which exceed more thand 2 MB. Its very difficult to upload new theme. They only gave phpmyadmin and wordpress thats it. Nothing more than that. Even i tried filezilla connecting ftp through ssh keys as per ur tutorials. Connected but there is no wordpress files. How can i find wordpresss files and how to chamge maxiimum upload size. Looking forward to ur postive answer bro
Leron Amin says
Hi Anwesh,
Were you able to access your php.ini file?
Susu says
Hi,
Try this plugin for upload large file “Add from server”…
Susu says
Hello Joe,
I need your help…
I have an issue here, I follow all steps here, there is no any file… the message is: “upload_max_filesize” not find.
I have noticed your Instance name is: bitnami-wordpress-xxx-xx,
but my Instance is just: wordpress-xxx-xx
I did set up the whole things by followed your videos.
What’s wrong with me?
Please help…
Thanks a lot
Susu says
Hello Joe,
Update my last post, I have no idea when it’s happened, in this VM instances, there is a new url replaced the one when I signed up. So my WordPress site url was changed, the old url was not able to accessed. So I use the new one and I can locate the files to increase these limits.
But after I edited the limits by followed your video, my WordPress theme- system-status still shows these original settings, nothing increased. It seems the WordPress theme and the system not sync.
Please help me…
thanks
Leron Amin says
Hi Susu,
After you made the changes, did you save the file?
In nano, you need to type CTRL + O to save changes after you’ve written/edited a file.
Talk to you soon,
Joe
Leron Amin says
Hi Susu,
Are you using the Bitnami version of WordPress on Google Cloud?
If so, you can access your php.ini file by executing the following command:
nano /opt/bitnami/php/etc/php.ini
If you search for “upload_max_filesize” is not found, try search for just “upload” instead.
Let me know if this helps.
Thanks,
Joe
Susu says
Hi Joe,
Thanks for your replies.
Yes I use GCP-Bitnami. And I did saved like that (followed every steps in your videos).
Now, I can find any file, and see my changes were applied (through SSH). But in my WP dashboard, the theme status are still displaying the same as default, nothing increased. What to do?
Leron Amin says
Hi Susu,
What do you mean when you say “the theme status are still displaying the same as default”?
Talk to you soon,
Joe
Susu says
Hi Joe,
The theme I use with a tab shows WP and Server Environment, as the theme has requestments like PHP Max Input Vars, Memory Limit…
The default is 1000, but the theme recommend is 1580. I already edited it to 1580 through SSH(GCP-Bitnami), and it’s applied. But in the theme tab is still showing PHP Max Input Vars: 1000. So, this affected the menu and blog page are not in function…
And in the tab showing WP Path is:
/opt/bitnami/apps/wordpress/htdocs/
I’m really confused…
Thanks
Leron Amin says
Hi Susu,
Check out this thread – you may have to add a line of code to your wp-config.php file.
Let me know if this works.
Thanks,
Joe
eric says
instead of nano i used vim lol. but yeah awesome tutorial
Leron Amin says
Hey Eric,
I should say “choose the text editor of your choice!” 😉
I’m glad the tutorial helped you. Thanks for the feedback!
-Joe
Leron Amin says
What did you think of this tutorial?
Share your questions and comments below.
Also, let’s connect on social media!
https://www.facebook.com/onepagezen
https://www.twitter.com/onepagezen
https://www.google.com/+onepagezen
-Joe