In this tutorial I will show you how to configure free, auto-renewing SSL certificates for WordPress websites that are hosted on Google Cloud Platform using the Bitnami version of WordPress on Google Cloud Platform.
Having SSL Security on your website will improve your Google search ranking.
Luckily for you, this step-by-step tutorial is super easy to follow. All you have to do is follow along with the video as I install an SSL certificate for my domain eborchids.com.
Before getting started with this tutorial, you should have already installed WordPress on Google Cloud Platform, and set up a domain name for your WordPress website.
So let’s get started.
There are 9 steps in this tutorial:
-
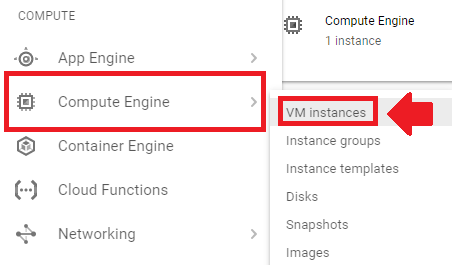
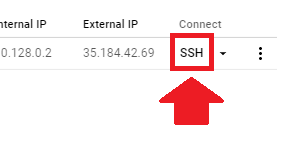
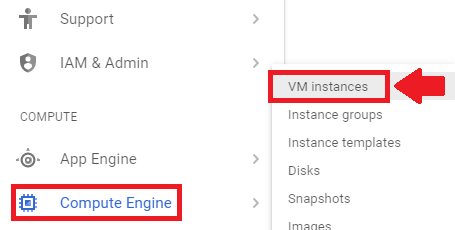
1. Connect to WordPress via SSH
-
2. Install Git
-
3. Install CertBot Client
-
4. Generate Certificates
-
5. Setup Certificate Auto-Renewal
-
6. Configure the Certificates
-
7. Update Domain URLs
-
7. Restart your Apache Server
-
8. Test your Configuration
1. Connect to WordPress via SSH

2. Install Git
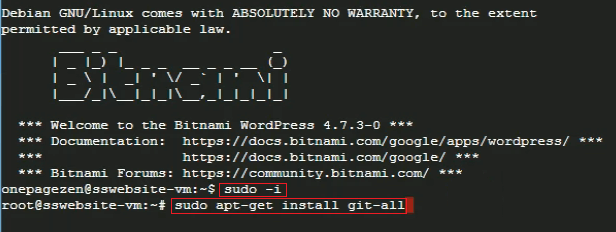
sudo -i

sudo apt-get install git-all
3. Install CertBot Client
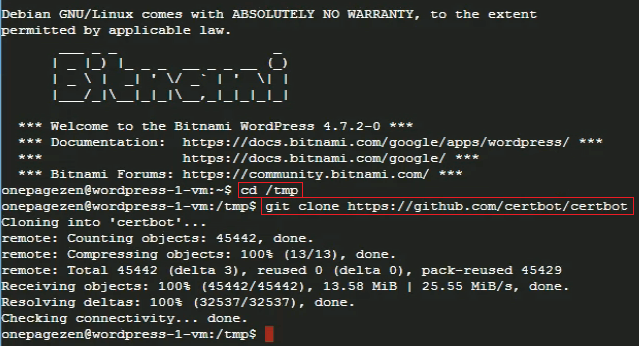
cd /tmp

git clone https://github.com/certbot/certbot
After running each of these commands, you can stay in the same SSH window or exit and open a new one.
4. Generate Certificates
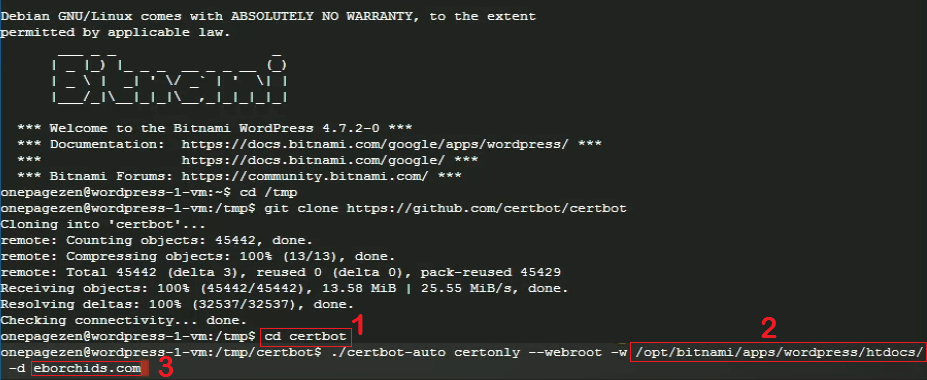
cd /tmp/certbot

./certbot-auto certonly --webroot -w /opt/bitnami/apps/wordpress/htdocs/ -d eborchids.com
 -d www.eborchids.com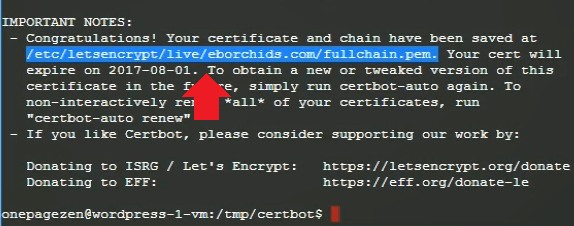
5. Setup Certificate Auto-Renewal
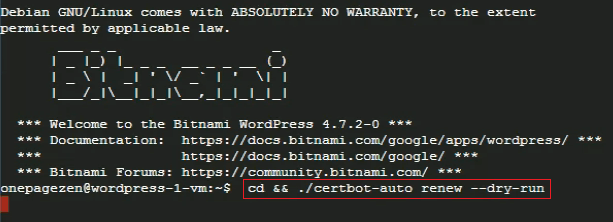
cd /tmp/certbot/

./certbot-auto renew --dry-run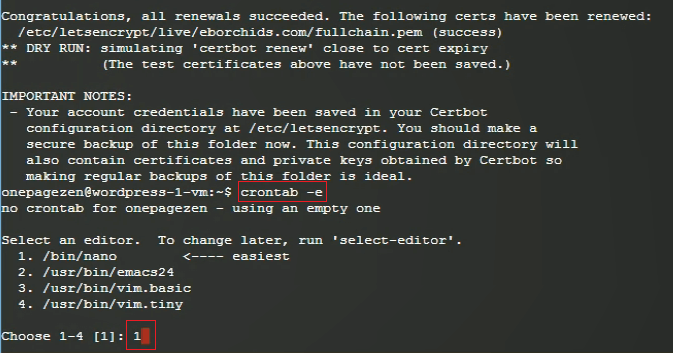
crontab -e

1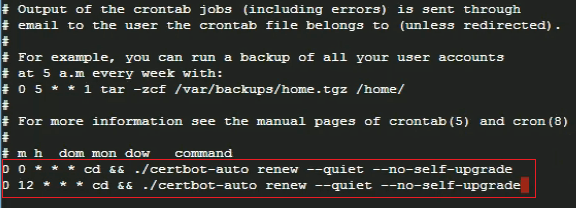
0 0 * * * cd && ./certbot-auto renew --quiet --no-self-upgrade

0 12 * * * cd && ./certbot-auto renew --quiet --no-self-upgrade
6. Configure the Certificates
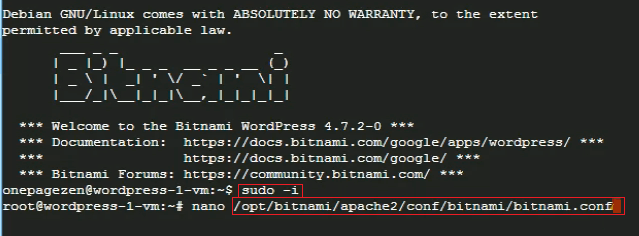
sudo -i

nano /opt/bitnami/apache2/conf/bitnami/bitnami.conf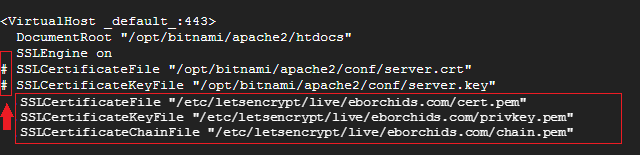
SSLCertificateFile "/etc/letsencrypt/live/eborchids.com/cert.pem"

SSLCertificateKeyFile "/etc/letsencrypt/live/eborchids.com/privkey.pem"

SSLCertificateChainFile "/etc/letsencrypt/live/eborchids.com/chain.pem"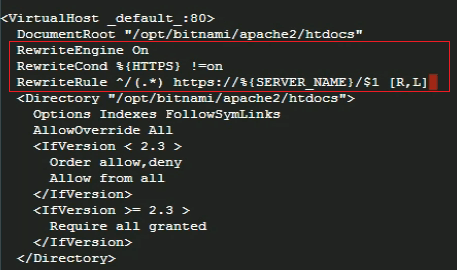
RewriteEngine On

RewriteCond %{HTTPS} !=on

RewriteRule ^/(.*) https://%{SERVER_NAME}/$1 [R,L]
After adding this code, enter ctrl+o to save changes, followed by ctrl+x to exit back to our home screen.
7. Update Domain URLs
Changing your website URLs via Settings > General is disabled in the Bitnami version, so you'll need to change your URLs by editing your wp-config.php folder.
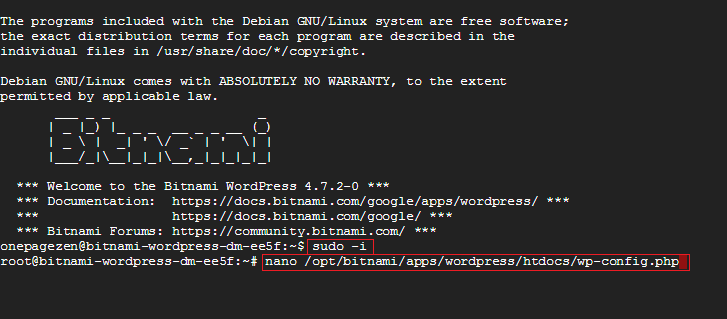
sudo -i
 nano /opt/bitnami/apps/wordpress/htdocs/wp-config.php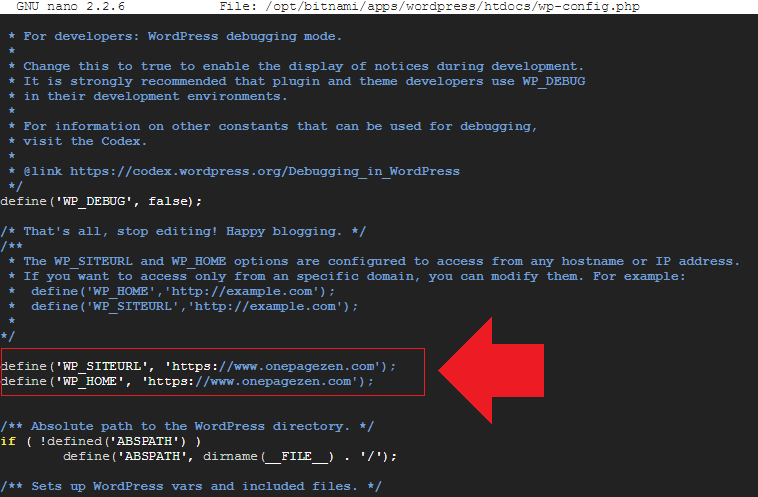
REPLACE THIS:


define('WP_SITEURL', 'http://' . $_SERVER['HTTP_HOST'] . '/');

define('WP_HOME', 'http://' . $_SERVER['HTTP_HOST'] . '/');


WITH THIS:


define('WP_HOME','https://yourdomain.com');

define('WP_SITEURL','https://yourdomain.com');
Remember to replace DOMAIN with either the www. or non-www. version of your domain name - whichever your prefer. For example:
define('WP_HOME', 'https://www.yourdomain.com');

define('WP_SITEURL', 'https://www.yourdomain.com');
After adding this code, enter CTRL+o to save changes, followed by CTRL+x to exit back to your home screen.
8. Restart your Apache Server
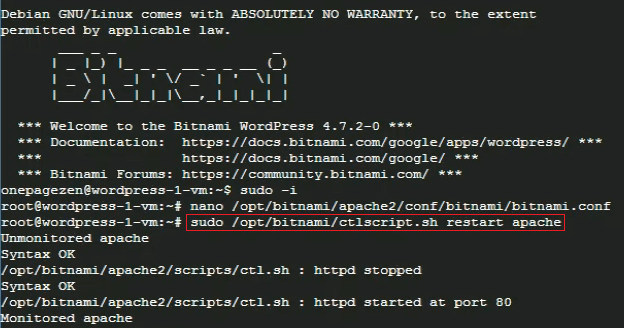
sudo /opt/bitnami/ctlscript.sh restart apache9. Test your Configuration
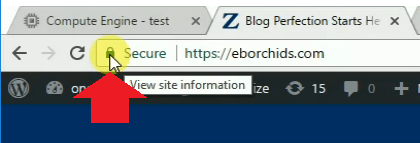
Did it Work?
If your SSL certificates were configured properly, you will notice that your website is being loaded with a green padlock icon.
Because we configured auto-renewal for our certificates, we don't ever need to renew them or setup new ones.
Pretty cool, huh?
Up Next...
Adolf de Volk says
İt’s successeful! it worked. You are best ONE PAGE ZEN ! – I would like to offer a coffee 🙂 Thank you so much
Leron Amin says
Thanks for the feedback Adolf de Volk!
Aazim says
Hi thanks for great tutorial. Do have any tutorial for installing paid comodo ssl issued from domain registrar on wordpress bitnami ?
Leron Amin says
Hi Aazim,
I don’t currently have such a tutorial, but hope to have one in the near future.
Let me know if you have any other questions,
Joe
Mehrab says
Hey! How can I install the SSL that i purchased from cloudflare which is 10$ per mont. How can I setup the SSL in my Google cloud. Not let’s encrypt.
Leron Amin says
Hi Mehrab,
You can simply enable ‘flexible SSL’ from Cloudflare, that way you won’t have to undergo the work of setting up a third-party certificate.
I go into detail about the different SSL options available through Cloudflare in step 6 of this tutorial.
Let me know if you have questions,
Joe
Jireh says
Hey Joe!
Appreciate all your help. Your site is very helpful!! One question, do we still need to follow the “SSL Certificate Setup for WordPress on Google Cloud (Bitnami)” guide if we already have SSL (Full) enabled via Cloudflare?
Leron Amin says
Hi Jereh,
The additional level of encryption between your server and Cloudflare usually isn’t necessary.
For more information, check out this section of the Cloudflare tutorial, where I examine the various types of SSL configurations available with Cloudflare in greater detail.
Please reach out if you have any questions,
Joe
Gopichand Wagh says
yesterday i sent u email regarding same issue while setting up SSL in bitnami wordpress.
today I tried using ur other tutorial link (https://onepagezen.com/free-ssl-certificate-wordpress-google-cloud-bitnami/#step8)
but same problem occuring at last when i use command
gopiw1@apnamstore-vm:~$ sudo -i
root@apnastore-vm:~# nano /opt/bitnami/apps/wordpress/htdocs/wp-config.php
root@apnalstore-vm:~# sudo /opt/bitnami/ctlscript.sh restart apache
Unmonitored apache
AH00526: Syntax error on line 15 of /opt/bitnami/apache2/conf/bitnami/bitnami.conf:
ServerName not allowed in context
apache config test fails, aborting
AH00526: Syntax error on line 15 of /opt/bitnami/apache2/conf/bitnami/bitnami.conf:
ServerName not allowed in context
apache config test fails, aborting
Monitored apache
root@apmastore-vm:~# nano /opt/bitnami/apache2/conf/bitnami/bitnami.conf
root@apnlstore-vm:~# nano /opt/bitnami/apache2/conf/bitnami/bitnami.conf
root@apallstore-vm:~# sudo /opt/bitnami/ctlscript.sh restart apache
Unmonitored apache
AH00526: Syntax error on line 15 of /opt/bitnami/apache2/conf/bitnami/bitnami.conf:
ServerName not allowed in context
apache config test fails, aborting
AH00526: Syntax error on line 15 of /opt/bitnami/apache2/conf/bitnami/bitnami.conf:
ServerName not allowed in context
apache config test fails, aborting
Monitored apache
root@apnamallstore-vm:~# sudo /opt/bitnami/ctlscript.sh restart apache
Unmonitored apache
AH00526: Syntax error on line 15 of /opt/bitnami/apache2/conf/bitnami/bitnami.conf:
ServerName not allowed in context
apache config test fails, aborting
AH00526: Syntax error on line 15 of /opt/bitnami/apache2/conf/bitnami/bitnami.conf:
ServerName not allowed in context
apache config test fails, aborting
Monitored apache
root@apnamallstore-vm:~#
please help
Leron Amin says
Hi Gopichand Wagh,
What does the top portion of your bitnami.conf file look like? There appears to be a syntax error somewhere around the ServerName directive.
Talk to you soon,
Joe
Robb Priestley says
There is a bug in the crontab code which is provided as:
0 0 * * * cd && ./certbot-auto renew –quiet –no-self-upgrade
0 12 * * * cd && ./certbot-auto renew –quiet –no-self-upgrade
When you say cd && you are missing the directory to cd into (/tmp/certbot/) so the path to ./certbot-auto will not be resolved and the command will always fail. This is probably one reason why the users in the comments above, like me, failed to have auto-renew succeed.
This is reflected in your subsequent posting here: https://onepagezen.com/letsencrypt-auto-renew-certbot-apache/ but it might be useful if you could update the above info as it might save some trouble for people.
Note that the Apache restart also seems to be required and this is not listed as a requirement for auto-renew.
Leron Amin says
Hi Robb,
Thanks for bringing this to my attention. I’ve been meaning to update the tutorial, as you’re correct that the crontab won’t work correctly.
Talk to you soon,
Joe
Luke says
After i have completed this video my WordPress dashboard is not longer safe to view. It says that the certificate is invalid. My website is completely fine.
How can i resolve this?
Leron Amin says
Hi Luke,
Check that your certificate is configured correctly with SSL Checker.
Feel free to share the output from the SSL test, and I will see how I can help.
Saif says
None of the common names in the certificate match the name that was entered (Soughty.com). You may receive an error when accessing this site in a web browser.
Leron Amin says
Hi Saif,
It looks like either the certificates were mistakenly issued for http://www.example.com or your server is still using the snake-oil certificates.
I would recommend re-issuing the certificates, and making sure that the certificates are properly configured in your Bitnami.conf file. Also, make sure that you restart your Apache server after you’ve implemented the changes.
Let me know if you have any question,
Joe
Bobby says
I am not sure why but when trying to access the terminal from the VM instance (when clicking “SSH”), the new window loads saying that it’s “Transferring SSH keys” and then it completely blanks out and no text loads in the terminal. Why would this be happening?
Leron Amin says
Hi Bobby – can you please include a link with an image of the error?
Azhdar Gasimzade says
Hi,
I did those steps few month ago, it worked awesome, but few days ago I sow that my certificate is expired and I wonder probably I missed a step for adding auto renew. Can you help me with that please?
Leron Amin says
Hi Azhdar,
Did you configure the auto-renewal according to the instructions here?
If not, use those instructions for configuring the certificate auto-renewal.
Hope this helps and let me know if you have questions,
Joe
Victor Villega says
Thank you, these steps always works for us, you are making a very good JOB
Leron Amin says
Glad to hear it – thanks for the feedback Victor!
Nop says
I was stuck on STEP 4 Generate Certificates
Domain: mysite.com
Type: unauthorized
Detail: Invalid response from
http://mysite.com/.well-known/acme-challenge/qLVPwy2nXiNCw2bqc5J46wYcnub7N5NGSWUjXzAR0gs:
To fix these errors, please make sure that your domain name was
entered correctly and the DNS A/AAAA record(s) for that domain
contain(s) the right IP address.
Leron Amin says
Hi Nop,
Did you replace mysite.com with your actual domain name?
Also – is your website online/accessible via the browser? If your website is offline and not accessible via HTTP then Certbot will be unable to validate your domain name.
Let me know if you have any questions,
Joe
Manuel Garcia says
Hi,
First I want to say thank you Joe for these tutorial
When I go to the WordPress Dashboard the site is secure and appears a padlock in the search browser, but when I go to visit the site it appears with a https url but no more padlock, instead there is a warning sign and it says: “your connection to this site is not fully secure ” .
do you know how can I fix it?
Leron Amin says
Hi Manuel,
Those are probably insecure content errors, which I cover in this tutorial.
Hope this helps and let me know if you have questions,
Joe
Hugo Trépanier says
Hi, thanks for this excellent tutorial, everything worked perfectly!
However, at step 7, since I have wordpress Multisite installed, I did not have those lines. I tried like this and it works fine, should I be concerned?
Also, at step 5, I replaced cd && ./certbot-auto renew –quiet –no-self-upgrade with cd/tmp/certbot/certbot-auto renew –quiet –no-self-upgrade
just doing cd, it cds into ~ (home), and the certbot-auto file is in /tmp/certbot/, no? Maybe I should move certbot out of /tmp into /etc?
Thank you
Leron Amin says
Hi Hugo,
You will have to move certbot out of the tmp directory or it will be deleted.
Check out the instructions in this tutorial for more information.
Let me know if you have any questions,
Joe
Sarkhan Latifov says
Hi Leron,
I used bitnami do deploy my webpage. At the last stage of SSL Certificate Setup, red https error appears. I faced same issues in my previous webpages, but I solves the issues with your help. This time again I need your help. I used click-to-deploy in my previous webpages.
As you see below, it says there is a syntax error on line 54. But when I check the command line 54 it seems there is no error.
Here is the error:
Unmonitored apache
AH00526: Syntax error on line 54 of /opt/bitnami/apache2/conf/bitnami/bitnami.conf:
SSLCertificateFile: file ‘/etc/letsencrypt/live/kagizkarton.com/cert.pem’ does not exist or is empty
apache config test fails, aborting
AH00526: Syntax error on line 54 of /opt/bitnami/apache2/conf/bitnami/bitnami.conf:
SSLCertificateFile: file ‘/etc/letsencrypt/live/kagizkarton.com/cert.pem’ does not exist or is empty
apache config test fails, aborting
Monitored apache
Here is the mentioned error line 54 on SSH
DocumentRoot “/opt/bitnami/apache2/htdocs”
SSLEngine on
#SSLCertificateFile “/opt/bitnami/apache2/conf/server.crt”
#SSLCertificateKeyFile “/opt/bitnami/apache2/conf/server.key” (command line 54 is this line)
SSLCertificateFile “/etc/letsencrypt/live/kagizkarton.com/cert.pem”
SSLCertificateKeyFile “/etc/letsencrypt/live/kagizkarton.com/privkey.pem”
SSLCertificateChainFile “/etc/letsencrypt/live/kagizkarton.com/chain.pem”
Do you have any idea how I can solve the problem?
Sincerely Yours,
Sarkhan
Leron Amin says
Hi Sarkhan,
Hope you are well!
To fix the issue, I would recommend using this solution posted by CJ.
Hope this helps and let me know if you have any questions,
Joe
Sarkhan Latifov says
Hi Leron,
I tried to follow the steps you mentioned but this time some different issues appeared.
When I type and enter my domain or IP ob browser, Apache debian default page appears. You can check yourself. IP: 35.204.153.151 domain name: kagizkarton.com
Also, when I connect Filezilla server, below error appears:
“You appear to be behind a NAT router. Please configure the passive mode settings and forward a range of ports in your router.
Warning: FTP over TLS is not enabled, users cannot securely log in.”
I couldn’t understand this.
At the same time, bellow error appears on SSH page. I tried to apply the rules you mentioned, but nothing happened.
Unmonitored apache
AH00526: Syntax error on line 58 of /opt/bitnami/apache2/conf/bitnami/bitnami.conf:
SSLCertificateFile: file ‘/etc/letsencrypt/live/kagizkarton.com/cert.pem’ does not exist or is empty
apache config test fails, aborting
AH00526: Syntax error on line 58 of /opt/bitnami/apache2/conf/bitnami/bitnami.conf:
SSLCertificateFile: file ‘/etc/letsencrypt/live/kagizkarton.com/cert.pem’ does not exist or is empty
apache config test fails, aborting
Monitored apache
Thank you for your time.
I hope I do not bother you.
Sincerely yours,
Sarkhan
Leron Amin says
Hi Sarkhan,
Try changing the permissions level of your Let’s Encrypt directory to 755:
Make sure the error is fixed by running:
After doing this, kill your Apache server and reboot it:
Hope this helps and talk to you soon,
Joe
Amarin says
Hey Joe,
Great tutorial. I’ve used your instruction many times and it worked great. However, I think
git clone https://github.com/certbot/certbot in step 3 is no longer working.
Can you help advise what I should do? It doesn’t look like I can continue the instruction without completing this step.
Thank you
Leron Amin says
Hey Amarin,
Use the updated version of the tutorial here.
Talk to you soon,
Joe
Antipov says
I open the file nano /opt/bitnami/apache2/conf/bitnami/bitnami.conf, but it’s empty!(
Leron Amin says
Hi Antipov,
Try using sudo before the command:
Let me know if this helps,
Joe
deb giri says
Sir, I have an SSL certificate provided by Godaddy. I want to link my WordPress bitnami website to this SSL certificate. How to link? I was trying to generate CSR but failed. Please suggest some step, so That I can Solve it.
Leron Amin says
Hi Deb,
The process for configuring a ‘paid’ certificate is different from the steps outlined in this tutorial.
You will have to generate a CSR, forward it to GoDaddy, then wait (usually 12-24 hours) for them to issue you your certificates. After that, you will have to upload the certificate files to your server (FileZilla tutorial), then add their file paths to your config file (same as in this tutorial).
Kyle Pflueger says
Thank you very much for this tutorial!
I am through everything up to step 6. However, I do not have an apache2 directory as a part of my install, and as such, I don’t have the bitnami.conf file accessible. Any ideas if this is something I may have missed during set up?
Leron Amin says
Hi Kyle,
Could you tell me a bit more about the stack that you’re using? If it’s a standalone LAMP stack as opposed to one of the pre-configured solutions, the configuration will be slightly different. Either way, you will have to put the same directives in your Apache .conf file, though it may be in a different location.
Talk to you soon,
Joe
ABDUL HAKEEM says
Perfect!
I have added Free Let’s Encrypt SSL to my website by following this tutorial. The problem only i faced in this case was
Step 6: I just copy and pasted three time. then i read comments and ssllabs.com suggestions.
The web site does not use SSL, but shares an IP address with some other site that does.
The web site no longer exists, yet the domain name still points to the old IP address, where some other site is now hosted.
The web site uses a content delivery network (CDN) that does not support SSL.
The domain name is an alias for a web site whose main name is different, but the alias was not included in the certificate by mistake.
MISTAKE WAS IN DOMAIN NAME:
SSLCertificateFile “/etc/letsencrypt/live/eborchids.com/cert.pem”
SSLCertificateKeyFile “/etc/letsencrypt/live/eborchids.com/privkey.pem”
SSLCertificateChainFile “/etc/letsencrypt/live/eborchids.com/chain.pem”
Leron Amin says
Great Abdul – I’m glad you were able to resolve the issue!
Patrick Cines says
Hey Joe!
Thanks for all the help. I’ve been following a lot of your videos around GCloud and they’ve been incredibly helpful. I have run into a bit of an issue, though.
I followed along your SSL Certificate Setup for WP on GCloud Bitnami, but I also have a Comodo SSL certificate on my domain as well. It looks like the one we installed in this tutorial is overriding my Comodo certificate because I’m getting the Chrome Privacy Error.
https://alumnibars.com/
How can I easily uninstall the SSL Certificate that we did in this video?
Thanks!!
Patrick
Leron Amin says
Hey Patrick,
I’m glad the tutorials have helped!
I ran a test on your domain, and it is showing that you’re using a self-signed (default) certificate.
To choose which certificates your server uses, you have to add the file paths to the certificate files in your Bitnami.conf file (as shown in step 6).
Let me know if you have any questions,
Joe
Patrick Cines says
Hey Joe,
Thanks for that. It seemed to only get me halfway there.
I was able to direct it to my certificates and Chrome is displaying a valid Comodo certificate, but I’m getting an “i” instead of the green lock with the message “Your connection to this site is not fully secure”.
I also noticed that when I try going directly to the site’s external IP address and go to the https port (35.194.55.28:443), I get the following message:
“Bad Request
Your browser sent a request that this server could not understand.
Reason: You’re speaking plain HTTP to an SSL-enabled server port.
Instead use the HTTPS scheme to access this URL, please.”
Any ideas on how to fix this?
Thanks,
Patrick
Leron Amin says
Hi Patrick,
If you haven’t resolved the issue yet, what is the domain that is causing the issue?
Talk to you soon,
Joe
Ethan says
Great tutorial! Very concise and clear. Question: Once I enter this command:
nano /opt/bitnami/apache2/conf/bitnami/bitnami.conf , vitual host 443 does not show up where I can enter the # sign to comment out bitnami’s SSL certs.
Can you tell me how to find bitnami’s SSL in port 443 so I can comment it out and enter my SSL cert numbers?
Up until that point, everything is fine.
Thank you in advance!
Ethan says
Hey thanks! I figured it out. Very nice website!!!
Leron Amin says
Hi Ethan,
I’m glad you were able to figure it out! 🙂
Sandeep says
I Got ” Apache2 Debian Default Page ” Error.
How to solve it
Leron Amin says
Run the following commands:
sudo /opt/bitnami/ctlscript.sh stop

sudo pkill -f apache

sudo /opt/bitnami/ctlscript.sh start
Sandeep says
ok thanks
I will Try
Leron Amin says
Ok sounds good, let me know if you have any questions!
Sandeep says
“Apache2 Debian Default Page”
Why this error showing always ..
what is the reason behind it
and how to solve it permanently
Leron Amin says
Hi Sandeep,
You will have to troubleshoot.
Try restarting your server using the the ctlscript command listed at the bottom of the tutorial.
The terminal will likely return a message saying what the error is; which probably has to do with a conflict on port 80.
Copy and paste the error message into a Google search and see what you can find.
Also, please let me know if you’re able to find the solution to the problem.
Let me know if you have any questions,
Joe
Sandeep says
********************************
(98)Address already in use: AH00072: make_sock: could not bind to address 0.0.0.0:80
no listening sockets available, shutting down
AH00015: Unable to open logs
/opt/bitnami/apache2/scripts/ctl.sh : httpd could not be started
********************************
Now this time Above error showing after when I run the commands as you told me..
Leron Amin says
Hi Sandeep,
It seems to be a common problem with Bitnami stacks.
Check out the following sources for information on how to fix the problem:
Source 1
Source 2
Source 3
Based on Bitnami’s forum posts relating to the issue, it appears to be an issue with the Bitnami configuration itself, one in which Bitnami’s developers are aware of.
The forum posts seem to only provide temporary solutions – so you should try and discover which solution works best for the long term.
Good luck and let me know if you have any questions,
Joe
Sandeep says
Apache/2.4.10 (Debian) Server at 35.224.202.14 Port 80
Marina Ficcio says
(also left this on youtube comments, don’t know witch one is better for you)
Hi, thank you for this tutorial, but on the step 6 to configure the certificates I had an error, do you know what could have been?
After clicking enter for “nano /opt/bitnami/apache2/conf/bitnami/bitnami.conf” look what happened.
” Default Virtual Host configuration.
<IfVersion
NameVirtualHost *:80
NameVirtualHost *:443
DocumentRoot “/opt/bitnami/apache2/htdocs”
Options Indexes FollowSymLinks
AllowOverride All
<IfVersion
Order allow,deny
Allow from all
= 2.3 >
Require all granted
# Error Documents
ErrorDocument 503 /503.html
# Bitnami applications installed with a prefix URL (default)
Include “/opt/bitnami/apache2/conf/bitnami/bitnami-apps-prefix.conf”
# Default SSL Virtual Host configuration.
LoadModule ssl_module modules/mod_ssl.so
Listen 443
SSLProtocol all -SSLv2 -SSLv3
SSLHonorCipherOrder on
SSLCipherSuite “EECDH+ECDSA+AESGCM EECDH+aRSA+AESGCM EECDH+ECDSA+SHA384 EECDH+ECDSA+SHA256$
SSLPassPhraseDialog builtin
SSLSessionCache “shmcb:/opt/bitnami/apache2/logs/ssl_scache(512000)”
SSLSessionCacheTimeout 300
DocumentRoot “/opt/bitnami/apache2/htdocs”
SSLEngine on
SSLCertificateFile “/opt/bitnami/apache2/conf/server.crt”
SSLCertificateKeyFile “/opt/bitnami/apache2/conf/server.key”
Options Indexes FollowSymLinks
AllowOverride All
<IfVersion
Order allow,deny
Allow from all
= 2.3 >
Require all granted
# Error Documents
ErrorDocument 503 /503.html
# Bitnami applications installed with a prefix URL (default)
Include “/opt/bitnami/apache2/conf/bitnami/bitnami-apps-prefix.conf”
# Bitnami applications that uses virtual host configuration
Include “/opt/bitnami/apache2/conf/bitnami/bitnami-apps-vhosts.conf”
# Status
ExtendedStatus on
ServerName local-stackdriver-agent.stackdriver.com
SetHandler server-status
Order deny,allow
Deny from all
Allow from 127.0.0.1
And now my website is also not working anymore 🙁 help please.
“This page isn’t working
http://www.marinaficcio.com is currently unable to handle this request.
HTTP ERROR 500″
PS. I did transfer the domain.
Leron Amin says
Hi Marina,
When you entered the command nano /opt/bitnami/apache2/conf/bitnami/bitnami.conf this opened your bitnami.conf file – which is what you have pasted in this message.
However, it looks as though you may have deleted/altered some important sections of the .conf file, which is why your server is now showing a 500 error. If you recently took a snapshot of your site, I would restore it from there.
Another option of last resort is to copy and paste the default virtual host configuration back into your .conf file. I’ve pasted a default virtual host file (with SSL configured) below for your use, however, you will still need to configure the conf. file to work with your website’s SSL based on the tutorial. Also, make sure to copy a backup of your .conf file before editing it.
# Default Virtual Host configuration.
NameVirtualHost *:80
NameVirtualHost *:443
DocumentRoot “/opt/bitnami/apache2/htdocs”
Options Indexes FollowSymLinks
AllowOverride All
Order allow,deny
Allow from all
Require all granted
# Error Documents
ErrorDocument 503 /503.html
# Bitnami applications installed with a prefix URL (default)
Include “/opt/bitnami/apache2/conf/bitnami/bitnami-apps-prefix.conf”
# Default SSL Virtual Host configuration.
LoadModule ssl_module modules/mod_ssl.so
Listen 443
SSLProtocol all -SSLv2 -SSLv3
SSLHonorCipherOrder on
SSLCipherSuite “EECDH+ECDSA+AESGCM EECDH+aRSA+AESGCM EECDH+ECDSA+SHA384 EECDH+ECDSA+SHA256 E$
SSLPassPhraseDialog builtin
SSLSessionCache “shmcb:/opt/bitnami/apache2/logs/ssl_scache(512000)”
SSLSessionCacheTimeout 300
DocumentRoot “/opt/bitnami/apache2/htdocs”
SSLEngine on
SSLCertificateFile “/opt/bitnami/apache2/conf/server.crt”
SSLCertificateKeyFile “/opt/bitnami/apache2/conf/server.key”
Options Indexes FollowSymLinks
AllowOverride All
Order allow,deny
Allow from all
Require all granted
# Error Documents
ErrorDocument 503 /503.html
# Bitnami applications installed with a prefix URL (default)
Include “/opt/bitnami/apache2/conf/bitnami/bitnami-apps-prefix.conf”
# Bitnami applications that uses virtual host configuration
Include “/opt/bitnami/apache2/conf/bitnami/bitnami-apps-vhosts.conf”
# Status
ExtendedStatus on
ServerName local-stackdriver-agent.stackdriver.com
SetHandler server-status
Order deny,allow
Deny from all
Allow from 127.0.0.1
Marina Ficcio says
Hi Leron, I didn’t know about the snapshot, I will do it from now on.
Thank you very much for your tutorial and help, now is working perfectly!!
Your videos are the best by far!
Thank you again, keep doing the great work! =D
Leron Amin says
Sounds good, Marina!
Thanks for the feedback – I am glad to hear the tutorials have worked for you 🙂
Joe
Johannes says
Thanks for the guides Joe!
I’m setting up sites on Google from time to time and always end up coming back to your blog. Truly amazing resource! 🙂
Leron Amin says
Thanks Johannes!
I am glad to hear that the tutorials have been useful to you! 😀
Vinicius Ragazzi says
Thank you so much! You saved my life! haha It’s worked!!!
Leron Amin says
Hi Vinicius,
I am glad to hear it worked!
Thanks for the positive feeback. 🙂
Joe
Ronak Ganatra says
I have not installed bitnami. i have install 1 click deploy. what should i do ?
Leron Amin says
Hi Ronak,
Follow this tutorial instead.
Let me know if you have any other questions, 🙂
Joe
Khushwant Singh says
Hi Leron Amin,
I have a website but it is developed by using X-cart and itis on platform Bitnami and hosted on Google Cloud Platform, I was trying to get SSL certificate for my website but when I reached at STEP 4 where we have to write the website’s root directory path and domain name at this step I got stuck as you give this command to enter:
./certbot-auto certonly –webroot -w /opt/bitnami/apps/wordpress/htdocs/ -d eborchids.com -d http://www.eborchids.com
I have made some chnages on this like (in place of):
wordpress – xcart
eborchids.com -d http://www.eborchids.com – my website domain name
But it doesn’t work, please tell me how to get the path of the website’s root directory in Bitnami (what commands I have to type in this ).
Leron Amin says
Hi Khushwant,
What do you mean when you say:
What exactly were the changes that you made? Since Bitnami follows a relatively ‘standardized’ configuration across most of their stacks, it wouldn’t surprise me if the webroot is also located at: /opt/bitnami/apps/wordpress/htdocs/
To verify this, run sudo ls /opt/bitnami/apps/wordpress/htdocs/ to verify that there are files present inside of that directory.
Talk to you soon, 🙂
Joe
Rachel says
Hi Leron,
Thanks for the post! It is awesome.
How can I find out my website’s root directory path, is it the same as your if I also host wordpress on google cloud bitnami? And when I installed google cloud SDK, it showes the error : failed to fetch component listing from server. Could you advise? thank you!
Leron Amin says
Hey Rachel,
Thanks for taking the time to post a comment!
The Click-to-Deploy and Bitnami versions of WordPress on Google Cloud have different root directories.
The root directory for Bitnami installs is: /opt/bitnami/apps/wordpress/htdocs/
The root directory for Click-to-Deploy installs is: /var/www/html/
Let me know if you have additional questions! 🙂
Thanks,
Joe
jajalabs says
thanks a lot you just made my day with this info
Leron Amin says
No problem!
I am glad the tutorial helped you! 😀
Luna says
Hi Joe,
I once used your guide and I worked for me. But now I am trying to use it again for another website and now it doesn’t work. I already failed to install Git. It says:
E: Failed to fetch http://security.debian.org/pool/updates/main/g/git/git_2.1.4-2.1+deb8u4_amd64.deb 404 Not Found [IP: 217.196.149.233 80]
And the same for all the files of http://security.debian.org.
Do you know what to do?
Leron Amin says
Hey Luna,
Were you able to figure out the problem? If not:
Is this a new WP on Google Cloud installation? Try using the wget command to retrieve the Cerbot files instead, as shown in this tutorial.
Let me know how it goes!
Talk to you soon,
Joe
Luna says
I tried it again and it worked! Thanks!
Leron Amin says
Hey Luna,
I am glad to hear that it worked! 😀
Joe
Rajes says
I already have install comodo ssl on my old server.
in which step i have to follow in Bitnami Google cloud platform?
is this i have to regenerate my SSL again?
Thank you
Leron Amin says
Hi Rajes,
Are you trying to transfer your old certificates to your Bitnami installation?
If so, you would need to upload the certificates to your server, then add the directory paths to your bitnami.conf file.
You would not need to worry about the auto-renewal steps, because this service is not offered with Comodo certificates.
Let me know if this answers your question!
Regards,
Joe
Rajes says
Thank you for fast replay.
Yes, I am trying to transfer old certificates to your Bitnami installation.
and just regenerate my Certificate. Waiting for approval.
Thank you.
mark says
Great post. Thanks!
Leron Amin says
Hey Mark,
I am glad to hear that you found the post helpful! 🙂
Please let me know if you have any suggestions for future tutorials.
Regards,
Joe
Matheus Santana says
Hello Leron, my site did not receive the certificate. now it is ‘Not Secure’. I think I did everything right.
In wp-admin the secure connection appears. While on the page no. What is going on?
My domain is empregabahia.com
Leron Amin says
Hi Matheus,
I took a look at your site and checked your certificates and they appear to be configured properly.
Additionally, all of the pages I visited on your site are being served via HTTPS.
Let me know if you have any other questions!
Thanks,
Joe
Alejandro Henao Ruiz says
Hi. I did the process for two websites, but it does not appear to me as a secure site. Check out my websites: elfichero.com – pulzovivo.com
Leron Amin says
Hi Alejandro,
That’s because your site is serving mixed ‘insecure’ content. Here is the error message I got when I visited one of the sites:
Mixed Content: The page at ‘https://elfichero.com/’ was loaded over HTTPS, but requested an insecure image ‘http://104.198.60.213/wp-content/uploads/2015/12/El_Fichero_color_200-90-01.png’. This content should also be served over HTTPS.
(index):146 Mixed Content: The page at ‘https://elfichero.com/’ was loaded over HTTPS, but requested an insecure image ‘http://104.198.60.213/wp-content/uploads/2015/12/El_Fichero_blanco_200-90.png’. This content should also be served over HTTPS.
You need to change the filepath of the unsecure content so that it is served via HTTPS.
Waqas says
Hi , Eveything runs fine and greate except when i restarted apache
waqasbriotex@justladies-1-vm:~$ sudo -i
root@justladies-1-vm:~# sudo /opt/bitnami/ctlscript.sh restart apache
Unmonitored apache
AH00526: Syntax error on line 51 of /opt/bitnami/apache2/conf/bitnami/bitnami.conf:
SSLCertificateFile: file ‘/etc/letsencrypt/live/justladies.co/cert.pem’ does not exist or is empty
apache config test fails, aborting
AH00526: Syntax error on line 51 of /opt/bitnami/apache2/conf/bitnami/bitnami.conf:
SSLCertificateFile: file ‘/etc/letsencrypt/live/justladies.co/cert.pem’ does not exist or is empty
apache config test fails, aborting
Monitored apache
Leron Amin says
Hi Waqas,
A syntax error means that there is a “spelling error” on that line.
Jump to line 51 in nano (using ctrl+shift+-) and double check that the cert files are entered appropriately.
Hope this helps 🙂
Joe
Sid Karwal says
Same issue.
Checked files using – nano /etc/letsencrypt/live/domain.com/cert.pem
Nano editor works but apache wont restart
Leron Amin says
Hi Sid,
Were you able to get the problem resolved?
Chuck Dunne says
I have done this tutorial twice now and am having the same issue. I am getting a Not Secure error in my google chrome browser window and SSL_ERROR_BAD_CERT_DOMAIN error when trying to go to my site on Firefox. My domain is http://websource.today
Any help you could give would be appreciated
Leron Amin says
Hi Chuck,
Your certificates are configured fine, however your domain is directing to the WWW-version of your site. This is a problem because the WWW-version of your site is not listed in your SSL certificate files. In this case you have 2 options. The first is to re-issue the certificates and include both domains: -d websource.today -d http://www.websource.today. The second option is to change your WordPress Settings > General URLs to match your preferred domain, which in this case is websource.today (not http://www.websource.today); this is from step 7 of the tutorials, “Update Domain URLs”.
Hope this helps 🙂
Joe
Tarun says
Hi Leron,
Is wild card ssl possible through this procedure, if yes then how ?
If not then can we create ssl for multiple subdomains . Please explain the procedure and also keep on adding for more subdomains.
Thanks
Leron Amin says
Hi Tarun,
Add all of the domains and subdomains that you want secured to the certificate issuing command (STEP 4). To secure a domain with multiple subdomains, you would enter: -d mywebsite.com -d http://www.mywebsite.com -d test1.mywebsite.com -d test2.mywebsite.com -d test3.mywebsite.com. LetsEncrypt does not offer wildcard support, so to add additional subdomains in the future, reissue the certificate and add the additional subdomains to the certificate issuing command.
Also – Wildcard support is coming in 2018.
Hope this helps 🙂
Joe
Tarun says
Thanks Joe for prompt reply, Please clear following doubts-
1. I have already created certificate for http://www.mywebsite.com and mywebsite.com so do I have to delete that certificate and reissue certificate which includes the these two and the other subdomains.
2. Every time I add a subdomain I will have to include all the previous domains in step 4.
3. Do I have to do any thing else besides above step.
I really appreciate your help in solving our problems.
Leron Amin says
Hi Tarun,
1. That is correct. You don’t have to ‘delete’ the certificates – just run the command to issue new ones, and you will be asked to overwrite the existing certificates.
2. Yes.
3. No.
🙂 Hope this helps!
Tarun says
Hi Leron,
I am asking you a bit off this topic, I want to add a subdomain and link it to a page in word press keeping the ssl . Like
htttps://test.example.com/ will map to https://www.example.com/test/ , I don’t want a redirect the address bar should show https://test.example.com/ and also the https should work.
Please suggest a way.
I am asking you as you have a great authority on this subject.
Thanks
Nadezhda says
Hello Joe,
Thank you for the extraordinary tutorials. I have made a mistake and this is the issue:
This is the default welcome page used to test the correct operation of the Apache2 server after installation on Debian systems. If you can read this page, it means that the Apache HTTP server installed at this site is working properly. You should replace this file (located at /var/www/html/index.html) before continuing to operate your HTTP server.
If you are a normal user of this web site and don’t know what this page is about, this probably means that the site is currently unavailable due to maintenance. If the problem persists, please contact the site’s administrator.
Configuration Overview
Debian’s Apache2 default configuration is different from the upstream default configuration, and split into several files optimized for interaction with Debian tools. The configuration system is fully documented in /usr/share/doc/apache2/README.Debian.gz. Refer to this for the full documentation. Documentation for the web server itself can be found by accessing the manual if the apache2-doc package was installed on this server.
The configuration layout for an Apache2 web server installation on Debian systems is as follows:
/etc/apache2/
|– apache2.conf
| `– ports.conf
|– mods-enabled
| |– *.load
| `– *.conf
|– conf-enabled
| `– *.conf
|– sites-enabled
| `– *.conf
apache2.conf is the main configuration file. It puts the pieces together by including all remaining configuration files when starting up the web server.
ports.conf is always included from the main configuration file. It is used to determine the listening ports for incoming connections, and this file can be customized anytime.
Configuration files in the mods-enabled/, conf-enabled/ and sites-enabled/ directories contain particular configuration snippets which manage modules, global configuration fragments, or virtual host configurations, respectively.
They are activated by symlinking available configuration files from their respective *-available/ counterparts. These should be managed by using our helpers a2enmod, a2dismod, a2ensite, a2dissite, and a2enconf, a2disconf . See their respective man pages for detailed information.
The binary is called apache2. Due to the use of environment variables, in the default configuration, apache2 needs to be started/stopped with /etc/init.d/apache2 or apache2ctl. Calling /usr/bin/apache2 directly will not work with the default configuration.
Document Roots
By default, Debian does not allow access through the web browser to any file apart of those located in /var/www, public_html directories (when enabled) and /usr/share (for web applications). If your site is using a web document root located elsewhere (such as in /srv) you may need to whitelist your document root directory in /etc/apache2/apache2.conf.
The default Debian document root is /var/www/html. You can make your own virtual hosts under /var/www. This is different to previous releases which provides better security out of the box.
Reporting Problems
Please use the reportbug tool to report bugs in the Apache2 package with Debian. However, check existing bug reports before reporting a new bug.
Please report bugs specific to modules (such as PHP and others) to respective packages, not to the web server itself.
Leron Amin says
Hi Nadezhda,
This is a DNS issue that normally happens because your instance switched IP addresses after it was restarted.
Did you reserve a static IP address for your instance? Also, does the IP address in your Cloud DNS records match the IP address that is connected to your instance?
Check out step 1 from this tutorial about static IP addresses.
Let me know if you have questions 🙂
Joe
Nadezhda says
I have checked. The IP address and the DNS match. I also have changed from ephemeral IP to static IP address, but I still got the above message when I restart Apache.
Unmonitored apache
Syntax OK
/opt/bitnami/apache2/scripts/ctl.sh : apache not running
Syntax OK
(98)Address already in use: AH00072: make_sock: could not bind to address 0.0.0.0:80
no listening sockets available, shutting down
AH00015: Unable to open logs
/opt/bitnami/apache2/scripts/ctl.sh : httpd could not be started
Monitored apache
Is it a good idea to go once again over the steps in this tutorial?
Leron Amin says
Hi Nadezhda,
The solution is to manually kill and restart Apache, as shown below:
$ sudo netstat -ltnp | grep ‘:80’
tcp 0 0 0.0.0.0:80 0.0.0.0:* LISTEN 581/apache2
$ sudo kill -9 581
$ sudo netstat -ltnp | grep ‘:80’
tcp 0 0 0.0.0.0:80 0.0.0.0:* LISTEN 585/apache2
$ sudo kill -9 585
$ sudo netstat -ltnp | grep ‘:80’
tcp 0 0 0.0.0.0:80 0.0.0.0:* LISTEN 586/apache2
$ sudo kill -9 586
$ sudo /opt/bitnami/ctlscript.sh restart apache
Unmonitored apache
Syntax OK
/opt/bitnami/apache2/scripts/ctl.sh : apache not running
Syntax OK
/opt/bitnami/apache2/scripts/ctl.sh : httpd started at port 80
Monitored apache
$
This solution was proposed via YouTube by user Belkacem Taleb.
Let me know if you have additional questions!
Isabel says
Hiya Joe (Leron),
Don’t know what happened but my certificates have not renewed as planned as per command…
Setup Certificate Auto-Renewal
crontab -e
1
0 0 * * * cd && ./certbot-auto renew –quiet –no-self-upgrade
0 12 * * * cd && ./certbot-auto renew –quiet –no-self-upgrade
…. mmh? none of my sites have auto renewed, in case you have a suggestion or fix?
Thanks buddy, Isabel 😉
Leron Amin says
Hey Isabel,
Because the cert files are saved in the tmp file, they were likely deleted sometime within the 3 months before renewal; I wasn’t able to find them anyways…
I will fix the tutorial so that people aren’t saving the Certbot files in the tmp directory.
You can fix the problem by navigating to the LetsEncrypt directory by executing
and then re-copying the certbot files by executing
After this, the new Certbot files are located at /etc/letsencrypt/certbot.
Switch to root user
Now edit your existing Crontab file by changing the Certbot directory path.
To do this, execute
From inside the file, change the Cronjob command to:
Make sure to save the changes to the file.
You can test the script before applying it by running:
Let me know if you have questions!
Best regards,
Joe
Isabel says
Cheers Joe, will execute these commands as soon as 😉
Have bookmarked this page to check in for your new tutorial update.
As always, thank you.
Isabel says
Works perfect! Just change first command from:
cd etc/letsencrypt/ to
cd /etc/letsencrypt
Leron Amin says
Hey Isabel,
I am so glad to hear it works! 😀
I made the changes to the command – thanks for pointing that out. I will make these updates to both of the SSL tutorials!
Best regards,
Joe
ric says
Hi Joe,
I followed the tutorial and got the certificates installed.
This week, I noticed that the certificate was not auto renewing so I followed the instructions above.
when i run the command: cd && /etc/letsencrypt/certbot/certbot-auto renew –dry-run
I get this message: No such file or directory
Can you help me figure out where I went wrong with this.
I am not sure auto renew is now working.
How can I verify that is working?
Leron Amin says
Hi Ric,
Check out my response to Isabel for the solution on how to manually renew certificates.
Don’t bother with the cron-job; auto-renew isn’t working and I am currently investigating the issue.
I will post on the new version of the tutorial with the updated cron command.
Let me know if you have any questions! 🙂
ric says
Thanks for the quick response.
I am not sure what I am doing wrong. I am following the instructions you gave Isabel above.
Here is what I do:
cd /etc/letsencrypt/ [works fine]
sudo git clone https://github.com/certbot/certbot [get message sudo: git: command not found ]
Leron Amin says
Hi Ric,
You will have to install Git before you run the clone certbot command:
sudo apt-get install git-all
ric says
Thanks so much. It worked great. Really appreciate your help!!
Now I just have to remember to renew every 3 months.
Leron Amin says
Hey Ric,
I just published a new tutorial on how to configure auto-renew.
You can check it out here.
If you do follow the tutorial and run into any issues, please let me know.
Thanks,
Joe
Mohamed Hak says
one more thing in settings page wordpress address(URL) is greyed out and its http not https,
the same also on the permalinks page.
how can I change that?
Leron Amin says
Hi Mohamed,
You can change that by editing your wp-config.php file, as shown in this tutorial here.
Let me know if you have questions!
Thanks,
Joe
Mohamed Hak says
You are AWESOME
Thank you so much
Mohamed Hak says
Hi Joe,
Thank you so much for this awesome tuts, I mean the whole series.
everything worked fine except when I open my site on safari it says safari can’t verify the identity of the website.
No problem at all on chrome, this happened on safari only.
do you know why this happened and how to fix it?
thank you
Leron Amin says
Hi Mohamed,
What is the domain name for your site? I will take a look.
Best regards,
Joe
Mohamed Hak says
thank you for the quick response
domain is cabreet.com
Leron Amin says
Hi Mohamed,
I just ran the homepage in Safari and it is loading as secure.
Additionally, the certificates appear to be configured correctly.
Was it just a certain page on your site that was showing up as not-secure in Safari?
Mohamed Hak says
should I ignore the warning in my safari browser then and click continue.
I am not sure about the not secured page I just did a fresh install following your amazing tutorial.
Thank you very much for your help, let me just subscribe on youtube
cheers
Leron Amin says
Hi Mohamed,
Follow the instructions in the tutorial from my last comment.
After you change your domain URL’s on the settings page, it may fix the problem in Safari.
Also – thanks for subscribing to my YouTube channel! 😀
Talk to you soon,
Joe
Steve says
Thank you for the tutorial. I am running Bitnami Multisite and was not sure if I should add the following to the wp-config file…
define(‘WP_HOME’,’http://example.com’);
define(‘WP_SITEURL’,’http://example.com’);
Is it ok to add?
Also since I am running multisite how can I add ssl to the other domains? Would I run…
./certbot-auto certonly –webroot -w /opt/bitnami/apps/wordpress/htdocs/ -d eborchids.com -d http://www.eborchids.com
for each domain then add a host?
thx!
Leron Amin says
Hi Steve,
Yes – that seems like the best way to do it.
According to the Bitnami documentation, the best practice in your scenario would be as follows:
“In order to set different SSL certificates for each new domain, configure each domain as a virtual host. Edit the /opt/bitnami/apps/wordpress/conf/httpd-vhosts.conf file and add a new virtual host for each new domain. The following code could be taken as an example:
<VirtualHost *:80>

    ServerName yourserverdomain.com

    ServerAlias *.yourserverdomain.com

    DocumentRoot "/opt/bitnami/apps/wordpress/htdocs"

    Include "/opt/bitnami/apps/wordpress/conf/httpd-app.conf"

</VirtualHost>

<VirtualHost *:443>

    ServerName yourserverdomain.com

    ServerAlias *.yourserverdomain.com

    DocumentRoot "/opt/bitnami/apps/wordpress/htdocs"

    SSLEngine on

    SSLCertificateFile "/opt/bitnami/apps/wordpress/conf/certs/new_server.crt"

    SSLCertificateKeyFile "/opt/bitnami/apps/wordpress/conf/certs/new_server.key"

    Include "/opt/bitnami/apps/wordpress/conf/httpd-app.conf"

</VirtualHost>
You should be able to configure all of your domains in the single certificate file, as shown here.
Thanks,
Joe
Marcel Bagrin says
Hello, Been following your tutorial, very good. I also encountered the problem that run into some other users – NUMBER 4. After about half of a day research, I found the correct path. Here is the final command that installed my certificates successfully.
./certbot-auto certonly –webroot –webroot-path=/opt/bitnami/apps/wordpress/htdocs/ -d sitename.com -d http://www.sitename.com
Good luck everyone.
Alex says
Hello I have this error – where I can find line 51 to edit it ?
Thanks …
Unmonitored apache
AH00526: Syntax error on line 51 of /opt/bitnami/apache2/conf/bitnami/bitnami.conf:
SSLCertificateFile: file ‘/etc/letsencrypt/live/drandreea.ro/cert.pem’ does not exist or is
empty
apache config test fails, aborting
AH00526: Syntax error on line 51 of /opt/bitnami/apache2/conf/bitnami/bitnami.conf:
SSLCertificateFile: file ‘/etc/letsencrypt/live/drandreea.ro/cert.pem’ does not exist or is
empty
apache config test fails, aborting
Monitored apache
Leron Amin says
Hey Alex,
Click the SSH button next your instance to open up the terminal window. Next, execute the following command:
nano /opt/bitnami/apache2/conf/bitnami/bitnami.conf
Jump to line 51 by pressing CTRL+SHIFT+- Then enter 51.
Here you will see the syntax error that you need to fix in order to fix the certificate issue.
Let me know if you have questions!
Joe
Alex says
Hey Leron,
Thanks for your answer , I have resolve that error but right now I have another error with SSL certificate , please visit my website https://www.drandreea.ro . I think is an error because it say that the website is not safe .
Thanks
Alex
Leron Amin says
Hi Alex,
The issue is that your website is serving mixed content – the SSL certificates, however, are working just fine.
You need to go to your website, right-click and choose inspect/developer tools, to see which of the page elements are being served over http instead of https.
Then you need to change the path to these elements to be https instead of http.
Let me know if you have additional questions,
Joe
Alex says
Hello Leron
I have do that and I dont find any http on my website . Everything is https … Can you please verify too if you have 1 minute ? https://www.drandreea.ro .
If you open the website from mobile device you must make a lot of steps to open the website it say unsafe website .
Thanks
Leron Amin says
Hi Alex,
I visited your website on mobile using safari, and it did indeed show your certificate as invalid.
I don’t know the solution to your problem, as it shows your certificates are configured properly, and this is not a problem I have encountered before with the LetsEncrypt SSL Certificates.
Did you change your WordPress URLs on the WordPress settings page?
Joe
Chandraprakash says
First of all, I want to say thanks for sharing such a valuable content. You saved my day.
Leron Amin says
Hi Chandraprakash,
Thanks for posting a comment.
I am very glad that the tutorial helped you!
Best regards,
Joe
Thomas Petersen says
Super tutorial thanks a lot :O)
Leron Amin says
Thanks for commenting Thomas!
I am glad you found the tutorial helpful!
Best regards,
Joe
Thomas Petersen says
Hi Joe
Thank you for your nice tutorials.
My site was working perfect with the letsencypt certificate. But when I did a restart of the WM instance on google cloud platform, I got a “It Works” apache2 page” I tried to delete /var/www/html/index.html file but now my page says:
Index of /
[ICO] Name Last modified Size Description
Apache/2.4.10 (Debian) Server at http://www.tepedu.com Port 80
Have you heard of this error before?
Thanks Thomas
Thomas Petersen says
Hi Joe
I ran the following commands and got the server running again
sudo killall -9 apache2
sudo /opt/bitnami/ctlscript.sh restart apache
But when i restart the server I have the same problem, again the 2 commands solves the problem, I looked at this thread:
https://community.bitnami.com/t/unable-to-restart-apache/21563/9
When i restart apache I get:
cphthomas@tepedu22feb2017:~$ sudo /opt/bitnami/ctlscript.sh restart apache
Unmonitored apache
Syntax OK
/opt/bitnami/apache2/scripts/ctl.sh : apache not running
Syntax OK
(98)Address already in use: AH00072: make_sock: could not bind to address 0.0.0.0:80
no listening sockets available, shutting down
AH00015: Unable to open logs
/opt/bitnami/apache2/scripts/ctl.sh : httpd could not be started
But I can start the server with the killall
Do you have any ideas what is causing this error?
Leron Amin says
Hi Thomas,
There have been a couple of people before you who’ve experienced this error.
Were you able to find a solution, or did you reconfigure the site from a backup?
Talk to you soon!
Thanks,
Joe
Andres says
Hey Thomas, I had a similar problem with apache.
¨(98)Address already in use: AH00072¨ Tells you there is something else using that port.
You can find how I troubleshooted that error, here:
https://community.bitnami.com/t/mysql-could-not-be-started/46404/13
In Sumary Killall doesn´t work for me, but pkill -f does:
sudo /opt/bitnami/ctlscript.sh stop
sudo pkill -f apache
sudo /opt/bitnami/ctlscript.sh start
I hope It works for you
Regards,
Andres
Leron Amin says
Hi Thomas,
Before restarting an instance, you should make sure you have a static IP reserved for your instance, as shown in this tutorial here. Without a static IP reserved, your instance will change it’s external IP, causing the default Apache2 page to appear. I looked at the certificate configuration for your site, and it looks fine. It loaded secure in my browser!
Thanks,
Joe
Thomas Petersen says
Yes the site works fine :O)
I checked the ip is static. I think maybe it has something to do with the port 447 but I´m not sure about it?
Andres says
Hello Joe, thanks for for your great tutorial.
I have configured SSL following your instructions, I believed everything was fine.
Today I entered in SSH console and saw a “You have new mail” message.
I used a ‘mail’ command, and there are many message I think they are telling me something is wrong with the cron for renew the certificate.
Example:
claftshoes@wordpress-multisite-claft-vm:~$ mail
Mail version 8.1.2 01/15/2001. Type ? for help.
“/var/mail/claftshoes”: 66 messages 66 new
>N 1 root@wp-c9401589. Sun Jul 02 00:00 23/1106 Cron cd && ./certbot
N 2 root@wp-c9401589. Sun Jul 02 12:00 23/1106 Cron cd && ./certbot
Hitting ‘n’ show me the following:
& n
Message 1:
From [email protected] Sun Jul 02 00:00:01 2017
Envelope-to: [email protected]
Delivery-date: Sun, 02 Jul 2017 00:00:01 +0000
From: [email protected] (Cron Daemon)
To: [email protected]
Subject: Cron cd && ./certbot-auto renew –quiet –no-self-upgrade
MIME-Version: 1.0
Content-Type: text/plain; charset=US-ASCII
Content-Transfer-Encoding: 8bit
X-Cron-Env:
X-Cron-Env:
X-Cron-Env:
X-Cron-Env:
Date: Sun, 02 Jul 2017 00:00:01 +0000
/bin/sh: 1: ./certbot-auto: not found
Do you know how to troubleshoot this?
Thank you,
Andrés
Leron Amin says
Hi Andrés
It appears to be a renewal error related to the install directory.
Check out this link here for more information.
Best regards,
Joe
Tarun says
Hi ,
It was php syntax error which I found by going through the Apache error_log file . I copied the commented example.com example given on the wp_config.php file and changed it to my domain and now it has started working.
I compared the previous statement and this statements and was unable to find any difference , but now it is working so I don’t want more time to spend on that.
Thanks for your wonderful tutorial.
Is there a way to check cron job’s report I mean what it has done.
Thanks
Leron Amin says
Hi Tarun,
Thanks for letting me know about the error, and I am glad you were able to find a solution!
There’s a great post from LiquidWeb here about checking cron jobs.
Best regards,
Joe
Tarun says
Hi,
I followed the steps and everything went fine until the last step of
“nano /opt/bitnami/apps/wordpress/htdocs/wp-config.php” once I changed it to
define(‘WP_SITEURL’, ‘https://www.mydomain.com’);
define(‘WP_HOME’, ‘https://www.mydomain.com’);
the I start getting the error msg 500 and after that I again changed the file with the original definition but still I am getting the same error.
Please help
Thanks
Mike says
I’m having the same issue with several sites that I just moved over to google cloud and I can’t figure out how to fix it. I’m pretty sure it has something to do with the wp-config file…
500 errors are mysterious…
Tarun says
Hi,
Mine was a syntax error in wp-config.php file . See the comment below.
Mike says
Yep! Totally a syntax error… Thank you for figuring that out!
For anyone else wondering what the problem was:
In step 7 there are some single quotation marks in the copy-able text that should be apostrophes.
Use this: ‘
Not this: ’
It was extremely easy to overlook. (Joe may want to fix this.)
Leron Amin says
Thank you Mike and Tarun for bringing this error to my attention.
I’ve fixed the problem in the post, so hopefully people won’t get this problem anymore!
Thanks again,
Joe
Sya says
Hi, maybe you need to change on step 7..
define(‘WP_SITEURL’, ‘https://www.yourdomain.com/’);
define(‘WP_HOME’, ‘https://www.yourdomain.com/’);
the correct one would be
define(‘WP_SITEURL’, ‘https://www.yourdomain.com’);
define(‘WP_HOME’, ‘https://www.yourdomain.com’);
remove the slash at the end of the ‘.com’ or else you will be getting http 500 error. Took me to redo whole process only to realize single ‘/’ was added into the code line.
Thanks btw, very good tutorial.
Leron Amin says
Hi Sya,
Thanks a lot for pointing this out! I changed the steps so hopefully people won’t get the error anymore!
Best regards,
Joe
abbas fedni jolan says
Need to get 219 kB/109 MB of archives.
After this operation, 420 MB of additional disk space will be used.
Do you want to continue? [Y/n] y
Err http://security.debian.org/ jessie/updates/main libtiff5 amd64 4.0.3-12.3+deb8u3
404 Not Found [IP: 128.101.240.215 80]
E: Failed to fetch http://security.debian.org/pool/updates/main/t/tiff/libtiff5_4.0.3-12.3+deb8u3_amd64.deb 404
Not Found [IP: 128.101.240.215 80]
E: Unable to fetch some archives, maybe run apt-get update or try with –fix-missing?
root@wordpress-1-vm:~#
Leron Amin says
Hi Abbas,
Check out this thread for some information about how to fix the problem. It could be several problems, but you’ll have to do some troubleshooting to figure out what works. Also, speaking of DNS, make sure you reserve a static IP for your instance under networking > External IP Address. Let me know which solution works for you. If you can’t find a solution let me know and I will see how else I can help!
Thanks,
Joe
Nestor Rentas says
Good Day!
The instructions provided are stellar and THNAK YOU!
I do get the certificate to install and the SSL enabled pages DO appear. The issue is that everytime (this is my 3rd time) I restart the service instance, it reverts back to the Abache Debian default page and I cant seem to find out why. Has this happened to anyone else?
Nes
Leron Amin says
Hi Nestor,
I’m glad that you’ve found the tutorials helpful!
The first thing you should do is go to your Google Cloud Dashboard, open up the main menu by clicking the hamburger menu in the upper left-hand corner of the screen, and going to Networking > External IP Addresses. Once there, make sure that your instance is using a static IP address, not an ephemeral IP address.
Next, you can check the status of your services by executing:
sudo /opt/bitnami/ctlscript.sh status
If any of them is stopped, you could start them by executing:
sudo /opt/bitnami/ctlscript.sh start
This should hopefully take care of the problem.
Let me know if you have any other questions.
Thanks,
Joe
Nestor Rentas says
Thanks!
Everything works great till I restart the server.
Here is what I get
php-fpm already running
apache not running
mysql already running
xxx@xxxxxxxxxx:~$ sudo /opt/bitnami/ctlscript.sh status
php-fpm already running
apache not running
mysql already running
xxx@xxxxxxxxxx~$ sudo /opt/bitnami/ctlscript.sh status
php-fpm already running
apache not running
mysql already running
xxx@xxxxxxxxxx:~$ sudo /opt/bitnami/ctlscript.sh restart apache
Unmonitored apache
Syntax OK
/opt/bitnami/apache2/scripts/ctl.sh : apache not running
Syntax OK
(98)Address already in use: AH00072: make_sock: could not bind to address 0.0.0.0:80
no listening sockets available, shutting down
AH00015: Unable to open logs
/opt/bitnami/apache2/scripts/ctl.sh : httpd could not be started
Monitored apache
Leron Amin says
Hey Nestor,
What does the top of your bitnami.conf folder look like?
Specifically any lines that involve the number 80.
Thanks,
Joe
Maysen says
hey Joe the tutorial was great once i finally understood my mistake i was making. One last question, My website is Now showing https instead of http, but the little green pad lock is not showing up, and some of the images across the site are not appearing. ssllabs gave us a grade A. just wondering why the green lock isn’t showing up
Leron Amin says
Hi Maysen,
The reason the green padlock isn’t showing up is because your page is still loading many images, videos and plugins via http:// instead of https://.
If you’re using chrome as a browser, you can view which elements aren’t being served via https:// by entering CTRL + SHIFT + I to pull up the developer console.
Now that you’ve configured your certificates, you will need to tell WordPress to serve your content using https://.
To do this, you’ll need to specify your domain name in the file /opt/bitnami/apps/wordpress/htdocs/wp-config.php. To access this file, you will enter the following command: nano /opt/bitnami/apps/wordpress/htdocs/wp-config.php. Edit and replace the following lines as shown, remembering to replace the DOMAIN placeholder with the actual domain name you wish to use:
define(‘WP_SITEURL’, ‘http://’ . $_SERVER[‘HTTP_HOST’] . ‘/’);
define(‘WP_HOME’, ‘http://’ . $_SERVER[‘HTTP_HOST’] . ‘/’);
with
define(‘WP_SITEURL’, ‘http://DOMAIN/’);
define(‘WP_HOME’, ‘http://DOMAIN/’);
After making the changes you will need to restart apache.
Run the following command: sudo /opt/bitnami/ctlscript.sh restart apache
Hope this helps!
Joe
abbas fedni jolan says
hi
When I try to SSL Certificate Setup for WordPress on Google Cloud
Here
I get the wrong message
Obtaining a new certificate
Performing the following challenges:
http-01 challenge for domains.com
Using the webroot path /opt/bitnami/apps/wordpress/htdocs for all unmatched domains.
Waiting for verification…
Cleaning up challenges
An unexpected error occurred:
There were too many requests of a given type :: Error creating new cert :: too many certificates already issued f
or exact set of domains: domains.com
Please see the logfiles in /var/log/letsencrypt for more details.
What’s the solution
Thank you
Leron Amin says
Hi Abbas,
Did you try issuing the certificates more that one time? Let’s Encrypt limits the number of certificates it will issue within a certain time frame.
If this isn’t the case, check out the log files (as shown in the error message for more info).
Let me know if you’ve figured it out, otherwise I will see how else I can help.
Thanks,
Joe
abbas fedni jolan says
hi
Did you try issuing the certificates more that one time? :::: yes
What is the solution now
Please provide assistance
Marcelo says
Dumb question:
Where I find the root Directory in google cloud?
I am stuck on PART 4 because of that.
Leron Amin says
Hi Marcelo,
If you’re using the Click-to-Deploy version of WordPress on Google Cloud, then your webroot will be /var/www/html/. If you’re using the Bitnami version, your webroot is /opt/bitnami/apps/wordpress/htdocs/.
mish says
Hello I loved this tutorial first of all.
After I did all those steps it does show however in https but it says it is not full secure yet.
My website is http://www.slingbay.com
I customized something on WordPress the design and theme then all of sudden my green https secure looking button my browser turned grey and made me feel sad help me 🙁
Leron Amin says
Hi Mish,
What likely happened is that your site started serving mixed content. Perhaps you added a new photo to your site that was loading via http instead of https?
You can check for mixed content (if you’re using Google Chrome) by right-clicking and going to developer tools. The console that is loaded will show errors if there is mixed content.
Let me know if this helps!
Thanks,
Joe
mish says
So you are saying that this is my browser’s fault?
also i do not undertand exact steps you told me.
Benjamin Waller says
Hello Leron,
First of all, your tutorials are fantastic, love them :). Very clear and easy to follow. I haven’t actually implemented this one yet but I plan to give it a try. I have a question if you don’t mind.
Would these steps also work for a Moodle (LMS) installation? so using a Bitnami installation, for configuring and then setting up an auto-renewing SSL certificates for Moodle websites that are hosted on Google Cloud Platform.
Leron Amin says
Hi Benjamin,
The steps should be similar, however they will ultimately be different because they Moodle directory structure will be different.
Also, I’m not familiar with the Moodle stack but I’m sure Bitnami has great documentation on how to get it set up.
I will see about doing some Moodle tutorials in the future.
Thanks,
Joe
Update:
Based on the documentation, it looks almost identical to the WordPress configuration.
Thanks,
Joe
Phinos says
Perfect! Thanks for your tutorial. Now my site running with green padlock. In the future how do we know if our ssl has been renewed? Is there an email to us?
Thank You,
Phinos
Leron Amin says
Hi Phinos,
I am not sure how to set up email notifications, but your certificate will renew itself before expiration.
-Joe
Phinos says
Other things, why Bitnami or GEC does not redirect the www or non www version. Can you create a tutorial how to write .htaccess file via ssh?
Thank You. 😀
Leron Amin says
Hi Phinos,
You can configure which version you want to be displayed in your htaccess file.
I will make a tutorial on it, but check out this guide in the meantime.
Let me know how else I can be of service!
Thanks,
Joe
Robert says
Hi Joe,
Thanks again for all your help. Hands down, best tutorials on the Google Cloud Platform for WordPress users.
I was able to get the certificates installed, but I notice that the my site isn’t loading properly after the certificate install. My site is recipe-costing.com and looks like some of the .css files are not loading correctly. Any ideas or suggestions.
Also, do you know how to access myphpadmin within Google Cloud Platform?
Thanks
Rob
Robert says
Okay, updated my permalinks and that fixed the .css issue. Now, I just need to access myphpadmin. Do you know where it’s located within Google Cloud?
Leron Amin says
Hi Rob,
Follow this tutorial from Bitnami, it should help.
If you’re not using the Bitnami install, let me know and I will see how else I can help.
Let me know how it goes!
Thanks,
-Joe
Leron Amin says
Hi Rob,
Thanks for commenting and thanks for all of your helpful comments in the past!
What I would do in your situation is call GoDaddy support (480) 505-8877 and get one of their technical staff to walk you through the issue.
I checked your domains on multiple SSL test sites and they all list it as configured properly, but I loaded the site on Chrome (ios and Windows) and the site isn’t loading securely. I don’t have a great deal of experience with securing multiple domains.
Let me know how else I can help, and let me know when you figure out the solution as I would be interested to learn about how you fixed it.
Talk to you soon,
-Joe
Mike Xu says
Great tutorial! Got my SSL up in one try! Can I trouble you with two questions:
1) How do i force the site to output with the www prefix?
2) How can i redirect my ip address to my domain if i paste the server ip in the browser address bar?
Leron Amin says
Hi Mike,
I plan on doing a tutorial on this but if you want to force your domain to always load with www. prefix, check out this tutorial.
For the tutorial to work, you need to have access to your htaccess file, which can be done manually in the console or by configuring an SFTP client for your instance.
Make sure you secure the www. version of your site (from step 4: you should include -d example.com -d http://www.example.com)
Let me know if you have any more questions!
-Joe
Robert Davey says
I’m interested in this as well
Leron Amin says
Hi Robert,
If you give it a try let me know how it goes!
Good luck,
Joe
Erhan says
Hi,
First of all thanks for your blog posts about google cloud wordpress solutions.
I am using google cloud wordpress but not bitnami, i am using click to deploy.
And i want setup ssl sertificate.
This article very helpfull for bitnami.
How can i setup ssl setificate for click to deploy wordpress on google cloud ?
Thanks.
Leron Amin says
Hi Erhan,
The steps are similar however your root directory is different.
For Click-to-Deploy, the root is located at /var/www/html/
Let me know if you have additional questions!
Thanks,
Joe
Alton Criswell says
Rookie question here.!
How do I determine my websites root directory? Assume I know nothing—because I don’t!
Also, when you ask for my domain name does that include the www. if I am currently using it?
http://www.debtshop.us
Leron Amin says
Hi Alton,
The root directory of your website will depend on the which WordPress deployment you’re using. If you are using the Bitnami WordPress install, your root directory will be the same as in this tutorial.
If you’re using a standalone or multisite WordPress install, your root directory will be different. Let me know which version you are using and I will help you find your root directory.
-Joe
Pramod says
Hey Leron,
THANKS A LOT FOR THE STEPS
I am using google click to deploy wordpress plugin. Will you pls help me with the root folder.
Thanks
Leron Amin says
Hi Pramod,
For Click-to-Deploy, the root is located at /var/www/html
Let me know if you have any other questions!
Thanks,
Joe
haris says
Hi I am using multisite , how do i determine my websites root directory?
Thanks in advance
Haris
Leron Amin says
Hi Haris,
I don’t know the root directory for Multisite.
The root is typically located in var/www/…
Connect to your instance via the shell and enter the command cd /var/www/
It may be in one of the child folders…
You’re looking for the directory that contains index.php.
Hope this helps!
Let me know if you have any additional questions!
Thanks,
Joe
Val says
Hi Joe,
I’m having trouble with step 6, when I go to
nano /opt/bitnami/apache2/conf/bitnami/bitnami.conf
Everything is blank, theres nothing I can do? I can’t add the certificates nor add # symbols , because theres nothing there…
Any way could help?
-Val
Leron Amin says
Hi Val,
Are you using the Bitnami WordPress install on google cloud?
If not, the filepath to your conf folder will be different than what is used in this tutorial.
If you’re using the Bitnami version and are still experiencing the error let me know!
-Joe
deepak says
SSL Test , Why The certificate Not Renewing Daily , it’s Expiring on 1 month, Is my crontab step is not done perfectly ? Or will it Renew Itself on the Last day of The Renewl ?
authorsguild.in
Fingerprint SHA256: f880013db1f16318ba0c7ff2ad14ffa90a5e2533c58cbbd4e31274ba72b27d33
Pin SHA256: C5TvFNb4eCfgS0zhNcMmlroROBlW+knNWk05K8n0acM=
Common names authorsguild.in
Alternative names authorsguild.in http://www.authorsguild.in
Valid from Sun, 07 May 2017 06:25:00 UTC
Valid until Sat, 05 Aug 2017 06:25:00 UTC (expires in 1 month and 27 days)
Leron Amin says
Hi Deepak,
The Certbot only checks if the certificate requires renewal. It will only renew when it is set to expire.
Also, thanks for posting so many great comments. Many of your comments are very useful and I really appreciate them!
-Joe
deepak says
Thanks For the The Reply, Now Your Next topic should be How To Redirect From Http to https with a 310 perfect seo , including url change, including url change of any outside image used in website, fonts etc,
there should be only one 310 redirect like http://www + http: non www + https:www = https:// non www . All should reach https://non www
deepak says
sorry it’s 301 🙂
Robb says
Hey Joe,
What do you mean by “set to expire?”
Does that mean that if the chron jobs are set up correctly, the certificate will be renewed prior to expiry so there is no loss of coverage?
Or does it mean that the chron jobs can only update the certificate once the certificate has already expired (meaning that there will be loss of coverage)?
P.S. Great tutorial, worked for me first time!
Leron Amin says
Hi Robb,
Certbot will only renew the certificates if they are due to expires in less than 28 days. And yes – if it’s configured correctly (according to this tutorial), there will be no loss in coverage, as the certificates will be automatically renewed before their expiration date.
To further elaborate: in this tutorial, the cronjob is set to execute once weekly to check for renewals. If the script executes and determines that the certificates aren’t due for renewal, they simply won’t renew. This process will repeat until [eventually] the certificates are due to expire in less than 28 days.
Hope this answers your question and let me know if you have questions,
Joe
deepak says
Very Imp Update I guess to make this article perfect
https://community.letsencrypt.org/t/intermediate-chain-certificate-error/34919/6
https://community.letsencrypt.org/t/intermediate-chain-certificate-error/34919/6
Leron Amin says
Very useful information Deepak,
Thanks so much for sharing this!
-Joe
Stephen B. says
After following your steps, I am getting this,
Forbidden
You don’t have permission to access / on this server.
I believe it has to do with the bitnami.conf file.
Here is a copy of my bitnami.conf file, for the time being, I have commented out the Rewrite because if it’s not, my site is down with that error on the screen.
# Default Virtual Host configuration.
<IfVersion
NameVirtualHost *:80
NameVirtualHost *:443
DocumentRoot “/opt/bitnami/apache2/htdocs”
# RewriteEngine On
# RewriteCond %{HTTPS} !=on
# RewriteRule ^/(.*) https://%{SERVER_NAME}/$1 [R,L]
Options Indexes FollowSymLinks
AllowOverride All
<IfVersion
Order allow,deny
Allow from all
= 2.3>
Require all granted
# Error Documents
ErrorDocument 503 /503.html
# Bitnami applications installed with a prefix URL (default)
Include “/opt/bitnami/apache2/conf/bitnami/bitnami-apps-prefix.conf”
# Default SSL Virtual Host configuration.
LoadModule ssl_module modules/mod_ssl.so
Listen 443
SSLProtocol all -SSLv2 -SSLv3
SSLHonorCipherOrder on
SSLCipherSuite “EECDH+ECDSA+AESGCM EECDH+aRSA+AESGCM EECDH+ECDSA+SHA384 EECDH+ECDSA+SHA256 EECDH+aRSA+SHA384 EECDH+aRSA+SHA256 EECDH !aNULL !eNULL !LOW !3DES !MD5 !EXP !PSK !SRP !DSS !EDH !RC4”
SSLPassPhraseDialog builtin
SSLSessionCache “shmcb:/opt/bitnami/apache2/logs/ssl_scache(512000)”
SSLSessionCacheTimeout 300
DocumentRoot “/opt/bitnami/apps/wordpress/htdocs”
SSLEngine on
SSLCertificateFile /opt/bitnami/apps/wordpress/letsencrypt/live/www.vapesupply.co/cert.pem
SSLCertificateKeyFile /opt/bitnami/apps/wordpress/letsencrypt/live/www.vapesupply.co/private.pem
SSLCertificateChainFile /opt/bitnami/apps/wordpress/letsencrypt/live/www.vapesupply.co/chain.pem
Options Indexes FollowSymLinks
AllowOverride All
<IfVersion
Order allow,deny
Allow from all
= 2.3>
Require all granted
# Bitnami applications that uses virtual host configuration
Include “/opt/bitnami/apache2/conf/bitnami/bitnami-apps-vhosts.conf”
# Status
ExtendedStatus on
ServerName local-stackdriver-agent.stackdriver.com
SetHandler server-status
Order deny,allow
Deny from all
Allow from 127.0.0.1
Please advice, the error page does have the ssl certs working! But not loading the site.
Stephen B. says
Crap, it didn’t paste all the code, if need be, I can send it to you for help.
Leron Amin says
Hi Stephen,
Your site appears to be loading fine and the SSL certificated appear to be configured properly.
Were you able to resolve the issue, if so, how?
-Joe
Saumya Brata Dutt says
Hello,
I worked according to the provided commands in https://www.youtube.com/watch?v=DBnQkH1v-Xw, yet there is no green bar on my site. Can you please help me?
Website – worldnews.gq
Saumya Brata Dutt says
Everything worked well. I deleted everything and now it works fine.
Muhammad Fikri says
Hi Joe,
Your tutorials are really helpful.
Thank you for sharing this tutorial. It worked and I have free ssl now, but I have a problem with SSL. Why is my “https” turn into green only when I login to wp-admin and the “https” turned into grey when the whole website and there is exclamation mark on it?
Thank you Joe.
Leron Amin says
Hi Muhammad,
You might be serving unsecured files on your page.
Go the page that is loading “grey”, and right-click and select “inspect” (do this in Google Chrome).
In the “inspect” console, you will see an error saying that your site is serving mixed content. Find out which images are causing the error (it will show their file paths) and edit the existing filepaths from http:// to https://, or, simply remove the http and serve the file starting with www. only (recommended).
Let me know if this helps!
-Joe
Dave Lozinger says
Hi Joe,
Thank you for your tutorial series on installing Bitnami WordPress on Google Cloud. Your style is easy to follow!
I am stuck on finding the path for my root folder as outlined in step 4 above…and unfortunately I’m getting lost in the details to the stack-overflow link. As someone who learned BASIC in the 80s but hasn’t done much coding, I can usually follow along as in your videos but in this case I’m lost.
Can you help me out? I’m running the basic Bitnami install as outlined in your videos.
THANK YOU!!!
Dave Loz, Pennsylvania
Dave Lozinger says
Hi Joe,
Please disregard my last question…I took a chance that my root was the same as yours, and everything from there worked like a champ!
Fantastic tutorial!
Thanks!
Leron Amin says
Hi Dave,
Thanks for commenting!
I am glad that the tutorial worked for you.
Please keep me posted if you have recommendations for future tutorials!
-Joe
Igor says
Hi Joe,
Again, thank you for these instructions. I have set up the SSL just fine, but bumped into a problem that I can’t wrap my head around. The site url inside WordPress is actually an IP address. And I can’t figure out how to change it into a domain name URL. The field is greyed out. How have you changed yours?
Is there a step that I missed somewhere?
Thank you,
Igor
Leron Amin says
Hi Igor,
Did this problem just start after you configured the certificate?
The first thing I would do is go back to this tutorial and make sure that your DNS records are configured properly on both Google Cloud and your Domain Name Provider.
https://onepagezen.com/transfer-wordpress-domain-google-cloud-platform/
If this doesn’t work, let me know.
-Joe
Rodolfo Lima says
I’m still having the same problem as Isabel, even if taking out the space
Leron Amin says
Hi Rodolfo,
After you’ve generated your certificates, open a new SSH window and type the following commands.
This should take care of the directory issue.
Let me know if this works. If it doesn't, let me know and I will help you through it.
-Joe
Rodolfo Lima says
Hello, Joe.
Thanks for the reply, the command was successfully runned, with this response: ‘Congratulations, all renewals succeeded. The following certs have been renewed: /etc/letsencrypt/live/leading.marketing/fullchain.pem (success)’
However, the site still “not safe”. I have completed step 6 and when I restart I got this message:
‘Unmonitored apache
AH00526: Syntax error on line 51 of /opt/bitnami/apache2/conf/bitnami/bitnami.conf:
SSLCertificateFile takes one argument, SSL Server Certificate file (‘/path/to/file’ – PEM or DER encoded)
apache config test fails, aborting
AH00526: Syntax error on line 51 of /opt/bitnami/apache2/conf/bitnami/bitnami.conf:
SSLCertificateFile takes one argument, SSL Server Certificate file (‘/path/to/file’ – PEM or DER encoded)
apache config test fails, aborting’
Leron Amin says
Hi Rodolfo,
There is a syntax error in your Bitnami conf file. This likely occurred when you were editing the certificate paths and you may have added files with the wrong extension.
The first thing you should do is go back to the video and look at the configuration in the video tutorial, and make sure your line 51 matches the same syntax as in the video. Type CTRL/SHIFT/- to jump to a specific line in your file once it is open in Nano.
Let me know if this helps.
-Joe
ChaiAndToast says
I had the same error. I had copied and pasted the SSLCert lines directly from your tutorial, then updated the domain.
It turned out the problem was how the ” char pasted. I deleted the ” and entered them in manually – then everything worked.
Leron Amin says
Hi ChaiAndToast,
Thanks for sharing the solution – I know many people will find it helpful!
Talk to you soon,
Joe
jash says
please help me after step 6
Leron Amin says
Hi Jash,
What issue are you having after step 6?
-Joe
Isabel says
Joe, thank you for these Google Cloud and WordPress through Bitnami tutorials and especially this one. I did it! Just with a couple of adjustments though…
on STEP 5 – Setup Certificate Auto-Renewal
Make sure you have it as …
cd /tmp/certbot/
./certbot-auto renew –dry-run
(in your reply you had it it as ‘ -dry-run’ not ‘–dry-run’ …oops)
on STEP 6 – Configure the Certificates
instead of command
nano /home/bitnami/stack/apache2/conf/bitnami/bitnami.conf
I used command
nano /opt/bitnami/apache2/conf/bitnami/bitnami.conf
…and all ran smoothly thereafter… thank you again 😉
Leron Amin says
Hi Isabel,
Thanks so much for sharing this valuable information!
I think it’s great that you were able to figure out the solution to these issues on your own, and that you spent the time to post your findings in order to help others. It is very much appreciated!
I will use your suggestions to update this tutorial to make it that much better.
Thanks again!
-Joe
Rodolfo says
I’m still having the same problem!
sanjeev Thakur says
Thank you for your efforts to publish this article & video 🙂
Keep Growing
Amen
Joe says
Hi Sanjeev,
I’m glad the tutorial was helpful to you!
Thanks for taking the time to post a comment, and let me know if you ever have questions or suggestions for future videos.
-Joe
deepak sharma kuluvi says
Finally it’s working 🙂 Thanks a lot Joe Keep Going, you are talented
Joe says
Hi Deepak,
Thanks so much! I’m glad you were able to get your certificates working!
Please let me know if you have suggestions for other videos, or if you ever have any questions or concerns with your WordPress on Google Cloud installation.
-Joe
Hector says
Hi tanks for the great tutorial, today install one SSL Certificate with this tutorial but have litle problem only have ssl chain only in wordpress admin, but not in frontend I don´t know why. but
I would appreciate your help…
thanks
Leron Amin says
Hey Hector,
Thanks for commenting. In step 6, in your bitnami.conf folder, after you’ve commented out the existing certificates (using # symbol), you will need to add all three of your certificate files. They are:
SSLCertificateFile “/etc/letsencrypt/live/hectormunoz.com/cert.pem”
SSLCertificateKeyFile “/etc/letsencrypt/live/hectormunoz.com/privkey.pem”
SSLCertificateChainFile “/etc/letsencrypt/live/hectormunoz.com/fullchain.pem”
Let me know if this helps, or if you have additional questions.
-Joe
hector says
Thanks Joe, all work perfect with 3º certificate… congratulations and thanks again
PhamUy says
I’ve got the same problem, the ssl chain that’s not in the frontend. I really need you help.
Leron Amin says
Hi Pham,
Would you please describe the issue in more detail?
-Joe
PhamUy says
Thanks for replying, Leron.
As I have a page that has ssl chain on it, then I’m uploading a new photo to insert to that page and the ssl chain does not work any more. How can I fix that?
Leron Amin says
Hi Pham,
This problem occurs when the image that the website is serving isn’t secure.
If you’re using Google Chrome, type ctrl+shift+i to view the page source console.
Within the console, it will show you which of the images are being served in an insecure form.
To fix the problem, locate the photo that is being served and in your code, remove “http://” from the beginning of the file path.
Let me know if this works for you.
-Joe
PhamUy says
Got it, Leron. I did change the website’s URL to ‘https’ in the dashboard and everything’s fine. Thanks for supporting me, bro.
Leron Amin says
Hi Pham,
I am so glad it worked!
-Joe
Hector Muñoz says
Hi thanks for the tutorial, but when I put in this command cd && ./certbot-auto renew –dry-run the console says “No such file or directory”.
Chris says
yes, I have that same problem
Leron Amin says
Hi Hector and Chris,
After you’ve generated your certificates, open a new SSH window and type the following commands.
This should take care of the directory issue.
And Chris, I think you mentioned to me on YouTube that you figured it out. Let me know if you have any issues with the configuration in the future.
-Joe
Isabel says
First off… I want to say thank you Joe for these stellar tutorials 😉
I’m having same issues as Chris & Hector and your advice will be appreciated…
I’m stuck now because neither one of these 2 commands have worked for me
1. cd && ./certbot-auto renew –dry-run
2. mysite@wordpress-1-vm:~$ cd /tmp/certbot/
mysite@wordpress-1-vm:/tmp/certbot$ ./certbot-auto renew –dry-run
Requesting root privileges to run certbot…
/home/mysite/.local/share/letsencrypt/bin/letsencrypt renew –dry-run
usage:
certbot-auto [SUBCOMMAND] [options] [-d DOMAIN] [-d DOMAIN] …
Certbot can obtain and install HTTPS/TLS/SSL certificates. By default,
it will attempt to use a webserver both for obtaining and installing the
cert.
certbot: error: unrecognized arguments: –dry-run
mysite@wordpress-1-vm:/tmp/certbot$
Really appreciate your input thanks 😉
Leron Amin says
Hi Isabel,
I saw from your latest comment that you figured out the issues and got everything working. Also, thanks a ton for letting me know about the errors and suggesting improvements!
-Joe